Showing posts sorted by relevance for query cauliflower puree. Sort by date Show all posts

Thursday, February 25, 2016

Mac and Cheese with cauliflower puree カリフラワープピュレー入りマックアンドチーズ

When my wife made baked cauliflower with cauliflower puree, we were impressed with how creamy the puree was without much fat. My wife suggested making Mac and Cheese with cauliflower puree instead of Bechamel sauce. So, one weekend, we made this new cauliflower puree Mac and cheese. We made two versions. One was topped with a mixture of panko bread crumbs and Parmesan cheese (see below). It came out nicely browned with a crunchy crust.


Under the crunchy topping was a creamy cheesy sauce clinging to the macaroni.


The second version was topped with grated cheddar cheese.


Again, underneath was the warm, cheesy sauce with macaroni.


Ingredients: (this makes about 8 servings in small ramekins such as the one seen above).
One head of cauliflower, separated into small florets.
Enough milk to cover the florets.
1 tbs unsalted butter
One large Jalapeno pepper, seeded and deveined, finely chopped (optional)
Cheeses (we used smoked gouda, fresh goat cheese, parmesan and cheddar) grated (#3)
Elbow macaroni, half box, cooked, drained, seasoned with salt, rice vinegar and then coated with olive oil (#5).

Directions:
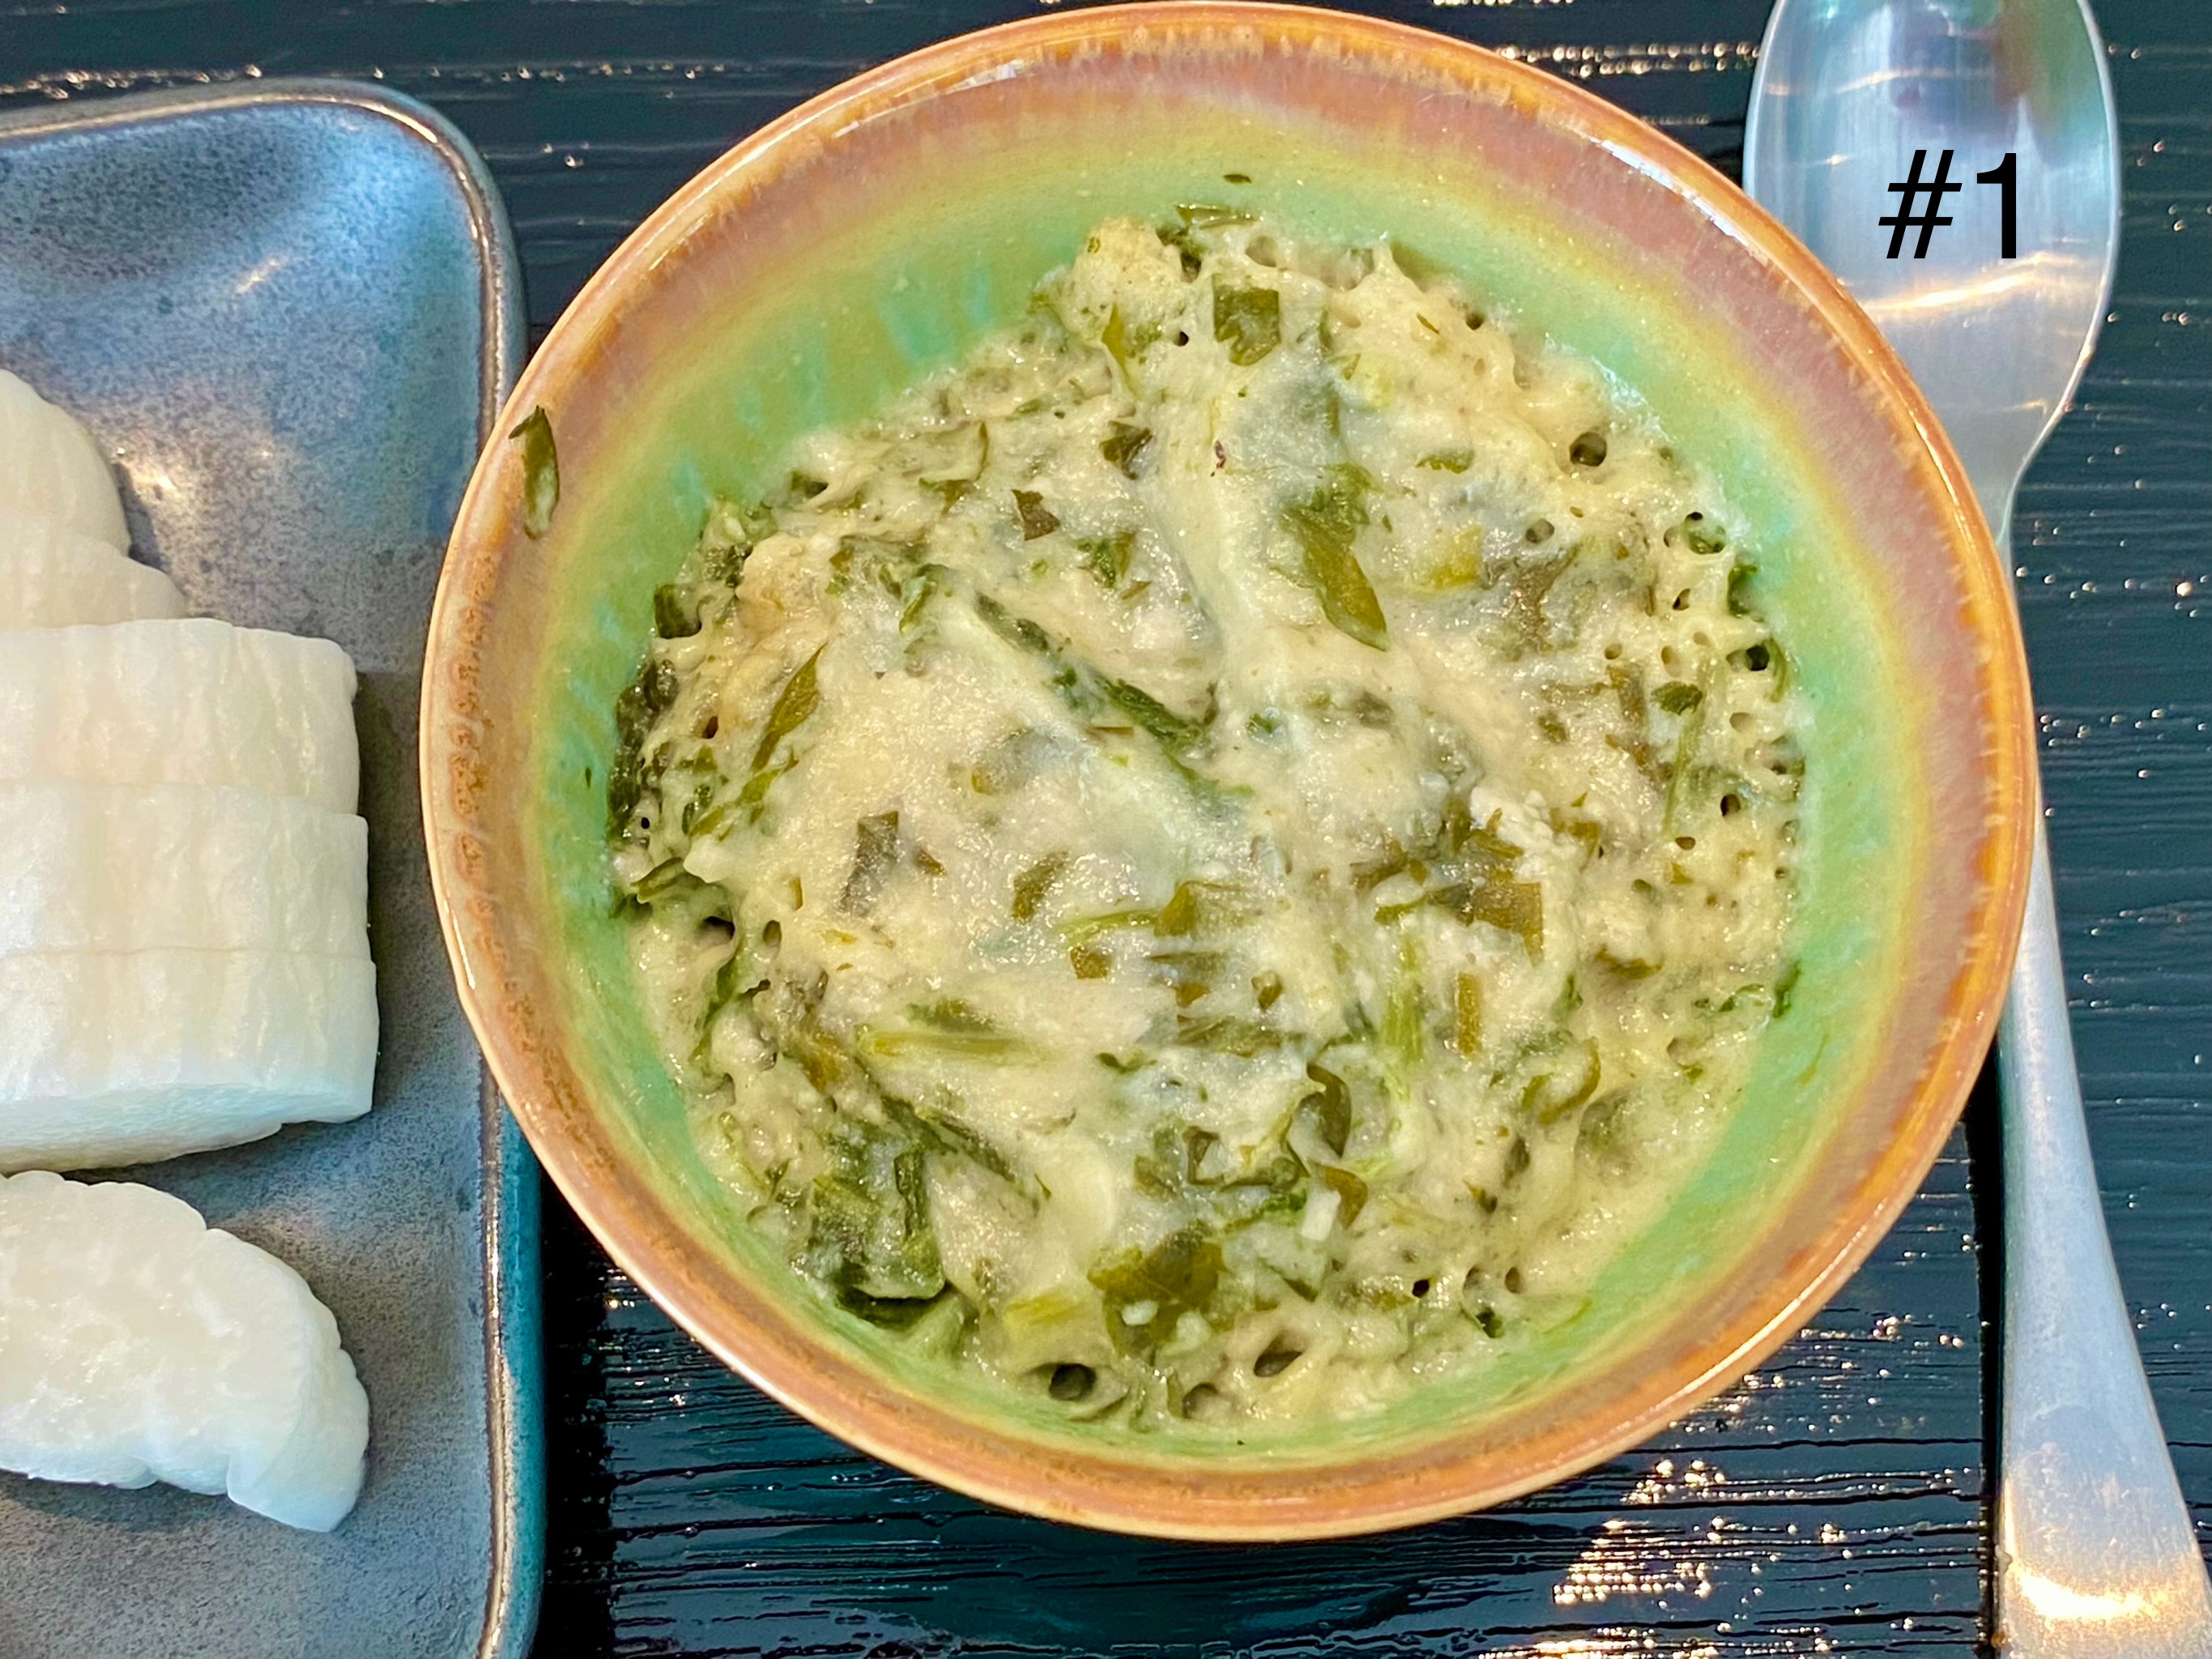
Making cauliflower puree is exactly the same as posted before. Briefly; separate a head of cauliflower into florets, cook it in milk until tender with a pat of butter and red pepper flakes. I added one medium onion sautéed (instead of baked), adjusted the amount of milk to attain the right consistency while blending using a immersion mixer (#1). For variation, I added sautéed and finely chopped Jalapeno pepper (seeded and deveined) (#2). For cheeses, I used smoked gouda,  fresh goat and parmesan (#3) and mixed into the puree and cooked over the lowest flame until the cheeses incorporated (#4). I added the cooked macaroni (#5) into the cauliflower puree cheese mixture (#6). Then added the cheddar cheese (#7).  The reason for adding the cheddar at the last moment is to prevent it from being over cooked and getting grainy in texture. Meanwhile, I mixed panko bread crumbs, grated parmesan and olive oil (#8).


I placed the macaroni mixture in small ramekins (#9 and 10). I topped one with the panko/parmesan mixture (#11)  and the other with grated cheddar (#12). Baked in 350F oven for 15 minutes. If the top is not browned enough, place it under the broiler until the top browns nicely.


The end result: Both version were good but the sauce/puree was a bit grainy as compared to the cauliflower puree we made before. We were wondering if this is something to do with the cheeses we used, although we took precaution not to overcook cheddar cheese which get grainy after long cooking. We do not know how much calories/fat we are saving by substituting bechamel with cauliflower puree but certainly this is a good alternative. Compared to bechamel based Mac, this cauliflower puree did not get thick even after baking. We liked the one topped with bread crumbs and Parmesan cheese.


Friday, April 15, 2016

Savory cauliflower and spinach Panna cotta カリフラワーとほうれん草のパンナコッタ

My wife came up with this dish. How this dish evolved is kind of interesting. It all started when my wife spotted a recipe for English pea panna cotta . She really wanted to try it. So I was tasked to get several bags of frozen petite peas and some cream for the recipe. I forgot to get the peas and the cream. Then I used up whatever cream we had in the fridge to make lobster bisque. Not to be deterred, my wife chose to do some substitutions. We had a head of cauliflower which I already separated to florets and washed. We also had a bag of spinach. Since we had some previous experience making cauliflower puree, she proposed making "cauliflower and spinach panna cotta".  It turned out to be very good. I served it with watercress and blanched sugar snaps dressed with EVOO (extra-virgin olive oil) and syrupy balsamic vinegar with freshly cracked black pepper.


All green and, perhaps, it would have been perfect for St. Patrick's day.


I decided to add more bright colors and made two kinds of sweet pepper coulis (red and yellow) and sweet vinegar marinated red radish slices.


I think I may have overdone it, this time. Maybe a little less red color would have been more "restful to the eye".


Ingredients(for Cauliflower panna cotta, about 8 servings):

Cauliflower, 1 medium head, separated into florets, washed.
Spinach, one bag, cooked in a covered pan without adding any liquid. excess moisture squeezed out  #2).
Onion, two, medium, cut into thin strips.
Garlic, two cloves with skin on.
Milk, enough to cover the cauliflower (#1)
Butter, unsalted, 3 tbs

Directions.
1. Add the cauliflower, onion,, garlic, and butter to a saucepan and cover it with milk. Simmer it until the cauliflower is cooked (#1, about 30 minutes) (see P.S. below).
Alternatively, we need not cook the cauliflower in milk. Instead we could cook the cauliflower by steaming, sweat the onions in a pan then use milk to puree the two together.  Then we could heat some milk with about 3tbs of butter in it to bloom the gelatin and that milk would give the proper texture. 
2. Strain the cauliflower and milk mixture through a sieve,  reserving the milk (My wife figured adding butter will make the milk more cream-like).
3. In two batches, I placed vegetables in a blender and added enough milk to puree (with our blender on high speed, it took 30-40 seconds to have a nice smooth puree, #3 and 4). 
I added one of the garlic clover after squeezing it out of the skin in one of the batches. After tasting this batch, I did not add the garlic to the other batch.
4. I combined the puree in a bowl (#5) and tasted. I added few pinches of salt which made the sweetness of the vegetables to come out.
5. I sprinkled 3 envelopes of unflavored gelatin on about a half cup from the remaining milk (still hot) and whisked it to dissolve and then added to the puree making sure all the gelatin was dissolved into the puree.
6. I poured the final mixture into small individual ramekins (#6).
7. Covered them with plastic wrap and refrigerated until set (several hours).


8. To unmold, I placed the ramekin in hot water for few seconds and also ran a thin bamboo skewer (or a thin narrow knife blade) around the edge and inverted on the center of the plate.


Ingredients (For sweet pepper coulis):

Red and yellow sweet pepper, 1 each
Shallots, 3, finely chopped and sauteed in olive oil until soft
Vinegar (I used rice vinegar) 4 tsp
Olive oil (EVOO) 4-6  tbs
Salt

Directions:
1. I roasted the peppers in the toaster oven on broil mode, for about 20 minutes, turning every five minutes so that all the surfaces got slightly blackened. I immediately placed them in a Ziploc bag and let them steam for 10-20 minutes or until cooled down (#1).
2. I removed the skin, stem end and seeds (#2).
3. Cut it in small cubes (#3).
4. Place the #3, half of the shallot, juice accumulated in the bag, vinegar, and EVOO in a blending container (#4).
5. Using an immersion blender in high speed, blended into thin sauce (#5). If the consistency is too thick, you could add a bit of water. I tasted and added a pinch of salt.
6. I repeated for the yellow pepper to make red and yellow pepper coulis (#6).


Ingredients (For pickled red radish):
Small red radish, 3, top and bottom end removed, sliced into thin rounds (I used a Japanese mandoline).
Sweet vinegar, 1/4 cup (I took a short cut, and poured sushi vinegar from a bottle into a Pyrex ramekin with 2 tsp of sugar, and microwaved until the vinegar was warm and the sugar melted).
I immediately marinated the radish slices, covered with plastic wrap and let sit for a few hours. The red color leached out and the radish slices become a nice homogeneous pink.

This was an unequivocal success! This savory panna cotta has a nice light green color exactly like the picture of English pea panna cotta. We used gelatin instead of agar-agar suggested in the original recipe since we are not serving this to vegetarians. The texture came out just right without jello-like consistency but very creamy and also kept its shape. You can taste the spinach but if you were not told. you could not guess this is made of cauliflower.  Although I overdid with the second versions with sweet pepper coulis and marinated radish slices, the mixture of sweet sour flavor really worked. Next time I will use more discretion. We found another good way to use cauliflower.

P.S. Some days later, since I had a head of cauliflower which was already one week old, I decided to make cauliflower puree. I followed the recipe from the Washington Post. As per the recipe, I first steamed the cauliflower for 8 minutes and made a puree using my Cuisinart. But the result was disappointing with a mealy texture despite the fact I ran the food processor for quite some time. It never attained the smooth and creamy puree my wife made in the current recipe. I thought it had something to do with how the cauliflower was cooked. She cooked the cauliflower in milk and butter. Disappointed, I just put my cauliflower puree in a sealed container in the fridge thinking I would have to come up with a way to use it. 

The same day, my wife wanted to try the English pea pannacotta she had originally wanted to make using the original recipe, since we had all the ingredients this time. When we pureed the peas, we used the blender instead of the cuisinart, and the pea puree came out very smooth and velvety. We didn't even have to sieve it. It dawned on me that maybe I should have run my cauliflower puree through the blender instead of the cuisinart. So I retrieved my coarse textured puree added a bit more milk and let it whir. The result was amazing. My cauliflower puree became silky smooth. Moral of the story, use the blender to make cauliflower or pea puree--not the cuisinart. 


Monday, February 22, 2016

Baked cauliflower with cauliflower puree

We try to have some vegetable dishes on hand which we can tap into during work weekdays. During the weekend, I usually blanch broccoli and green beans so that we can use them during the week, either as is or by quickly sautéing them in butter as a side. The challenge is always to find new and interesting ways to prepare the veggies. For example we have cooked cauliflower many different ways. But, even so, we were getting into a rut.  (The Japanese expression would be "manmeri" マンネリwhich is reportedly derived from the English word "mannerism". Certainly "mannerrism" does not have the same usage or meaning as the Japanese word "manmeri".) So my wife went hunting on the internet to find some inspiration and a different way to prepare cauliflower. She perused many different recipes and came up with her own recipe inspired by several of those she found. It is really good but very visually white. She said she would make some improvements to further perfect this recipe. It is essentially au gratin dish made out of baked cauliflower and onion and instead of béchamel sauce, she used cauliflower puree. She also added panko crumbs with olive oil and chopped parsley on the top.


The Panko crust gave nice crunchy layer which contrasted with creamy puree underneath. The cauliflower florets were a bit too soft and we will improve on this next time.


Ingredients:
Cauliflower, one large head, separated into florets (#1).
Onion, two medium, cut into thin (1/4 inch) rings.
Garlic, several cloves skin still intact
Milk, 1-2 cups (see direction below).
Butter, 1 tbs
Red pepper flakes
Juice of one lemon

Direction:
1. Place a bit more than half of the cauliflower florets, the onion, and garlic on a cookie sheet, add several tablespoons of olive oil, and salt and coat all vegetables well (#2) and bake it in a 375F preheated oven for 30 minutes mixing once during the baking until some brown spots appear on the cauliflower.
2. Place the remaining cauliflower in a sauce pan and add milk to cover, pepper flakes and the butter. Simmer until the cauliflower is soft (#4) (yes we noticed picture 3 is missing but for various reasons it will stay that way).
3. Strain the cauliflower (#5) reserving the liquid (#5).
4. Add some of the baked onion and garlic (skin removed) (#7) to the strained milk cauliflower (#6).


5.  Add 1/4 cup reserved cooking liquid and the vegetables into the blending cup and puree using an immersion blender. Add more reserved liquid until the consistency of béchamel sauce is reached(#8). Taste and season with salt and white pepper.
6. In a small ramekin, place the baked cauliflower, onion, and any remaining roasted garlic (#9) and cover them with the puree (#10). Drizzle on some lemon juice if desired. 
7. Cover the surface with a mixture of Panko bred crumbs with olive oil (mix well using finger tips) and bake it in 400F oven until brown (#11).

The cauliflower puree is really silky and luscious. It tasted like a very rich béchamel. I can envision many other uses for this concoction. The combination of texture and flavor in this dish is really good. This time, the baked cauliflower was a bit over done but next time, my wife said she would bake it at a higher temperature (400F) and for shorter time to make the cauliflower more crisp with brown spots. The baked onions gave it rich sweetness and the garlic was done perfectly adding another flavor dimension.  

Tuesday, May 24, 2016

Cauliflower puree with parmesan cheese パルメザンチーズ味カリフラワーのピューレ

This is based on a recipe that appeared in the Washington Post. I decided to make this since I had a head of cauliflower in the fridge which I bought a week ago. I followed the recipe exactly and it was not good. It had an unpleasant mealy consistency and was not smooth and creamy. We figured out why this was. The recipe calls for using a food processor. No matter how long your run the food processor, the cauliflower will not become smooth and creamy. Instead of a cuisinart you need to use a blender on high speed (puree mode). Once I fixed this, the end product was nice and creamy with good Parmesan flavor.


As suggested, I garnished it with finely chopped parsley fresh grated Parmigiano-Reggiano and freshly cracked black pepper. 


The below are the original recipe with one important modification; instead of a food processor, use a blender.

INGREDIENTS
1 medium head (2 pounds) cauliflower, cored and cut into 11/2-inch florets (7 cups)
1/3 cup low-fat milk (1 percent), plus more as needed
1 tablespoon unsalted butter
1/4 teaspoon kosher salt, plus more as needed
Generous pinch freshly grated nutmeg
1/4 cup freshly grated Parmigiana-Reggiano cheese, plus 4 teaspoons for garnish
1 tablespoon chopped fresh flat-leaf parsley
Freshly ground black pepper

STEPS
Place the cauliflower florets in a steamer basket set over a pot of boiling water. Cover and steam until the cauliflower is just tender, 5 to 7 minutes.
Transfer the cauliflower to a blender along with 1/3 cup of the milk (I needed more milk, probably 1/2 cup total), the butter, the 1/4 teaspoon of salt and the nutmeg; puree until very smooth.  Add extra milk a tablespoon at a time, as needed. Immediately add 1/4 cup of the cheese and pulsed just until the cheese melted and was incorporated.

When I first made it, using the Cuisinart as specified in the recipe, it was grainy and mealy. When my wife made cauliflower puree to make her cauliflower/spinach panna cotta, the cauliflower puree was really silky smooth. I initially thought cauliflower must be cooked in milk and butter as my wife did. But when we made English pea panna cotta, it became clear to us, the use of the blender made the difference. So I placed my previously made cauliflower puree into the blender and pureed it again. I needed to add a bit more milk but the end result was night and day different. Now the puree was nicely smooth, creamy and incorporated more air and became fluffy. This can be served warm or cold. I served it cold the second time with some good Spanish olive oil on the top. This made it better still. This can be eaten as a side vegetable dish, drinking snack or even as a spread for a cracker or a slice of bread. 

Tuesday, January 17, 2023

Seared Scallops on Cauliflower Puree 焦がし帆立とカリフラワーピュレー

We like cauliflower puree. Now I changed how I make it and the process is easier but the results are the same (I added the directions below).  We used the puree for quite a few dishes. Recently, we revisited one of our favorite fish dishes; Chilean sea bass (Patagonian tooth fish). We really like this fish over a bed of Cauliflower puree. Recently we tried a similar combination using seared diver scallops which we got from Great-Alaska-Seafood. I made an impromptu pan sauce which went well.


For seared scallops
Ingredients (for two small servings)
4 diver scallops, thawed if frozen, patted dry and seasoned with salt and pepper
1tsp peanut or other vegetable oil
Pan sauce:
2tbs Japanese sake for deglazing
1tbs lemon juice
1 tsp x4 concentrated Japanese noodle sauce
1 tbs of cold butter

Directions:
Add the vegetable oil with high smoking point to a stainless steel or iron frying pan on medium high flame. Heat the pan until the oil just starts smoking
Add the scallops and brown one side for 1-2 minutes and flip-over . Brown the other side for another 1 minute or until the scallops are just cooked in the center (expect some smoke).
After removing the scallops, add the sake and deglaze the pan. Reduce the liquid to half. Add the noodle sauce and the lemon juice. Reduce briefly and finish with pats of butter.
Place the scallops on the bed of warm cauliflower puree and pour the pan sauce over the scallops.

For cauliflower puree
Ingredients (makes at least 4 to 6 servings):
One head of Cauliflower, washed and florets separated
1 to 3/4 cup 4% milk, warm (I microwave but be careful of over boiling)
Several thin pats (2-3 tbs) of cold butter
1/2 tsp salt or to taste

Directions:
Steam the florets for 7-10 minutes or until very soft.
Meanwhile warm the milk (I microwave but be careful of over-boiling)
In a cylindrical container for a immersion blender, add the cauliflower and half of  the warm milk.
Press down the immersion blender at a medium speed, up and down several time.
Depending on the consistency add more milk and blend in high-speed until silky smooth (may take some time to attain the smooth puree).
Add the butter and salt and further blend
Taste and adjust the salt

We really like this combination. The pan sauce also worked well. If this is a main dish, I would use 4 scallops per serving and add side vegetables.

Tuesday, May 25, 2021

Scalloped potato with cauliflower puree

My wife came up with this dish one day. A few days before I had made my usual Cauliflower puree. Beside eating it as an “adult baby” food, we have made Mac-and-cheese using the puree instead of Béchamel sauce. I am not sure how she came up with this dish but, it is essentially scalloped potatoes made with the Cauliflower puree, cheese, onion and jalapeño pepper. This was topped with several kinds of cheese and baked.


After the servings were cut out, you could see multiple layers of thinly sliced potato with cheesy sauce. The green bits are chopped Jalapeño pepper. She ended up making a quite large amount but we managed to enjoy it all as a side for lunches and dinner and also as appetizers. Probaly not as rich as if we made this with full-fledged Béchamel sauce but it was quite good.


I ask my wife to provide the recipe. I help her by slicing potatoes, onions, and chopping up Jalapeño pepper.


Ingredients:
Two russet potatoes thinly sliced
2 onions thinly sliced
2 jalapeño pepper
1 cup of cheddar cheese grated
1 cup monterey Jack cheese grated
1/2 cup parmesian cheese grated
Several slices of smoked gouda to top.
Enough cauliflower puree to cover several layers


Directions:
Cover the bottom of an oven casserole dish with the puree. Distribute a layer of potatoes (#1) then the sliced onions, jalapeño pepper and the various cheeses (# 1&2) then the cauliflower pure (#3) Keep layering until all the ingredients have been distributed. End by putting on slices of smoked gouda (#4). Cook in a 400 degree oven covered for 30 minutes. Remove the cover and continue cooking for 30 minutes until the potatoes are tender and a knife slides in easily. Let cool for 15 minutes before serving.


This is a very comforting dish with thin layers of potatoes between custard like layers of warm cheese. The jalapeño peppers and onion give a nice flash of flavor. You would never guess that cauliflower was one of the main ingredients. It heated up nicely in the microwave. This would the a staple for any menu. 

Monday, February 15, 2021

One spoonful appetizers a.k.a baby food for adults 一口スプーンの前菜第二弾

This is another iteration of one spoonful appetizers. I am making more purées or what I refer to as “baby food for adults” to use as one gulp spoonfuls of food. In any case, the below are three such appetizers. From left to right: Kabocha potage カボチャのポタージュ, seasoned soft boiled egg 味卵 with ikura salmon roe イクラ and cauliflower puree with ikura.


I also strewed the plate with simmered kabocha カボチャの煮物 (left lower corner), braised cauliflower モンパルナスのカリフラワーand blanched sugar snap in salt broth スナップ豌豆の塩びたし.


The below was what I served for another evening. This time I made broccoli puree which I garnished with flowerets of blanched broccoli. The other two are the same cauliflower puree and Kabocha potage shown in the pictures above.


I made broccoli puree from the stem of broccoli, onion, and parsnip. It has very good and interesting flavors. When I ask my wife to taste it, she thought it had asparagus.


I made the broccoli puree without a recipe but the basic is very similar to any potage or puree.


Ingredients:
Broccoli stem, hard bottom removed and hard skin removed (I used stems of two broccoli heads), cut into small cubes.
One medium onion, finely diced
One parsnip (or maybe a potato), skinned, cut into small cubes.
1/2 cup of chicken broth or more depending on the consistency of the puree (I used Swanson's no fat reduced salt)
1 tsp unsalted butter and 2 tbs olive oil
Salt to taste
Two bay leaves (optional)

Directions:
Add the olive oil and butter to the pan on medium flame and sauté the onion until cooked (2-3 minutes).
Add the broccoli stem and parsnip and coat with butter/oil and add the chicken both to cover.
Add the bay leaves and simmer until soft (15-20 minutes)
Remove the bay leaves and puree using an immersion blender until smooth (add more chicken broth for desired consistency).
Season with salt

These appetizers are nice. The spoonful is just the right amount for a satisfying gulp. They provide a nice range of flavors although the consistency seems, well consistent. It is lovely and smooth but I can’t help but think of it as sophisticated “baby food for adults”. I’ll have to come up with something different.

Thursday, November 10, 2022

Chilean Sea bass チリアン・シーバス

 We eat lots of fish. When we lived in California many years ago, we really liked  “Chilean sea bass” which is buttery moist yet flakey and very difficult to overcook and make dry. Then we learned the real name of this fish is ‘Patagonian toothfish” and, at that time, that the fish was frequently illegally poached. So we stopped buying it and forgot about it for a long time. Then, my wife found Chilean sea bass available at Vital Choice which came from MSC (Marine Stewardship Council) -certified sustainable fishery. We remembered how wonderful it was and ordered it, although  it was a bit on the expensive side.

Digression alert: “Chilean sea bass” is said to be the most popular in US, and EU as well as in Japan. (Although when I was in Japan I did not know about this fish.) In Japan, this imported fish is reportedly called “mero” メロ or “ginmutsu” ギンムツ.

The fish was as wonderful as we remembered. Actually the first time I cooked this fish, I did not take a picture. So, I made the same dish a second time in an identical fashion. This was simply sautéed in butter with a caper lemon butter sauce. The sides were  cauliflower purée and haricot vert (pre-blanched) and Campari tomato (skinned) sautéed in butter. Everything went well together but the combination of cauliflower puree and Chilean sea bass was sublime.


Ingredients (2 servings):
2 4oz frozen Chilean sea bass, thawed, seasoned with salt and pepper

For Caper lemon butter sauce
2 tsp pickled capers (from a jar)
1 tbs unsalted butter
1 tsp lemon juice (half lemon)

Directions:
Cook the filets in melted butter on medium flame, turn once after 5 minutes and cook another 5 minutes (I put on the lid since one of the filets was rather thick)
Once cooked, set aside on a plate
In the same pan add the butter. capers and lemon juice and quickly warm them up then pour over the filets

We also served small slices of mini-baguette I baked to soak up the sauce. The fish is buttery, flakey but moist. Somehow it went so well with the cauliflower puree. The green beans can be “a hit” (nicely crunchy after few minutes of steaming) or “a miss” (fibrous skin no matter how you cook) but this one was definitely “a hit”.

Friday, May 27, 2016

English Pea panna cotta イングリッシュピーパンナコッタ

Previously, when my wife wanted to make this dish, we ended up making cauliflower-spinach panna cotta. This time, we made English pea panna cotta. It was based on a recipe in the Washington Post. As usual, we made some changes. The original recipe used agar-agar making it a vegetarian dish but, not being vegetarian and not having any agar-agar, we used powdered gelatin instead. We also infused this dish with fresh French tarragon as we do with our pea soup. Our panna cotta came out deep green; much deeper green than one in the picture contained in the recipe.


Instead of using cold sauteed vegetables around the panna cotta, I just placed watercress, thin slices of carrot, small cubes of tomato which were then dressed with my usual honey mustard dressing and fresh grinds of black pepper.


The pannacotta was smooth and creamy.


This time we made sure we had all the ingredients. We used frozen petite green peas from Hanover brand. (Over the years, my wife tried many different kinds of peas for various dishes and this is one instance when, generally, the frozen variety is better than fresh.  We even tried fresh peas which we bought at the roadside stands but they were too starchy. Among the frozen brands, she likes Hanover the best. I guess unless you grow the peas yourself, frozen are better than fresh. Oh-oh, maybe, I shouldn't give my wife ideas about growing our own peas).

Ingredients (about 12 servings using small Pyrex ramekins):
Frozen petite pea (Hanover brand petite pea, 12oz bag), 2 bags, thawed using running hot water.
Spinach, 2 bags, cooked without adding any liquid, turning occasionally, until well wilted. Let it cool down and squeeze out excess moisture.
Onion, one medium, halved and thinly sliced, sweat with olive oil until semi-transparent
Fresh tarragon, leaves removed and finely chopped (about 1 tbs)
Milk, we used 1% milk, added as needed while pureeing the peas (about 1/3 cup per one bag of frozen peas (#1) and also for infusing tarragon and dissolving the gelatin, about 2 cups (#3 and #4).
Butter, unsalted, 3 tbs
Gelatin, powdered, unflavored, 3 envelopes
Salt

Directions:
1. Add half of the peas, onion, spinach and tarragon in the blender* (#1). We did this in two batches. Add milk and puree. Add more milk until peas are totally smooth and pureed (#2).
*Do not use a food processor. We learned that using a good blender in "Puree" mode gives the best result.
2. Heat 2 cups of milk with 3 tbs of butter and tarragon (#3).
3. Just before boiling, sprinkle powdered gelatin on the top and whisk to dissolve (#4)


4. Put the milk mixture through sieve and put into #2 in the picture above, mix well. Taste and season with salt.
5. Pour into individual small glass ramekins.
6. Refrigerate until firm (at least several hours).
7. Remove from the ramekin by passing a thin bladed knife around the perimeter of the ramekin, inverting the ramekin over the plate and use the tip of the knife held against the side to introduce air to the bottom of the ramekin. The panna cotta should drop onto the plate with a "plop".

This was an unconditional success! The panna cotta has nice deep green color with creamy texture and an intense fresh pea taste with a hint of fresh tarragon. The salad around the panna cotta was also great with some bitterness of watercress and slightly sweet and tangy dressing. We really liked my wife's original cauliflower puree spinach panna cotta, but this is definitely a nice fresh pea and tarragon flavor variation on the theme of panna cotta. This is a perfect salad/appetizer in hot summer season.

Monday, May 30, 2016

Chashu egg チャーシューエッグ

I got a rather large pork loin the other day. Instead of hot smoking the entire loin in my Weber grill, I divided it into two portions; I hot smoked one portion in the Weber and the other I made into Chinese-style simmered pork 煮豚・焼き豚 or Cha-siu 叉焼, "Chashu チャーシュー". Loin is not the best portion of pork to use for cha-sui since it does not have enough fat but still there is some fat on the surface which totally rendered out and became sweet and gelatinous which was nice. I used this as a ramen topping for lunch.  This also works well as a sandwich. Then I saw "Chashu eggs" チャーシューエッグ which is supposedly famous in one of the restaurants called "Yachiyo" 八千代 in Tsukiji market 築地市場 and wanted to try making the similar  or "inspired" dish.


This is a much tamer version than the one described at Tsukiji market. This version is less fatty (and therefore less unctuous) with thin slices of loin cha-sui and one egg. I served this as a "shime" 締め or ending dish one Friday evening with pieces of my baguette.


I also made a kind of broccoli au gratin using blanched broccoli mixed with parmesan cauliflower puree,  a bit of mayonnaise and topped with more grated Parmigiano-Reggiano.  I put it in a Pyrex gratin dish and baked it in the toaster oven. The cauliflower picked up and "expanded" the mayonnaise flavor and gave the dish the mouth feel of a rich cheesy gratin with, we would like to think, much less fat.

To make sunny side up eggs, I heated a non-stick frying pan on medium flame and melted the butter. I then placed two eggs on each side of the pan. I didn't want to put the pork directly on the hot surface of the pan so I carefully placed the slices of the pork over the cooking white portion of the egg. I put on the lid, waited 2 minutes then cut off the flame. I let it sit for another 2 minutes with the lid on. The eggs were sunny side up with cooked whites (my wife hates uncooked and loose egg white) but the yolks were nice and runny (of course I used Davidson's pasteurized eggs here).


I firmly believe that a good breakfast is also a good "shime" dish after imbibing. This was perfect! We mopped up egg yolk with the baguette.