Showing posts sorted by relevance for query oven potato. Sort by date Show all posts

Friday, June 5, 2015

Duck fat roasted potato 究極のオーブンポテト

My wife is always in pursuit of the "ultimate" fried potato without actually frying. She has been making "oven fried potato" which is very good but a bit of work. This time, from the same source, "Cook's illustrated",  she saw a recipe for "duck fat roasted potato" with rosemary. Duck fat is not something we regularly stock. When I cook duck breast I usually mop up the fat with paper towels but last time, I poured the rendered duck fat into a small ramekin since the amount of rendered fat was unusually large. I did not have any intention of saving it but my wife apparently covered it and placed it in the refrigerator. So when she came across this recipe, it was like the stars and the moon were lining up properly and she had to try it. The below is the final product; nice thick crispy crust and soft center with nice rosemary flavor.


Unlike myself, my wife measures, weighs and follows the recipe precisely. She had to scale the original recipe to 2/3 but the amount given below is from the original recipe.

Ingredients:
3 1/2 lb Yukon gold potatoes, peeled and cut into 1 1/2 inch pieces (#1)
              Kosher salt and pepper
1/2 tsp   baking soda
6 tbs      duck fat
1 tbs      chopped fresh rosemary

Instruction:
  1. Preheat oven to 475F with a rimmed baking sheet on the top shelf. (Note to self: when using the dark nonstick rimmed baking sheet reduce the temperature to 400 and check periodically to see about adjusting the time.)
  2. Add 10 cups of water to a pot and boil over high heat, add potatoes, 1/3 cup of salt and baking soda. Return to a boil and cook for 1 minute. Drain potatoes. Return potatoes to pot and place over low heat. Cook, shaking pot occasionally, until surface moisture has evaporated, about 2 minutes. Remove from heat. Add 5 tablespoons duck fat, 1 teaspoon of salt, mix to coat (#2).
  3. Remove (hot) baking sheet from the oven spread potato in one layer and bake for 15 minutes (3#, surface is showing just few brown spots).
  4. Using metal spatula, turn the potatoes over (#3), the bottom developed nice brown crust. We made sure that the pale side of potatoes is down and brown side up #4) and baked 12-15 minutes longer. While potatoes roast, combine finely chopped rosemary and the remaining 1 tbs duck fat in a bowl.
  5. Spoon rosemary mixture over the potatoes (#5) and using spatula turn.  Bake an additional 3-5 minutes (#6). Season with salt and pepper as needed.


ultimate orasted potato

This is less work than oven-fried potato and the result is better. Because of the par-boiling and baking soda, a thick crust forms during baking and the fresh rosemary adds a nice flavor. Although the entire kitchen smelled of duck fat, we did not taste not much "duck" flavor on the potato.

We may try this with just olive oil or with bacon dripping. Another alternative may be using white potato instead of Yukon Gold. In any case, this is indeed a fantastic oven potato. The leftovers heat well in the toaster oven.

Saturday, September 15, 2018

Oven fried baby red potato オーブンフライドレッドポテト

This was a rare occasion for us to enjoy steaks. I got some that were labeled "tenderloin steak" from our regular grocery store. It had some marbling and could represent Chateaubriand (head of tenderloin) but certainly was not a regular filet mignon. It was not too expensive and (unexpectedly) excellent. When it comes to beef steak, my wife is strictly a  "meat-and-potato Gal". Since we had baby red potatoes*, she remembered often making crispy oven fried red potatoes in the past. I also  added sautéed green beans and red wine sauce.

*red potato: In the U.S. these red potatoes are called  Norland Red potato and are sold as "baby red potatoes". It has a dark red skin and white flesh. Flesh is not too starchy or waxy.


The cut surface of the potato became really crispy and inside was soft and creamy. My wife removed the skin before eating and I ate everything. (I thought the skin added to the flavor). (When cooked like this the skin comes off very easily.)


Although we have posted quite a few variations of oven fried potatoes, somehow this one escaped our attention. This is by far the easiest but the result is excellent.

Ingredients:
Baby red potatoes, cleaned and eyes removed if needed, cut in half
Kosher salt
Olive oil

Directions:
Preheat the oven at 375F.
Put olive oil in a small flat dish and dip the cut surface of the potato into the olive oil to coat.
Arrange the potatoes after dipping the cut surface in olive oil on a cookie sheet with the cut surface up (#1 picture below).
Season the cut surface with Kosher salt
and turn them over so the cut surface is on the pan(#2 and #3).
Bake it for 30 minutes (#4)


This potato was very satisfying. Nice crunchy exterior and soft creamy interior with a slightly sweet taste. As compared to other oven-fried potatoes, this is the simplest and very good. The steaks were cooked as usual; brought  to room temperature, seasoned with salt and pepper. Seared with melted butter 2-3 minutes on each side (for medium rare, I did not finish them in the oven this time).

For the red wine sauce, I simply blotted the excess oil from the pan the steak was cooked in. I poured in some red wine (I happened to have an open bottle of Tempranillo) and a small amount of balsamic vinegar. I mixed and removed the "fond" with a silicon spatula and reduced the wine mixture until it just coated the bottom of  the pan and finished it with pats of cold butter.

We decided to open a good wine for this occasion and had Caymus Special selection 2010. We bought this some years ago (it was much less expensive when we bought it than current market prices). We stored it for a number of years in our wine refrigerator. I decanted it carefully and served with the steak. The wine was excellent. There is no sign of excess oxidation. It still has lots of dark fruits, chocolate  and vanilla with silky tannin. Ultimate California cab!  So this was a quite a potato-and-meat feast with a good wine.

Wednesday, July 26, 2017

Crispy Roasted Potato with thyme クリスピイローストポテト

This is a variation of Hasselback potato. We were having filet mignon steak for dinner. My wife likes to have some kind of potato side dish with steak to maintain her "meat and potato" aficionado credentials.  We felt a bit too lazy, however, to make oven fried potatoes. She came up with this recipe from Wililams-Sonoma web site.


It looks a bit "over-crisped" but it was quite good.


Ingredients:
4 small/medium Yukon Gold potato, skinned and thinly sliced (2 -3 mm thick).
1 stick (4oz) butter, melted (we used non-salted)
1/2 tsp dried Thyme (we did not have fresh thyme 1 tbs, chopped)
1 tbs Kosher salt

Directions:
Preheat oven 374F (we used convection toaster oven).
Bush melted butter on the bottom of the baking pan, arrange the sliced potato and pour the remaining melted butter.


Sprinkle with thyme and salt.


Bake it for 1 hour and let it stand for 10 minutes before serving.


It appears that our toaster oven has a bit uneven temperature and a portion of the dish got a bit over crisped but this was a good, easy potato dish to make. Our steak was cooked to perfect medium rare.

Since this was a rare occasion to have steak, we opened 2011 Joseph Phelps Insignia. This is a very elegant and complex red wine. We enjoyed a simple steak dinner with crispy baked potato with thyme and sautéed green beans with this wonderful California red. We equate this wine to the good left bank Bordeaux without any funkiness. We continue to be impressed with this wine.

Sunday, May 17, 2020

Japanese sweet potato muffin Version3 サツマイモ マフィン バージョン3

This is the third iteration of Japanese "Satsuma-imo" sweet potato roll/muffin. In dealing with various food shortages during the covid-19 crisis we took an inventory of the foods we had in the freezer. My wife discovered a package of prepared satsuma-imo which she had prepared in the fall but forgotten about. She immediately decided to make sweet potato muffins. She basically used the recipe for the first version of sweet potato muffin and did not rise the dough over night in the refrigerator as she did in version 2 . The good news is that we finally have regular yeast again (from Amazon, Fleischmann's instant yeast* 1 lb) so she did not use biga to make this. She used the usual amount of active yeast.

* Digression alert:
This is the largest amount of yeast we ever bought but this was the only package available. We usually buy a 4 oz jar of Fleischmann's active yeast. We are bit confused about  the differences between "active", "instant" and "rapid-rise" or "rapid-acting" yeast. This is a somewhat confusing subject but this web site appears to provide the most clear explanation. The following is what we understand from reading this article.  The only difference between "active" and "instant" yeasts is the size of the granules. The granules in "active" yeast are larger than in "instant" yeast and require "proofing" or "activating" before being mixed into the rest of the ingredients.  Because the granules in "instant" yeast are finer it can be mixed into dry ingredients without proofing. In addition, instant yeast unlike active yeast can be frozen--which we will have to do since this is such a large quantity. "Rapid-acting" and "Rapid-rising" yeasts are brand-specific names. These yeasts include additional ingredients that make rising faster and these yeasts are not suited for long fermentation such as overnight rising in the refrigerator or making over night pre-ferments.

This 3rd iteration of sweet potato muffin, is basically the same as the first version. The major difference is the mixture used for the stuffing. My wife didn't have enough sweet potato to just use that in the stuffing as she did in the original version so she used a mixture of ricotta cheese and sweet potato instead. As you can see, as it cooked steam made a space over the stuffing but the muffin tasted really good. We like this stuffing better.


She brushed the top with melted butter before placing into the oven.


Ingredients:
for the bread
1 cup of processed sweet potato (1/2 cup for the bread and about 1/2 cup to use as filling in the bread)
4 1/2 teaspoons (two 1/4-ounce packets) active dry yeast
1/4 cup sugar
1/2 cup warm water (110 to 115 degrees)
3 large eggs
3 tablespoons melted unsalted butter
1 teaspoon salt
3 to 3 1/2 cups flour, plus more for the work surface
Oil, for greasing the proofing bowl.
an additional 1 tsp butter to brush on the muffins before baking

for the stuffing
1/2 cup processed sweet potato
1/2 cup ricotta cheese

Directions:
Process the sweet potato by cooking several Japanese sweet potatoes either in the Weber grill or microwave. Let cool, peel and thoroughly mash in a food mill so it is smooth. (Since we made this batch of sweet potatoes in the Weber one weekend to have with barbecued chicken it had butter and soy sauce previously added).

Combine the yeast with 1 tablespoon of the sugar and the warm water in the bowl of a stand mixer; proof for 5 minutes.  Add the eggs and beat on low speed, then add the remaining sugar, the butter and salt. Beat on low speed for about 2 minutes (no need to scrape down the bowl), then add the sweet potato and beat for about 1 minute. Add 1 cup of the flour at a time, beating to form a slightly stiff dough that has pulled away from the sides of the bowl; add flour as needed to form dough. Knead on speed 2 for 7 to 10 minutes. 

Transfer the dough to a lightly floured work surface; knead for 2 to 3 minutes. When it is smooth and springy, shape it into a ball. Use oil to lightly grease the inside of a large bowl, then place the dough in it, turning it to coat evenly. Cover the bowl with plastic wrap; let the dough rest for about 1 hour or until it has doubled in size. The dough will be ready when you can push 2 fingers into it and the indentations remain.

Meanwhile mix the remaining processed sweet potato and ricotta cheese in another bowl and set aside. (shown in picture below).

Punch down the dough. Cut into pieces weighing about 2 oz. each (about 56 g). Flatten the dough and put a small scoop of the sweet potato ricotta mixture in the middle. Pinch the dough around the sweet potato ball and form into a muffin. Place in a greased baking dish. Cover with plastic wrap; let the muffins rise for 45 minutes to 1 hour or until doubled in size. Just before baking brush with 1 tbs of melted butter. Cook in a preheated oven of 375 degrees for 18 to 20 minutes until golden.


These sweet potato muffins are definitely one of our favorites. They are very nice when stuffed with just excess processed sweet potato but these stuffed with sweet potato and ricotta cheese are even better. The ricotta cheese picks up the flavor of the potato and seems to accentuate it. It has a mild sweetness. In addition the filling is very smooth and creamy. This goes very well with the tenderness of the bread's texture.

Tuesday, June 18, 2019

Fastnacht bread with sweet potato サツマイモ ”ファストナハト” ケーキ

My wife is a devotee of Japanese sweet potato "Satsuma-imo" サツマイモ. Whenever she sees it at our near-by Whole Foods, she will get some. The most common way we enjoy Japanese sweet potato is cooking it wrapped in aluminum foil on the Weber grill when we are cooking either chicken or pork roast (using indirect heat). She usually mashes the potato and adds soy sauce and butter. Then using the left-over mashed sweet potato, I make croquets (with ground pork, onion and shiitake mushroom) which is great (I have posted it). She has also used the mashed sweet potatoes to make gnocchi. This was a really good preparation because the sweetness combined with the saltiness of the soy sauce comes through very nicely. This time, my wife decided to make her "Fastnacht cake" using the mashed sweet potato. Her thinking was 'the recipe used regular mashed potatoes so how would it taste if I substituted the sweet potato?' She also modified the way she incorporated the " rivals*” and gave the bread a second rise which was not called for in the original recipe.

*According to the wikipedia definition of rivels, they are a type of spaetzle like small dumpling put in a soup. In the context of this fastnact cake, "rivels" are a sweet sugar crumb topping. (My wife did not make up this terminology. According to the ancient Pa Dutch cookbook she uses they specifically say "top with rivels" then give explicit instructions on another page under the heading of sugar topping. These include brown sugar topping, streusel topping and rivels. The main difference between them being the ratio of sugar, butter and flour).


The rivels are a crucial part of the cake. They are nice and crunchy and sweet. The problem is many of them fall off when they are put on the top and you end up picking up the crumbs eating them separately from the cake. She wanted the rivels to be a part of the cake. So, she decided to put a layer of rivels in the center. (pictured below). With this innovation, the rivels still come off the top and you still end up picking up crumbs (which apparently is just an inevitable part of enjoying this cake) but in addition there is now a guaranteed layer of lovely sweetness in each bite from the layer in the center of the cake.


Ingredients:
1/2 cup HOT mashed sweet potato (please note the recipe specifies HOT)
1 1/2 cup milk
1/2 cup butter
1 egg
1/2 cup sugar
2 tsp. salt
1/2 tsp. nutmeg
1 pkg active dry yeast
1/4 cup warm water if blooming the yeast
4 cups of AP flour to start, adding more as needed to make velvety dough.

Ingredients and directions for rivels (Crumb topping)
Mix together 1/2 cup sugar, 1/2 cup flour and 4 tbs. butter softened until the ingredients are completely combined and look like fine crumbs.

Directions:
Put the hot mashed potatoes into the bowl of a stand mixer. Using a mixing paddle beat in the butter, then the egg and a mixture of sugar, salt and nutmeg. Beat until fluffy. Bloom the yeast in warm water.
Beat the yeast into the potato mixture. Switch to a dough hook and alternately add the flour and milk beating well after each addition. If necessary add more flour to make a soft dough. Knead the dough on a floured surface until smooth and satiny. Put into a greased bowl. Grease the top of the dough, cover and let rise in a warm place until doubled.

Punch down the dough. Since the recipe makes two cakes split the dough into quarters so the rivals can be put into the middle of the cake. Then put 1/4 of the dough in the bottom of the pan, sprinkle on 1/4 of the rivels and top it with another quarter of dough (#1). Do this for both cakes. Brush the tops with melted butter and cover both with the remaining rivels (#2).  Let the cakes rise in a warm place for about 30 to 40 minutes while the oven preheats. Cook in a 400 degree oven for about 20 minutes or until golden brown.  The third picture shows the cake as it came out of the oven. And #4 shows the cake sliced. 


Both the use of the Japanese sweet potato, adding rivels to the center of the cakes and giving the cakes a second rise worked out well.  These were the the best fastnacht cakes ever—or at least the best my wife ever made. The sweet potato is completely substitutable for regular potatoes. The texture, however, was much better than the original recipe. It was much fluffier, more tender and slightly sweeter. The rivels in the center amalgamated into the  texture of the cake. But they also provided a moist layer of sweetness that was very pleasant. This may be the primary way my wife makes this cake in the future. 

Tuesday, November 19, 2019

Japanese "Satsuma-imo" Sweet potato muffin version2

My wife likes to bake bread and she also likes Japanese "Satsuma-imo" 薩摩芋 sweet potato so she is always looking for ways to combine the two. She made "sweet potato" rolls using Japanese sweet potato roasted in the Weber grill and then mashed and seasoned with butter and soy sauce. She used the mashed Japanese sweet potato in the bread dough and also as a filling. In this variation she used the recipe for "refrigerator potato bread" but substituted mashed sweet potatoes for the white potato called for in the recipe. The result was this wonderful rolls/muffin. It has a very tender delicate texture and you can definitely taste the mild sweetness of the Japanese sweet potato. This muffin does not have a sweet potato filling because all mashed the sweet potato went into the dough.


Ingredients:
1 pkg. yeast
1/2 cup sugar (plus 1/2 tsp additional to proof the yeast)
1/2 cup warm water
1 cup warm milk
1 1/2 sticks ( 3/4 cup butter softened)
2 tsp. salt
2 eggs
1 cup mashed Japanese "Satsuma-imo" sweet potatoes (make link to my potato recipe) run through a food mill to eliminate any chunks that may remain after the potatoes have been mashed #1.
4 cups bread flour (with more as needed)

Directions:
Day1:
1. Proof the yeast in the warm water and 1/2 tsp. sugar.  Warm the milk with the butter in it. Dissolve the sugar in the milk mixture.
2. Using a mixing paddle on the stand mixer add the warm milk butter mixture, eggs and mashed potatoes blend thoroughly. Add the proofed yeast and salt. Mix completely.
3. Switch to a dough hook and add the flour one cup at a time until the dough clings to the hook and is smooth and springy to the touch. Knead on speed 2 for 7 to 10 minutes.
4. Form into a ball and put into a bowl with a small amount of vegetable oil turning the dough to cover with a coat of the oil. Cover tightly and place in the refrigerator overnight (or as the recipe says up to 16 to 18 hours).

Day2:
1. Next morning punch down the dough. (It will extremely cold and dense so "punch down" may not be the process that is actually possible. Just flatten the best you can) #2. Let rest for about 5 minutes (picture below) #3. Cut off pieces weighing 2 1/4 oz. #4. Form into rolls and place in a heavily greased baking dish several inches apart so they can rise #5. Cover and let rise until doubled. Cook in a 400 degree oven for 18 to 20 minutes until they sound hollow when tapped #6.


These muffins were amazing. The slow rise overnight in the refrigerator resulted in a very fine texture. The flavor was very delicate but clearly tasted of the sweetness of the sweet potato. The combination of the delicate texture and flavor almost felt like we were actually eating fluffy cooked sweet potato rather than bread. So the substitution of sweet potato for regular potato in this recipe worked very well and the end result was equally as good but distinctly different...well worth the variation.

Friday, October 16, 2009

Raclett Cheese and Potato

Raclett Cheese and Potato  ジャガイモとラクレットチーズ
We recently had this in a restaurant in Zurich. It is supposedly a typical Swiss dish. You can not go wrong with the combination of potato and melted Raclett cheese. We think this is a good dish for Izakaya. It is so simple and there is no real recipe (I just recreated what we had). I used a Russet potato but the dish we had in the restaurant appears to be made using a different kind of potato. (When asked the waitress couldn't identify the type of potato). The dish may work better with something like Yukon Gold. I microwaved the potato in a covered dish for 6-7 minutes or until cooked through (depends on the size of the potato and the wattage of the microwave). I grabbed it using a towel and removed the skin while it is hot (I am sure you could leave the skin if you like). I scooped out the top of the potato to make a groove in the depth of  1/3 of the thickness of the potato and stuffed it with chopped Raclett cheese and placed a few slices to cover the top of the potato. I then put it in a 450F oven for a few minutes. You could also place it under a broiler until the cheese melts. The original we had at the restaurant did not have any garnish but I added chopped chive mostly for color. This is an especially satisfying dish particularly with a little salt on the side to enhance the flavor of those parts of the potato not covered with cheese.


Similar potato dish we also like is "potato and butter" or "jaga-bata" ジャガバタ. You start with a boiled or microwaved whole potato (you could do this step ahead of time). Cut into quoters along the long axis and put them on the grill to make char marks on the cut surfaces and to warm it thoroughly. Then cut in a crosswise fashion in half inch thick slices. Put buttons of butter on it and let it melt. Eat with some salt or with soy sauce. When we go to a near-by Robatakaki/sushi bar called Tako Grill (this is not "taco" and "tako"means "octopus" in Japanese), this is the one we always order.

Monday, November 16, 2009

Oven fried potato オーブンフライドポテト

Deep fried starch may not be good for your health but certainly tastes good. French fries are by far the most popular in this category. Although this may not be strictly "Izakaya" food, it goes well with any drinks--sake, beer or wine. We found this oven fried potato recipe in "Cook's Illustrated". It is not "low fat" by any means, but it probably is better than the deep fried counter part, and, actually, in our hands, this oven fried potato tastes much better than our deep fried ones. The leftovers will reheat very well in a toaster oven the next day.

The original recipe recommend Russet potatoes which we used and were good but we also used "white" potatoes and we like the white potatoes better. Reiterating from the recipe in the Cook Illustrated; Preheat your oven at 475F (We use a convection oven at 450F). After removing the skin of the potatoes, cut into long half inch wide sticks, and soak them in warm tap water for 10-15 minutes to remove excess starch. Rinse and pat dry using a paper towel. In a large bowl, add the potatoes and 3-4 tbs of vegetable or peanut oil and toss well to coat. Meanwhile on a large sheet pan, spread 1 tbs of oil and sprinkle salt (about 2 tsp or more) and 1/2 tsp of black pepper (We use kosher salt. The larger salt gains appear to prevent the potatoes from sticking more than for seasoning). Spread, the potatoes in a single layer keeping some spaces between the potatoes. Tightly cover the sheet pan with aluminum foil and place it on the bottom rack of the oven and bake for 5 minutes. Remove the foil, and bake another 15 to 20 minutes. Turn over the potatoes with a spatula and/or tongs and bake another 10-15 minutes. When the surface is nicely golden brown remove from the oven and place the potatoes on another sheet pan lined with paper towel. Season with extra salt if desired.

The outside is nicely crunchy and the inside is creamy soft. Certainly we believe this is the best oven fried potatoes. We make this as an accompaniment for steaks or just as is like tonight, with sake. In that case, we eat them with a lemon and salt, otherwise, with ketchup.

Saturday, January 20, 2018

Japanese sweet potato rolls さつま芋ロール

My wife found Japanese sweet potato (satsuma-imo) at Whole Foods and had to get them. We like these kind of sweet potatoes because they have firmer flesh than U.S. yams and are very sweet. We made a few of our usual dishes from them. One is cooking them in the Weber grill when we grill chicken. Simply, wash, prick all over with a fork (so they don't explode while cooking), wrap them in aluminum foil and stick them in the Weber at the same time the chicken is put in. By the time, the chicken is done the potato is also done. We grilled 4 sweet potatoes this way one weekend. We ate some of the sweet potato with the chicken for dinner. The next day, my wife made these sweet potato rolls with the leftovers. Although the rolls are based on a recipe she found, as my wife was making these rolls she realized she had lots of extra sweet potato. Since she is particularly fond of rolls with surprise fillings she decided to put the extra sweet potato into the center of the the roll as shown. It turned out to be quite successful.


Although she did not add any sugar to the sweet potato filling, it is really sweet and reminded me of "white anko paste" or "shiro-an" 白あん made of white beans grown in Hokkaido.


Ingredients:
8 ounces sweet potato. The sweet potato is divided 1/2 cup for the bread and about 2 cups to use as filling in the bread)
4 1/2 teaspoons (two 1/4-ounce packets) active dry yeast
1/4 cup sugar
1/2 cup warm water (110 to 115 degrees)
3 large eggs
3 tablespoons melted unsalted butter
1 teaspoon salt
3 to 3 1/2 cups flour, plus more for the work surface
Oil, for greasing the proofing bowl.

Directions:
We cooked 3 Japanese sweet potatoes wrapped in aluminum foil in the Weber grill when we barbequed chicken one weekend. Let cool, then peeled and thoroughly mashed in a food mill so it is smooth. You should have 1/2 cup of flesh.

Combine the yeast with 1 tablespoon of the sugar and the warm water in the bowl of a stand mixer; proof for 5 minutes.  Add 2 eggs and beat on low speed, then add the remaining 3 tablespoons of sugar, the butter and salt. Beat on low speed for about 2 minutes (no need to scrape down the bowl), then add the sweet potato and beat for about 1 minute. Add 1 cup of the flour at a time, beating to form a slightly stiff dough that has pulled away from the sides of the bowl; add flour as needed.

Transfer the dough to a lightly floured work surface; knead for 2 to 3 minutes. When it is smooth and springy, shape it into a ball. Use oil to lightly grease the inside of a large bowl, then place the dough in it, turning it to coat evenly. Cover the bowl with plastic wrap; let the dough rest for about 1 hour or until it has doubled in size. The dough will be ready when you can push 2 fingers into it and the indentations remain.

Punch down the dough. Cut into pieces weighing about 2 oz. each. Flatten the dough (#1) and put a small scoop of the extra, sweet potato (#2) in the middle (#3). Pinch the dough around the sweet potato ball and form into a roll (#4). Place in a greased baking dish. Cover with plastic wrap; let the rolls rise for 45 minutes to 1 hour or until doubled in size. Cook in a preheated oven of 375 degrees for 15 to 20 minutes until golden.


These rolls were wonderful. Very light with a lovely mild sweetness. The center of sweet potato was a really good addition. It was soft and also sweet.

Friday, March 8, 2019

Potato and salmon salad filled rolls ポテトとサーモンサラダ入りのパン

Since my wife had just made sweet potato bread stuffed with a mixture of Japanese sweet potato puree and ricotta cheese (which was excellent BTW) I mentioned in passing that stuffed breads (for example breads filled with curry sauce "kare-pan"カレーパン, sweet red beans "An-pan" あんぱん, custard cream "Kuri-mu-pan" クリームパン and so on) were very popular in Japan.  I even sent her the link to a recipe for potato salad filled rolls. The recipe was in Japanese but it included pictures and I verbally translated how the bread was made. To my surprise she took to the project of "stuffed bread" like a piranha.

I regularly make potato salad and salmon salad over the weekend because they are good staples to have; the potato salad as a side for any main dish or by itself as a snack. The salmon salad is great on crackers or bread as canapés or sandwiches.  I came home one day and the kitchen was filled with the nice smell of baking bread. My wife had noted that I made more potato salad than we could reasonably eat before it went bad so she put together potato salad stuffed bread as per the Japanese recipe. Then noting a similar surplus of salmon salad decided to "go for broke" and put together salmon salad stuffed bread. Based on my description of the Japanese recipe she took her favorite white bread dough as the base. The main element she learned from the recipe was to cut the top of the rolls to form a vent for the steam from the filling to escape. This would prevent the development of a large void in the bread covering the filling .

 In the picture below, the left front is the salmon salad filled and the right back is the potato salad filled rolls.


Here are the cut surfaces. The left two are the salmon salad and right two are potato salad. Probably, she could have put more fillings but this is her first try and never having made this kind of bread was not the least bit sure it would turn out.


The picture below shows the salmon and potato salad filled rolls just after they came out of the oven.


Both rolls were really great. It was amazing that the flavor of the salads remained fresh and permeated the bread. The salmon salad filled roll had the assertive salmon and dill flavor of the salad which we thought would be good for lunch or even breakfast. The potato salad filled one was a bit more subdued but this starch-on-starch approach really works. Now my wife has ideas about other fillings she could use. Did I mention that, in Japan, filled breads even made of "pasta" (such as spaghetti  or fried Japanese noodles) are very popular. The possibilities are limitless. I "tremble in fear" at the thought of what kind of filling my wife will come up next...but I will be first in line to try whatever she makes.

Wednesday, April 29, 2020

Puff pastry loaf with roast beef, cheese and potato salad ローストビーフ、チーズ、ポテトサラダローフ

My wife invented this loaf which is a variation of egg and smoked salmon in puff pastry. She already made one variation using smoked salmon, cheese and mashed potato. This time, we were in cleaning-up-leftovers mode. Although we rarely eat beef, one weekend we made a beef roast on the Weber grill with hot smoke. We used thin slices of the roast beef for sandwiches during the week but still had some left over. In addition, I had made potato salad a few weeks ago and a good amount was still left.  (The potato salad is made with rice vinegar and strained yogurt i.e. Greek yogurt in addition to the usual mayonnaise, and these two ingredients act as a kind of preservative. As a result the potato salad lasts a long time but even so there is a limit so we had to use it up). My wife came to the rescue with this dish using roast beef, potato salad and her variation of cheese stuffing. This is like a "pasty", all inclusive--starch, veggies and proteins from the meat and cheese.


Ingredients:
sheet of puff pastry thawed

for cheese filling:
4 oz. feta cheese
3 oz smoked mozzarella cheese
2 oz. Monterey jack
5 oz. ricotta cheese
2 large eggs
sprinkle of red pepper flakes to taste

Other ingredients
roast beef cut into thin slices.
cup of potato salad (or amount needed to top the cheese filling)

Directions:
Preheat oven to 425 degrees. Crumble the feta cheese into small pieces. Grate the mozzarella and Monterey jack cheeses. Mix the crumbled and grated cheeses with the ricotta, egg and red pepper flakes. Roll out the thawed puff pastry on parchment paper. On half of the pastry dough, add layers of thinly sliced roast beef, the cheese mixture and potato salad (shown below).


Fold the other half of the pastry dough over the filling and seal the edges by painting on a mixture of water and flour and pressing the edges using the tines of a fork.  Dock or prick the top of the dough with the fork. (This lets steam escape as the loaf cooks). With the loaf still on the parchment paper place it on a rack and put the rack on a cookie sheet. (This allows the bottom to cook thoroughly). Cook for 25 to 30 minutes or until the pastry is golden brown.


Again, you can't go wrong with this combination of pastry, meat, cheese and potatoes--its a meal in itself. The potato salad was an interesting addition. It added a slight vinegar tang and the mayonnaise yogurt blended into the cheese mixture adding a creaminess. The onions and carrots in the potato salad were a nice dimension that was not present in previous versions of this loaf. The smokiness of the barbecued beef also added its "voice" nicely. (Although the roast beef was very nice, we decided that maybe we preferred the saltiness of the smoked salmon used in previous versions a bit better). Slices of the loaf heat up well in the toaster oven. This is nice to have after work with a nice glass of red wine of course.

Thursday, June 8, 2017

Tater tots, sort of テイタートッツ

We don't eat steak very often but when we do, my wife always likes to have potatoes as the side. (Apparently, she is an all American meat-and-potato gal when it comes to steak). She usually makes oven fried (baked) potatoes. She tried several iterations using duck fat or bacon drippings in the past. Since I got two small filet mignon for dinner, she wanted potatoes but wanted to make something different. She came up with this variation of the ultimate American potato; "Tater tots". They are essentially grated potato formed into short cylinders and deep fried. Generally this dish starts life frozen in a package on the freezer isle of the grocery store (Ore-Ida invented this in 1953). Then it is baked in the oven. (When my wife was a very young child, she thought the freezer was the source of all food including a continuous supply of pre-made tater tots).  Being a bit older now, there was no way my wife was going to send me to the grocery store to get frozen tater tots. They were going to be home-made...was that even possible? Turns out tater tots are very popular and there are many recipes to make them at home from scratch. My wife consulted several of these recipes and came up with this variation. It is more like small hash-browns than tater tots.


Instead of deep frying, this was baked.


Ingredients:
White potatoes, 5, peeled
Bacon, 2 strips, cooked crisp and crumbled
1/2 tsp onion powder
1 Tbs. AP flour
1/2 cup grated cheddar cheese
1 1/4 tsp. salt
1/2 tsp pepper
2 Tbs. olive oil
Italian parsley, finely chopped, 1 tbs

Directions:
Partially cook the potatoes in salted water (starting from cold water, add 5 minutes after the water comes to a boil). (Next time we may try just grating the potato raw).
Grate the partially cooked potatoes coarsely using a box grader. Then mix in the bacon, onion power, AP flour, cheddar cheese, salt, pepper, olive oil and parsley. (#1).

Instead of making the potato mixture into short cylindrical shapes which is traditional, my wife just made a loose ball using a medium size ice cream scoop on a greased non-stick baking sheet. She then lightly pressed them flat  (#2 and 3).
She baked them in a 450F for 20 minutes turning over once after 10 minutes (#4).


This was good with a crunchy outer shell and soft center. We did not taste much of the bacon, though. For the amount of work, we may be better off with our oven baked potato or I may even suggest we go for those Ore-Ida frozen original tater tots.

Wednesday, August 16, 2017

Hasselback potato with flat iron steak ハッセルバックポテト

One weekend, my wife assumed my usual duty of foraging for food and went to the grocery store in my place. She came back with, among other things, a bag of Russet potatoes and a flat iron steak. Another "meat and potato" dinner was inevitable. Since my wife had just recently made crispy roasted potatoes, we wanted to try something different and decided to make "Hasselback" potatoes.


They came out nice. A whole potato, however, is more than we could handle, so we shared one. This was cooked in olive oil and bacon drippings.


Since we had not made this dish before, I consulted several recipes on line and came up with this one.

Ingredients:
Russet potato (we cooked two at a time)
Olive oil and bacon dripping (optional)
Salt and pepper
Herbs of your choice (may be rosemary), we used parsley in the end.

Directions:
To open up the leaves of potato, it appears the secret is to cut off the bottom (#1).
Placing two chop sticks (disposable) one front and one in back of the potato, I cut 1/4 inch multiple slices without cutting completely through the potato (apparently gadgets to cut Hasselback potatoes are available). I used the small cut piece as a small pillow (#3).
I brushed olive oil between the leaves of potatoes and seasoned it with salt and pepper.
I baked it for 1 hour at 425 F in a convection oven (we used our toaster oven on convection mode).
I basted the potatoes a few times. The last 30 minutes I based the potatoes with bacon drippings (#3 and 4).
I garnished it with chopped parsley.


For the flat iron steak, I seasoned with with salt and pepper, slices of garlic and fresh rosemary (see below) and let it warm up to room temperature for 1 hour. I removed the garlic slices before cooking the steak in a frying pan to medium rare doneness.


The meat and potatoes were good but the Hasselback potato is mostly for show. It tasted like a good potato. The flat iron steak was good with rosemary and garlic flavors.

Tuesday, June 28, 2022

Duck-fat potato Focaccia bread アヒルの脂肪入りジャガイモフォカッチャ

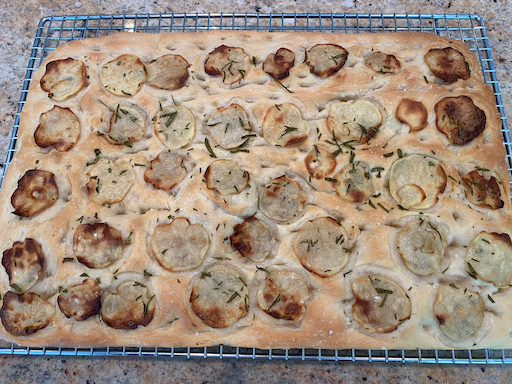
This focaccia bread is based on a recipe from a new cookbook called "A good day to bake".  We got the cookbook at the recommendation for my wife's sister. She read a good review of it in the New York Times The original recipe calls for goose fat. But we did not have goose fat. We did, however, have frozen duck fat (leftover from making duck confit). This is essentially a recipe for the standard focaccia bread but instead of olive oil, it uses duck (or goose) fat plus thinly sliced potatoes and rosemary as toppings. It came out nicely with the potato almost like potato chips (see picture below).


Ingredients:
450 g (3 and 1/4 cups) bread flour
7gram instant yeast
300 ml (1 1/4 cup of water )(or a bit more or less depending on the dough consistency)
1 tsp Kosher salt
80g duck fat or goose fat
1tsp sugar

Topping
3-4 baby red potato, eyes and skin removed and sliced thinly (I used a Japanese mandoline "Benriner")
A few sprigs of fresh rosemary, leaves removed and roughly chopped.
More duck fat to coat the potato slices.

Directions: (Since the amount of flour and water is the same as my focaccia bread, I used my usual procedure of the food processor fitted with a kneading blade instead of a stand mixer or by hand).

Add the flour, salt, sugar, yeast and duck fat in the food processor. Pulse it to roughly mix. Turn on at low speed and drizzle in the water until a dough ball forms above the kneading blade (the amount of the water may need to be adjusted). Let it stand for 5 minutes so that the moisture distributes evenly. Turn on the food processor to low speed and knead the dough for 1 minute. Take the dough out onto a floured board, and knead 5-7 minutes and make a tight ball. Put a small amount of olive oil (or duck fat) in a bowl, place the dough ball turning a few times to coat in the oil/fat. Cover the bowl with plastic wrap and let in rise until the volume doubles (1-2 hours) (I used a bread proofing box at 80 F). Place the dough on a 38x26cm(15x10 1/2 in) lightly oiled (I used olive oil but duck and goose fat can be used) baking pan, spread to fill the pan (may need 5-10 minutes rest to relax the dough). Cover it with a plastic wrap and let it rise for 45-60minutes (the baking pan did not fit into my proofing box, so I just put it on the top of the box without the lid. Preheat the oven to 375F (the original recipe calls for 435F but to me that is too hot since we do not like a hard crust).

Coat the dough surface with oil (I used olive oil) and make deep dimples using your fingers. Spread the duck fat coated potato slices and roughly chopped fresh rosemary leaves (see below).


Bake it 25-30 minutes or until the surface is brown/golden (see below picture). Take it out on the wire rack and let it cool.


Thinly sliced potato adds an interesting crunch texture almost like potato chips (but not quite that crispy). We could taste the rosemary but not the duck fat.


We had similar experience with the pan baked potato with duck fat. Somehow the duck fat does not add much of the flavor. I would rather use olive oil to reduce the amount of saturated fat. In any case, this is a good focaccia but I will make it without duck or goose fat next time.


Monday, February 3, 2020

Smoked salmon, potato, cheese loaf and cheese bites スモークサーモン、ポテト、チーズローフ

We had some leftover cooked spinach, mashed potatoes and a small amount of smoked salmon so my wife came up with this. It is a combination of several recipes; "egg and smoked salmon in puff pastry", "spinach cheese loaf"and mashed potatoes with cream cheese and chives. The egg and smoked salmon recipe inspired the use of smoked salmon. The spinach cheese loaf was the basis for the center cheese and spinach layer. The mashed potato layer was a variation of gnocchi.


The layers are shown here from the bottom, the smoked salmon, cheeses mixture and mashed potato encased in puff pastry..


Since the cheese filling was too much for the loaf, my wife put the excess into small muffin tins with a small piece of smoked salmon on the  bottom to make little cheese bites (shown below).  They came out very nicely.


Without pastry shell and potato, these by themselves were quite a good small bite.


Ingredients:
1 frozen puff pastry sheet, thawed
1 cup mashed potato with cream cheese with chives
Smoked salmon, enough to cover 1/2 of the puff pastry (or whatever amount available)
6 oz. double Gloucester cheese grated (original recipe calls for Mozzarella, we did not have it).
block of feta cheese, crumbled (or to taste).
10 oz. ricotta cheese
One bag spinach (or whatever available) cooked without adding any liquid, excess moisture squeezed and finely chopped.
red pepper flakes (optional)
3 eggs (2 for cheese layer 1 for potato layer)

Directions:
On a piece of parchment paper roll out the puff pastry. Combine the cheeses and the spinach (#1). Stir in the 2 eggs (#2). Put the mashed potatoes in a bowl. Stir in the egg. Add enough flour so the spinach has the consistency of gnocchi i.e. has a firm consistency and is not runny.

Assembly: Lay the smoked salmon on 1/2 of the puff pastry. Spread the cheese and spinach layer on top (#4). Spread the potato layer on top of the cheese (#5). Fold the other half of puff pastry over the half with the cheese mixture. Seal the edges with some water and press with a fork. Dock the pastry with the tines of the fork (#6). Transfer the puff pastry on the parchment paper to a baking sheet. Bake in a 425 degree oven for 30 to 35 minutes or until the pastry is golden brown.


Directions for the cheese bites
Since there was too much cheese stuffing to go into the puff pastry my wife used it to make little cheese bites. She greased a tin for mini muffins. Put a small piece of salmon in the bottom of the cup and scooped in enough filling to fill the tin. She baked these with the puff pastry loaf at 425 for about 18 minutes. When they came out of the oven the cheese stuck to the side of the tin. She used a spatula to loosen the edges while the cheese was still hot. Luckily because of the salmon on the bottom the little bites just fell out when the tin was inverted and tapped gently on the counter top.

This was a very good variation on the "cheese-in-puff-pastry" theme. The salmon gave a salty smokiness. The ricotta spinach feta combo is always winning. The layer of gnocchi like potato on the top was a lovely surprise. The cream cheese chive flavor really came through and smooth texture of the potatoes was a nice contrast to the somewhat firmer texture of the cheese layer. The little cheese bites were also very good. Again the salmon added it characteristic salty smokiness, the cheese layer was very good but it was different from the cheese layer in the puff pastry loaf made with the same ingredients. The outside of the cheese had gotten toasted in the mini muffin tins so it was somewhat crunchy and the flavor of the toasted portion was somewhat deeper than the un-toasted portion. It made a very satisfying single mouthful. These would definitely be worth making in their own right.

Thursday, February 7, 2019

Refrigerator Potato Bread/muffin 冷蔵庫ポテトパン/マフィン

This is the second potato bread we made. This time my wife did everything herself from the beginning to the end. So, her arm is definitely improving as well as she is determined to accomplish what she wants to do. This is called "refrigerator" bread since it rises over night in the refrigerator. The recipe also came from "Beard on Bread" cookbook. Again, it is a nice rustic bread with integrity and perfect for toasting with butter for breakfast.


Ingredients:
1 pkg. yeast
1/2 cup sugar (plus 1/2 tsp additional to proof the yeast)
1/2 cup warm water
1 cup warm milk
1 1/2 sticks ( 3/4 cup butter softened)
2 tsp. salt
2 eggs
1 cup mashed potatoes (make link to my potato recipe) run through a food mill to eliminate any        chunks that may remain after the potatoes have been mashed.
4 cups bread flour (with more as needed)

Directions:
Day1:
1. Proof the yeast in the warm water and 1/2 tsp. sugar.  Warm the milk with the butter in it. Dissolve the sugar in the milk mixture.
2. Using a mixing paddle on the stand mixer add the warm milk butter mixture, eggs and mashed potatoes blend thoroughly. Add the proofed yeast and salt. Mix completely.
3. Switch to a dough hook and add the flour one cup at a time until the dough clings to the hook and is smooth and springy to the touch. Knead on speed 2 for 7 to 10 minutes.
4. Form into a ball and put into a bowl with a small amount of vegetable oil turning the dough to cover with a coat of the oil. Cover tightly and place in the refrigerator overnight (or as the recipe says up to 16 to 18 hours).

Day2:
1. Next morning punch down the dough. (It will extremely cold and dense). Let rest for about 5 minutes (picture below).


2. Knead vigorously until it becomes soft and pliable (about 6 minutes).
3. Shape into 2 loaves of equal size and place into 2 heavily greased loaf pans. Cover and let rise until doubled in bulk  (the recipe says this could take up to 4 hours. This bread rose in 2 hours).  Make shallow slashes using a bread lame (see picture below).


4. Bake in a 375 degree oven for 40 to 45 minutes until browned and sounds hollow when tapped.
5. Remove from the pans immediately when they come out of the oven. (When I removed the loaves they seemed a bit soft on the underside so I put the loafs back in the oven outside the pans directly on the oven rack for about 5 minutes. This made the crust nice and crunchy).


This bread has a very pleasing dense but fine texture. It has a slightly sweet taste and the taste of the cream cheese and chives used in the mashed potatoes came through adding a pleasant dimension.


We are glad that my wife is up to baking again. I am certainly benefitting from having good breads to enjoy.

Addendum (1-22-22): This bread can also be made into muffins as shown in the next picture. These muffins were weighed at 76 grams and produced a total of 23 muffins. They were cooked in a 400 degree over for 20 to 25 minutes or until golden. When turned out of the pan the underside was very soft and white so I turned them upside down on a cookie sheet and cooked them for another 5 to ten minutes until they formed a light brown crust.