Showing posts sorted by relevance for query oven potato. Sort by date Show all posts

Tuesday, February 21, 2023

Fastnacht Cake Version 3 ファストナハトケーキ V3

Since “Fastnacht” day (“Fat Tuesday”) is approaching, my wife made a new and improved version of “Fastnacht” cake. This one is made with Japanese sweet potato (satsuma imo サツマイモ), is double layered with “rivels” between the layers and on the top and as an additional innovation my wife added; a medley of dried fruit.


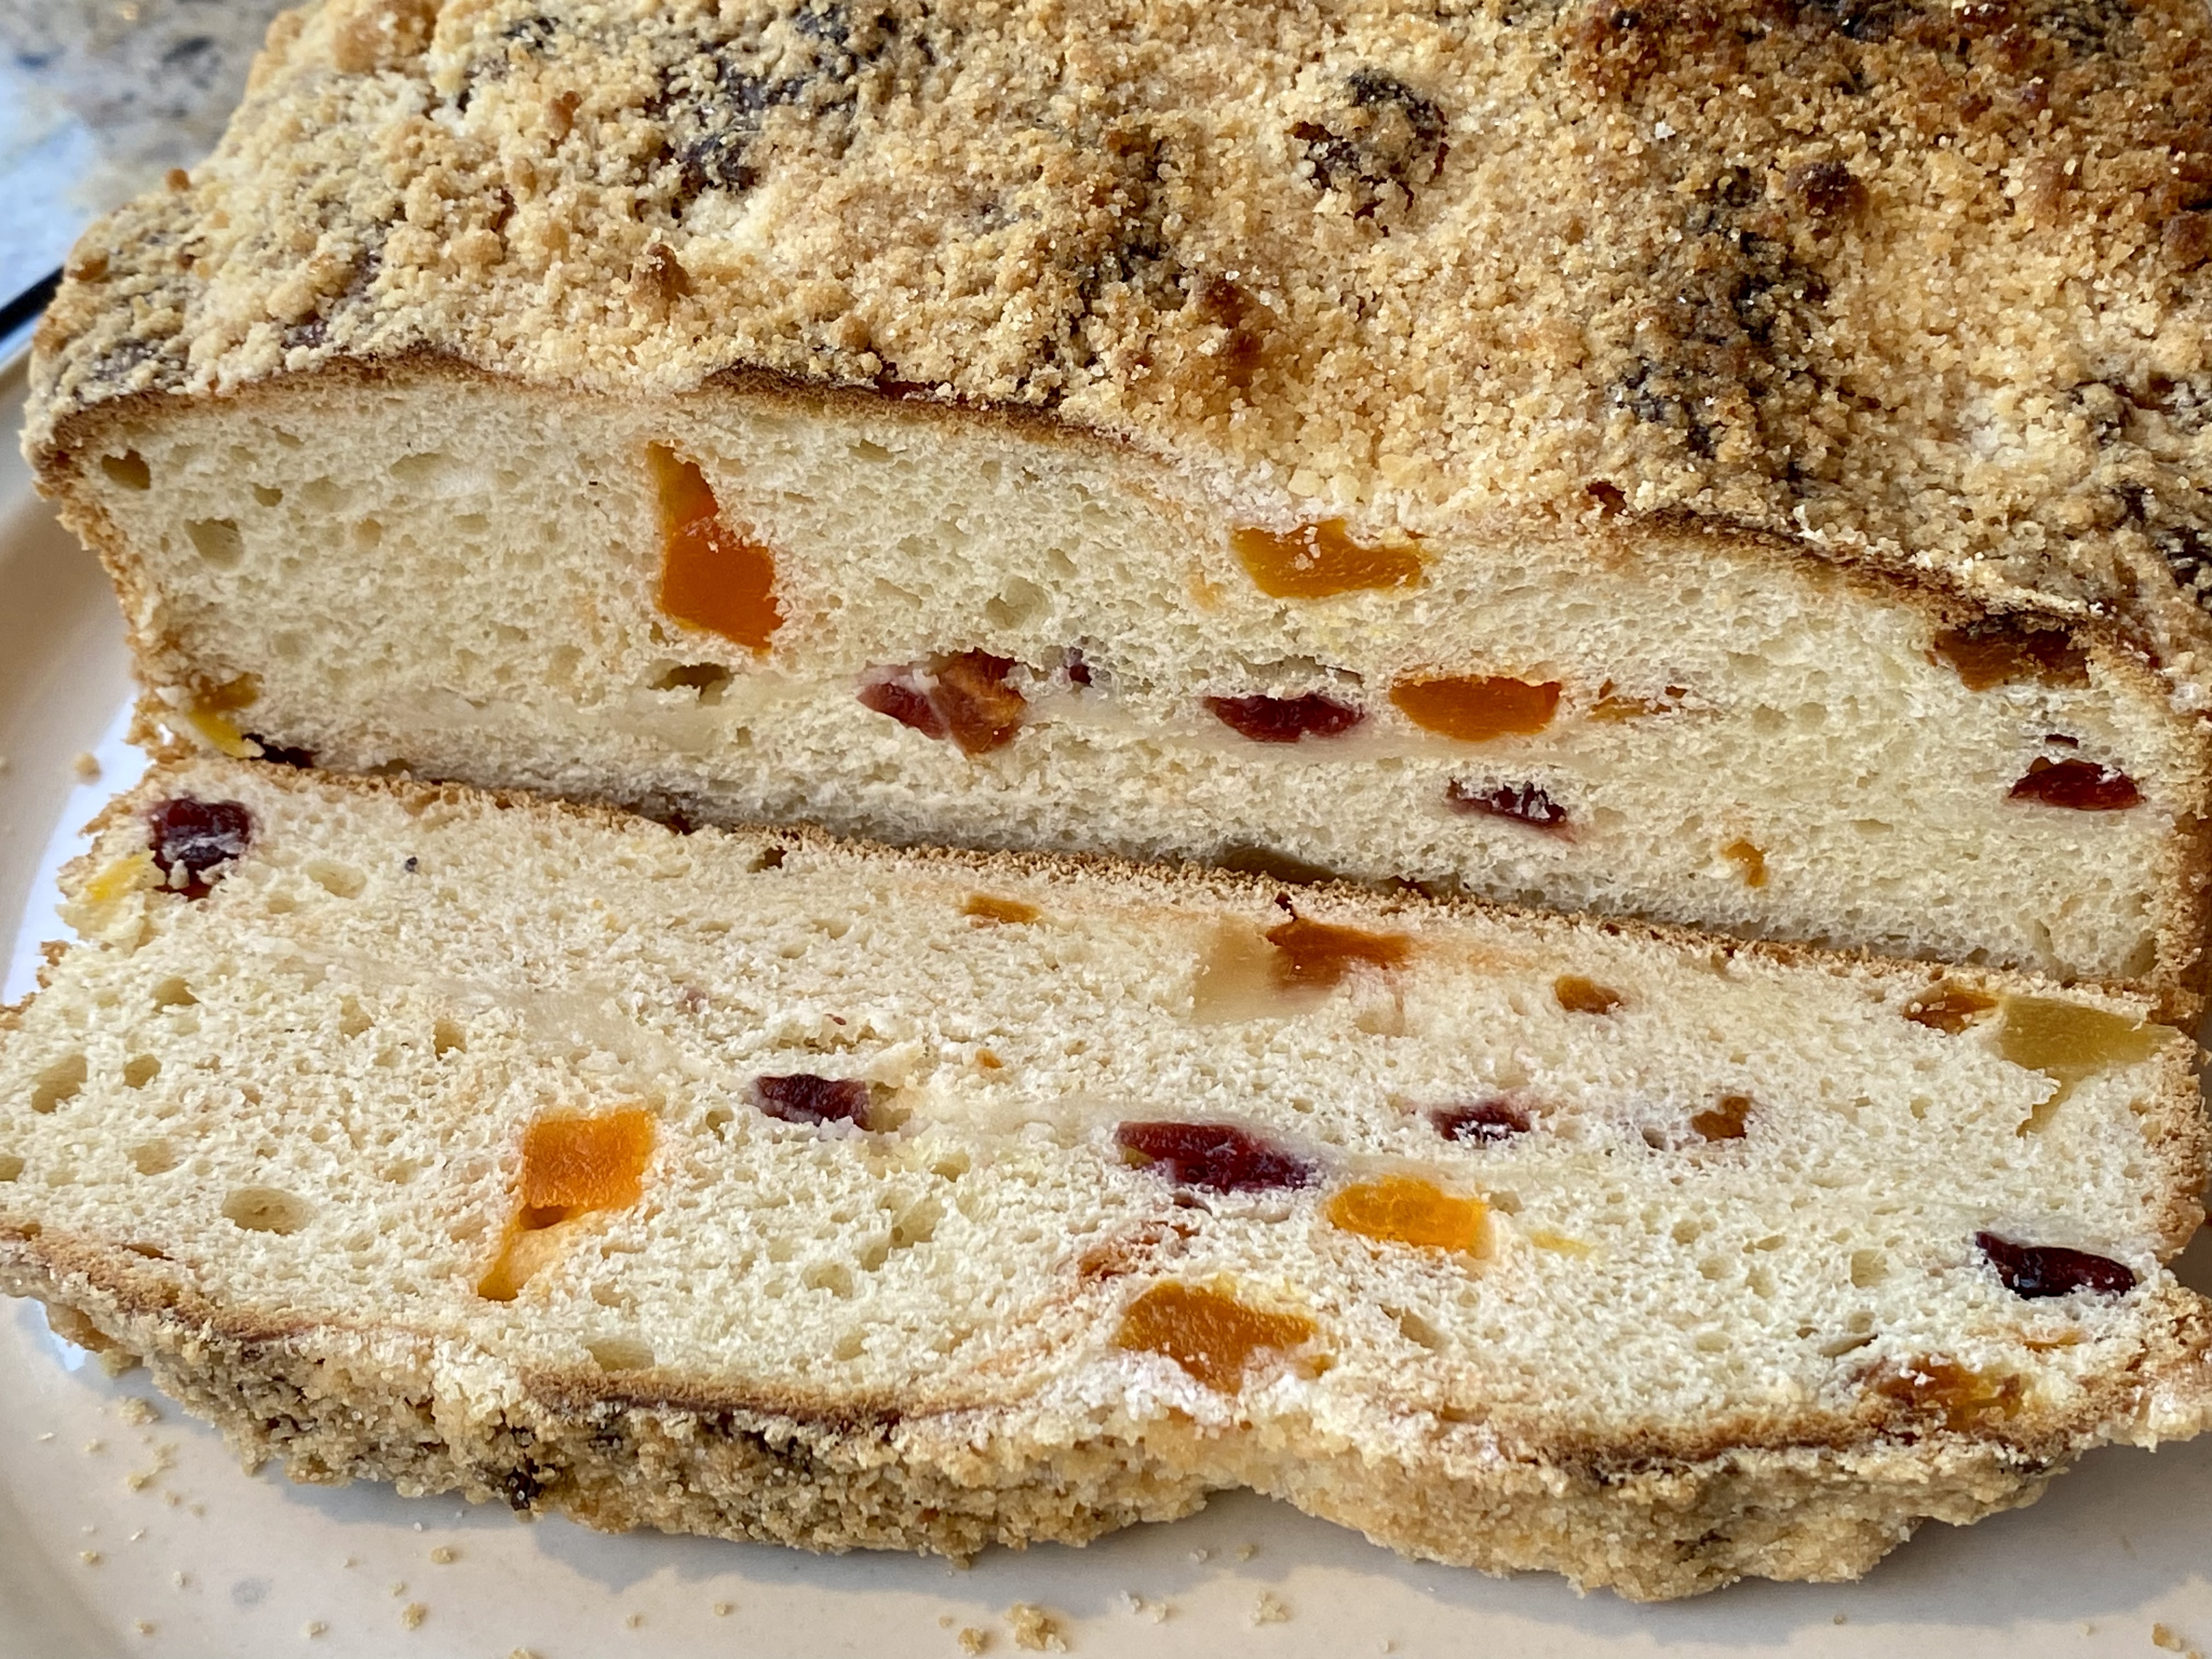
The “rivel” layer is difficult to see but it is there as is the dried fruit.


Ingredients: My wife will tell what she did to make the cake (makes two round 8 inch cake/bread)
1/2 cup warm mashed sweet potato (please note the original recipe specifies HOT)
1 1/2 cup buttermilk
1/2 cup butter
1 egg
1/2 cup sugar
2 tsp. salt
1/2 tsp. nutmeg
1 pkg active dry yeast
1/4 cup warm water if blooming the yeast
4 cups of AP flour to start, adding more as needed to make velvety dough.
1 cup of dried fruit cut into small pieces

Ingredients and directions for rivels (Crumb topping)
Mix together 1/2 cup sugar, 1/2 cup flour and 4 tbs. butter softened until the ingredients are completely combined and look like fine crumbs. (I added the ingredients to a small food processor and processed it until small clumps formed. These rivals were much finer than the ones made by hand.)

Directions:
Put the mashed potatoes into the bowl of a stand mixer. Using a mixing paddle beat in the butter, then the egg and a mixture of sugar, salt and nutmeg. Beat until fluffy. Bloom the yeast in warm water.
Beat the yeast into the potato mixture. Switch to a dough hook and alternately add the flour and milk beating well after each addition. If necessary add more flour to make a soft dough. Knead the dough on a floured surface until smooth and satiny. Spread the dough into a flat square and cover the square with the dried fruit then fold the dough over the fruit and knead until the fruit is well distributed. Put the dough into a greased bowl. Grease the top of the dough, cover and let rise in a warm place until doubled.

Punch down the dough. Since the recipe makes two cakes split the dough into quarters so the rivals can be put into the middle of each cake. Then put 1/4 of the dough in the bottom of the 8 inch pan (#1). Sprinkle on 1/4 of the rivels (#2) and top that layer with another quarter of dough (#3). Do this for both cakes. Brush the tops with melted butter and cover both with the remaining rivels. Let the cakes rise in a warm place for about 30 to 40 minutes while the oven preheats. (This is a variation from the original PA Dutch recipe. It does not call for the second rise; the cakes are cooked immediately after they are put in the pan. I’ve made fastnacht cakes both ways and think the cake made with a second rise is much better. It comes out much thicker and has a lovely tender texture.) Cook in a 400 degree oven for about 20 minutes or until golden brown. Picture (#4) shows the cake as it came out of the oven.


This is a good moist “cake” with a pleasing tender texture. (Although it is known as a cake, that might not be the most accurate nomenclature. It is not a cake in the traditional sense. It is more a mix of a cake and a very soft bread). It is only very slightly sweet. The sweet potato flavor is very subtle but does come through. The middle layer of rivels made with the food processor were much finer than those made by hand and maybe as a result almost disappeared. Nonetheless they added a layer of moist texture. The dried fruit really added and provided a little additional burst of flavor and sweetness. The cooks who wrote the original recipe that appeared in the 1940’s cookbook my wife uses, may not recognize this as the fastnacht cake they knew but as far as I am concerned this is the best version my wife has made yet.

Tuesday, April 26, 2022

Potato mozzarella croquet モッツァレラチーズいりコロッケ

My wife was inspired to make these cheese croquets after viewing a similar dish on Webspoon (Youtube). Of course, ingredients and directions are hard to remember since there appears to be no written recipes for Webspoon. This recipe (as shown on the web site) was mashed potatoes with some starch, salt and grated parmesan cheese added. Mix and make discs, place mozzarella  cheese on one disc and cover it with another to make cheese enclosed by potato and fry it. My wife decided to make this dish and as usual took the web recipe as advisory. For the potatoes, she used her gnocchi recipe. The picture below shows the result; crusty outside, soft creamy potato with melted mozzarella cheese oozing out. This is a good version. As usual, I will ask my wife to take over. 


Ingredients:
16 oz. of mashed potatoes* (3 cups) 
4 oz. of AP flour (3/4 cup)
1 egg
1 tsp. salt

Low-moisture while cow’s milk Mozzarella cheese

*The mashed potatoes are made from russet potatoes wrapped in aluminum foil cooked in the Weber when we cook either pork or chicken. My wife then removes the potato skins, mashes them in a bowl and adds about 1/2 stick of butter, 1/4 cup cream cheese and chives, salt and drippings from barbecued meat. (These are pretty luscious mashed potatoes as is, especially wrapped in crispy chicken skin.)

Directions:
Put the potatoes through a potato ricer to remove any remaining clumps not previously mashed. Add the remaining ingredients and mix until it forms a dough. (Shown in the bowl in #1. You may need to add more flour until the dough forms.) Form a patty and put it on a parchment paper covered cookie sheet. Put the cheese (also shown in the lower right in #1) on the patty. Take another clump of potato mixture put it on top of the cheese covered patty and seal the edges. After the patties are formed dredge them in flour (#2). Fry the patties in peanut oil (#3) until they are golden brown (#4). 


These are a great way to eat potatoes. The potatoes themselves have great flavor from the cream cheese, butter and barbecue meat drippings. They have a nice crispy outside texture and a soft creamy interior. Also, there is no way to go wrong with the added feature of cheese oozing out. They also crisp up nicely in the toaster oven. 

Wednesday, March 13, 2024

“Roman” Gnocchi ローマンニョキ

We like gnocchi and every time we cook chicken or pork on the Weber grill, we also cook potatoes and my wife often makes gnocchi from any potatoes left over. She cooks the gnocchi and then freezes them. To serve we heat them up in the toaster oven. Recently, she saw a recipe for “Roman” gnocchi on the Washington post web site and decided she had to make it. This gnocchi is not made with potato but, instead, semolina flour. Also, instead of boiling and then pan frying it is baked (or more accurately oven fried in melted butter). We served this one evening as a part of multiple small “otoshi” snacks. It has nice crust with soft inside with buttery flavor quite different from traditional gnocchi.


The original recipe came from Washington Post.

Ingredients:
8 tablespoons (1 stick) unsalted butter, cut into small pieces and divided, plus more for greasing the dish
4 cups whole milk
1/4 teaspoon fine salt, plus more to taste
1 1/2 cups (9 ounces) semolina, preferably coarse
2 large egg yolks
3 ounces pecorino Romano cheese, finely grated and divided (1 1/2 lightly packed cups) (She used parmegiano reggiano
Freshly ground black pepper

Although I made the gnocchi according to the original recipe these are the changes I would make to the original recipe if I made it again. I would halve the recipe. I would significantly reduce the butter because under the original recipe the gnocchi was swimming in butter when it came out of the oven. I would cook the semolina in the milk slightly differently as described below.

Ingredients: (1/2 recipe)
2 tablespoons unsalted butter, cut into small pieces and divided, plus more for greasing the dish
2 cups whole milk
1/8 teaspoon fine salt, plus more to taste
3/4 cups semolina, preferably coarse
1 large egg yolks
3/4 cup ounces finely grated cheese finely grated and divided (1 1/2 lightly packed cups)
Freshly ground black pepper

Directions:
Position a rack in the middle of the oven and preheat to 400 degrees.
Use a little butter to grease a 9-by-13-inch baking dish (if using the original recipe, the smaller baking dish if using the changed recipe).

In a medium saucepan over medium-high heat, combine the milk and salt. Stirring and scraping the bottom of the pot with a rubber spatula to prevent scorching, bring to a simmer and reduce the heat to medium-low to prevent a boil-over.

Then sprinkle in the semolina, stirring constantly as you do. Cook, stirring, until the mixture is so thick that the spatula can stand in the middle without falling over, 2 to 3 minutes. (Although this is what the recipe suggests when I did it the semolina hit the hot liquid and immediately formed lumps. So in the future I suggest adding the semolina to the cool liquid and then gently heating it up. This way the semolina can be evenly distributed in the liquid before it starts to firm up when heated.)

Let cool for a few minutes, then add half of the butter (4 tablespoons) and 1/2 cup of the cheese, stirring until the butter and cheese melt and the mixture is thoroughly combined. Add the egg yolks, one at a time, and stir until incorporated. The mixture should be the texture of thick mashed potatoes.

Scrape the semolina mixture onto a large sheet pan and use wet hands, a damp knife or offset spatula to spread it out evenly, and pat the top to smooth it. (It should be about 1/2 inch thick, but it’s okay if it’s a little thicker.) Let cool to room temperature, about 5 minutes.

Fill a small bowl with water. Dip a two-inch cookie cutter, biscuit cutter or drinking glass in the water and use it to stamp out rounds, re- dipping frequently, or use a knife to cut it into two-inch squares. If cutting into rounds, mush together and spread out the scraps again and keep cutting, repeating until all of the mixture is used.

Arrange the pieces in overlapping rows, like shingles, in the buttered baking dish (#2). Sprinkle them with the remaining cheese, and top with the remaining pieces of butter.

Bake for 15 to 20 minutes, or until the cheese is browned in spots (#3). Grind a generous amount of pepper on top and serve warm.


This is very different from the gnocchi made with potatoes but it tasted pretty good and has real potential with a few changes. The outside was crispy and the inside soft. It had a pleasing mild flavor of the cheese. It may not be good for you since it has lots of cheese, egg yolks and then oven fried in melted butter. My wife thinks she could cut down on the butter next time. Although the gnocchi was litterly swimming in butter when it came out of the oven the melted butter in the baking dish was completely absorbed as it cooled.

Sunday, December 26, 2010

Baked mashed potato and celeriac with Parmesan cheese crust and stuffing マシュドポテトとセロリの根のパルメザンチーズオーブン焼きとスタッフイング

This is is a good side dish for any special occasion like Thanksgiving or Christmas but the leftovers can be perfect as a small drinking dish. This is a rather unique mashed potato dish since it includes a root bulb of a special type of celery plant called "celeriac" and has a nice crust of Parmesan cheese on the top.

We served this as a "drinking snack" along with my wife's holiday stuffing and bacon (which was placed over the stuffing when it was baked in a casserole. The bacon was further crisped in a frying pan before serving--decadent).

I learned this recipe from a friend who served this when we were visiting them a long time ago. I do not know where the original recipe came from. Making this dish is relativly easy except that you need celeriac (below left) which appears to be available in Japan, although I have never seen it there while I lived in Japan. After peeling off all the rootlets and skin, you get the object shown on the right.

I use white potatoes (6 medium) but Yukon gold is another kind you may like to use. I peel and cut the potatoes in quarters, parboil and rinse them in running cold water. This removes the excess starch and prevents the mashed potato from becoming too gooey or gummy (skip this step if you like your mashed potatoes gooey and gummy). I dice the celeriac (1/2 inch dice) and cook it with the potatoes in salted water for 20-30 minutes or until both are soft and mashable. I drain and mash them together. I season the mixture with salt. I could use cream or butter or both but I add creme fraiche (2-3 tbs) and mix. I put the mashed potato mixture in a shallow buttered baking dish (I used Pyrex as seen below) and smooth the top using a rubber (silicon) spatula. I grate Parmesiano Reggiano on it. You grate enough cheese to cover the surface of the potato so that it will make a nice crust. Broil it for 5-10 minutes until the cheese melt and developed brown crust (below). Let it stand for 5 minutes so that the parmesan cheese will harden to make a nice crust.

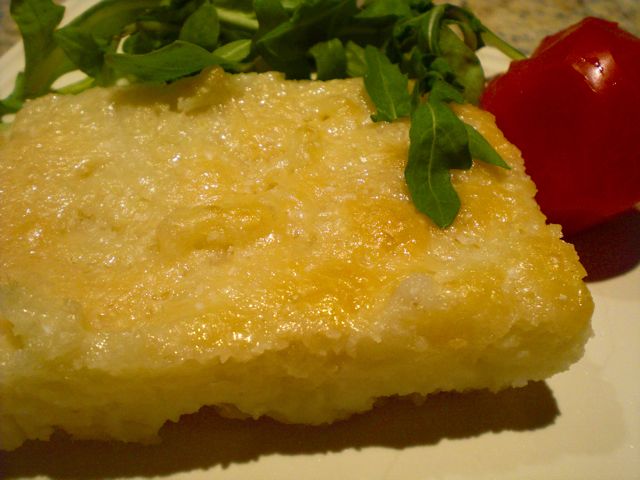
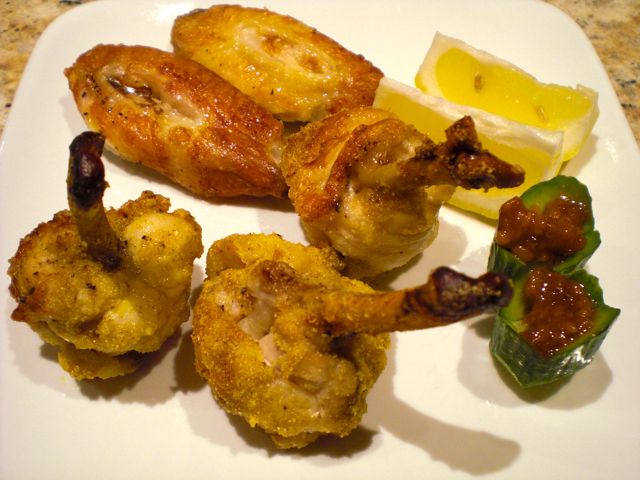
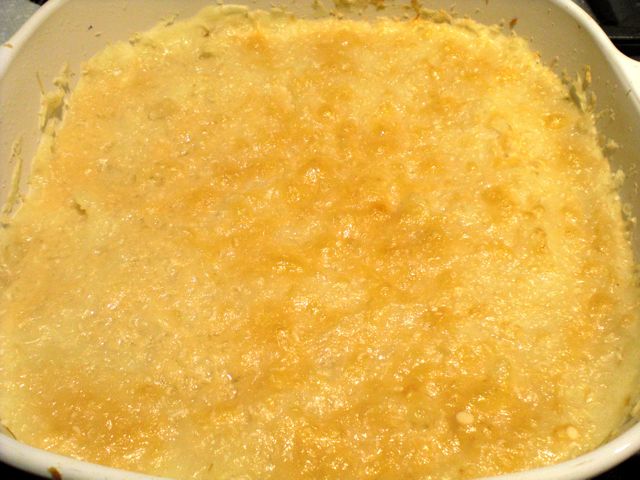
Using a small metal spatula, I cut out rectangles, lift, and serve. The mashed celeriac has a very intense celery-like flavor and the same texture of mashed potatoes. In addition, the dish has the crust of Parmesan cheese.  This combination of flavors and texture is much more interesting than usual mashed potatoes. You can heat up the leftovers in a toaster oven with a good results (actually it comes out even better). This picture makes the dish look bland and does not give a clue to the layers of flavors it contains. 
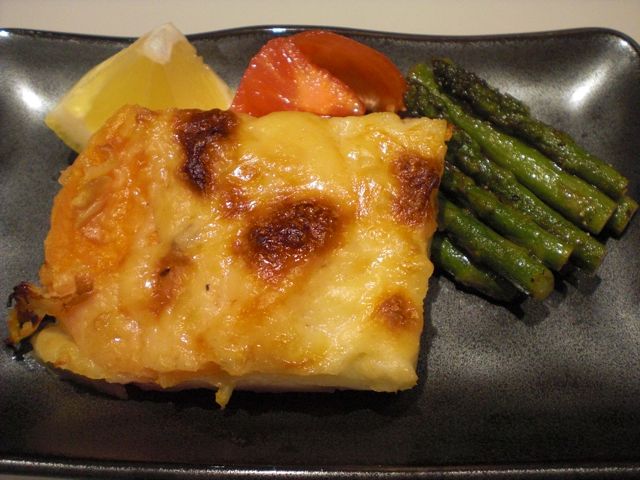
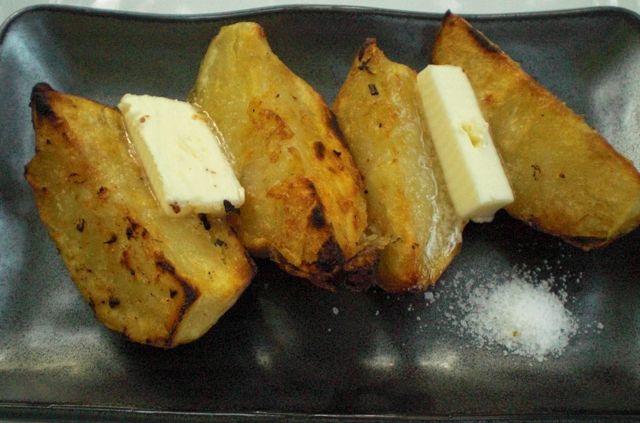
The stuffing was made by my wife and is baked, not in the cavities of a poor fowl, but in a separate baking dish. (As far as she is concerned the turkey is strictly a stuffing delivery system so she decided to dispense with the turkey and go straight to the stuffing). She sautés chopped celery, onion, and apple (cut a bit larger that the onion and cerely), season with salt and pepper. The sauteed veggies get mixed into herbed bread stuffing (she likes Peperidge Farm brand but you could use your own stale bread and herb mixture if you like.) She adds toasted and chopped walnuts and raisin as well. She then adds enough but not too much chicken broth with melted butter (in several stages allowing the broth to absorb. She uses low salt, no-fat Swanson chicken broth, which becomes fatty again with butter). Since the stuffing is baked separately from meat she puts strips of bacon on top to add flavor and keep the stuffing from drying out. She bakes it in a 350F oven for 30 minutes. When the stuffing comes out she finishes crisping the bacon in a frying pan.  

These leftovers work very well with any drink, albeit carb-heavy. We had Astrales 2007 from Ribera Del Duero, 100% Tempranillo, which is one of our favorites, with this. 

Friday, November 27, 2009

Potatoe gratiné square with asparagus ポテトグラタン、アスパラ添え

My wife made this potato gratin dish (I helped with cutting potatoes and making the Béchamel  sauce) as a side when we made a roasted pork tenderloin with mustard, ginger, and garlic marinade. The original recipe for the potato dish is from "Cooking light" but I do not think this is quite "light" cooking. I just used the leftover potato gratin as a part of Izakaya course menu item.

For the potato gratin, peel and slice both potatoes and sweet potatoes (2 medium, each) in 1/4 inch in thickness. Boil 4-5 minutes in salted water until just cooked. For Béchamel sauce, saute one strip of bacon finely cut until the fat is rendered and the bacon gets crispy. Take out the bacon and set aside. Add 1 tbs of butter and saute chopped onion (one medium) for 1-2 minutes (do not brown) and add 1/3 cup of all purpose flour. Keep sauteing so that all the onion pieces are coated with flour (using finely chopped onion is the secret of making Béchamel with a small amount of fat since each piece of onion holds flour on its surface and prevents the flour from clumping). Add 2 cups of low-fat (I used 1%) milk at once and stir on medium low heat. Add back the bacon. As the liquid heats up, it thickens. Add more milk if it is too thick. Stir in 1/2 cup of grated Parmigiano-Reggiano cheese and adjust the seasoning (salt and pepper).  The final product should be rather loose (if needed, add more milk). Grease a rectangular (9x13 inch) pyrex baking dish with light olive oil. Make alterate layers of the cooked potatoes and sweet potatoes slices and pour the Béchamel cheese (Mornay) sauce over the potatoes to cover. Bake at 370F for 45 minutes.

For this serving, cut small squares of the leftover potato gratin and put it in toaster oven at 400F for 5 minutes or until throughly heated. Saute green asparagus (pre boiled) in browned melted butter and season (salt and pepper). We used this as a part of the Izakaya course for our guests. Although this is not Japanese dish it went very well with the rest of the Japanese dishes we served. Such a comfort food.

Saturday, July 26, 2014

Baked Curry flavored wings カレー味手羽のオーブン焼き

Although this is the most common way we cook chicken wings, I was surprised to find that I never posted this particular dish. This is my answer to Buffalo wings. It is baked instead of deep fried and seasoned with curry powder instead of hot sauce. My secrets are:  1) the use of a high temperature convection oven (most of the time we use our trusty toaster oven in convection mode at 450F), 2) the addition of flour to the seasoning and 3) the thorough coating of the wings with the seasoning.

Here is today's batch. This is not one of my best efforts but it is good enough with crispy skin and juicy meat.


We especially like wings as oppose to drumetts.


Ingredients:

Chicken wings: I used 6 wings, wing tips removed and wing and drumetts separated.
Dry rub*: This is a mixture of flour (AP) 1/2 cup, curry powder 1 tbs (this one is called "sweet" curry powder from Whole Foods, you can add more or use spicier curry powder), salt (1 tsp) and black pepper (1 tsp). I mixed the spices and placed the mixture in a Ziploc bag large enough to hold the wings. I then placed the wings and drumetts in the bag to coat them well (my version of "shake-and-bake").


* I usually just "eye ball" the ingredients for the spice mixture and place them directly in the Ziploc bag.

I placed these seasoned wings and drumetts on a baking sheet. (I cover the sheet with aluminum foil and either olive oil or Pam spray to prevent sticking). I placed it in a preheated 450F (highest setting) toaster oven in convection mode for 30 minutes turning after 15 minutes. The idea here is that the wings oven fry in their own fat. The flour helps make a nice crust on the surface. The only caution is that the smell of curry powder may permeate the house. My wife insists that I move the toaster oven under the hood vent for the stove while we cook this dish.

The result is very satisfactory. We eat it like Buffalo wings with a blue cheese dip made of blue cheese dressing and greek yogurt. This evening we had this with potato salad and coleslaw that I had made the previous weekend. We definitely like this better than the ones I made using sous vide. The results are very similar but this is much more simple to prepare.

Sunday, July 4, 2010

Grilled potato with butter じゃがバタ

Hokkaido 北海道 where I am originally from is the Northernmost island of Japan and the climate is more like New England.  Many cold weather crops and non-traditional Japanese (i.e Western) crops are produced. Two of these are potatoes and corn. One potato cultivar "May Queen" is particularly famous in Hokkaido. We do not see this variety in North America. In addition, Hokkaido is also different from the rest of Japan in that dairy farming is a major agricultural activity. As such, both potatoes (called "jagaimo" ジャガイモ) and butter are speciality products in Hokkaido. The combination is simply called "jagabata" ジャガバタ in which the whole potato is cooked (boiled, steamed, microwaved) and eaten with butter. People in the U.S. may think 'nothing unusual about that' but in Japan, it is, at least it was, a rather exotic local food. In the downtown park in Sapporo 札幌, called "Odori koen" 大通公園, during the tourist season which starts in the early summer, you can buy "jagabata" and grilled corn on the cob or "yaki toukibi" 焼きとうきび from food carts. Since the crop is not harvested until July, the corn and potatoes available in the early tourist season are from the previous year. Besides being a favorite tourist snack, "Jagabata" has now become a popular Izakaya food in Hokkaido and elsewhere. In terms of salty seasonings for your potato, you usually have three choices; salt, soy sauce, or shiokara 塩 辛 (squid and guts), for which  "Hakodate" 函館, the Southernmost large port city of Hokkaido, is famous. Our version of "jagabata" is a cross between this and French fries and modeled after "jagabata" at Tako Grill and served with salt. Until you add butter, this is a much healthier food than French fries but you have to have the butter.

I first microwaved whole white potatoes (skin on, washed, with the "eyes" removed) in a microwave oven-proof vessel with a lid on until I can insert a bamboo skewer easily to the center. Be careful not to over zap it. I cut it into quarters. You could do this step a few hours or, maybe, a day ahead. Just grill the potato on the charcoal fire until all the surfaces are nicely brown/crunchy and heated through (about 5 minutes). Add pats of butter and let them melt, dip it in salt and enjoy. Extremely simple but satisfying dish.....!!MM!!!MmmmmmmmMMmmMMMM!!. (hope Jon did not trade mark this).

Tuesday, August 31, 2010

Roasted pork tenderloin with rosemary ポークテンダーロインのオーブン焼き

We cook this very often and we use the leftovers for sandwiches and other dishes. We cook this in several different ways depending on the situation, although the initial preparation is the same. I use packaged pork tenderloin (usually two in the package) and season it with rosemary, salt and black pepper. We cook this one of three ways: 1) In a low-temperature oven (350F) for 1 hour with other vegetables (sweet potato, onion, garlic-clove separated but with skin still on, carrot etc. coated with olive oil, 2) Seared first in a frying pan and finished in a 400F oven, 3) Using a Weber grill. The end products are slightly different but all are good in their own way.
Preparation: After removing the silver skin and the ends (tail and head) of the tenderloins (I use these cut off portions for other pork dishes), you will have two nice cylinders with an even diameter throughout the length of the loins. I finely chop fresh rosemary (2 tbs) and mix it with olive oil (4 tbs) and coat the surface of the meat generously and season it with salt and freshly cracked black pepper. This time I used the method #2 above. I added olive oil (1 tbs) to a frying pan on a medium high flame and seared the surface all round by turning 90 degree once one side is nicely browned. Then I put it in a 400F preheated oven for about 10 minutes or until internal temperature reads 145F at the center of the loin. I remove the meat and keep it warm on a plate under a tent of aluminum foil.
Sauce: I made a red wine reduction with a sprig of rosemary in it ahead of time and used it on the pork. I made this reduction since I had leftover red wine (called "Cheap Red Wine"). I reduced it to 1/4 of the original volume with a sprig of fresh rosemary in it.

I removed the excess oil from the frying pan in which the pork was cooked using a paper towel On a medium flame, I deglazed the brown bits from the bottom of the pan ("fond") with a 1-2 tsp of red wine vinegar and let cook down until it was almost dry. Then I added the rosemary flavored red wine reduction (4 tbs). I also added any juices that may have accumulated on the plate on which the pork was resting.  I seasoned the sauce with a bit of sugar, salt and pepper. I finished the sauce with several pats of butter. Another sauce that we use, especially if the meat is cooked in one of the other two ways and there is no "fond" to deglaze, is a simply reduced balsamic vinegar.

Since I had leftover fennel (1/3 bulb), red onion (1/2 medium), and sweet potato (1/3, medium), I just cut them up in equal sized strips and sauteed them in olive oil with salt and pepper and placed the frying pan in the same oven to finish as an accompaniment. The "presentation" of this dish, as shown in the picture, could stand some improvement but it did taste good.

Wednesday, August 18, 2021

Not-fried "Kara-age" fried chicken 揚げない唐揚げ

My wife really likes the chicken kara-age I make. I have not made it for some time. One weekend, we got chicken thighs specifically to make this dish but somehow I didn’t get around to it over the weekend. I just prepared the chicken (removed the bone and cut the meat into bite sized pieces). I marinated it in soy sauce, mirin, sake, sesame oil, grated garlic and ginger in a Ziploc bag. I thought, maybe, I could fry it up one weekday evening. But I did not have the energy or time to do that. So, instead, I baked it in our toaster oven on convection mode. We have baked such dishes as chicken wings before in the toaster oven instead of frying them. This version of kara-age was not as good as deep fried but good enough. I served this as an appetizer with cucumber and tomato salad.


Ingredients:
4 bone-in, skin-on chicken thighs, excess fat removed and bone removed, cut into bite sized pieces with some skin on.
1/4 cup "Katakuri-ko" potato starch

Marinade:
4 tbs soy sauce
2 tbs sake
2 tbs mirin
1/2 tsp grated garlic (from tube)
1/2 tsp grated ginger (from tube)
2 tsp dark sesame oil
Hot sauce such as Sriracha to taste

Directions:
Place the marinade and the chicken in a Ziploc bag, massage, remove the air, seal and let it marinate overnight in the refrigerator.
Remove the chicken, blot off the excess marinade and dredge with the potato starch shaking off excess starch.
Preheat the toaster oven to 380F (I could have used a higher temperature like 400F, but I was afraid it might burn since the marinade contained mirin).
I covered the baking tray with aluminum foil  (still the chicken stuck, I could have used parchment paper), lightly oiled, placed the chicken and baked for 25-30 minutes (shorter with higher temp may have been better).


This was not bad but it may have been better if I could have cooked it at a higher temperature. I didn’t because of the sugar in the mirin, it could easily burn. Maybe, next time, I may just use soy sauce and  sake in the marinade omitting the mirin.

In any case, this was good especially weekday night and it heated up nicely in the toaster oven in the toasting mode next day.

Saturday, March 16, 2013

Hash brown potato and egg casserole ハッシュブラウン キャセロール

This was yet another breakfast dish made by my wife. She saw this recipe on line. The original recipe used packaged frozen "hash brown" potatoes and "chicken sausage". In general we don’t stock premade frozen foods but we always have potatoes so we replaced the frozen hash browns with finely julienned potato. We also replaced the sausage with leftover roasted pork filet. As you can see below, the exposed portion of potatoes got “high done”—the recipe requires some further refinement. This was served with sweet onion, cucumber salad dressed in rice vinegar and Greek yogurt and my wife's whole wheat dill rolls.

Using a Japanese mandolin (Benriner), I finely julienned white potatoes. I tossed them in about 1 tbs. of olive oil to coat and added salt and pepper. Then I put them in two small ramekins (#1). We baked this blank in a 400F toaster (convection) oven for 10 minutes (#2).(Next time we need to lower the temperature). Meanwhile, my wife mixed together two eggs,small cubes of roasted pork, and cheddar cheese. We poured this egg mixture into the nests of potato and baked for another 10 minutes or until the egg was cooked (#4).

This was a quite nice small breakfast. If we can prevent the edges of the potato from getting overcooked, this will be perfect.

Friday, July 12, 2013

Yakitori; three kinds 焼き鳥3種類

On the weekend, I had a package of chicken thighs. I was afraid it would go bad soon. Although we could not grill outside because of the pesky mosquitoes, I decided to do "Yakitori" 焼き鳥 in the toaster oven. With some influences from eating Yakitori at Torishin 鳥心 in New York. I decided to make three different sauces/seasonings.

The picture below is what I cooked.  The closest skewer is Yuzu-koshou and Jalapeño pepper, the middle is sweet miso with "shiso" しそ perilla and the furthermost with onion is with a "tare" sauce.
  
I. "Tare" or "Tsume" sauce たれ or つめ (right in the picture below).
Many "Yakitori" places have their secret sauce which has been in use for many years.  The sauce is maintained by straining the old sauce, adding a new batch and cooking it again everyday.  Dipping grilled chicken into it everyday for many years, of course adds to the flavors. Home cooks could not possibly match this.
Another similar sauce is called  "Tsume" which is a short for “Tsume-dare” つめだれ. “Tsume” comes from the word  "nitsumeru" 煮詰める or to "reduce" by boiling. It is usually used to "paint" some sushi like "anago" 穴子. It is essentially a concentrated ”sweet and salty” or “ama-kara” 甘辛 sauce made from soy sauce (mirin, sake) and sugar with some savory elements (classically, for anago, I was told, grilled "anago" bones were used. Some recipes use pre-made “oyster sauce”).
Mine started out as the simmering liquid for "Vermillion snapper". After  the fish was cooked and removed,  the remaining and reduced seasoning liquid totally congealed in the refrigerator because of the protein components from the fish. I diluted this using “dashi broth” and made a simmered tofu or “Niyakko” 煮奴. After making this dish, what remained of the simmering liquid was kept in the refrigerator. This was the base of the sauce I used here. I tasted the sauce and added more soy sauce, mirin and reduced it to 1/3. It became slightly thick and tasted salty and sweet (not as sweet as some Yakitori “tare” sauce) with good savory “umami” flavors (right in the picture below). Of course, you can make this sauce simply by mixing soy sauce, mirin or sugar and thickening it with a potato starch slurry.
2. Sweet miso with perilla 大葉入り甘味噌 (left front in the picture above).
This is made with miso (2tbs), green perilla (2 large leaves finely chopped), and mirin (about 2 tbs or until the consistency of the miso reaches a saucy stage).  I thought of adding a bit of dark sesame oil but refrained.
3. Yuzu-koshou and Jalapeño pepper 柚子胡椒ハロペニョ (left back in the picture above).
I made the least amount since this was rather spicy. I finely chopped up half a Jalapeño pepper (1/2, seeded and deveined) and mixed with yuzu-koshou (1 tbs) and mixed in mirin (1 tbs). I was thinking of adding lemon zest (micrograted) but forgot to do it.
4. Chicken
I boned and skinned 6 thighs (3 were large but three were small). I cut them into a bite size chunks. I just made 4 skewers just from the chicken and two with sweet onion (left in the picture below).
Since I had to use more skewers than usual for cooking in the toaster oven, I also had to use a larger baking pan than usual but the skewers could not reach both rims of the pan. So I had to improvise. I added another metal skewer in the back so that the chicken skewers would not sit in the juice in the bottom of the baking tray. I used the broil function of my toaster oven which turns on the upper elements to highest power. I cooked the chicken without sauce (seasoned only with salt) turning once after 8 minutes until the chicken meat was almost completely cooked. I then smeared two skewers each with one of the three sauces. I then grilled each side for one to 2 more minutes being careful not burn it. (In the picture below, from the right, tare, miso and Yuzu-koshou).
For oven grilled Yakitori, they were not bad at all. The yuzu-koshou ones were rather spicy but not too spicy (at least for me). My wife liked the miso flavor the best. Both agreed “tare” was rather mundane. We had this with Dassai 50 Daiginjou 獺祭50大吟醸. This sake may have been a bit to gentle and delicate for yakitori.
*Digression alert:
I was wondering about the name of this sake "Dassai" for some time. While I was drinking this sake, I read the label which explained the origin of this name. I supplemented this with some more Google search results. The first letter 獺 means "river otter" or "kawa-uso". The second letter 祭 means "festival". The combined word "Dassai" 獺祭 or "Otter festival" was based on the observation that after catching several fish, the otter will line them up on the river bank before eating them as though making an offering of the fish to it's ancestors. The word "Festival" obviously referred to a commemoration of ancestors such in the "obon" festival. The poet 李商隠 Li Shangyin in the late "Tang" 唐 dynasty called himself 獺祭魚 meaning "fish of the otter festival" equating himself to the fish caught by the otter as he sat among all the books and scrolls of his predecessors lined up around him to give inspiration for new poems. Later the Japanese poet 正岡子規 "Shiki Masaoka" took this name as well and called himself 獺祭書店主人 meaning "master of the otter festival book store". The sake brewery which makes "Dassai" is called "Asahi Sake brewer" 旭酒造 which is located in a small town called 獺越(おそごえ)"osogoe" in Yamaguchi prefecture 山口県. Taking one letter "otter" 獺 from the name of the place, they named their sake 獺祭 or "otter festival".

Saturday, December 6, 2014

Samosa with pork 豚肉入りサモサ

On a recent weekend we had dinner guests and my wife decide to serve two different Indian-style curries with rice. As an appetizer, in keeping with the “curry” theme, I proposed making samosa. Including pork is not traditional, but I had left over baked pork tenderloin so I minced it up and added it to the filling. Instead of making the skin from scratch we took a “short cut” and used store bought "egg roll" wraps which worked well.


Here are the samosa hot out of the oil but when we served them to our guests we re-heated them in the toaster oven, which actually made the skin crispier and better.


Ingredients: (this made about 30 samosas with a fair amount of stuffing leftover.)
Potato: white potato, 4 large mashed, boiled whole until done, skin removed while hot.
Onion: 1 medium, finely chopped.
Spices:
Ginger, 1 Tbs. finely chopped fresh
Jalapeno pepper, one,  finely chopped
3 tbs finely chopped cilantro
1 1/2 tsp salt
1 tsp ground coriander
1 tsp garam masara,
1 tsp ground roasted cumin seeds
1/4 tsp cayenne pepper
2 tbs lemon juice
Pork:
I had previously cooked the pork tenderloin. I used a dry rub of smoked Spanish paprika, cumin, cinnamon, nutmeg, black pepper and salt, and baked it at 350F for 30 minutes). I just chopped one tenderloin (#1 below). This is totally optional.
Egg roll skin (one package) (see #5 below).

My wife first sautéed the onion in vegetable oil (1 tbs) until the edges got slightly brown and the added the spice mixture to bloom (#2), The minced pork was added and further sautéed (#3), If using uncooked ground meat, it may have to be cook in a separate frying pan and then combined with the spices. #3 The meat/spice mixture was mixed into the mashed potatoes. I tasted the mixture and it was highly spiced and seasoned (#4).


samosa composit

as a wrapper, I used egg roll wraps (skin) as seen in #5 above. This is almost square but one end is slightly longer (#6). I cut this in half (I layered several of them) using a sharp long knife. I then removed the narrower strips from each halves so that resulting sheets have a proportion of 1:4 (#7).

The diagram on the left is from http://masalanmagic.blogspot.com/2012/02/patti-samosa-folding-techniques.html. There are many YouTube videos you can watch as well.

We made about 30 of these with the loose ends of the egg roll wraps secured by painting them with a "glue" made of water and potato starch or flour (#8).

I deep fried them in 320-340F vegetable oil for several minutes per side until golden (#9). I drained them first on a metal cooling rack #9 with a cookie sheet underneath) and then on sheets of paper towel (#10).

These reheated very well in the toaster oven (turning once during the reheating), we used the highest "toast" mode. They were actually more crisp after the reheating.

As you know "fried" starch tastes good. The egg roll wraps worked very well and after reheating they tasted even better than when they just came out of the oil. The stuffing was very hot (temperature) and flavorful but not too "hot" (spicy). This was great hit among our guests.

Friday, September 1, 2017

Kamo eggplant with pork miso stuffing 賀茂茄子の肉味噌詰め

The other day, I found a round Japanese eggplant at our Japanese grocery store. This was either Kamo-nasu 加茂茄子 or Mizu-nasu 水茄子  but it had no label. I asked the cashier and was told it was "Kamo-nasu". Kamo-nasu is often used in Kyoto cuisine 京都料理 and has a nice firm flesh. Dengaku 田楽 is the most common way to serve this vegetable. (While I am writing this I realized I never posted eggplant "dengaku". When I made this, I thought I must have already posted the usual miso-dengaku and decided to make this variation using pork meat).


It is miso flavored but I also added ground pork and white sesame paste. I garnished it with roasted white sesame seeds.


I served this one evening with pork belly "Kakuni" 豚の角煮 I made recently.


Ingredients:
One Kamo-nasu (#1) (or you can use regular American eggplant), cut into four disks after removing the skin in an alternate pattern. I removed some of the flesh of the eggplant to make space for the stuffing (#2).
Light olive oil, as need, to bake the eggplant (or you could deep fry).

For stuffing:
1/4 lb of ground pork (I used trimming from pork tenderloins and hand chopped)
1/4 tsp finely chopped ginger
1/4 tsp finely chopped garlic
2 tbs miso (I used white miso)
2 tbs mirin
2 tbs sake
1 tsp roasted white sesame paste "nerigoma" 練りゴマ.
1/2 tsp of dark roasted sesame oil
1 tsp vegetable oil
Finely chopped flesh removed from the eggplant as discussed above.
1 tsp potato starch slurry (potato starch and sake in equal amount)


Directions:
For eggplant,
I decided to bake rather than either cook in a frying pan with oil or deep fry.
I lined the baking sheet with aluminum foil and coated with the olive oil.
I painted all the surfaces of the eggplant slices with the oil and baked at 350F for 30 minutes in the toaster oven (convection mode) (#3 and 4 above).

For stuffing:
In a non-stick frying pan, I added the vegetable and sesame oil on low flame and sautéed the ginger and garlic until fragrant. I added the finely diced flesh of eggplant, pork and turned up the flame and cooked the meat until cooked and separated.
I first loosened the miso with sake and mirin by adding the liquid in increments while mixing in a separate container. I added the sugar and mixed well. (If the consistency was not liquid enough, add water or more sake).
I added the sauce into the cooked meat mixture and cooked until the liquid was reduced in half about 10 minutes.
I added the sesame paste and a splash of sesame oil and mixed well.
I tasted the stuffing (you can adjust sweetness by adding more sugar or mirin at this point).
I finished with the potato starch slurry to thicken the stuffing. Make sure to cook for about one minute before cutting off the flame.

Assembly:
I kept both the baked eggplant and the stuffing in the refrigerator until just before serving.
I layered the miso-pork stuffing on the top of the eggplant slices and placed in a preheated 350F toaster oven for 15 minutes or until warmed up completely.
I garnished with sesame seeds and served hot.

This was very good. The eggplant was soft and sweet which was well complemented by the ginger miso and pork flavors of the stuffing. The only problem was the skin of the eggplant--it was tough. I could probably leave the skin alone rather than making an alternate peeling pattern since we had to remove the skin to eat the eggplant anyway. This combination of the pork belly dish and the miso-pork stuffing dish went very well together.

Sunday, December 31, 2023

Classic Pumpernickel Bread 伝統的パンパニッケル パン

We used to get Pumpernickel boule at Whole Foods. We used it for certain sandwiches such as beef tongue and Lebanon Bologna. We did not see Pumpernickel boule or Russian rye bread at Whole Foods for some time and my wife asked if they had any. The answer was that they are not making them any more.  When we asked, “Why” they didn’t give us an answer.  (Subsequently, we went to two other of our local grocery stores and found they didn’t have any rye breads either). So since we had recently gotten pumpernickel flour from King Arthur we resorted to making pumpernickel bread ourselves. This time I volunteered. It was by far the most convoluted bread I’ve ever made. The recipe also came from King Arthur and is titled as “classic” Pumpernickel. The recipe also warned that this bread was dense and suggested slicing it thinly. I decided to make this as a baseline. Indeed this is dense but very flavorful bread.


Next day when the loaf was completely cooled, I sliced it. It is very dense. As you can see below. I sliced it thinly and tasted. It has lots of flavors and the inside is moist.


The recipe is from King Authur. I followed the recipe weighing the ingredients. Exception was  mashed potato. Since we found that all our potatoes were sprouted, we used Japanese sweet potato instead. Some of the instructions appear to be missing the details. Maybe this recipe was meant for an experienced baker. (With common baker’s knowledge-CBK- I added a few extra steps and details in notes to myself).

Ingredients
1 1/2 cups (340g) water
1/2 cup (71g) yellow cornmeal
1/4 cup (85g) molasses
1 tablespoon butter
1 1/2 teaspoons (9g) table salt
2 teaspoons granulated sugar
2 teaspoons caraway seeds
1 tablespoon unsweetened cocoa, Dutch-process 
2 1/2 teaspoons instant yeast
3 cups (319g) King Arthur Organic Pumpernickel Flour
1 cup (113g) King Arthur Whole Wheat Flour
1 cup (170g) cooked, mashed potatoes

Instructions 
Combine 1 cup of water (the other 1/2 cup was supposed to be used to proof the yeast) * with the cornmeal in a saucepan and cook over low heat until thick, stirring often (about 5 minutes). Remove the pan from heat and add the molasses, butter, salt, sugar, caraway seeds and cocoa powder. Stir to combine and set aside to cool to lukewarm.

*I missed this instruction and used all 1 1/2 cups (or 340 grams) of water for making the cornmeal mixture but since we used “instant yeast” which does not require proofing, this worked out fine.

Add the cornmeal/molasses mixture and mashed potatoes in the bowl of standing mixer fitted with a dough hook.  Stir in the pumpernickel and whole wheat flours. Mix and knead the dough at medium speed for 10 minutes.

*To make the dough ball cling to the dough hook, I had to stop the mixer and push the dough toward the hook a few times and I also added a small amount of additional water.

Transfer the dough to a floured kneading board, quickly knead and make a ball (sticky but very dense dough). Transfer to a greased bowl, turn the dough ball to coat all surfaces. Cover the bowl, place in a 85Felectric proofing box. Let rise until the dough is not quite doubled; about 1 hour.

Shape the dough into a loaf and place in a greased (used butter) 8 1/2" x 4 1/2" loaf pan.

*Although no second rising was suggested, based on (CBK) I did place the loaf pan back in the proofing box and let it rise for 40 minutes (I am not sure this made any difference).

Slash the top*.

*As per instruction I did this but totally not needed. Only time this may make sense is for a decorative purpose after flouring the top of the loaf

Bake in a preheated 360 F oven* for 55 to 65 minutes, until the center measures 200°F when measured with an instant-read thermometer.

*Since I used my convection oven, again based on CBK, I reduced the temperature from the suggested 375F.

Remove from the oven, tip out of the pan, and cool on a rack completely before slicing.

As mentioned, this is a very dense bread but the inside is moist and very flavorful. Thinly sliced and cut into smaller squares, this may be good for making canapé but may not be appropriate to make a full sandwiches. Nonetheless it was extremely flavorful lightly micro-waved to warm it slightly for breakfast. We saw another recipe at the King Authur site called “Pumpernickel boule”. This may be very similar to what we used to get from Whole Foods. We (either my wife or I) will try this recipe next.

Thursday, September 10, 2015

Cornish Game hen tarragon flavor タラゴン風味コーニッシュゲームヘン

This is another padding post. We had the Cornish game hen one evening on Sunday. It appears Cornish game hens are not popular in Japan. I have posted more-than-you-ever wanted-to-know about cornish game hens. The vast majority available here were previously frozen (Tyson being the predominant brand) but rarely you can find some that are non-Tyson and non-frozen. This time, I got one that had not been frozen (Purdue).

We made quite a few varieties of salads on the weekend and I served these salads (bulgur wheat edamame, wheat berry with olives, and potato salad). The Cornish game hen was seasoned with fresh French tarragon (from our herb garden). For greens I also served broccolini, which was blanched and then sautéed  in butter.


One  of the original aims of developing Cornish game hens was to create a bird that was the perfect size for one serving but I served a half a bird per person but even this was, of course, too much for us.


At least, portions of the skin were crispy and somehow it tasted better than its larger brethren. Even the thigh meat was like white meat but juicer.


Preparing Cornish game hen:
Thaw (if frozen) and wash thoroughly inside and out. Using kitchen shears, cut along both sides of the back bone and butter-fly the bird by flattening it on a cutting board pressing on the breast bone using your palm. Using a chef’s knife or any heavy knife, cut through the middle of the breasts (through the sternum or keel bone) to make two halves. Season it with pepper, salt and finely chopped french tarragon.

Cooking:
Preheat the oven to 400F
In a large sauté pan which can hold two halves snugly, I added a small amount of olive oil and placed the chicken halves with the skin side down on medium high heat (placing weight such as a cast iron skillet make skin brown better). I browned the skin 5-6 minutes. I turned the chicken halves over and poured dry sherry (1 tbs) into the pan and put the lid on to steam. After 1 minute  (or less) when the liquid was all gone, I removed the lid and transferred the pan to the preheated oven. When the internal temperature (near the hip joint not touching the bone) reached 165F (about 15 to 20 minutes), I removed the pan from the oven. I let the meat rest for 5-10 minutes.

We like Cornish game hens. They don’t taste gamey in any way. The meat is similar to any other chicken but more succulent and flavorful. It went very well with grain salads.

Thursday, November 25, 2010

Baked cornmeal drumett "tulip" 手羽元チュウリップのコーンミールオーブン焼き

I bought chicken wings over the weekend but we did not use them. I marinated them in sake and kept them in the refrigerator so that they would stay fresh for several more days. Since it was not feasible to grill them over a charcoal fire on a weeknight - not to mention that it is getting too cold and dark to barbecue after we get home, I baked them in the oven to make a Yakitori style dish. I decided to do a slightly more elaborate preparation of the drumetts and made "tulips".

It appears this "tulip" preparation is more popular in Japan than here. First, I cut off the wing tips (discard) and then separate the wings and drumetts. For making a drumett "tulip" (here is a visual aid), just loosen the meat from the bone and nick the skin around the joint so that skin and meat can be pushed down and inverted making a "tulip" shaped meat on one end with bone sticking out as a convenient handle. Naturally, I could have deep fried them but I decided to bake them in the oven instead. To make it slightly more interesting, I added a cornmeal crust.

I just evenly coated the the drumett tulips with light olive oil (using my hands) and season with salt and pepper. I made a mixture of yellow cornmeal and potato starch (about 4:1 ratio) and dredged the chicken. I prepped the wings as usual making a cut beween the bones through the skin and seasoned with salt and pepper. I placed the wings and drumetts on a baking sheet with a raised metal rack (I let the drumett tulips stand up with the meat side down). I baked them in a preheated 450F convection oven (very hot) on the top rack for 20-25 minutes until the surface is golden brown as seen in the above picture.

I served this with wedges of lemon and moromi cucumber. It is a bit healthier than deep frying and the cornmeal flavor is kind of nice. 

Thursday, December 8, 2022

Black bean pumpkin gyoza 黒豆かぼちゃ餃子

My wife wanted a seasonal quesadilla which is composed of pumpkin puree, black beans, cheese, and roasted pork. After enjoying the quesadilla as a lunch, a good amount of the filling remained.  My wife suggested we use it to make gyoza. It sounded a bit like an odd combination for gyoza but I have seen a recipe for gyoza stuffed with potato salad so I complied. I added more finely chopped BBQed pork . Since we ended up with quite a good number of gyoza, we realized we couldn’t possibly eat them all before they went bad so we decided to freeze some. Then the next question was how? In the past I made up some gyoza and without any additional preparation froze them. The shells became brittle and shattered apart. So we decided some degree of preparation was required to keep that from happening again. So I boiled them first and froze a number of them that way. Then we realized that we would have to fry them before serving. So we got the (brilliant) idea that if we boiled, fried and then froze them, all we would have to do is toaster-oven them (the verb form of noun toaster oven) without thawing and then serve. In any case, the pre-boiled gyoza were fried in a small amount of peanut and sesame oil to produce nice brown crispy shells, frozen than toasted in the toaster-oven as shown below. (Easy-peasy). 


You can see, on the cut surface, small cubes of pork, black beans and pumpkin puree. It is not typical gyoza flavors but it worked. 


We have two frozen batches; one boiled but not fried and the other boiled and fried. Any bets on which batch gets eaten first?


Wednesday, September 20, 2023

Tsukune with Lotus Root and Perilla 蓮根大葉つくね

This is a hybrid of “Renkon Tuskune”  蓮根つくね and “Tsukune with perilla” つくねの大葉焼き. Since our perilla is growing profusely in our herb garden, we are using perilla leaves whenever we can.  This is also the last segment of fresh lotus root we got from Weee asian grocery delivery service. We found that we could make the lotus root last longer by separating the fresh lotus root into its individual segments, wrapping the segments in paper towel and vacuum packing them. With this preparation they last for a long time under refrigeration (at least 1 mouth or more). Beside using a slice of the lotus root as a base for the Tuskune, I also included chopped up lotus root in the tsukune itself to give it nice crunch without using chicken cartilage. The perilla leaves add an additional unique flavor.


I served this with “kinpira” braised lotus root 金平蓮根 I made to finish up the last of the renkon. I also served simmered “kabocha”  かぼちゃの煮物 Japanese pumpkin.


Ingredients:
8 slices of lotus root, skin peeled and sliced into (4-5mm) thick plus two or three slices chopped up (to mix into the tuskune itself)
8 perilla leaves (if too large cut in half to make 8 pieces)
4 oz (114 gram) of ground chicken (this was low-fat breast meat ground chicken)
1/2 tsp ground ginger root
1/2 tsp ground garlic
1 tsp mayonnaise (optional, to compensate low-fat ground meat)
1 tsp miso
1 tbs “katakuri-ko” potato starch
1 tbs vegetable or olive oil

Directions:
In a bowl, mix the chicken, ginger, garlic, mayonnaise, miso and chopped up lotus root. Mix well by hand until the mixture is elastic and binding together (if too loose, you could add potato starch, if too stiff, you could add a beaten egg)
Coat the slices of lotus root with the potato starch thinly (to improve the adhesion of the meat mixture)
Place 1/8 of the chicken mixture onto the lotus root on the cutting board and press lightly so that the mixture will go into the holes of the lotus root.
Place the perilla leaf on and press lightly so that it adheres to the meat mixture (see below)
Add the oil to a non-stick frying pan on medium heat, and start cooking the lotus root side down first (see below) and cook a few minutes or until the lotus root browns a bit
Gently turn it over and turn down the heat to low and cook a few more minutes with the lid on for the last 2 minutes to make sure the meat mixture is cooked through.
Optionally you could add a mixture of mirin and soy sauce at the end but I did not.


Drain excess oil on a paper towel.


This tsukune is seasoned enough for us but you could add “Yakitori sauce (equal mixture  of mirin and soy sauce) ” as mentioned before. This re-heats nicely in a toaster oven. It is a nice contrast in textures and taste. The chicken portion is almost fluffy in texture which is a nice contrast to the crunch of the renkon on the bottom layer and distributed through out the meat. The perilla adds a nice fresh minty spiciness.

Friday, May 30, 2014

Sous vide filet mignon

We heard that sous vide is the best way to cook a perfect steak. I have also heard "you can hold the steak at the desired doneness for a long time in sous vide without worrying about over cooking”. So, with high expectations, we tried sous vide filet mignon.

It appears that there are two methods of doing this. One is to cook the steaks in the sous vide first and them sear them. Another is to sear the steaks first and then sous vide them. With this method, the steaks are briefly seared again after coming out of the sous vide in order to “refresh” the crust. The advantage of the second method is that the first searing occurs when the meat is cold and uncooked which helps the searing process and cooks only the surface. In the first method, after the meat is sous vide cooked, the meat is warm and to developed enough crust, wider layers of over cooked meat will develop under the curst. I am not sure if this two methods make a big difference. But I decided to try the second method. I got two USDA prime filet mignons.

We served the steak with my wife’s oven fried potato, haricot verts (first blanched and then sautéed in garlic and butter). We could have done a better presentation (particularly with that blob of catsup) but it is too late.

I did the first searing using a small amount of vegetable oil on high heat for 30 seconds each sides. The filets came out directly from the refrigerator. After blotting off any juice/moisture, I vacuum sealed it (#1) using the edge type vacuum sealer. Towards the end of the vacuum sealing, some moisture got sucked out and the vacuum was not as tight as when I vacuum sealed dry items. Nonetheless it made a reasonable vacuum seal. Apparently if you use a “chamber” vacuum sealer, you can vacuum seal wet items better but that type of equipment is beyond my reach. For medium-rare, I set my ANOVA sous vide machine to 56C (133F) based on this recipe (#2). The thickest filet mignon was about 1.5 inches, so it should take about 90 minutes to cook. I set it to 3 hours instead, since that would put us at the right time for dinner. Also I trusted what I read that the steaks could be held for up to 6-8 hours without over cooking or deterioration of flavor.

stake sous vide composit
After the steaks were cooked in the sous vide, I finished them by searing a second time. This time I used butter and sprigs of fresh thyme on high heat for 10-15 seconds each side basting with melted butter (#3). I then seasoned them with Kosher salt and freshly cracked black pepper. As you can see the nearly entire cut surface is nicely rosy pink with a very thin crust (#4). No over cooked surface areas or undercook center.

We think sous vide steak is much better than any we have tried. I usually cook steak by keeping the steak out at room temperature for 15-20 minutes and then searing it in a hot frying pan and finishing in the oven. This method is not bad but, definitely, produces an overcooked surface area and undercooked center even after resting the steak for 10 minutes.

This filet mignon was very tender with a nice crust but no bloody juice came out. The thyme was from our herb garden but we did not taste much of thyme flavor in the steak. Besides being a perfect steak, I think, the sous vide method is perfect for cooking steaks for a company dinner. You just hold the steaks in the sous vide until serving and quickly refresh the crust and serve. It is much easier than a frying-pan-to-oven method.  The only shortcoming may be that it is not possible to accommodate different doneness unless you have more than one sous vide machine.

Sunday, June 27, 2010

Grilled rosemary lamb chops with barley risotto ラムチョップと大麦のリソト

Well, I am, again, deviating from the Izakaya theme. This is a type of a Bistro cuisine but apparently some Japanese bars serve this type of dish. I used a rack of lamb and cut it into individual chops. This rack was not as well prepared as the ones we usually get and I had to remove some silver skin and excess fat but I left some fat just above the chop since the fat imparts a good lamb flavor (if you like lamb flavor).

I marinated the lamb chops in fresh rosemary (chopped up, 1 tbs, from our herb garden), crushed garlic (4-5 cloves), olive oil (3-4 tbs) and cracked pepper (1/2 tsp) in a Ziploc bag overnight in the refrigerator. Just before cooking, I removed the meat leaving the garlic and marinade in the bag (I noticed that one of the garlic cloves went with the meat to the grill judging from the picture below). I then salted the meat. I was too lazy to fire up the charcoal grill so I used an electric grill outside (see below left).

I cooked the chops 2-3 minutes for medium doneness (this grill cooks from both sides). I turned the chops 90 degree in the middle of the cooking time to make nice grill marks. This dish had a more assertive lamb flavor than the oven roasted rack of lamb but if you like lamb this is a very straightforward nice dish.

Barley risotto: My wife made this dish and I assisted by chopping up the ingredients. I finely chopped onion (large, half), shiitake mushroom (5 medium, stem removed), and garlic (3 cloves). In a small pot, add olive oil (1 tbs) and saute the above vegetables for 2-3 minutes on a medium flame, season with salt and pepper. Add one cup of pearled barley and saute to coat the grains with the oil. Add 2/3 cup white wine (we used sake) and cook until the wine is completely absorbed. Add 3 and 1/2 cups of chicken broth (our usual Swanson reduced salt no-fat version). After it comes to a boil, cover and turn the heat down to simmer and cook for 30 minutes or more, stirring once or twice during cooking, until done. (It should be creamy but all the liquid should be absorbed). Add crumbled fresh goat cheese (2 tbs) and fresh thyme (from our herb garden) to taste. Adjust seasoning if needed. We also added small cubes of oven roasted root vegetables (this was leftover from a previous dish. sweet potato, onion and carrot were tossed with olive oil and seasoned with salt and pepper, roasted with garlic and onion at 350F for 45 minutes to one hour).

As an accompaniment, we served barley risotto and oven roasted green beans. This was a very satisfying "comfort" food type dish. The barley has a nutty flavor with a rich mouth feel and a slight "al dente" crunch. Of course, a good red wine is called for. We had a nice Spanish Temperanillo, Caro Dorum 2005.