Showing posts sorted by relevance for query savory cookie. Sort by date Show all posts

Friday, December 29, 2023

Tahini- Miso Cookies タヒニと味噌クッキー

As we mentioned before we are big fans of “savory” cookies which will go well with wine rather than as a dessert. My wife has made a few in this category before. Recently she I found her searching for savory cookie recipes. During this search, she came across “Tahini-Miso cookies” at a website called “kitchen stories”. Since we had tahini and miso, it was a “no brainer” to try making these. This recipe uses a lot of white sesame seeds. Good thing I just got a large jar of white sesame from Weee.  The cookies are great with a taste of saltiness from the miso and nuttiness from the tahini and sesame seed coating the surface of the cookies.


I will ask my wife for how this was made.

Ingredients (shown in the picture below)
225 g flour
¾ tsp baking soda
½ tsp baking powder
115 g butter (room temperature)
220 g brown sugar
100 g sugar
80 g white miso paste
80 g tahini
1  egg
1½ tsp vanilla extract
100 g sesame seeds


Directions:
Add flour, baking soda, and baking powder a bowl and mix to combine, then set aside. Add butter, brown sugar, and sugar to a separate bowl and beat with a hand mixer until very light and fluffy, approx. 5 min.

Add miso and tahini to the butter-sugar mixture and mix until combined. Scrape down the sides of the bowl and mix again. Add egg and vanilla and mix just to combine, then add some of the flour mixture and mix in on low speed. Add remaining flour and mix just until combined.

Add sesame seeds to a bowl. Use an ice cream scooper to scoop some of the cookie dough, then add to the bowl of sesame seeds and cover the ball with the sesame. Transfer to a parchment-lined baking sheet. Repeat until all the cookie dough is gone, (first picture below). Then cover the baking sheet with plastic wrap and chill dough for at least 2 hours, or overnight.

Preheat oven to 350F. Remove some cookies from the baking sheet so there’s enough room for them to spread out while baking. Bake the cookies for approx. 8 min., then use a fork to gently flatten them a bit. Continue baking for 8 - 10 more mins. Let cool completely.


I did not remove any of the cookie dough from the baking sheet as advised in the instructions. They seemed evenly spaced even if they spread a bit. In addition, the instructions said to flatten them with a fork half way through which implied they needed that additional step to spread at all. I tried flattening them as instructed but it was a complete waste because the soft dough just stuck to the tines of the fork making a mess of the cookie so I stopped and just put them back in the oven to finish cooking. At the correct time I opened the oven door and…SURPRISE! The cookies had flattened into an almost solid mass as shown in the picture below; completely unexpected. (Why in the world did the original recipe require flattening them during cooking when they would do this on their own?)


Nonetheless I was able to break them apart into irregular cookie like shapes. Despite the shapes they tasted pretty good. These were not really savory cookies but they also were not as sweet as a desert cookie. They had a slightly chewy texture and deep rich flavor from the miso and tahini. The sesame added an additional nuttiness but they tended to continually fall off the cookie creating a bit of a crumby mess. I’m not sure I will use them next time.

Wednesday, September 12, 2018

Rosemary scone (cookie) with macchiatos ローズマリースコーン

This is my wife's baking project of making savory cookies (it was dubbed as a scone but it is more like a fluffy cookie). It is based on a recipe in the "La Brea Bakery" cookbook. It has a fresh rosemary flavor which you would not expect from the appearance. One weekend afternoon, we had this with espresso macchiatos. I am not a big desert or cookie eater but this is really good and perfect with the macchiatos. Please note, in the picture below, the scone/cookie is very large and the coffee cup is a demitasse size. In truth we shared one cookie between the two of us. (We admit this was a staged photoshoot).


The cookie is soft but slightly crumbly with gentle sweetness with fresh rosemary flavor which are such a great combination of tastes and textures.


The picture below shows our usual macchiatos which we often have as a second cup of coffee after morning cappuccinos on the weekend. The bean was a blended bean called "Altiplano" from Sweet Maria. We home roasted to full-City+. I use foamed cream (just a small amount) on the top. I use my  Nespresso frother for this. This cup may look similar to one with cappuccinos but, as I mentioned, this is a much smaller cup.


This scone is made using the rosemary from our herb garden. Our current rosemary is the third or fourth iteration we planted. Our winters are generally too cold for rosemary to survive more than a year or two. Remarkably, we planted this rosemary more than 20 years ago. It has grown into a small gnarled bush with a beautifully thick twisted stem. This spring we were afraid that it may not have survived the winter. After removing several dead branches, however, at least two major branches are still alive and producing new growth. We were so glad and relieved; it was like welcoming back an old friend who had been seriously ill. We have been refraining from cutting sprigs of our rosemary, during the summer,  to give it a chance to fully recover.  Now, it has grown enough that we can safely use our rosemary again.


Ingredients:

3 3/4 cups All Purpose flour
1 3/4 cups corn flour (or corn meal)
1 Tbs. plus 1/2 tsp. baking powder
1 Tbs. finely chopped fresh rosemary (more or less to taste)
3/4 cup brown sugar
3 sticks (12 oz.) butter cut into 1/2 inch cubes and frozen
2 large eggs
2 Tbs. plus 2 tsp. honey


(The original recipe called for, 1 large egg, 1 egg yolk and 1/2 cup plus 2 tsp heavy cream. I misread the recipe and as shown above I used 2 eggs. In addition, I left out the heavy cream...the scones were still really good.  I'll have to try the original recipe to compare with the one I made. Nonetheless, my variation is worth trying).

Directions:

In a food processor fitted with a blade, combine the flours, baking powder, rosemary and brown sugar and process until incorporated. Add the butter and pulse until the mixture is pale yellow and the consistency of fine meal. (The amount was too big for my food processor so I processed it in batches) In another bowl add the eggs, honey and cream and whisk together. Add the wet ingredients to the dry ingredients, mixing until just combined.

Turn the dough out only a floured work surface and gently knead a few times until it comes together. Roll the dough into a 3/4 inch thick square. Cut the scones (I cut them into squares to eliminate the scraps that would have to be reworked if I cut them into rounds). Place the pieces on a parchment lined baking sheet. Bake in a 350 degree oven for 30 minutes or until slightly browned and firm to the touch.


This one is in the same category of other savory cookies we have made such as "anchovy black pepper cookie", "rosemary pine nut cookie", "castagnoccio"  and "chili cheese shortbread". It uses a ridiculous amount of butter but it is well worth it. We like all the savory cookies but this one may be our new favorite.

Saturday, October 15, 2016

Chilli cheese shortbread 唐辛子とチーズのショートブレッド

This is my wife's savory cookie/shortbread which belongs to a similar category as the anchovy black pepper cookie she made before. This is seasoned with red pepper and worchestershire sauce.


This is not sweet at all and clearly calls for wine or some other drink to accompany it.


Ingredients:
2 cups AP flour
12 Tbs. butter
2 tsp Worcestershire sauce
1 tsp  red pepper flakes
1 1/2 cup shredded cheese (cheddar and gruyere)

Blend all the ingredients in a food processor. (Word of advice: This is a very dry flaky dough. Don't panic if it looks like it is not coming together. We had to dump it as crumbs out of the food processor and my wife worked at it diligently. Eventually she was able to make the ball shown in #1 below.) Wrap the dough in plastic wrap and put in the refrigerator for 15 minutes. Roll out dough as shown in #2. Cut out cookies whatever shape you want and put on a cookie sheet #3. Preheat oven to 325 degrees and cook for 15 to 18 minutes until golden. Put on a rack to cool #4. 


This is an ethereal cookie. It dissolves on your tongue leaving behind a slight saltiness (from the Worcestershire sauce) followed by a pleasant buzz from the red pepper that slowly kicks in and builds. Although anchovy is the main ingredient for Worcestershire sauce, this version of savory shortbread is much more subtle compared to the anchovy black pepper cookie.  Despite all the butter in this shortbread the texture is somewhat grainy and some libation helps nicely to wash it down. We had it with Spanish red wine which went really well.  

Tuesday, December 8, 2020

Lemon basil shortbread cookie レモンバジルクッキー

This is a continuation of my wife’s attempt to use more of the basil we are growing in our window sill herb garden. This is a savory cookie/shortbread which goes very well with red wine. My wife found the original recipe on line somewhere.


We had this with DAOU Vineyards Pessimist Red Blend 2018 which is Petit syrah based. Our recent favorite/house wine.


Ingredients: (18 cookies)
1 cup AP flour
1/2 cup sugar
1/2 cup unsalted butter, cold, cut into pieces
2 tbs sliced basil (or more to taste)
grated zest from one lemon
1 tbs lemon juice (or more to taste)
1/4 tsp kosher salt

Directions:
Preheat oven to 375F
Line cookie sheet with parchment paper
Add all ingredients to the food processor and mix (#1)
Using a small ice cream scoop, portion out the dough (#2)
Using the palm (or the lightly floured bottom of a glass) , press the ball into flat disks (#3)
Bake 7-8 minutes at 375F (#4)
Let cool on a cooling rack


The lemon flavors come through strongly contrasts nicely with the sweetness and is pleasantly refreshing. After one day in the refrigerator, the basil flavor began to surface more strongly. Somehow this cookie went well with the red wine we were having. My wife has made quite a good variety of savory cookies. This is another good one.

Wednesday, April 27, 2016

Biscuit ビスケット

The word "Biscuit" is used differently in North America and the British commonwealth. In England, biscuit is either sweet or savory "cookie" or "cracker" and in North America, it is soft quick bread (made with leavening agents such as baking powder or soda or both).   In Japan, biscuit  ビスケット usually means a type of cookie like in England. When I was growing up "biscuit" meant  a round sweet cookie which was locally produced and called "saka-biscuit" 坂ビスケット. It was wrapped in a paper cylinder (such as the one in the picture to the left). This company is still making "biscuits" but they are not wrapped in a paper cylinder like the old days.

More recently, probably because of its popularity KFC in Japan has made, North American style "biscuits" (with some Japanese modifications) became popular.

When I first came and live in the US, I was quite impressed with an instant biscuit that comes in a cardboard cylinder from Pillsbury. (see first picture).  With a sharp whack, the cylinder pops open (something my wife liked to do when she was a kid). You get "freshly" baked biscuits simply by putting the dough from the cylinder on a cookie sheet and baking.

Digression alert: My wife told me that when she was little girl her mother sent her to the local corner grocery store to get somethings for dinner, one of which was a package of Pillsbury biscuits. She was holding a roll of the biscuits in her hand while waiting in line to check out. The line was fairly long and it was taking some time.  When she got to the cashier she accidentally dropped the cylinder onto the floor. To every one's surprise there was a loud POP and the end of the tube flew off. The biscuits shot out of the tube like from a canon. Apparently the heat from her little hand activated the leavening agent and the whack when it hit the floor broke the seal causing the dough, which was by then under considerable pressure, to shoot out like little doughy canon balls.)

I haven't had these biscuits for quite some time but when I was using them I thought they were quite good particularly just out of the oven. But once they got cold they became hard as a rock.

My wife used to make authentic North American biscuits from the scratch all the time but she has not made any for quite some time. So, when she saw this interesting recipe in the Washington Post, she had to try it.  We enjoyed them with scrambled eggs for breakfast.


The original recipe was "double ginger" flavor but she did not add any ginger.
Ingredients

For the biscuits (the recipe yielded a dozen rectangular biscuits):
- 2 cups all-purpose flour, plus more for rolling
- 1 cup cake flour
- 1 tablespoon plus 3/4 teaspoon baking powder
- 1 1/2 tablespoons sugar
- 1 teaspoon salt
- 6 tablespoons (3/4 stick) chilled unsalted butter
- 3/4 cup cold regular or low-fat buttermilk, or more as needed

(The original recipe provided weights for the ingredients and generally when given a choice for baking, my wife thinks using weights is more accurate. But she discovered that the weights provided were nowhere close to the weight of the ingredient if measured by the cup then weighed on the scale. I could hear her muttering, "Don't they ever proof read their recipes or better yet try them out first?") 

Directions

Whisk together the all-purpose and cake flours, baking powder, sugar, ground ginger, if using, and salt in a large bowl.

Use the widest opening on a box grater to grate the butter into the flour mixture, adding it a bit at a time and gently mixing it into the flour so it doesn’t clump up. Use your hands to make sure the butter is fully incorporated into the flour. Add the buttermilk; use a flexible spatula to mix until the dough holds together. If the mixture's still too crumbly, add up to 2 more tablespoons of buttermilk.

Lightly flour a rolling pin and a clean work surface. Transfer the dough there; use a light touch to shape it into a rectangle, then pull the far end of the rectangle up toward you and fold the dough over in half. Press down on the dough and repeat this step 6 more times.

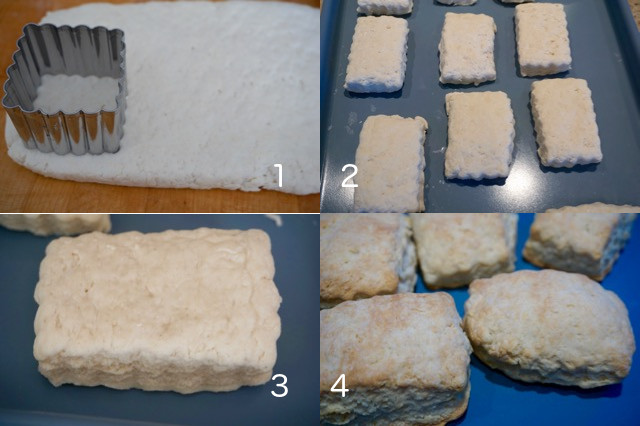
Roll out the folded dough to a 1-inch thickness. Use the biscuit cutter to form a total of 10 to 12 biscuits; you can re-roll the dough once, but you might notice less height on those re-rolled biscuits after baking. For this reason my wife made the biscuits into a rectangular instead of the traditional round shape. This is because, as suggested by the recipe above, the round shape results in dough between the circles being left over. In order to use up all the dough these leftover pieces have to be re-rolled and re-cut. The extra working of the dough causes the biscuits to be less tender and flaky. The rectangular shape results in using all the dough with only one cutting (pictures shown below). Place the biscuits on a baking sheet.

Cover the biscuits with plastic wrap; freeze for 1 hour or up to overnight.

When ready to bake, preheat the oven to 425 degrees. Line a baking sheet with parchment paper or a silicone liner.

Bake the biscuits (straight from the freezer, unwrapped; middle rack) for 12 minutes, then reduce the oven temperature to 375 degrees and bake for 8 minutes or until the tops are golden brown.


There were two reasons my wife wanted to try the recipe. First the idea of using a grater to flake the butter sounded like a good technique. Secondly, freezing the dough idea was new to us and we were interested in  how this came out. The biscuits were not as flaky or as fluffy as my wife's usual buttermilk biscuits. They were good in there own right but nothing special. They did go well  with the scrambled eggs (I made mine into a small sandwich). Hopefully, my wife will make her original buttermilk biscuits again, soon.

Tuesday, May 22, 2012

Anchovy and black pepper cookies アンチョビ黒胡椒クッキー

One weekend, my wife was looking through a cookbook titled "500 appetizers". She disappeared into the kitchen and came back with "Anchovy and olive tepanade cheese dip". I asked how many anchovies she used knowing how hard it is to use up an entire tin of anchovies. She said the can was empty but I had to wait until tomorrow. The result is shown below. It looks like a perfectly innocent sweet butter cookie but it delivers quite a surprise. It has the texture and crumb of a sugar cookie but it is savory; with the pleasant salty taste of anchovy, pepper and Parmesan cheese. This is certainly not for desert or an afternoon snack but goes surprisingly well with red wine.

I asked my wife for the recipe.

The cookie dough: 1/2 cup all-purpose flour, 1/4 cup butter chilled, 1/3 cup freshly ground Parmesan cheese, 3 anchovies drained, 1/2 tsp. ground black pepper. Process in a food processor until the ingredients come together into a dough. Make into a ball, cover with plastic wrap and refrigerate (my wife chilled it over night). Roll out the dough to about 1/2 inch thick (picture 1) and cut into various shapes with a cookie cutter (picture 2). Put on a lightly greased cookie sheet (picture 3) and bake in a 400 degree oven for about 6 minutes until golden brown (picture 4). 

These are not the cookies to serve with coffee to the bridge club, but as an hors o'dourve accompanied with a full bodied red wine they are very special.

Tuesday, May 30, 2017

Rosemary Pine nut cookie ローズマリー松の実クッキー

Christopher Kimball, who is a founder of America's test kitchen, left there and started a new cooking site/publication called Milk Street. We started subscribing to his quarterly Milk street magazine. This cookie is from one of those issues. We always like savory and not sweet cookies like anchovy black pepper cookies and chili cheese shortbread, so this was a natural for us to try, so we made this one weekend (I did the grating and chopping and my wife did the rest).


It is topped with pine nuts and honey butter glaze.


Ingredients: Pictures #1 and #2 (by accident I included sesame seeds in the picture. They are for another dish).
1 1/2 cups (213 gm) AP flour
1/2 cup (85 gm) cornmeal
1/2 cup (99 gm) sugar
1 Tbs. finely chopped fresh rosemary
2 tsp grated orange zest or orange flavoring
16 Tbs (2 sticks) salted butter softened (14 tsp. for the dough, 2 tsp. for the honey topping)
1 cup pine nuts
3 Tbs. honey


Directions:
In an electric mixer with a paddle, mix the sugar, rosemary and orange zest until the moisture from the orange zest and rosemary makes the sugar form coarse clumps (#3, 2-3 minutes).
Add 14 tbs butter in small pats one-by-one until they are well incorporated making a wet paste (#4). Beat on high until fluffy. Add the flour gradually until a dough ball forms on the paddle (#5)
Break up the dough into small chunks and place them in an aluminum foil lined 13 x 9 inch baking pan  (excess edges of foil all around to facilitate the removal of the cookie) (#6)
Press the chunks (using fingers) into a flat sheet (#7)
Place the pine nuts in a single layer and press them hard into the dough (#8)
In a small bowel melt the remaining 2 Tbs. of butter. Add the honey and mis thoroughly. Brush the surface with the honey butter (#9)
Bake it at 325 F for 40-45 minutes (#10)
Let it cool for 15 minutes and lift out the sheet of cookies to the cutting board
Cut into small rectangles and let it completely cool on the cooling rack.


The aroma of the orange and rosemary while these were cooking was quite strong and very pleasant. The combination of orange, rosemary and pine nuts all works. It is sweet/savory with very complex flavors. The honey butter glaze is a nice finish. This cookie can be enjoyed while sipping wine.

Tuesday, December 26, 2023

Blue Cheese Walnut Cookies ブルーチーズと胡桃のクッキー

This is an additional installment in the continuing tale of “we are big fans of “savory” cookies which go well with wine.” My wife saw this recipe for “blue cheese walnut cookies” in the Washington Post website and decided she had to make it. We used Cambozola cheese which is a mild blue cheese; sort of a cross between blue (Gorgonzola) and Camembert cheeses. The cheese tastes better than it smells and while the cookies were baking in the oven, the entire house was filled with the smell of the cooking cheese which was not totally pleasant. In any case, the end result is worth it. The cookie is a bit crumbly with a mild cheesy and walnut flavor.


I ask my wife to take over.

Ingredients
3 1/2 ounces good-quality, mild blue cheese (we used Cambozola cheese)
3 tablespoons unsalted butter, at room temperature
1/2 cup flour
1/4 cup cornstarch
1/4 teaspoon coarse salt
1/8 teaspoon freshly ground black pepper (we used cayenne pepper)
1/3 cup walnuts, finely chopped

Directions
Preheat the oven to 325 degrees. Line a baking sheet with parchment paper. Combine the flour, cornstarch, salt and pepper in a bowl and set aside.Combine the blue cheese and butter in the bowl of a food processor; pulse until thoroughly blended. We also added the walnuts to the mixture in the food processor and pulsed until they were cut up too. According to the instructions at this point we were to add the flour, cornstarch, salt and pepper into the cheese mixture and mix until a moist dough was formed. Since the food processor we were using was pretty small, we transferred the contents of the food processor to the bowl of dry ingredients to make the dough. Gather up the dough into a flat disk. Roll out the dough to a thickness of 1/4 inch. Use 2-inch cookie cutters to cut out shapes (We just cut the dough into 1 inch squares using a knife).

Transfer to the baking sheet, spacing the cookies 1 inch apart. Bake for 12 to 14 minutes until lightly golden on the edges. Transfer to a wire rack to cool completely before serving or storing.

As I mentioned earlier blue cheese cooking in the oven is not a pleasant smell. We were a little afraid of what the cookie would taste like after smelling it cook. (Not only did it smell bad but the smell permeated the entire house). Luckily the cookie tastes much better than it smelled. Initially the cheese taste was s bit strong but over time it mellowed into a tangy flavor that went very well with the included walnuts and above all goes well with the red wine we were having.

Friday, January 22, 2021

Olive and black pepper savory cookies

This is part of my wife's savory cookies project.  This is based on the recipe my wife found  in a blog called "Raspberry Cupcake". The original recipe calls for Kalamata olives but we did not have any so she used pimento stuffed green olive instead. (Hey! They were for my Martini!).


This is a savory shortbread and perfect with a glass of wine.


As usual, I ask my wife to fill in the rest.


Ingredients:
50 gm olives
1 1/4 cup (150 gm) flour
1/4 tsp. baking soda
1/2 tsp salt
1 tsp black pepper (or to taste)
1 stick (140 gm) butter
2 Tbs. sugar
1 large egg yolk

Directions:
Measure the dry ingredients (flour, soda, salt, pepper) in a bowl and set aside. Cream the butter, sugar and egg yolk until fully incorporated and fluffy. Add the dry ingredients to the the butter egg mixture. Fold in the olives. Roll the mixture into “logs” and wrap in plastic wrap. Refrigerate the dough for at least an hour. (Dough can be refrigerated for up to week or frozen for up to a month.) To cook: preheat the oven to 350 F, slice the logs into 1/4 inch pieces and put them on a parchment covered cookie sheet. Bake for 18 to 20 minutes or until golden.


These cookies are spicy (from the pepper) with a  slight sweet overtone (from the sugar) and bright bursts of saltiness (from the olives). They make a nice addition to an appetizer tray served with other cheeses, prosciutto and a glass of red wine. 

Thursday, March 7, 2024

Salted Oatmeal Cookie

We are a big fan of savory cookies. My wife came across this recipe for “Salted oatmeal cookies” and decided to make it. It turned out this is not quite “savory” but has a nice contrast of salty and sweet and pretty good.


The recipe came from Washington Post.

Ingredients (made 33 small cookies)
12 tablespoons (1 1/2 sticks/170 grams) unsalted butter, softened
1 cup (220 grams) packed light brown sugar 1/2 cup (100 grams) granulated sugar
1 teaspoon baking powder
1/4 teaspoon baking soda
1/4 teaspoon ground cinnamon
2 large eggs
1 teaspoon vanilla extract
2 cups (180 grams) rolled oats (do not use quick-cooking or instant)
1 3/4 cups (219 grams) all-purpose flour Flaky sea salt, for sprinkling

Directions:
Beat the butter in the bowl of a stand mixer or handheld electric mixer for a few minutes on medium-high speed until light and fluffy. Stop to scrape down the sides of the bowl.

Add the brown and granulated sugars, baking powder, baking soda and cinnamon, beating on medium speed until the mixture is well blended. Reduce the speed to medium-low; add the eggs and vanilla extract, mixing until well incorporated.

Reduce the speed to low; add the oats and flour stopping to scrape down the sides of the bowl as needed and mixing just until incorporated. Cover the bowl and refrigerate the dough for at least 1 hour, until needed.

Position a rack in the middle of the oven and preheat to 375 degrees. Line a large sheet pan with parchment paper.

Form the dough into golf ball-size balls and place about 2 inches apart on the prepared sheet. Sprinkle generously with flaky salt (the second picture).

Bake one sheet at a time for about 15 minutes, or until the cookies are puffed and beginning to turn golden, being careful not to overbake. (The cookies should have a tender interior.) Transfer the cookies, still on the parchment paper, to a wire rack to cool completely.


The contrast between the salt and the sweet are what really make these cookies. The out side is crunchy and the inside is soft. As you can see in the picture the oats retain their shape and provide an additional element of crunch.

Friday, February 20, 2015

Cheese pocket チーズポケット

My wife is now into making food pockets using pie crusts filled with various stuffings. This one is a wonderful appetizer that goes perfectly with wine. She used a store bought refrigerated piecrust (3rd picture, #8) which came out very nicely golden and flakey.


I did not do a good job of taking a picture of the cheese stuffing.


She used the gadget (#1) to make the pockets. For the apple pie, she used one of the largest. For this cheese stuffing, she used a medium size. She first rolled out the pie crust (#2) on the large cutting board but did not further roll it out thin (based on the previous experience. Thin crust tended to crack while baking).

Cheese stuffing: This is a mixture of cheeses;
7 1/2 oz Ricotta cheese
1 egg (She used a fork to beat the egg and used approximately 1/2 in the cheese mixture and the rest as an egg wash to seal the pie dough. you could use the yolk in the cheese mixture and the white for the egg wash.)
1/4 cup Parmesan cheese

1/2 cup Feta cheese
1/4 cup smoked mozzarella cheese
One small onion finely diced and caramelized
1/8 cup parsley finely chopped
1/4 tsp. salt
1/2 tsp red pepper flakes


Basically just mix all the ingredients until homogenized and blended.


cheese pocket composit

The bottom of the mold is a cutter, so she cut out the perfect round of the pie crust and stuffed it with the cheese mixture using a small ice cream scoop (#3). She brushed the perimeter of the crust with egg water (one beaten egg and 2 tbs of water) (#4 and 5) then closed and pressed (#6) producing a perfect filled pocket (#7).  The secret is not to overfill (which she did several times; its hard not to because you want to pack as much of the goodness of the filling into the pocket as possible). She cooked them on a cookie sheet in a 400 degree oven for 15 to 20 minutes or until the crust turned a golden brown.

This made a very nice savory cheesy appetizer encased in a buttery flakey crust as a starter with red wine. All the cheeses make a complex flavor with a slight zing from the pepper flakes. The caramelized onions really add to the dish. This is a great and elegant appetizer for guests. It’s very hard to eat just one.  The leftovers heat up nicely in the toaster oven.

Friday, November 6, 2015

Chestnut Flour Cake: Castagnaccio 栗の粉のケーキ:カスタナチオ

Since my wife got chestnut flour, she searched for some recipes and came up with this Tuscan chestnut cake. This is indeed an interesting cake. As the recipe indicated, it requires wine to "wash it down".


This is a flat cake without any leavening agents. It is savory in taste with rosemary, pine nuts, walnuts and raisins.


My wife put some of these in the batter and some on the top.


We made a few variations from the original recipe.

INGREDIENTS

2 ounces raisins
16 ounces chestnut flour
2 tablespoons sugar
Zest of one lemon,
Pinch salt
2 cups water
3 tablespoons olive oil, plus more for pan
1 fresh rosemary sprig, leaves picked and finely chopped
1 ounce toasted chopped walnuts
1 ounce toasted pine nuts

DIRECTIONS

Preheat the oven to 375 degrees F.

Place the raisins in a ramekin of water to soften for 20 minutes.

In a large mixing bowl, sift the chestnut flour. Add the sugar, lemon zest, and pinch of salt, mix well and then gently start adding the water to the mix.

Using a whisk, beat the mixture well making sure to eliminate any lumps, then add 2 tablespoons olive oil, and half of the raisins, nuts and rosemary and mix again.

Lightly oil an 11-inch pie plate with 2-inch sides with olive oil and pour in the batter it should be no more than 1/3-inch thick. Sprinkle the cake with rosemary leaves, the remaining softened raisins, walnuts, and pine nuts. Sprinkle with 1 tablespoon olive oil and bake for about 40 minutes.

We used a rustic looking ceramic pie pan.


We used finely chopped fresh rosemary from our herb garden.


This is a very interesting cake. It has the texture and taste of a very large chestnut smashed into a flat piece. The predominantly chestnut flavor and texture is accented by intriguing overtones on rosemary and pine nuts (I couldn’t detect any walnut flavor). The original recipe said that this was not “kid friendly” and they were right. This is definitely not for desert and will not go well with coffee or tea. But the flavor grows on you. Also over time the rosemary and pine nut flavor marry into the chestnut flavor and the cake gets better.  We were probably too careful about adding too much rosemary. This time of year the rosemary in our garden is extremely aromatic and tacky with oil—probably at its best for the season.  Next time we can be a lot more aggressive with that herb. This cake reminded me of when I was introduced to the Italian liquor Compari. When I first tasted it, the flavor was very strong/bitter, unique and distinctive and I wasn’t sure I liked it. But then it grew on me. The cake is rather crumbly and we ended up eating it in chunks rather than slices. Since the raisins, pine nuts and rosemary we put on the surface just fell off as we ate and while we stored the cake, my wife suggested that next time we just mix all of it into the batter.

We had this with red wine and that combination worked out well. This cake ranks next to my wife’s anchovy black pepper cookie . They are of a similar  genre. Both go well with sipping wine rather than as a "dessert".