Norio on Wine and Food

Most recent post

  • Most recent post
  • About us
  • Japanese Izakaya Cookbooks
  • English Izakaya Cookbooks
  • Norio's Izakaya Cookbooks
  • Norio's New Year Dishes
  • Grocery stores we use on-line
Showing posts sorted by relevance for query soda bread. Sort by date Show all posts

Saturday, March 18, 2023

Soda Bread with Raisin, Craisin, and Caraway (Soda Bread V4)

Over the years my wife has baked various versions of Irish soda bread. This year my wife initially baked version #3 of Irish soda bread, which was by far our favorite, in preparation for the upcoming St. Paddy’s day. This bread was really great especially with the honey butter she spread on it after a light toasting. I, then, found a recipe called “Americanized Irish soda bread” in the Washington Post which looked interesting and told her about it. She baked this as Irish soda bread (Americanized) version #4. This bread was very good—on a par with version #3 but with a subtly different taste. It had great texture and was slightly sweet from the inclusion of raisins and craisins (dried cranberries).


As usual, my wife modified the recipe mainly due to ingredients we did not have.

Ingredients:
2 cups mixture of raisin and craisins, (substituted for currents called for in the original recipe.)
6 cups (750 grams) all-purpose flour, plus more as needed
3/4 cup (150 grams) granulated sugar
3 tablespoons caraway seeds
1 tablespoon baking powder
2 teaspoons baking soda
3/4 teaspoon fine salt
2 cups (480 milliliters) whole buttermilk
8 tablespoons (4 ounces/113 grams) unsalted butter, melted and cooled
1/2 cup (120 milliliters) heavy cream
1 large egg
1 tablespoon vegetable oil

Directions:
Position a rack in the middle of the oven and preheat to 375 degrees. Line a large, rimmed baking sheet with parchment paper.
In a very large bowl, whisk together the flour, sugar, caraway seeds, baking powder, baking soda and salt. Scatter the dried fruits into the flour and fold them in with a flexible spatula until evenly distributed.
Whisk together the buttermilk, melted butter, cream, egg and the oil until combined. Pour into the flour mixture.
First using a spatula and then hands, stir and mix the dough together. (The original recipe says, “do not use a mixer”.) The dough should be slightly wet but not gloppy. Add a bit more flour, 1 tablespoon at a time, if the dough feels too wet and is spreading. Re-flour your hands and gently knead the dough, turning and folding it over itself, just until it is somewhat firmer, sprinkling more flour on your hands or the work surface as needed. Try not to add too much more flour to the dough.
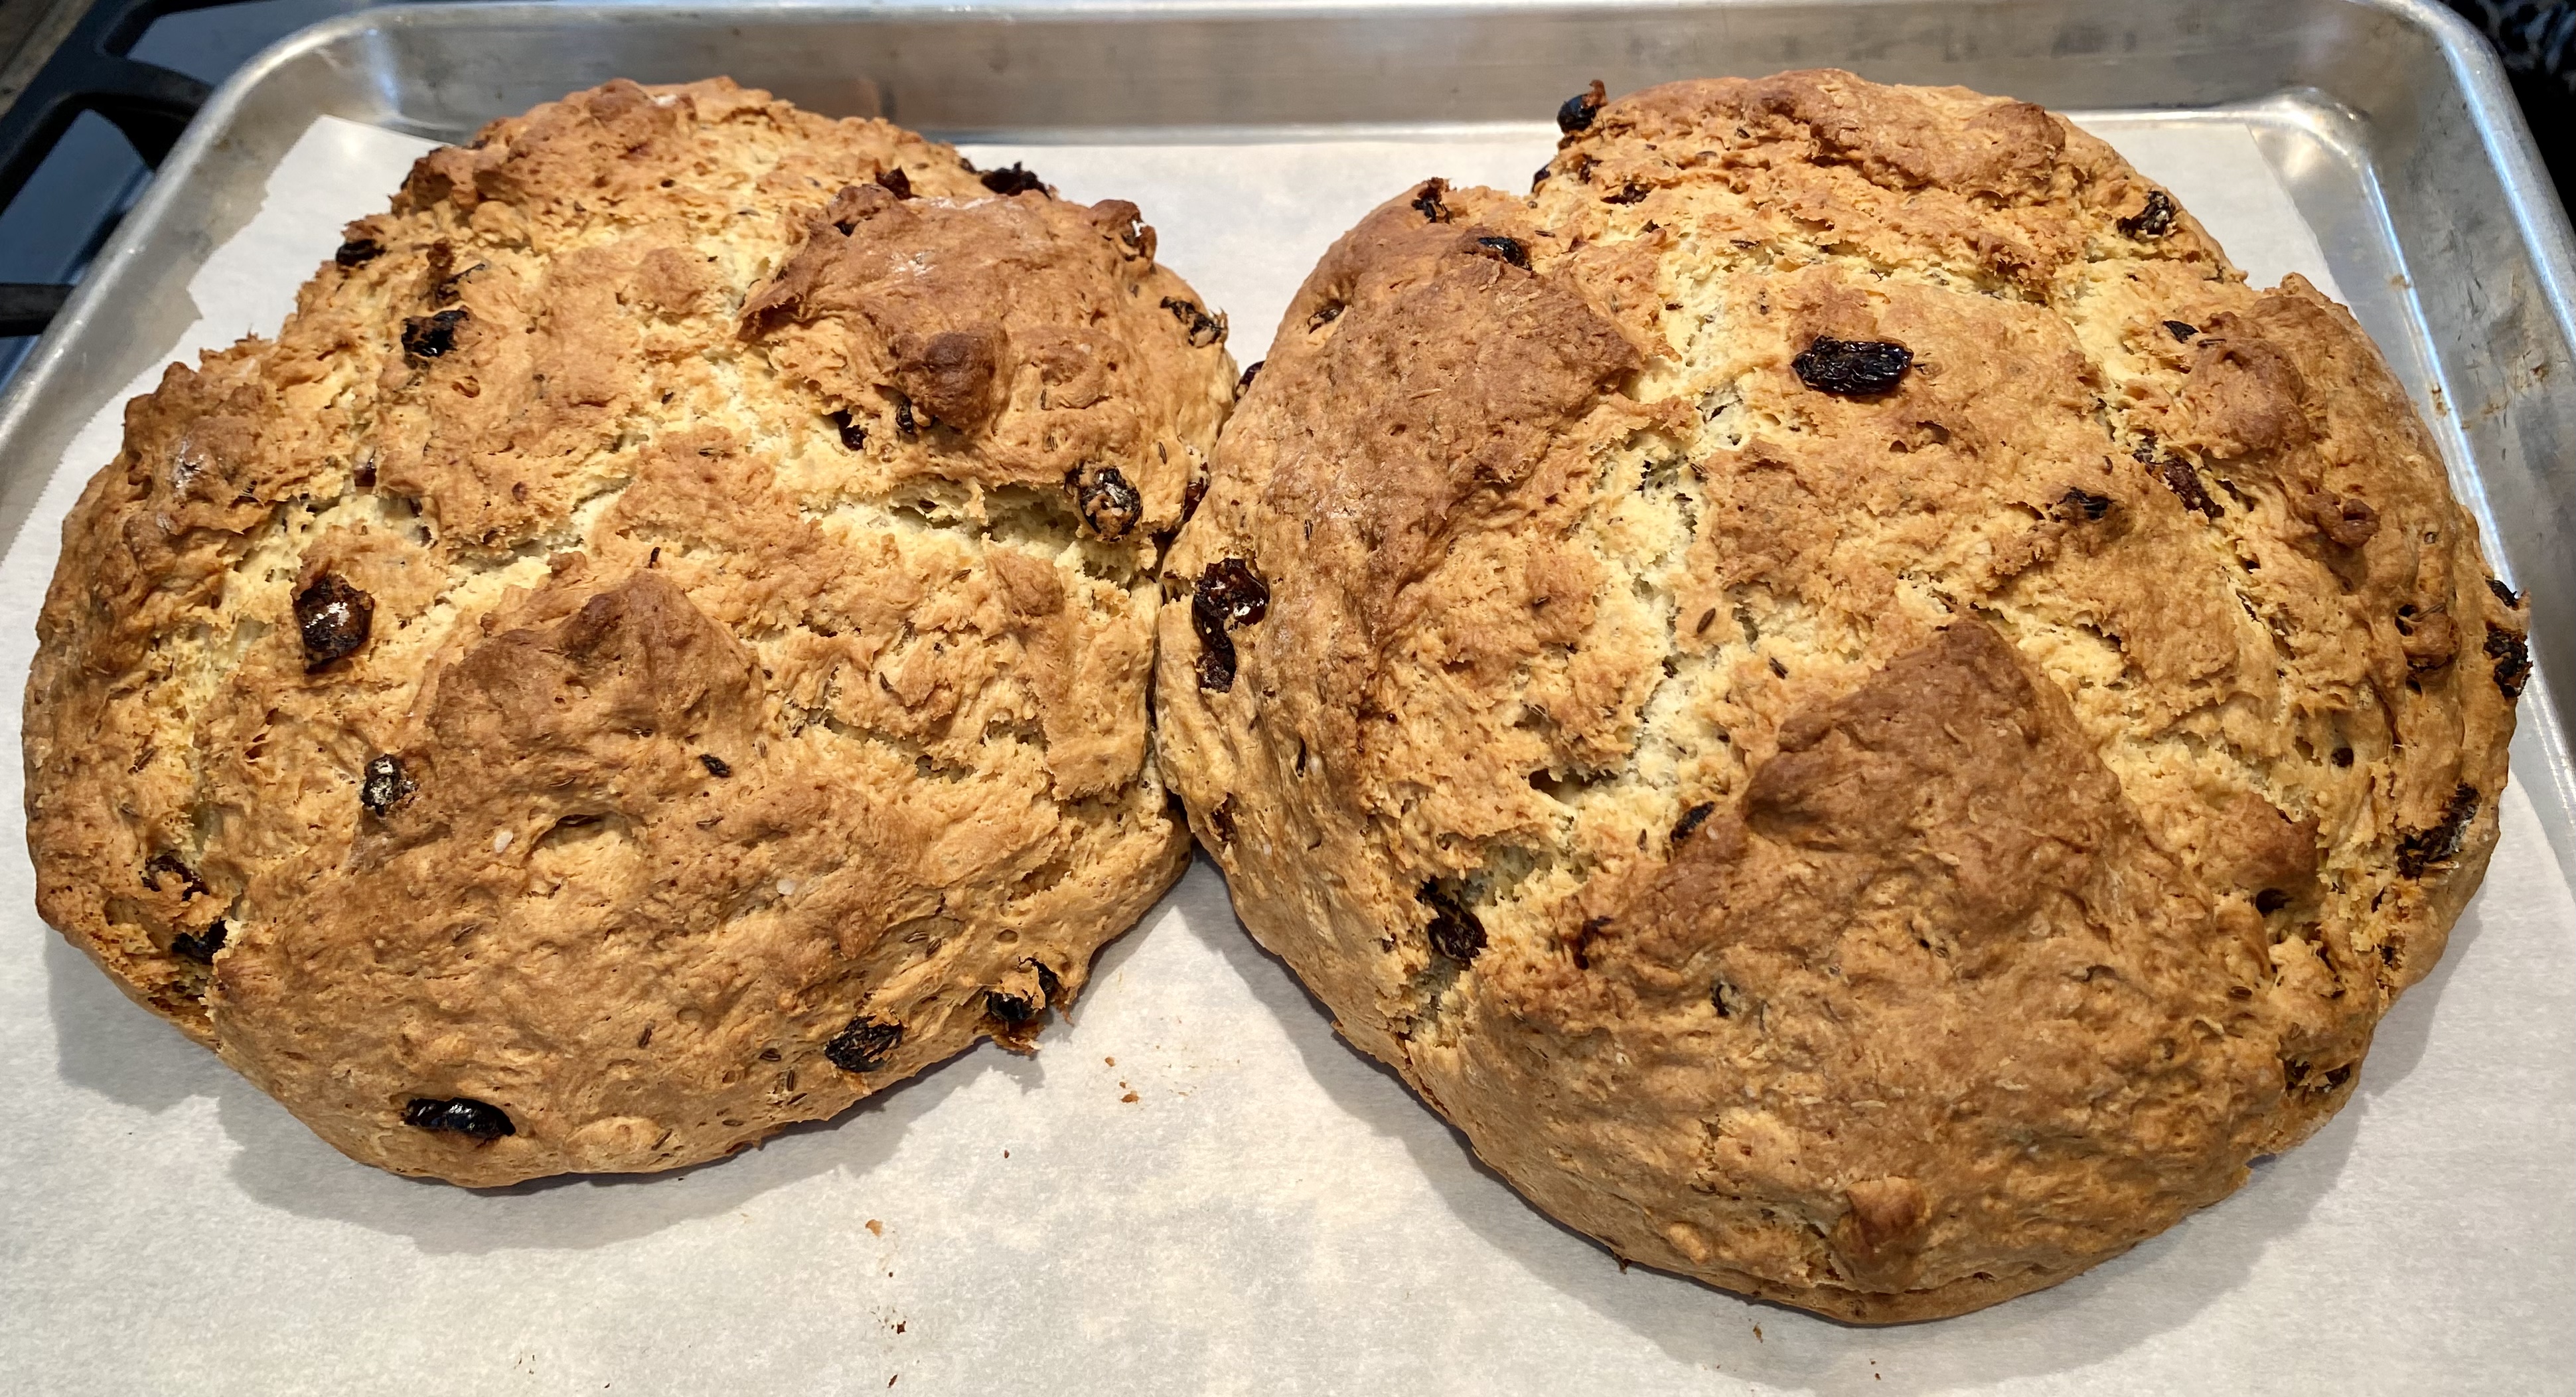
Divide the dough in half, shaping each portion into a round loaf 5½ to 6 inches in diameter, positioning any seams on the bottom. Do not flatten the loaves, making sure they are shaped more like mounds.
Place the loaves several inches apart on the prepared baking sheet (they will spread a little) but not up against the rim. Use a lame to gently score an X no more than ¼- to ½-inch deep into the top of each loaf (see picture below).


Bake for 50 to 60 minutes, rotating the baking sheet from front to back halfway through, until the loaves are nicely browned and a knife inserted in the center comes out clean. The loaves should also sound hollow when tapped on the bottom (see picture below). Cool completely on a wire rack


Among the 4 versions of soda breads, we like the version 3 and 4 the best.
Posted by Uncle N at 6:00 AM No comments:
Email ThisBlogThis!Share to XShare to FacebookShare to Pinterest
Labels: baked bread

Tuesday, March 23, 2021

Irish soda bread #2 アイルランドソーダブレッド #2

After making one Irish soda bread, my wife is on a roll and made this Irish soda bread from her favorite bread recipe book “Beard on bread”. This one used whole wheat flour.


Because of the whole wheat flour, the flavor is a bit different from the first bread she made but came out also nicely moist.


I will ask my wife to provide the recipe.

Ingredients:
3 cups whole wheat flour
1 cup AP flour

1 Tbs. kosher salt
1 tsp. baking soda
3/4 tsp. baking powder
1 1/2 to 2 cups buttermilk

Directions:
Combine the dry ingredients and mix thoroughly to distribute the soda and baking powder. Add enough buttermilk to make a soft dough. It will be the consistency of biscuit dough but should be firm enough to hold its shape. Knead for 1 or 2 minutes until smooth and velvety. Form into a loaf and place in an 8 inch pie pan well buttered or lined with parchment paper. Cut the traditional cross on the top of the loaf. Bake in a 375 degree oven for 35 to 40 minutes until golden brown and sounds hollow when tapped.

This was a nice variation on the Irish soda bread theme. The whole wheat flour gave it a slight nutty flavor. The texture was fairly dense but also moist. It tasted great slightly microwaved and slathered with butter.
Posted by Uncle N at 6:00 AM No comments:
Email ThisBlogThis!Share to XShare to FacebookShare to Pinterest
Labels: Baked, bread

Monday, August 12, 2024

Icelandic Pumpernickel (Rye) Bread アイスランドのライ麦パン

My wife wanted to use pumpernickel flour (whole or dark rye flour) before it gets too old. We have already made “classic” pumpernickel bread and also German Black (Pumpernickel) boule. We found a recipe for “Icelandic Rye (pumpernickel) bread” at King Arthur Flour website. The recipe appeared interesting. Since it is a “soda” bread, my wife took the initiative for making it (soda bread is not my shtick). This bread turned out to be pretty good and the texture/density is something between the classic pumpernickel bread and Pumpernickel boule (picture #1). It is a bit sweeter and made perfect sandwich bread (picture #2).


This was a lunch. We happened to have a hot smoked (in Weber grill) pork roast. I made sandwiches with avocado slices, mayo and Dijon mustard.


Ingredients:
4 1/2 cups (477g) Pumpernickel Flour (original recipe calls for “medium” rye flour)
2 teaspoons table salt
1 tablespoon baking powder 
3/4 teaspoon baking soda 
2 cups (454g) buttermilk 
1/2 cup (168g) honey
1/2 cup (170g) molasses

Directions:
Preheat the oven to 325°F with a rack in the center position.
In a large bowl, whisk together the flour, salt, baking powder, and baking soda.
In a separate bowl, whisk together the buttermilk, honey, and molasses.
Pour the wet ingredients into the dry ingredients, stirring to combine.
Transfer the batter to a lightly greased 9" pain de mille (pullman) pan and smooth the top. Lightly grease the lid, and place the lid on the pan. (We do not have a pullman pan so I just used a regular loaf pan. Luckily I put a tray underneath because the batter over flowed the loaf pan big time). Next time I will put the batter into two loaf pans.) 
Bake the bread for 2 hours. Turn off the oven and remove the lid from the pan. Leave the loaf in the turned-off oven for another 15 minutes, then remove from the oven and turn out of the pan onto a cooling rack.

Since this bread is denser than usual sandwich bread, I sliced it a bit thinly and made perfect roast pork sandwiches. 
Posted by Uncle N at 6:00 AM No comments:
Email ThisBlogThis!Share to XShare to FacebookShare to Pinterest
Labels: baked bread

Sunday, March 21, 2021

Traditional Irish soda bread 伝統的アイルランドソーダブレッド

 Just a few days before St. Patrick’s day, I happened to see  a  “real Irish soda bread” recipe on the “Serious Eats” website. I showed my wife the recipe and in passing mentioned that St. Patrick’s day was coming up. Next thing I knew she has found 2 other Irish soda bread recipes and for 3 days in a row when I came home a new loaf was cooling on the rack. What a treat!  This is the first loaf she made. It was baked in an enameled cast iron Dutch oven like “no-knead bread” and produced a nice brown crust and center was moist.


She cut the traditional cross on the top but the dough was very wet and just filled in. Nonetheless you can still a light impression of the cross.


The below recipe is from “Serious eats”


Ingredients
15 ounces all-purpose flour (3 cups; 425g)
1 3/4 teaspoons (7g) kosher salt; for table salt, use the same weight or half as much by volume
1 1/8 teaspoons (6g) baking soda
18 ounces low-fat cultured buttermilk (2 1/4 cups; 510g), well shaken

Directions
1.Adjust oven rack to middle position and preheat to 450°F (230°C) at least 15 minutes in advance. Roughly cover the bottom of a deep 10-inch cast iron or enameled Dutch oven with a sheet of parchment paper; no need to trim.
2.Combine flour, salt, and baking soda in a large bowl and whisk a full minute to combine. Stir in buttermilk with a flexible spatula until dough is fully moistened and no pockets of flour remain. For extra-fluffy results, stop folding as soon as dough comes together. For extra-chewy results, fold dough about 20 seconds more. Scrape sticky dough into prepared Dutch oven and smooth with a spatula into a rough boule-like shape. Score deeply into quarters with a sharp knife or razor, cleaning the blade between each slice.
3.Cover and bake until well risen and golden, 45 minutes. Remove lid and continue baking until chestnut brown, with an internal temperature of 210°F (99°C), 12 to 15 minutes longer. Invert onto a wire rack, discard parchment, turn right side up, and cool until crumb has set, about 30 minutes. Cut thick slices to accompany hearty soups and stews, or slice thinly for sandwiches. (This will be easier if bread is allowed to cool 2 hours more.) Store up to 24 hours in an airtight container and toast to freshen bread before serving.

The bread had a nice crunchy crust and the interior was moist with a nice crumb. The buttermilk gave it a subtle tang. The flavor was a bit salty. We had this with a lamb stew I made. (What else would you have for St. Patrick’s day?) This was the perfect bread to accompany the stew. 


Our plum tree was in full bloom and our backyard was filled with the nice sweet smell of plum blossom. This is the plum tree we got many many years ago. We wanted the type of plum that produced the fruit used to make Japanese salted plum and umeshu.  After some search, we finally found one at an Oregon nursery. It arrived as a twig in a small envelope but it miraculously grew into a good sized tree and provided lots of plum fruit over the years. We used the fruit to make “umeshu” plum wine. Then, a few years ago all the plum trees in the area got a fungal disease. Our poor tree was no exception. We thought it was a “goner” especially after we had to transplant it during a landscaping project. Although the tree is much smaller than it was at its peak, it appears that this plum tree is surviving. Spring is almost here.
Posted by Uncle N at 11:11 AM No comments:
Email ThisBlogThis!Share to XShare to FacebookShare to Pinterest
Labels: Baked, bread, plum

Friday, March 26, 2021

Irish-style soda bread #3 アイルランド風ソーダブレッド #3

 This is the third and last of my wife’s Irish soda bread baking binge. This one is quite different from the “traditional” recipe. This came from “Nancy Silverton’s Pastries from the La Brea Bakery”.  It is much more complicated than the traditional recipe. (It wouldn’t be La Brea if it wasn’t). It is a muffins/roll and uses eggs, butter, sugar and Caraway seeds. This one is accordingly called  “Irish-style”. As a result, it has a very different flavor from the traditional. (Although I used an Easter bunny plate for the picture, my wife pointed out that I covered up the “bunny’s” face with the bread when I took a picture below so only his feet are showing). (Sorry).


Like all the other Irish soda breads my wife made this has the same rough brown texture on the crust.


I will ask my wife to fill in the rest.

Ingredients
3 3/4 cups AP flour
1/2 cup whole wheat flour
1/4 cup sugar
1/2 cup wheat flakes (I didn’t have any so I left it out)
1 1/2 tsp. kosher salt
1 Tbs. baking powder
1 Tsp. baking soda
1 Tbs. lemon zest (or 2 tsp. lemon flavoring)
2 Tbs. caraway seeds
1/2 stick (2 oz.) butter cut into 1/2 inch cubes and frozen
1 3/4 cup buttermilk
1 egg

Directions:
In a bowl whisk together the dry ingredients from the AP flour to the the caraway seeds so they are well distributed. In the bowl of a food processor with a steel blade add some of the mixed dry ingredients with the butter and pulse until it resembles fine meal. Add the rest of the mixed dry ingredients and continue pulsing. (I found this works better to fully incorporate the butter. If all the mixed dry ingredients are added at once the butter remains in cubes.) Put the dry mixture into a large bowl. Mix the buttermilk and egg. If using lemon flavoring add it to the buttermilk now. Mix the buttermilk egg mixture into the dry mixture. Mix just until everything is incorporated. (I found I had to add more buttermilk for the dough to form otherwise it would have been just crumbs and not held together). Turn out onto a floured surface and gently pat into it together. (The original recipe calls for patting it into a 1/2 inch thick rectangle and then cutting it into various shapes using about 1/2 cup of dough for each shape.) I just took a 1/2 cup measure. filled it with dough and turned it out onto a cookie sheet lined with parchment paper. Bake in a 375 degree oven for 35 to 40 minutes.

This was without a doubt the most complex and refined version of the Irish soda breads my wife made. It had depth of flavor. The caraway seed with the slight hint of lemon was a very good addition. It had the familiar rough crunchy crust and soft moist interior. Traditionalist would say, “but it is not genuine soda bread.” Next time my wife said she would make it even less so by adding raisins.
Posted by Uncle N at 6:00 AM No comments:
Email ThisBlogThis!Share to XShare to FacebookShare to Pinterest
Labels: Baked, bread

Monday, March 25, 2024

Mary Walsh's Currant Cake マリイウオルシュのカラントケーキ

We like food themed travel shows. One of which was by Phil Rosenthal. It started as a PBS show “I’ll Have What Phil is Having” which evolved into a Netflix show called “Somebody feed Phil”. Although we had forgotten about it, turns out we had a copy of “Somebody feed Phil The book”. We rediscovered it while looking for another cookbook on the book shelf. It is an interesting read of behind-the-scene stories of the first 4 seasons but it also contains recipes provided by the local chefs they visited during the show. Among those recipes, was one titled “Mary Walsh’s Currant Cake”. Since St. Patrick's day was coming up and the current cake was basically an Irish soda bread my wife decided to make it. According to the book, although it was called current cake one of the secrets of why it tasted so good was that Mary didn’t use currents. She used sultanas (golden raisins) instead. Maybe she used sultanas because she didn’t have any currents. We, of course, didn’t have any currants either (we also didn’t have any sultanas). So my wife used raisons and dried fruit medley from Harry and David. (So really we should probably call our version dried fruit medley cake). As the queen of ingredient substitution in recipes my wife did not stop there. The recipe called for orange and lemon zests but we did not have any oranges. We did, however, have some Meyer lemons which have a flavor that is a cross between a lemon and an orange. So she used that instead and it worked well.

You can see the dried fruit medley and raisins on the cut-surface (picture #1)


Ingredients:
2 ounces (½ stick/55g) unsalted butter (room temperature), plus more for the pan
3¼ cups (450g) all-purpose flour, plus more for dusting
2 tablespoons (25g) castor or light or dark brown sugar
½ teaspoon baking soda
½ teaspoon kosher salt
Zest of 2 Meyer lemons
1 cup dried fruit medley
1 cup of raisins
1 large egg
1¼ cups (300ml) buttermilk
2 tablespoons (30ml) heavy whipping cream
1 tablespoon brown sugar

Directions:
Preheat the oven to 425°F (220°C) and place a baking rack in the lower third of the oven.
Lightly butter an 8-inch round cake pan. In a large bowl, mix the flour, brown sugar, baking soda, and salt together. Use your fingers to rub the butter into the dry ingredients. Use a citrus peeler to zest the Meyer lemons. Add all the zest and the dried fruit to the bowl with the flour mixture and stir until well combined.

Put the egg in a medium bowl and whisk in the buttermilk and cream. Set aside 2 tablespoons of the buttermilk mixture.

Make a well in the center of the dry ingredients and pour in the remaining buttermilk, stirring to make a very moist, shaggy dough. Or, use your hands: grip the edge of the bowl with one hand, stir with a broad circular motion with the other. Turn the dough out onto a well-floured work surface and dust your hands lightly with flour. Gently shape the dough into a thick, roughly 6-inch (15cm) round and use a bench scraper or large spatula to transfer the dough to the center of the cake pan.

Brush the top and sides of the dough with the reserved buttermilk mixture and sprinkle the remaining brown sugar on top (#2). Put the cake pan in the oven, reduce the temperature to 400°F (180°C).


Bake for about 40 minutes until the bread is lightly golden brown on top and sounds hollow when tapped (#3). Transfer the bread to a wire rack and let cool for about 20 minutes. Cut the bread into thick slices and serve it warm with butter.


This is a very nice soda bread. Perfect for Saint Patrick’s day. It had a dense moist texture and a mild slightly sweet taste. The robust flavor of the butter milk as well as the citrus note from the Meyer lemon zest came through nicely. The dried fruit added a nice burst of sweetness.
Posted by Uncle N at 6:30 AM No comments:
Email ThisBlogThis!Share to XShare to FacebookShare to Pinterest
Labels: baked bread

Thursday, June 28, 2018

Sour cream bread サワークリームパン

This again is my wife's baking since I cannot seem to come up with new Izakaya dishes recently, although I am making our favorites regularly. This is also from the "Beard on Bread" cookbook. She decided to make this bread since she had leftover sour cream from making "rich sour cream bread". The name is similar but this is totally different from the other recipe and much easier to make. It is a very versatile bread almost like a white bread loaf but it is a bit more tender and has more flavor.


Perfect for toasting with butter.


Ingredients:
1 package dry yeast
3 Tbs. granulated sugar
1/4 cup warm water
2 cups sour cream (I only had one cup of sour cream so I made up the difference with half and half and it seemed to come out just fine)
1 Tbs. salt
1/4 Tsp baking soda
4 to 5 1/2 cups bread flour

Directions:
Bloom the yeast in the warm water with the sugar dissolved. Add the salt, baking soda and 4 cups of bread flour to a stand mixer with a dough hook. Add the bloomed yeast and sour cream. Mix until dough is formed adding additional flour as needed. Knead for 7 to 10 minutes of speed 2. The dough should be soft, smooth and pliable. Put in a bowl with a little bit of vegetable oil to coat the dough so it won't dry out. Let rise until doubled in size.

Punch down and form into two loaves. Put the loaves in heavily buttered bread pans and let rise until doubled. Cook in a 375 degree oven until golden brown and sounds hollow when tapped. Turn out on a rack to cool immediately.


We had this as a breakfast freshly toasted and buttered. This is a really basic but great bread. It has a fairly fine crumb and soft texture. There is a complexity to the flavor that is very good but subtle and hard to describe. The taste of the bread goes extremely well with the taste of the butter. We probably like this bread better than the other sour cream bread especially for every day.
Posted by Uncle N at 7:46 AM No comments:
Email ThisBlogThis!Share to XShare to FacebookShare to Pinterest
Labels: Baked, bread

Monday, September 3, 2012

Goat cheese drop biscuit 山羊乳チーズビスケット

This was a classic Southern breakfast which my wife made based on Chef Art Smith of Ophra Winphrey fame. But, this is also a good starch dish to end your evening.

Biscuit ビスケット can mean two totally different things whether the term is used in England (Commonwealth) or in North America. In the former, it is  a type of cookie or short bread  (which is also what Japanese think of “ビスケット”) and the latter, a type of quick bread somewhat similar to scones.Digression alert!: The category of “bread” called “quick” bread, in which biscuit certainly belongs, usually use chemical leavening agents (instead of organic and living  agents such as yeast). These are baking powder and baking soda. Baking soda is rather straight forward. It is “sodium bicarbonate” which requires an external acid to do its job which is to release carbon dioxide gas that causes the bread to rise.

On the other hand, baking powder is more complex. It contains its own source of activating acid in addition to the basic baking soda and is differently formulated depending on the brand.  I am not going into details but “double action” baking powders can contain “aluminum” compounds (heat activated or slow-action part). My wife is very sensitive to the taste of baking powder which contains aluminum compounds (I cannot taste it). She can tell immediately if something has been baked using baking powder with aluminum compounds. For any recipe which calls for baking powder, she uses the brand which does not contain aluminum salts (the brand she uses contains bisodium pyrophosphate).

In addition to the fact that some people are sensitive to the metallic taste of aluminum compounds, aluminum is not a metal I would like to consume. Certain neurodegenerative diseases such as ALS (amyotrophic lateral sclerosis or better know as Lou Gehrig disease in North America) or even Alzheimer may be linked to aluminum (disclaimer; no scientific proof has been established). Japanese often use another “aluminum” salt called “myouban” 明礬 in cooking especially to preserve the bright purple color of eggplant when it is picked (salted). I do believe that we should avoid eating aluminum, although its ill effects are not proven. I’d prefer to eat brown discolored eggplant “tuskemono” 漬物 to avoid the risk of aluminum; proven or not.
I have to ask my wife for the recipe.

This is the recipe doubled—no sense in making small quantities because they go so fast!

4 cups AP flour, 1 Tsp baking soda, 4 tsp baking powder, 2 tsp salt, 8Tbs (4 oz) butter, 8 Tbs. goat cheese, 2 cups buttermilk, chives chopped.
Heat oven to 425, and put cast iron skillet in the oven while it is preheating. (I used one 8 inch, and one 5 inch pan. Place flour, baking soda, powder and salt in a bowl and whisk to evenly distribute ingredients. Cut in the cold butter and goat cheese until they are about the size of small peas. Add the chives and coat with the flour to distribute evenly. Pour in the buttermilk and stir until just moistened.

The next part is a bit intimidating. Take the hot pan out of the oven (be careful because it will be really hot). Drop in a Tbs. of butter or whatever amount is necessary to coat the bottom of the pan. Scoop the batter into the pan in spoonful, (hence the name drop biscuits). I use a large ice cream scoop. Leave room around the biscuits so that they can form a nice crunchy crust. Pop back into the oven and cook for 14-16 minutes until brown. Since the dough is “dropped” into a hot iron skillet (see above left), the bottom of the biscuit became brown and extra  crispy (see above right)—this is without a doubt the best part! The goat cheese flavor with chives in this crunchy fluffy and hot biscuit is good eatin’ any time.
Posted by Uncle N at 6:30 AM No comments:
Email ThisBlogThis!Share to XShare to FacebookShare to Pinterest
Labels: Baked

Friday, March 18, 2022

Miso maple syrup loaf 味噌メープルシロップローフ

I saw this interesting quick bread in one of the food blogs I follow (in Japanese) using “miso” and “maple syrup”.  This recipe was credited to Dorie Greenspan and it was easy to find the recipe in English in the New York times cooking section among other sites. So, I commissioned my wife to make this bread loaf. While baking, it definitely had the smell of  nutty miso. It is mildly sweet and salty with nutty overtones. It’s quite unique (in a good way) and nice. We had this as an ending dish the evening she baked it and also as a breakfast bread.


Ingredients: (Pictures #1 & #2) (Makes one loaf)
4 ounces (113g) unsalted butter, at room temperature
1¾ cups (238g) all-purpose flour
1¾ teaspoons baking powder
¼ teaspoon baking soda
¾ cup (150g) granulated sugar
¼ teaspoon salt
Finely grated zest of 1 orange or 2 tangerines (or 1 tsp. Orange flavoring)
¼ cup (70g) white miso
¼ cup (60ml) pure maple syrup
2 large eggs, at room temperature
1½ teaspoons vanilla extract
⅓ cup (80ml) buttermilk (well shaken before measuring)

Recipe doubled (makes 2 loaves)
8 ounces (226g) unsalted butter, at room temperature
31/2 cups (476 g) all-purpose flour
3 ½ teaspoons baking powder
1/2 teaspoon baking soda
1 1/2 cup (300g) granulated sugar
1/2 teaspoon salt
Finely grated zest of 2 orange or 4 tangerines (or 2 tsp. Orange flavoring
1/2 cup (140g) white miso
1/2 cup (120 ml) pure maple syrup
4 large eggs, at room temperature
3 tsp. teaspoons vanilla extract
2/3 cup (160 ml) buttermilk (well shaken before measuring)

Directions:
Whisk together the flour, baking powder and baking soda. Put the sugar, salt, and zest in the bowl of a stand mixer. Rub the ingredients together until the sugar is moist and fragrant; it may even turn orange. Add the butter, miso, and maple syrup to the bowl. Beat on medium speed for about 3 minutes, scraping down the bowl and beater(s) as needed to form a creamy mixture. One by one, add the eggs, beating for a minute after each. Beat in the vanilla. The mixture might curdle, but this is a temporary condition. Mix the wet ingredients into the dry ingredients alternately with the buttermilk and mix until they are incorporated.


Scrape the batter into the greased loaf pan, working it into the corners and smoothing the top (#3). Cook in a 350 degree oven for 50 to 55 minutes. Check the loaf after 40 minutes and cove the top loosely with a foil or parchment tent if it’s browning too fast. The loaf is properly baked when it pulls away from the sides of the pan and a tester inserted into the center comes out clean. The top will be flat and most likely cracked down the middle (#4). Transfer the pan to a rack and let the bread rest for 5 minutes, then run a table knife around the edges of the loaf and unmold onto the rack; turn it right side up.


This was quite an engenius flavor combination. The bread has a very tender texture and the maple/miso combo plays extremely well together. Praise-be to whom ever thought of combining maple syrup and miso. (Side note: My wife made the bread in the late afternoon and it came out of the oven just before dinner. That night my wife woke up smelling miso. Her first thought was, ‘someone is making miso soup…who would be making miso soup at this hour?’ Then it dawned on her. It was the residual smell of the bread she had just baked.) We highly recommend this bread.


Our plum tree has been blooming recently in response to several warm days we had. It was a nice reminder that spring was indeed on its way. It looked beautiful and it had a lovely fragrance that was wonderful wafting on the breeze. Then a “bomb cyclone” whipped through, dumping snow, ice and cold temperatures. We woke up to a white winter wonderland. Everything, including the plum blossoms covered in snow and ice. But our plum tree stood fast. We still had plum blossoms even after the snow melted. Spring was not to be deterred by the late winter icy temper tantrum of a mean old bomb cyclone! 
Posted by Uncle N at 6:00 AM No comments:
Email ThisBlogThis!Share to XShare to FacebookShare to Pinterest
Labels: baked bread, Miso

Sunday, April 26, 2020

"Rescued" sour cream bread "救助”されたサワークリームパン

Due to the shortage of yeast during the Covid-19 pandemic, my wife has been relying on biga/poolish as the leavening agent for bread. She has experimented with substituting preferments in various of her favorite bread recipes with great success. So she decided to try making sour cream bread based on a recipe in "Beard on Bread" using biga. She made the biga the night before and by morning it had puffed up nicely. She used it to make the dough; making adjustments for the moisture and flour already in the biga. She made the dough in the morning but by 5:00 PM basically nothing had happened. The dough sat sullenly in the bottom of the bowl just basically where it had been in the morning. We consulted each other about what to do with the recalcitrant dough. Should we give it a time out by just putting it into the fridge and letting it spend the night getting its act together and hopefully rising? Then I suggested, "Maybe we should just cook it now like a focaccia". That sounded like a plan to us so I rolled it out on parchment paper. (This is a new technique I read about recently for getting these types of bread in and out of the oven and found it works very well). We decided to top it with cream cheese and black olives.


This is the loaf after it was cooked. It had some rise, at least it wasn't flat like a cracker.


Ingredients:
Biga:
1 3/4 cups flour
2 cups sour cream
1/8 tsp yeast

Dough:
biga
3 tbs. sugar
2 tsp. salt
1/4 tsp. baking soda
3 to 4 1/2 cups flour

Directions:

The night before baking mix together the biga, cover it with towels and leave at room temperature overnight. Next day in an electric mixer with a dough hook combine the biga, sugar, salt, baking soda and flour into the smooth elastic dough. Knead on the dough hook for 7 to 10 minutes. Remove from the bowl and hand knead a few minutes more. Put into the bowel and lightly coat with oil. Let rise.

In this case it did not rise. After some consternation and discussion it was decided the bread had been re-designated as focaccia and I stepped up to "center stage". I  took the dough out of the bowl in which it had spent the day and transferred it to a piece of parchment paper (big enough to hold the final rectangle). I stretched the dough into a rectangle shape, then folded all sides inward and stretched it again to make the same sized rectangle. I repeated this 2 times and ended up with the focaccia shape shown above. I covered it with plastic wrap and a towel and let it rise (hopefully) for another hour. Meanwhile I preheated the oven with a baking stone in it to 390 F. After one hour, I pressed the dough with my finger tips like I would do with focaccia bread. I brushed the surface with olive oil. At my wife's suggestion, I put small cubes of cream cheese and slices of black olives on top of the loaf. I transferred it still on the parchment paper using a metal pizza paddle to the baking stone and baked it for 30 minutes.

Surprisingly this bread was very good! The texture was dense and chewy but soft at the same time. The basic recipe was slightly sweet with a slight tang from the sour cream. Those flavors came through and went extremely well with the saltiness of the olives and the creaminess of the cream cheese. This turned out to be a very good breakfast bread that went well with coffee. It is a prime example of how "forgiving" yeast breads can be. We have taken to calling it "rescued" bread.  We wouldn't mind making it again but we are not sure we could reproduce the "mistake" that resulted in this version of the bread rather than the one we were expecting. We think maybe the ratio of biga to flour was not correct and most of the gluten was eaten by the resulting yeast so the bread couldn't rise. (Just a theory. Who knows? We'll be working on this.)
Posted by Uncle N at 6:00 AM No comments:
Email ThisBlogThis!Share to XShare to FacebookShare to Pinterest
Labels: Baked, bread, Cheese, Olive

Sunday, September 13, 2015

"Super secret" pumpkin bread 秘密のパンプキンブレッド

This "super secret" pumpkin bread recipe was graciously given to us by one of our friends. Since Halloween is coming and we just took out the pumpkin decorations, it was appropriate to make this bread. 


This is indeed a great bread.


The original recipe given was said to make 6 loaves in 8 ½ x 4 ½ x 3 inch loaf pans so we halved the recipe. Our loaf pans must have been larger and made 2 loaves. The below (indented and in italic) is the original recipe.

Ingredients:
5 cups AP flour, 4 ½ cups sugar,1 tablespoon baking soda,2 teaspoons salt, 2 teaspoons ground cinnamon,*2 teaspoons ground nutmeg*, 1 teaspoon pumpkin pie spice*, 1 ½ cups vegetable oil,1 cup water, 6 XL eggs, two 15-ounce cans pumpkin,1 regular size package of chopped walnuts (2 cups or so).
The picture below is half of the above amounts. Since we did not have store bought "Pumpkin pie spices" we made it by mixing cinnamon 1/2 tsp, ginger powder 1/4 tsp, nutmeg 1/8 tsp, allspice 1/8p which makes 1 tsp of pumpkin pie spices (see right upper image, we used half of what was shown). Also we roasted walnuts before chopping.

Pumpkin bread ingriedients compo

Note:  The spices are all measured as heaping.  Don’t heap if you don’t like extra spicy but I think it makes a nicer loaf.  This recipe is my tweaked version, which has extra pumpkin, therefore extra spices.  It makes six loaves.  I get the little foil pans and spray with butter flavor Pam.  You can also get the mini loaf pans and make mini loaves.  Just check frequently when baking.  I’ve never had trouble getting a loaf out.  For freezing, wrap loaf in plastic and then in foil.  Can stay in the freezer FOREVER and is good to take out when company comes.  Practically foolproof. Instructions:Combine flour, sugar, soda, salt, cinnamon, and nutmeg in a large mixing bowl; mix with a wire whisk to combine.  Add oil, water, eggs and pumpkin; beat at medium speed of an electric mixer until thoroughly blended.  Stir in walnuts.  (You can leave out walnuts if you don’t like them.  The bread will come out just fine without nuts.)  Pour batter into 6 greased 8 ½ x 4 ½ x 3 inch loaf pans.  Bake at 350 for 1 hour, or until loaves test done and tops are golden brown.  Serve hot or cold with butter or cream cheese.  Yield: 6 loaves.
Since our loaf pans were larger than specified, we poured the batter in two pans.


After one hour at 350F, it came out nicely. After some cooling, we tipped the loaves out to cool further on the cooling rack.


We could not wait for the bread to cool down completely and sliced the edge and tasted it. When it was still warm, the center looked wet but after it cooled to room temperature, the moisture distributed throughout the bread. The texture of the bread was very moist and plenty of pumpkin pie flavors. We thank our friend for divulging this “super secret” and excellent recipe. We really appreciate that our friend chose to share her coveted recipe with us and the readership of our blog.
Posted by Uncle N at 6:00 AM No comments:
Email ThisBlogThis!Share to XShare to FacebookShare to Pinterest
Labels: Baked, bread, pumpkin

Monday, February 4, 2019

Dill-weed bread ディル入りパン

I helped to make this bread with my wife since she is still having problems with her arm. This bread is very unusual in that it has only one rise. Nonetheless, the texture is very delicate almost cake like. The original recipe is for one loaf. So we doubled the recipe and made two loaves. This is also from "Beard on Bread" cookbook. The original recipe indicated a choice of using dill weeds or dill seeds. We used fresh dill weed in this bread.


Ingredients (2 loaves):
2 packages yeast
4 tsp sugar (1/2 tsp. additional to proof yeast)
1/2 cup warm water
16 oz. cottage cheese
2 eggs
4 tsp grated onion
4 tbs melted butter
2 tsp salt
1/2 tsp baking soda
2 cups whole wheat flour
3 cups All Purpose flour
4 Tsp fresh dill weed finely chopped

Directions:
1. Proof the yeast in the 1/2 cup warm water with 1/2 tsp sugar.
2. Using a mixing paddle on the stand mixer add the cottage cheese, eggs and blend thoroughly.
3. Add the grated onion, melted butter, dill weed, salt and baking soda. Mix completely.
4. Switch to a dough hook and add the flour one cup at a time until the dough clings to the hook and is smooth and springy to the touch. Knead on speed 2 for 7 to 10 minutes.
5. Heavily butter two loaf pans. Distribute the dough into the pans (it will be very sticky and difficult to divided up).
6. Cover and let rise until doubled in bulk.
7. Bake in a 375 degree oven for 35 to 40 minutes until it sound hollow when tapped.


The crust appears rather rustic but the bread has a very nice tender texture with a distinctive dill smell and flavor. (The crust came out "rustic" because the dough is very sticky and was a little difficult to get into the loaf pan.)


This is a great bread toasted with butter and perfect for breakfast. It is interesting that with only one rising, the texture of the bread is very fine and tender. It has nice dill tastes but onion flavor is very subtle.

Posted by Uncle N at 6:00 AM No comments:
Email ThisBlogThis!Share to XShare to FacebookShare to Pinterest
Labels: bread, Cheese

Sunday, January 18, 2015

Steamed brown bread with honey cream cheese 蒸し黒パン

When I made pork buns, I remembered that my wife at one time made steamed brown bread and reminded her of it. She immediately got into action and, on one weekend, made this steamed brown bread. According to her, the classic should have been steamed in a can but she made it in deep ramekins. She said she reduced the amount of molasses since I am not particularly fond of strong molass-y flavor. According to her, this bread is eaten with honey cream cheese which she also whipped up by mixing honey and cream cheese. She sliced thin disks of the bread and smeared on the honey cream cheese. This was really good as a snack or even breakfast.


First, she arranged thusly (above). I said it looks like packman. So she rearranged below.


Here I ask my wife to take over.

This recipe is from a book entitle “Quick Breads” by Beatrice A. Ojakangas
Ingredients:
2 cups All Purpose flour
2 cups cornmeal
2 tsp baking soda
1 tsp salt
3 cups buttermilk
1/3 cup karo syrup + 1/3 cup dark molasses (This combination is what Pa Dutch recipes call “table molasses”. I did this to tone down the molasses flavor to accommodate my husband who is not overly fond of it. If you really like molasses then just use molasses and no Karo for  2/3 cup molasses).
2/3 cup raisins.

In a large mixing bowl stir the flour, cornmeal, baking soda, and salt until blended. Combine the buttermilk and molasses. Add the liquid ingredients to the dry. Mix until well blended. Add the raisins. 

This bread is steamed. Generously grease the ramekins as well as the aluminum foil used to cover them. I prepared the large pot we used for sous vide and the Dutch oven by putting egg steaming trivets from the instant pot on the bottom of each and filling with enough water to come half way up the side of the ramekins (see pictures below).  I used 2 large ramekins and 4 medium sized ones. The two large ramekins plus an optional smaller one could fit in the large sous vide pot. The 4 smaller ramekins, however, also fit well in the Dutch oven so just the large ramekins could go in the sous vide pot. I spooned the batter into the ramekins until they were 2/3 full. I tightly covered them with aluminum foil held on with a rubber band then put them in the steaming pot, water gently boiling so the water came 1/2 the way up the ramekin. I covered the pot and steamed them for about 45 minutes or until a tooth pick came out clean. I removed the bread from the ramekins and let it cool. I sliced the small round loaves in 1/2 inch slices and slathered them with cream cheese with honey mixed in.

This is a very hearty flavorful bread with a bit of tang from the molasses and the buttermilk. The texture is pleasingly dense but moist. The cream cheese offsets the tang and is a perfect accompaniment.


Posted by Uncle N at 6:00 AM No comments:
Email ThisBlogThis!Share to XShare to FacebookShare to Pinterest
Labels: bread, Steamed

Thursday, September 7, 2017

Banana Bread バナナブレッド

We thought we must have already posted my wife's banana bread recipe but realized we did not. This time, she made it from red bananas instead of regular bananas. The red bananas have a denser sweeter texture. When using regular bananas my wife found the the bread tasted best if the bananas were extremely ripe--as in almost completely black. On a number of occasions, I saw the blackened bananas sitting in a bowl on the counter and went to throw them out.  My wife would object claiming they were almost ready for banana bread. Another technique she used was to freeze the ripened bananas (after peeling) until she had enough to make the quantity of bread she wanted. This is a classic quick bread which she has been making for long time and we have been enjoying as a breakfast bread.


This post is mostly to have her recipe on line so that she can refer to it easily. Beside using red bananas, she added pecan nuts.


She let it cool down just a bit before removing the loaf from the pan.

Bananas add flavor as well as moist texture without adding too much fat.

Ingredients.
3 cups All Purpose flour
2 Tsp. salt
2 Tsp. baking soda
2 cups mashed bananas
2 cups sugar
2 eggs
1/2 cup butter melted
2 Tsp. vanilla
Toasted pecans, chopped (optional)

Directions:
In a bowl stir together the flour, salt and baking soda. In another bowl, stir together the remaining liquid ingredients. Mix the liquid ingredients with the dry ingredients. Pour into a greased loaf pan (this recipe makes 2 loaves). Bake in a 325 F oven for 50 to 60 minutes until a wooden skewer inserted in the middle comes out clean. Let cool in pan for 10 minutes then remove from the pan.
This recipe is extremely easy to scale up. The amount is all based on the quantity of bananas available. My wife has made up to 10 times the recipe which is the maximum our large bowls can handle. 

As far as I am concerned this is the best banana bread! It is moist, sweet, and tastes of vanilla and bananas. Over the years, my wife has tried other recipes but keeps coming back to this one. It tastes great in the morning with a cup of coffee.
Posted by Uncle N at 6:00 AM No comments:
Email ThisBlogThis!Share to XShare to FacebookShare to Pinterest
Labels: Baked, bread

Saturday, August 25, 2018

Corn bread with raw corn and sage セージ味コーンブレッド

This is another one of my wife's baking. The recipe is based on one from La Brea Bakery Cookbook. We had this cookbook for many years but we did not really made anything from it until now. This is an interesting corn bread which uses raw corn and also fresh sage (from our herb garden). My wife also used corn flour instead of cornmeal which made the texture of the bread much more tender.


I did not take a special serving picture and we couldn't restrain ourselves so we nibbled the nice crunchy top crust off one of the loaves right after the bread came out of the oven and before taking this picture which explains the missing crust portions in the picture below.


The interesting part of this recipe is that you cook graded raw corn, butter and sage (almost polenta) to make dough for this bread. We liked the first batch so much my wife made a second batch and we restrained ourselves from eating the crust so the picture below is intact.


The recipe called for putting sage leaves in the bottom of the bread pan. The notation suggested this was better than putting it on the top where it would burn while the bread cooked. The end result as shown below may add to the sage flavor but at the very least it is decorative.


Ingredients:

1 1/2 cup grated corn
1 stick butter
6 large sage leaves (or several sprigs of rosemary)
1 1/2 tsp salt
2 large eggs
1 cup buttermilk
3/4 cup corn flour (or corn meal)
2 cups All Purpose (AP) flour
1/2 tsp baking soda
2 tsp baking powder
1/4 cup sugar (or more for a slightly sweeter muffin)

Directions:
Grate the ears of corn on a stand grater. Scrape the ears with the back of the knife to get the remaining "corn milk" (#1).  Melt the butter in a saucepan (do not allow it to boil or brown). Mix in the grated corn, salt, and sage leaves. Cook until creamy and thickened, making a kind of polenta (shown below). Remove the sage leaves. To achieve a really smooth emersion blend it further in a “motor boat” blender. Allow the mixture to cool. Add the buttermilk and eggs and mix until blended.


In a large bowl sift together the corn flour (#2)(or corn meal), AP flour, baking soda, baking powder, and sugar (#3). Add the liquid ingredients (#4) and stir until blended. Add to greased loaf pan. (either small individual sized loaf pans or one large pan) (#5 & #6). As suggested by the original recipe, I put a sage leaf on the bottom the the loaf pan (#7) and poured the batter on top (#8). (I'm not sure if this added to the sage flavor or was just for decoration.) Cook in 400 degree oven for 18 to 20 minutes for muffins, 20 to 25 minutes for small loaves and 30 to 40 minutes for large loaf or until a skewer comes out clean and the loaves are nicely browned.


This bread is lovely. As it cooked the smell of corn, butter and sage filled the house. It's flavor reflects these smells and is a very pleasant combination of corn and sage flavor. The texture is very tender. It is wonderful lightly toasted with melted butter.
Posted by Uncle N at 6:00 AM No comments:
Email ThisBlogThis!Share to XShare to FacebookShare to Pinterest
Labels: Baked, bread, corn

Friday, November 23, 2012

RGPB (Really Good Pumpkin Bread) パンプキンブレッド

Again, this is something my wife made. This recipe came from America's test kitchen. I have to say this is one of the best quick breads I ever tasted. It is moist, flavorful with the crunch of nuts and sweet crumbs on the top. You can eat this any time of the day. It is sweet enough to be even a dessert (at least for us but probably not for most Americans). I asked my wife to take over this post.

This bread consists of two parts: the topping and the bread itself. The secret of this recipe is to cook the pumpkin puree to caramelize slightly and remove the “canned” taste. 


Topping: 5 Tbs. packed light brown sugar,1Tbs. all purpose flour, 1Tbs. unsalted butter softened, 1 Tsp. ground cinnamon, 1/8 Tsp. salt. I used my fingers to mix all the ingredients together until the mixture resembled coarse sand.

Bread: 
2 cups all purpose flour, 
1 1/2 Tsp baking powder, 
1/2 Tsp. baking soda, 
1, 15 oz. can of unsweetened pumpkin puree (According direct mathematical conversion 15 oz. should equal 425 grams.  But when I weighed the actual contents of the can it came out to 418 grams. I provide this information in case I don’t have a can of that exact size), 
1tsp. salt, 
1 1/2 tsp ground cinnamon, 
1/4 tsp. ground nutmeg, 
1/8 tsp. ground cloves, 
2 cups granulated sugar, 
1 Tbs. molasses, 
1/2 cup vegetable oil, 
4 oz. cream cheese cut into pieces, 
4 large eggs, 
1/4 cup buttermilk, 
1 cup walnuts toasted and chopped. 

I mixed the flour, baking powder and baking soda together in a bowl and set it aside. I combined the pumpkin puree, salt, cinnamon, nutmeg and cloves in a large sauce pan and cooked continuously until it turned brown and reduced by about half (picture 1 below). I removed the pan from the heat and stirred in the sugars, molasses, oil and cream cheese. I mixed it until everything was incorporated and homogeneous. I whisked together the eggs and buttermilk and added it to the pumpkin mixture (picture 2). (This step requires some care not to curdle the eggs so either let the mixture cool down or temper the eggs a bit before adding.)  I poured the cooled pumpkin mixture into the flour mixture to form a batter. I folded the walnuts into the batter. I poured the mixture into two greased loaf pans and sprinkled the topping mixture on top of the loaves. I cooked the loaves in a 350 degree oven for about 45 or 50 minutes or until a skewer came out clean. (I also made these into muffins, making a total of 15 muffins.) Just after cooking, this loaf is very tender so I let it rest in the pan for about 20 minutes before I attempted to remove it (picture 3). I waited until it was completely cool before slicing it (picture 4).

This bread is quite good. It is very tender and has lots of flavor. The nuts add a nice counterpoint to the rich soft texture of the bread. The topping adds an additional texture component and a nice sweet crunch. The bread would be really good even without the topping. We will be making this again.
Posted by Uncle N at 6:30 AM No comments:
Email ThisBlogThis!Share to XShare to FacebookShare to Pinterest
Labels: Baked, bread, pumpkin
Next Posts Home
Subscribe to: Posts (Atom)

Subscribe To

Posts
Atom
Posts
All Comments
Atom
All Comments

Search This Blog

Followers

Labels

almond (5) anchovy (2) Appetizer (31) apple (4) artichokes (6) asparagus (16) avocado (17) bacon (3) bagel (1) Baked (284) baked bread (9) baked bread (25) Bamboo shoot (6) basil (12) beans (7) Beef (64) bentou (2) bites (1) blini (6) Blueberry (15) bonito (6) braised (6) bread (120) broccoli (4) buttermilk (11) cabbage (11) cake (17) carrot (16) cashew nuts (3) cauliflower (9) celery (3) chawanmushi (1) Cheese (186) Chestnuts (34) Chicken (206) chicken tenders (10) chocolate (5) clam (1) coffee (3) confit (1) cookbook (1) cookie (20) corn (20) crab (7) Cucumber (56) curry (22) daikon (24) dango (1) Deep fried (129) dip (1) Duck (20) edamame (4) eel (3) Egg (200) eggplant (23) espresso (2) fig (2) fis (1) Fish (305) fish cake (12) fish roe (62) fruit (24) garlic chive (2) ginger (5) Ginko nuts (5) Grapes (4) green beans (4) Grilled (95) gyoza (5) hamachi (1) Hanami (16) hazelnuts (1) hummus (1) ice cream (1) indian (1) Indian-style (16) instant pot (5) izakaya (2) Kabocha (9) Konnyaku (1) Lamb (20) lily bulb (4) Liver (13) Lobster (9) mackerel (1) Matsutake (16) meat ball (2) milk (3) mint (4) Miso (100) Mitsuba (2) mochi (11) Muffin (30) Mushroom (105) Nabe (5) natto (23) Noodle (54) octopus (29) Oden (7) Olive (13) olive oil (4) orange (1) Osechi (10) Other (24) oyster (3) pancake (13) panna cotta (10) Pasta (30) peanut (2) pecan (1) Pennsylvania Dutch (10) pepper (4) perilla (7) persimmon (6) pickled (12) Pie (5) pine nuts (4) Pizza (9) plum (5) Pork (178) porke (1) Potato (99) prune (1) pumpkin (12) quail (1) r (1) renkon (12) Restaurant Review (33) Rice (128) Sake (35) Salad (99) salmon (74) sashimi (79) scallops (10) Sea weed (49) sesame (10) shishamo (1) Shrimp (26) Shumai (3) simmered (29) Simmered (Nimono) (70) souffle (1) Soup (76) Sous vide (14) Speciality flour cake (3) spinach (1) Squid (59) Steamed (30) stew (10) stir fry (1) strawberry (3) Sunomono (22) sushi (21) sweet pea (2) tahini (1) tea (7) teriyaki (1) Tofu (113) tomato (42) Tsukemono (16) tsukimi (1) Tuna (96) udon (18) ume (2) Umeboshi (14) Uni (40) Vegetable (285) Walnuts (5) wine (8) Yakitori (14) Yamaimo (34) yogurt (24)

Blog Archive

  • ▼  2025 (33)
    • ▼  June (3)
      • Tokyo Kyobashi Areas Izakayas (part 2) 東京の居酒屋 東京駅八...
      • Cream Cheese with Pickled Daikon クリームチーズ 沢庵入り
      • Tokyo Kyobashi Areas Izakayas (part 1) 東京の居酒屋 東京駅八...
    • ►  April (5)
    • ►  March (6)
    • ►  February (9)
    • ►  January (10)
  • ►  2024 (88)
    • ►  December (5)
    • ►  November (10)
    • ►  October (9)
    • ►  September (10)
    • ►  August (2)
    • ►  July (8)
    • ►  June (10)
    • ►  May (7)
    • ►  April (4)
    • ►  March (8)
    • ►  February (8)
    • ►  January (7)
  • ►  2023 (113)
    • ►  December (10)
    • ►  November (10)
    • ►  October (10)
    • ►  September (8)
    • ►  August (9)
    • ►  July (9)
    • ►  June (7)
    • ►  May (12)
    • ►  April (10)
    • ►  March (11)
    • ►  February (10)
    • ►  January (7)
  • ►  2022 (105)
    • ►  December (8)
    • ►  November (10)
    • ►  October (10)
    • ►  September (10)
    • ►  August (10)
    • ►  July (7)
    • ►  June (9)
    • ►  May (8)
    • ►  April (7)
    • ►  March (8)
    • ►  February (7)
    • ►  January (11)
  • ►  2021 (108)
    • ►  December (10)
    • ►  November (7)
    • ►  October (7)
    • ►  September (6)
    • ►  August (9)
    • ►  July (10)
    • ►  June (10)
    • ►  May (11)
    • ►  April (10)
    • ►  March (8)
    • ►  February (9)
    • ►  January (11)
  • ►  2020 (112)
    • ►  December (8)
    • ►  November (10)
    • ►  October (11)
    • ►  September (10)
    • ►  August (8)
    • ►  July (11)
    • ►  June (8)
    • ►  May (10)
    • ►  April (7)
    • ►  March (9)
    • ►  February (9)
    • ►  January (11)
  • ►  2019 (87)
    • ►  December (3)
    • ►  November (3)
    • ►  October (10)
    • ►  September (10)
    • ►  August (12)
    • ►  July (10)
    • ►  June (5)
    • ►  May (4)
    • ►  April (4)
    • ►  March (7)
    • ►  February (9)
    • ►  January (10)
  • ►  2018 (90)
    • ►  October (4)
    • ►  September (8)
    • ►  August (11)
    • ►  July (10)
    • ►  June (7)
    • ►  May (9)
    • ►  April (10)
    • ►  March (10)
    • ►  February (10)
    • ►  January (11)
  • ►  2017 (110)
    • ►  December (11)
    • ►  November (7)
    • ►  September (10)
    • ►  August (10)
    • ►  July (10)
    • ►  June (10)
    • ►  May (10)
    • ►  April (10)
    • ►  March (11)
    • ►  February (9)
    • ►  January (12)
  • ►  2016 (124)
    • ►  December (11)
    • ►  November (10)
    • ►  October (10)
    • ►  September (10)
    • ►  August (11)
    • ►  July (10)
    • ►  June (10)
    • ►  May (10)
    • ►  April (10)
    • ►  March (11)
    • ►  February (10)
    • ►  January (11)
  • ►  2015 (122)
    • ►  December (9)
    • ►  November (10)
    • ►  October (11)
    • ►  September (10)
    • ►  August (10)
    • ►  July (10)
    • ►  June (10)
    • ►  May (10)
    • ►  April (11)
    • ►  March (11)
    • ►  February (9)
    • ►  January (11)
  • ►  2014 (120)
    • ►  December (10)
    • ►  November (7)
    • ►  October (10)
    • ►  September (10)
    • ►  August (11)
    • ►  July (10)
    • ►  June (11)
    • ►  May (10)
    • ►  April (10)
    • ►  March (11)
    • ►  February (9)
    • ►  January (11)
  • ►  2013 (119)
    • ►  December (10)
    • ►  November (10)
    • ►  October (10)
    • ►  September (10)
    • ►  August (10)
    • ►  July (10)
    • ►  June (10)
    • ►  May (9)
    • ►  April (10)
    • ►  March (11)
    • ►  February (9)
    • ►  January (10)
  • ►  2012 (146)
    • ►  December (10)
    • ►  November (10)
    • ►  October (10)
    • ►  September (11)
    • ►  August (10)
    • ►  July (11)
    • ►  June (10)
    • ►  May (13)
    • ►  April (15)
    • ►  March (15)
    • ►  February (15)
    • ►  January (16)
  • ►  2011 (189)
    • ►  December (16)
    • ►  November (15)
    • ►  October (15)
    • ►  September (15)
    • ►  August (16)
    • ►  July (15)
    • ►  June (15)
    • ►  May (16)
    • ►  April (17)
    • ►  March (17)
    • ►  February (15)
    • ►  January (17)
  • ►  2010 (208)
    • ►  December (18)
    • ►  November (15)
    • ►  October (18)
    • ►  September (16)
    • ►  August (16)
    • ►  July (19)
    • ►  June (18)
    • ►  May (18)
    • ►  April (19)
    • ►  March (17)
    • ►  February (16)
    • ►  January (18)
  • ►  2009 (65)
    • ►  December (15)
    • ►  November (17)
    • ►  October (17)
    • ►  September (16)

Popular Posts

  • Cucumber with moromi miso もろきゅう
    This is a teiban 定番 or regular dish in Izakaya. It is very simple dish and this is not a recipe per se ; essentially serving cucumber and a...
  • Simmered Salmon head 鮭の兜煮
    The other day, we were in our regular grocery store and found salmon heads for sale. We have never seen this before. Of course, my wife want...
  • Salmon sashimi and “Yukke” style salmon サーモン刺身とユッケ風
    When we received our order of an assorted frozen sashimi from Riviera Seafood Club, they substituted salmon for the “Tuna chunks” (total of ...
  • Two premium types of Japanese rice from "The rice factory" 北海道ななつぼしと富山県コシヒカリ
    When COVID pandemic started, we tried to buy a bag of rice at our Japanese grocery store and realized all  15 Lb. bags of the rice we usuall...
  • Keema curry Japanese Version キーマカレー
    Keema (meaning ground meat) curry and its variation dry curry are popular in Japan. I posted  some variations of these dishes before. This ...
  • Rice with butter and soy sauce バーター醤油ご飯
    This may not be post-worthy but I realized this represents a regional way of eating rice peculiar to the "Hokkaido dialect" of J...
  • Chicken noodle soup チキンヌードルスープ
    Every time I make my version of chicken noodle soup, this " Far side " cartoon by Gary Larson comes to mind. I am sure this sli...
  • Grilled fatty salmon belly 鮭のハラスの祐庵焼き
    This was a starter dish one evening. Although the belly portion of salmon, "harasu" ハラス* is very fatty and probably the best...
  • Nabe cooked on an induction cooker, IH 適応土鍋で鱈ちり
    Some years ago, when we remodeled our kitchen, and were exiled to cook in the basement for the duration of the construction, we got a tablet...
  • Tempura smelts 生シシャモの天婦羅
    I spotted fresh and cleaned smelt in our regular grocery store one day. Smelt is a small fish and, in Japan, a type of smelt is called ...

About Me

My photo
Uncle N
I was born and grew up in Sapporo, Japan, until I moved to the United States sometime ago. I met my wife in California and, ever since, we have lived in the U.S. Now I have been in U.S. longer than I was in Japan. Living in the U.S., we like all sorts of food but, as I grow older, I gravitate toward Japanese food, if I have a choice. The tastes and smells of Japanese food take me back to fond old memories.
View my complete profile
Awesome Inc. theme. Theme images by A330Pilot. Powered by Blogger.