Sunday, July 19, 2020

Salmon appetizer 4 kinds 鮭のお通し4種

The day after we had sashimi salmon, we had the four starters pictured below. Two are repeat dishes from the ones we had the previous day when we had salmon sashimi. In the back is instant gravlax (previously posted instant Gravlax made with umershu 梅酒 ) canapé on the no knead rye bread I made. Topped with sour cream and cucumber.  


Here is a close-up of the gravlax.


The picture below shows  Russian marinated salmon on the second day. So,  it is bit more "cured" or "cooked" than when we had it the day before but still not completely "cooked" and quite good.


This is the usual salmon salad. Instead of crackers, I served it with slices of cucumber so that we would not get filled up too quickly.


Below is "salmon nanban" 鮭の南蛮漬け. This is a variation of nanban 南蛮. I made it with chicken,  jack mackerel 鯵, "shishamo" ししゃも or capelin fish previously.


So, these were 4 starters all made with salmon. We had cold sake which went very well with all dishes.

Thursday, July 16, 2020

Baguettes baked in Emile Henry ceramic baker 陶器ベイカーで焼いたバゲット

I have been making baguettes for some time. Getting a good crust on the bread, however, is always tricky since home ovens do not have steam injectors. I used to create the necessary steam by putting a baking sheet below the baking stone and then throwing in a couple of ice cubes after placing the baguettes on the baking stone. I believe that this may have led to the eventual demise of our old oven. In the interests of preserving our replacement oven I stopped the “ice cube” method and, instead, I sprayed water on the baguette dough just before putting it into the oven. This creates some crust but not a good one. More recently I started baking no-knead bread in a cast iron pot which created a nice crust. Apparently steam from the dough gets trapped and produces the crust. Since it is not possible to place a long straight baguette in a short round pot, we got this french made (Emile Henry) ceramic baguette baker. It requires some modifications to my baking methods. The below is the second try which I consider 80% successful. Since I made this using biga/poolish starter that my wife made, the texture is great, the taste is wonderful and cooked in the new baker, the crust is much better. But, these are not full size baguettes; they should be called mini-baguettes.


This shows the baguette baker with lid. (Lovely, luscious red color. All the other colors were sold out. Baking has become very popular during covid.) There are three small holes on the top.


The below picture shows the the baker bottom with the lid removed This makes three rather small baguettes.


Ingredients
For biga/poolish
1 cup bread flour
1 cup buttermilk
1/8 tsp active yeast

Mix in a bowl, cover with plastic wrap, then with towels and keep at room temperature for 12 hours.

2 cups of bread flour
1/2 tbs Kosher salt
Additional water/flour if needed

Directions
In a stand mixer, fitted with a dough hook, add the biga, the flour, salt and mix in low speed. Once the dough is formed, turn up the speed. The dough may be attached to the bowl at the bottom but cleanly pulls away from the sides. If too wet, add flour, if too dry, add water. Let it knead for 7-8 minutes.
Scrape out the dough onto a well floured work surface and hand knead until smooth. Form into a ball and seal by pinching the bottom seam.  Add a small amount of neutral oil in a bowl, place the dough, turn to coat all surfaces. Cover it with a plastic wrap and then towels and let it rise for a few hours in warm draft-free place. When it doubles in size, deflate, fold and put it back in the bowl cover and let it rise for the second time for a few more hours.

Place the dough on a well-floured work surface. Fold several times and divide into three equal sized balls (I weighed the pieces to make sure all three were of equal weight). Let the dough rest for 10 minutes. Fold the dough ball in half twice to make a short cylinder. Make an elongated dough which will fit the bottom of the baker (see below). Put on the cover and let it rise 20-30 minutes. Slash the dough with a lame or sharp knife, spray enough water on the dough to coat it, put the lid on and place it the oven preheated to 450F for 25 minutes, 


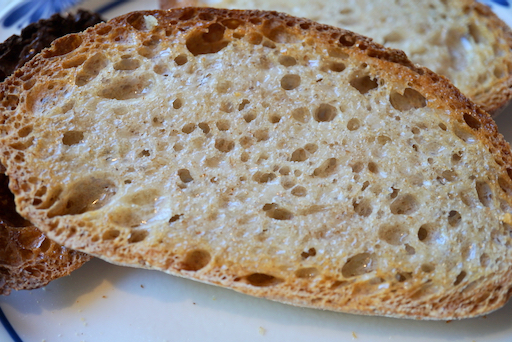
Take off the lid and bake another 5 minutes until golden brown (below)


Take the baguettes out of the baker and cool on a wire rack. This was, as I said before, only an 80% success. The first attempt was a sort of failure since I used a total of 3 and 3/4 cup flour which was too much dough. Although the initial dough fit nicely in the baker the baguettes expanded and fused together into one mass. It still tasted good. The second try, I used a total of 3 cups of flour (one cup in the starter and I added 2 cups more). This amount of dough fit very nicely but the center baguette was stuck to the baker bottom and half of the bottom crust came off. To remedy this problem,  we may need to grease and flour the base. We will post if this works next time. I forgot to mention that with the biga starter this bread had a wonderful flavor that is unmatched by any commercially made bread we have ever eaten. 

Monday, July 13, 2020

No knead rye bread 捏ねないライ麦パン

This is another "No knead" bread. This time it was rye bread. The below is how this one came out. Looks pretty rustic and nice.


After it was completely cooled, I sliced it. The hole-yness is just right as was the thickness of the crust.


Ingredients
300gram bread flour
100gram rye flour
>8gram salt
2gram instant yeast
300gram cold (55-65F) water

Directions
Same was other no knead bread. I baked at 450 F instead of 475 F. 

Since I made instant gravlax from sashimi-grade salmon the day before and there was still some left over, I made a small canapé with the rye bread thinly sliced and lightly toasted, topped with this gravlax (this one was made with 23 year old home made umeshu 梅酒 instead of straight vodka). I topped the salmon with sour cream and cucumber slices.


Although rye flavor is not really pronounced, this is a good rustic bread with nice flavor and texture and perfect for this canapé/open sandwich.

Friday, July 10, 2020

Salmon sashimi 4 ways 鮭の刺身4種類

This was made with frozen sashimi salmon from Catalina. We got it for New Year but we did not eat it since we had so much other good food. We decided it wasn't getting any better with age and the ice crystals forming inside the package was probably not an improvement. So, we defrosted and enjoyed it. Since frozen sashimi salmon from Catalina usually comes in 1 lb. packages, I always have to come up with several variations rather than straight salmon sashimi.

The picture below shows what I came up with this time. From the left, straight sashimi with Meyer lemon juice squeezed on it. The next item (moving to the right) is salted and scorched on one side with a kitchen torch and then briefly marinated in concentrated Japanese noodle sauce. The rose shaped item is instant gravlax made from Umeshu 梅酒, and on the right most is several hour (instead of usual 3 days) marinated "Russian" salmon 鮭のロシア漬け. I could shorten the marination time since this salmon was sashimi grade.


The following pictures are close-ups of the individual preparations. Since I had Meyer lemons, I squeezed juice over the sashimi just before serving. In only a few minutes, the surface became slightly opaque and had a nice Meyer lemon flavor. This was so tender it was almost like eating salmon belly.


The below is salmon with one side salted and seared with a kitchen  torch and then marinated in concentrated Japanese "mentsuyu" 麺つゆ noodle sauce and garnished with the thinly sliced green part of scallion. The seared portion added an almost smokey flavor and a slightly denser texture which contrasted nicely with the soft un-seared portion. 


The below is the instant gravlax, probably the best I ever made.  The marinade is composed of 1 tbs each of brown sugar (I used regular sugar and drops of dark molasses) and Kosher salt, finely chopped dill, 1 tsp each zest of lemon and orange. I also added about 50 ml of vintage umeshu which I made in 1997, from the plums grown on the tree in our back yard, using 40% alcohol vodka. I mixed and coated the small block of salmon and covered it with plastic wrap and marinated in the refrigerator for 4-5 hours. Just before serving, I removed it from the marinade, removed the excess marinade from the surface by blotting with a paper towel and sliced it. This instant gravlax had nice complex flavors. Compared to regular gravlax, it was very moist since the it is mostly raw. We really liked it.


This is the classic Russian marinated salmon which I make every New Year using a recipe I got from my mother many years ago. (This used to be a regular in her line-up of NewYear dishes). I used the belly portion of the salmon and marinated for only several hours. So, the inside was raw. This was quite a contrast with the gravlax. It was lemony and slightly vinegary but not sweet at all. I garnished it with chiffonade of perilla.


Although this is a lot of salmon, because of the different flavors and textures, each preparation was uniquely varied so the entire dish was not monotonous as would have been the case if we ate everything as just salmon sashimi. (Believe me we tried it that way one time before and it was overwhelmingly too much of a good thing). This was infinitely better approach. There was a small amount of leftover Russian marinated salmon and gravlax. Since these preparations were particularly good we were glad to enjoy it again the next day.

Tuesday, July 7, 2020

Pork belly and cabbage steamed in wine 豚バラとキャベツの塩蒸し

Because of COVIDー19, we have started using grocery home delivery. One of the problem is that when ordering on line using the descriptions and images provided we may not always end up with exactly what we wanted. This is one case in point; I thought I ordered a block of pork belly but instead, we got sliced pork belly. The slices are thicker than we expect to use in Japanese "Buta-bara" 豚バラ or "Sanmai-niku" 三枚肉.  I proposed several different dishes from the sliced pork belly but my wife wanted "Kaku-ni" 角煮 style preparation. So although I have never made kakuni from slices of pork belly before, I made that for her plus one other dish. Since I had jelled left over simmering liquid in the refrigerator from the previous pork belly (block) kakuni it was easy. I just cut the slices of pork belly into bite sized pieces and marinated them in a small amount of soy sauce for a few minutes. I then browned both sides and simmered it in the leftover simmering liquid for 2 hours. This was as good as my usual made from a block of pork belly.


The second dish I made was based on a recipe I saw on line. Since the slices of pork belly I got were thicker than Japanese buta-bara, I flattened the pieces with a meat pounder. Since we had leftover rose wine from Provence, I used that for this dish.


This is a simple dish but quite good. I splashed it with our favorite spicy Spanish olive oil before serving.


Ingredients
1/4 Cabbage, small head, leaves separate and washed and torn into bite sized pieces.
1lb slices of pork belly (They were a bit thicker than Japanese bura-bara. I pounded them thin, and cut into a bite sized pieces).
3 tbs white wine (We had a small amount of rose from Provence left over so I used that. It was more than 3 Tbs. more like 1/3 cup).
1/3 tsp salt
2 tsp oilve oil
slat and pepper for the meat.

Directions
Season the pork with salt and pepper.
In a pan, make alternating layers of cabbage and pork.
Add the wine, salt and olive oil, put it on medium flame with a lid.
Turned down the flame to low when it starts boiling.
Cook until the pork is cooked and cabbage is soft.
Serve hot, if needed season with additional salt and pepper (I sprinkled on our favorite Spanish olive oil)

This is a simple but good dish. Since the pork was well seasoned no additional seasoning was needed. It was good that I used up the cabbage I had, the left over wine and the last of pork belly slices.

Saturday, July 4, 2020

Karikari-koume rice balls カリカリ小梅のおにぎり

I made small crunchy salted green plums or "karikari-koume" カリカリ小梅 with the fruit we retrieved from the fruit ladened branch of the plum tree that broke in a recent thunderstorm. The recipe I followed stated, it takes several weeks' rest in the refrigerator before the salted plums can be enjoyed. Indeed, it did taste bitter when I tasted it few days after I moved the plums to a jar and placed them in the refrigerator. After a few weeks in the fridge, however, I tasted it again and the bitter aftertaste was gone. In the episode of "Midnight diner" 深夜食堂 featuring "karikari-koume", the last dish the master served was the salted plum rice balls. So, inspired by that episode, I made karikari-koume rice balls.

First, cut off the plum meat from the stone using a knife (below).


Add it to warm cooked rice.


Sprinkle roasted white sesame on top and mix well.


Make a small triangular rice ball and attach a small rectangle of the seasoned "nori" seaweed as seen below for taste as well as to provide the place you can hold the rice ball with your hand.


We had this with refrigerator-dried grilled salmon. The salted plum gave both salty and plummy flavors and a nice crunchy texture. We really liked these rice balls.

Wednesday, July 1, 2020

No Knead whole wheat bread Version2 捏ねない全粒小麦粉パン 第二弾

This is the second attempt at "No knead whole wheat bread". This was an unqualified success. Two changes I made were; 1. Baked at 450F (instead of 475F) and 2. I let it cool completely and sliced it the next morning. The first bread, which was baked at 475F, had a mahogany brown crust and looked very rustic and artisanal, but for us, the crust was a bit too much. The second bread (below) which was baked at 450F had a lighter more brown crust.


The holes are a bit smaller than the first one which we like better.


This is crusty enough for us and has a nice nutty flavor with a chewy but pleasing texture. It takes 2 days to make this bread but it is easy to make since you do not have to knead the dough. The only difficult and dangerous thing is not to burn yourself while trying to get the uncooked loaf into the super heated hot cast iron Dutch oven. My next bread will be the no knead rye bread.