Friday, December 11, 2020

Basil and pine nuts quick bread バジルと松の実の速成パン

 My wife made this quick bread as an effort to use more of the basil we are growing in our windowsill herb garden. In addition to the basil, it has pine nuts and parmesan cheese. So it is a kind-of disaggregated “pesto” bread.  This is a savory quick bread which is good for breakfast or even as an hors d’oeuvre with wine.


The cut surface shows basil and pine nuts.


Ingredients: (three small loaves)
2 cups AP flour
1 1/2 tsp baking powder<
1/2 tsp baking soda
1 tsp salt
1 cup buttermilk
1 large egg
1/4 cup olive oil
1/2 cup pine nuts, toasted
1/2 cup grated Parmesan cheese
3 tbs minced fresh basil (or more to taste)

Directions:
Preheat oven to 350F.
Butter the three small loaf pans (5x3 inch).
In a large bowl, whisk together the flour, baking powder, baking soda, and salt. Stir in the cheese and minced basil.
In a medium bowl, whisk together the butter milk, egg and olive oil.
Pour the liquid ingredients to the dry ingredients, stir together until just combined.
Fold in the pine nuts.
Bake 30-35 minutes at 350F
Let it cool down for 15 minutes and remove the loaves

This bread is very flavorful. It is really good lightly toasted with melted butter. Since it is late in the season, the basil taste was a bit muted but still present. 

Tuesday, December 8, 2020

Lemon basil shortbread cookie レモンバジルクッキー

This is a continuation of my wife’s attempt to use more of the basil we are growing in our window sill herb garden. This is a savory cookie/shortbread which goes very well with red wine. My wife found the original recipe on line somewhere.


We had this with DAOU Vineyards Pessimist Red Blend 2018 which is Petit syrah based. Our recent favorite/house wine.


Ingredients: (18 cookies)
1 cup AP flour
1/2 cup sugar
1/2 cup unsalted butter, cold, cut into pieces
2 tbs sliced basil (or more to taste)
grated zest from one lemon
1 tbs lemon juice (or more to taste)
1/4 tsp kosher salt

Directions:
Preheat oven to 375F
Line cookie sheet with parchment paper
Add all ingredients to the food processor and mix (#1)
Using a small ice cream scoop, portion out the dough (#2)
Using the palm (or the lightly floured bottom of a glass) , press the ball into flat disks (#3)
Bake 7-8 minutes at 375F (#4)
Let cool on a cooling rack


The lemon flavors come through strongly contrasts nicely with the sweetness and is pleasantly refreshing. After one day in the refrigerator, the basil flavor began to surface more strongly. Somehow this cookie went well with the red wine we were having. My wife has made quite a good variety of savory cookies. This is another good one.

Saturday, December 5, 2020

Renkon salad 蓮根サラダ

This is a simple salad made using renkon. This is not even a recipe. 


Besides the renkon, I added blanched broccoli and skinned Campari tomato and dressed them with Yuzu mayonnaise which I concocted from Hellman’s mayonnaise. 


Ingredients: (amounts are all arbitrary)
Fresh renkon, skinned and cut into wedge-shaped bite-size chunks (called “rangeri” 乱切りby cutting on bias,  turn 45 degree again cutting on bias.
Boil it in water with a splash of rice vinegar for 10 minutes, drain and let cool.
Blanched broccoli floret and skinned Campari tomato.

Dressing:
1tbs Hellman’s mayonnaise
1 tsp of Yuzu juice (from the bottle)
1/4 tsp. sugar

This dressing tastes really similar to the commercial Yuzu mayonnaise we bought recently. This combination of vegetables works well—the nice crunchy texture of renkon and slightly less crunchy broccoli.

Wednesday, December 2, 2020

Renkon balls レンコンまんじゅう

This dish is the result of an unexpected “silver lining” derived from the Covid epidemic. Because of Covid, we decided as a safety precaution, not to go to the grocery store but rather have groceries delivered. This forced us out of our usual routines and by necessity introduced us to new options. One of which was buying groceries from HMart Korean grocery store via the Instacart. As a benefit, we are now getting items which were not available from our usual grocery stores. One such item is fresh “reckon” 蓮根 or lotus root. (It is the floating stalk, not the root of a water lily). Even at our Japanese grocery store, the only reckon we could get was cleaned, boiled and sold in a package. It is easier to use than fresh renkon but it limits the dishes that can be made from it. For example, I could not have made this renkon ball or dumpling  dish レンコンまんじゅう shown below from packaged prepared renkon. But with fresh renkon available I could. I served the dumplings in a very gentle broth, with garnishes of edamame 枝豆, and simply fried reckon slices.


Reckon is an interesting vegetable. Even after cooking, it remains crunchy but grated and made into dumplings, the consistency changes completely into the consistency of “mochi-mochi” もちもち or like-fresh rice cake. I added shrimp and edamame to the dumpling. As a garnish I added simply fried renkon  which gave a nice contrasting  crunchy texture.


The other evening, I served three renkon dishes. From the left, Nitsuke 煮付け, the center is this renkon ball or dumpling dish but I added one fish ball made from blue fish, the right is renkon salad れんこんサラダ. 


In this nitsuke dish, renkon remains crunchy.


Boiled  renkon (again remains crunchy), blanched broccoli and skinned Campari tomato dressed in Yuzu mayonnaise. Since we used up the store bought Yuzu mayonnaise, I made my version by mixing Hellman’s mayo, yuzu juice (from the bottle) and a pinch of sugar . This really emulated the commercial Yuzu mayonnaise we got earlier.


Instructions for the renkon balls

Ingredients:
One segment of fresh renkon (#1) (after grated, #4, it was slightly more than 700grams)
2 tbs potato starch
3 large shrimp, thawed, shell removed and cut into small chunks then salted
10-15 shelled edamame

For broth
1 cup kelp and bonito broth (I used a dashi pack)
1 tbs of white dashi “shirt-dashi” 白だし seasoning or 1tbs each mirin and light colored soy sauce (or to taste).

Directions:
One segment of fresh renkon (#1).
Remove the ends of the segment of renkon and peel the skin (#2 and #3)
Finely grate the renkon and drain to remove excess moisture (#4)
Mix in the corn starch, shrimp and edamame. Make small balls about one inch in diameter.
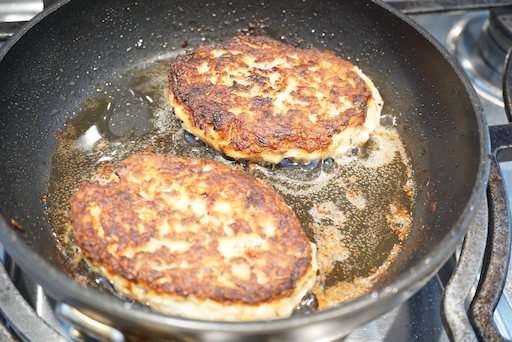
Deep fry at 300-320 F for 7-10 minutes (#5)
I also fried sliced and quartered renkon
Drain (#6)


Assembly:
I cut one renkon ball in half and placed the halves in a bowl. I added the fried renkon and edamame and poured in the hot broth. You can also reheat everything in the broth and serve.

This is a very good dish. The contrast of elastic texture of the renkon balls and crunchy fried renkon is wonderful. The shrimp has similar texture to the renkon ball and since it was salted, it imparts briny salty burst of flavors. I made the broth very gentle and light which also went well.

Sunday, November 29, 2020

Yellowtail marinaded in sake lee ハマチの粕漬け

This was the last of the whole fresh yellowtail. I marinated the filet in sake lee 酒粕 or "Kasu-zuke" 粕漬け. Since I did not have a time to cook this during the week, the fish marinated for a week which was a bit too long. I also made Japanese stewed vegetable  "nituske" 煮付け as a side.


I broiled the fish in our toaster oven.


The Japanese vegetable stew included lotus root  or "renkon" レンコン, daikon 大根、carrot, and "konnyaku" こんにゃく. I added blanched and salt broth sugar snaps スナップ豌豆の塩びたし at the time of serving.


Ingredients:
Sake lee 300grams
Red miso 30grams
Sugar 3 tbs
Salt 1/2 tsp
Sake to loosen up the marinade if too stiff,

Directions:
I added half of the sake lee mixture in the bottom of a sealable container and placed cheese cloth (after washing to remove any lint). I put in the filets and then covered them with another layer of cheese cloth. I put the remaining sake lee mixture on top. I let it marinate in the refrigerator (for a week as it turned out).


This was a bit over-marinated. I started broiling on the flesh side first as shown below in the toaster oven.


When the fish is 70% done, I flipped it and broiled the skin side. This would have been perfect if I cooked the fish after 2-3 days. Nonetheless this was good . The fish flesh was firmer than if it was marinated for less time (moisture was leached out). Still, we enjoyed this.

Thursday, November 26, 2020

Yellowtail burger はまちバーガー

 I was trying to use all parts of the whole yellowtail I got from Hmart through Instacart. I scraped off all the meat from the bone as well as the meat close to the end of the tail. I minced it but the amount was not enough to make a substantial dish. So I decided to make a yellowtail burger. As a binder and to make the "meat" go further I added “hanpen ” はんぺん. It is steamed Japanese fish cake made of white fish meat and egg white and came pre-made in a package. I served the resulting burger as a lunch with leftover shiitake mushroom risotto, sautéed pencil asparagus and scrambled egg with tomato.


The yellowtail hamburger came out rather soft and tender thanks to the hanpen but the surface was nicely browned with a slight crunch. 


Ingredients:
Yellowfin meat scraped off from the bone and the end of the tail, finely minced (I am not sure how much this was but probably less than 200 grams)
1/3 hanpen, thawed, cut into small cubes
1/2 egg, beaten
2 shiitake mushroom, both stalks and caps finely chopped
1 tsp of red miso
1/2 tsp mirin
Pinch of salt
Vegetable oil for cooking

Directions:
In a plastic cylinder (which came with the emersion blender), add the hanpen and the egg. Using the emersion blender make a smooth mixture. Add the miso and the seasoning and blend. Add the yellowtail meat and mix with a silicon spatula. Dump the mixture on a lightly oiled plate, divide in half and form two oval disks, half inch thick. In a non-stick fry pan, on medium-low heat add the oil and slide in the disks. I cooked one side about 5 minutes and turned the burger over and cooked another 3-4 minutes until done.


This was rather gentle tasting and tender fish burger. The miso flavor really made it. This was nice light lunch.

Monday, November 23, 2020

Simmered yellowtail head ハマチの兜煮

For many non-Japanese (and even for some Japanese I suppose), this may not look attractive but stewed fish head is a classic Japanese dish and does have a quite good amount of meat to enjoy. Even my wife likes stewed fish heads. I made this from the yellowtail fish I bought recently from Hmart and was part of my effort to make sure none of the fish went to waste.  The classic fish used for this dish is perch or “Tai” 鯛. I have made this using salmon head which was very good. This yellowtail head was not very big (I should not have removed the collar or “kama” which I froze for later use. It would have added more meat). I simmered the head in seasoned broth with daikon.


Ingredients: (for two servings)
One yellowtail head, cut into two lengthwise (requires a heavy chef’s knife)
Daikon, peeled and cut into 4 one inch thick rounds
Ginger, 4-5 slices
100ml sake
100ml water
2tbs mirin
2tbs soy sauce
1 tsp sugar

Directions:
Place the two halves of the fish head in a sauce pan (they should fit snuggly).
Add the sake and water and simmer for 10-15 minutes with folded aluminum foil as an inner lid or “otoshi-buta” until cooked through. 
Add the mirin, soy sauce and sugar (I also added rounds of daikon which were precooked in water with some rice grains). I cooked until only a small amount of liquid remained (15-20minutes).

I served the fish heads with daikon and added sugar snaps cooked in salt broth スナップ豌豆の塩びたし. This was quite good. The seasoned broth was a flavorful part of the serving as were the daikon which absorbed the flavor or the broth and were nice and tender. The fish cheek meat, as is the case with other meat sources such as beef or pork was the best part of the stew. Next time I will not remove the collars since they would have provided a bit more meat.