Saturday, February 27, 2021

One spoonful appetizers and more

These are appetizers I served one evening. Not particularly new but we had "uni" sea urchin from Maruhide 丸秀 a day before, so my one spoonful appetizers a.k.a baby food for adults got a topping of ikura with chopped perilla (for cauliflower purée) and uni with broccoli florets (for broccoli purée).


I also added three small appetizers  which I served in small lidded bowls we got from Nishiki market in Kyoto 京都錦市場. We had Dassai 45 獺祭45with this.


This is salmon "Nanban" 鮭の南蛮漬け (fried salmon marinated in sweet vinegar with carrot and celery).


This is salmon Russian marinade 鮭のロシア漬け topped with vinegar cucumber slices.


For veggies, I served blanched sugar snap soaked in salt broth スナップ豌豆の塩びたし and skinned Campari tomato.


Uni from Maruhide (both regular and in salt water) is really good. My one spoonful appetizer definitely got "kicked up a notch" with the addition of uni.

Wednesday, February 24, 2021

Seafood nabe on a snowy day 雪降りの夕の海鮮鍋

As the weather got colder our thoughts turned to having Japanese hot pot or nabe 鍋 for dinner. This week we had some snow and our backyard was transformed to a winter wonderland; perfect time for nabe. So we decided to have one using whatever ingredients we had on hand.


We used to cook nabes on a portable gas cooker with a butene fuel canister but both the cooker and the canisters became so old we started worrying about how safe they were. Fortunately after we used up the canisters several years ago. We switched to a table top induction cooker (or Japanese will say IH or induction heater).  Making Sukiyaki すき焼き on this type of cooker works well because a sukiyaki nabe pot is usually made of cast iron but other earthenware or pottery pots or nabes won’t work. Then, we discovered an induction-cooker-compatible nabe pot. (It has a magnetic metal disk embedded in the bottom). With it,  we can do a nabe at the table without having to use a gas canister fuel source. 

I checked our freezer and refridgerator and decided we could do a sea food nabe or “kaisen-nabe” 海鮮鍋. We defrosted, scallops, cod, pacific oyster (this is the second time we used frozen Pacific oyster which worked well as a fry) and shrimp. We also had fresh shiitake and  nappa cabbage but not other green leafy vegetables. In any case, we set up our nabe feast.


I started the broth by soaking kelp in the nabe pot in cold water for several hours.  In the evening, I put the pot with the kelp in it on the induction cooker. Once the water came to a boil, I removed the kelp. I then added the shrimp shells and once the color of the shells changed I continued simmering for a few minutes, I the removed the shrimp shells.  I seasoned the broth with white dashi “Shiro-dashi” 白だしand light colored soy sauce making a very gentle broth. I started cooking the hard part of the nappa cabbage as well as the other vegetables. We also had some decent firm tofu from Whole Foods which I added. Next came daikon, carrot and potato, all precooked in the microwave oven.


Our seafood lineup is shown below (all frozen, and thawed in the refrigerator). It included shrimp, scallop (from Great Alaska Seafood), Pacific oysters (from Vital choice wild sea food and organics) and cod (from Whole foods). This was the second time we used frozen Pacific oysters. The first time I made fried oysters.  These were much better than the small fragmented fresh or pasteurized  oysters we sometimes get.


The picture below shows the vegetables which waiting to be put into the nabe; the leafy portion of nappa cabbage, tofu, shiitake mushroom, precooked daikon, potato, and carrot. 


We made sure the seafood was not overcooked. We also used  ponzu sauce as we were eating. This was a fun dinner perfect with the snowy winter outside and the steaming body warming nabe inside. We had warm sake (“Hakutsuru Ginjo 白鶴吟醸) to boot. Of course, there were leftovers. Classically, Japanese will end the nabe by adding rice or noodles into the remaining broth to make a “shime” 〆 final dish but we were too full and the next day, we made rice porridge with eggs for lunch.

Sunday, February 21, 2021

"Almost" no-knead bread, improved version of no-knead bread ほとんど捏ねないパン改善版

When we were organizing our cookbooks and recipe print-outs, we found a small book called "Cook's Illustrated All-Time Best Bread Recipes" (published in 2018). We had completely forgotten about this book. While I was browsing through it, I came across "No-knead bread 2.0" by J. Kenji Lopez-Alt. This was based on the "no-knead bread recipe" by Jim Lahey which was popularized by Mark Bittman when his recipe was published in the New York Times. We learned about Jim Lahey's recipe through the Washington Post and bought his book. I made a few of the no-knead bread recipes from the book and they were great. But I have to agree with Kenji that because of the high hydration rate of 75-80% in the original recipe, the dough is very difficult to handle. In addition, placing the uncooperative dough in a hot cast iron pot runs the real risk of seriously burning yourself. As a result with some degree of struggle, it usually gets into the pot whatever way you  can manage without burning yourself. Fingers may be intact but at the expense of bread somewhat irregularly shaped. Also, the shape tends to be rather flat since the dough deflates a bit when placing it in the hot cast iron pot. This v 2.0 recipe reduced the hydration to close to 70%, and has added vinegar and beer for additional flavor. Also, you knead it a little so it is "almost" no-knead bread. Instead of putting the dough on a floured dish towel for the second rise, it happens in a skillet (or bowl I suppose) lined with parchment paper.  You can then transfer the dough using the parchment paper on which it is sitting to get it into the hot cast iron pot. All these changes make it much easier to handle the dough, and produces a consistent shape and really "artisanal" bread with sour dough-like great flavors.


Nice crust and good texture (multiple irregular holes).


Ingredients: (I am listing the original Kenji's recipe and metric weight in parenthesis which I converted by weighing the ingredients but not just numerical conversion of "cups" and "tsp", "tbs").
3 cup (425g) AP flour (Instead of bread flour, this recipe uses AP flour, I am not sure why but I should try it with bread flour).
3/4 cup plus 2 tbs (207g) water
6 tbs (80g) beer*
1 tbs (13g) white distilled vinegar (I used rice vinegar)

(Total liquid of 290g which makes hydration rate of 68%)

1 1/2 tsp salt
1/4 tsp instant yeast

*Kenji recommends to use light Pilsner-style lager beer such as Budweiser. I did not have Bud in our fridge so I used Sam Adams' Boston lager.<

Directions:
In a bowl, mix the ingredients using a wood spoon until no dry flour remains.
Cover the bowl with plastic wrap and let it rise for 8-12 hours in a warm place (I used our proofing box at 85F for 8 hours).
Take the dough out and put on a floured board and knead 10-15 times. Make into a boule-shaped dough ball.
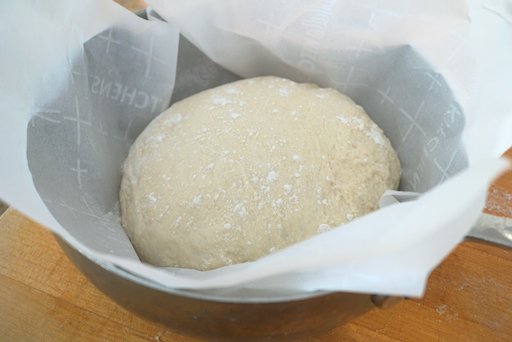
Place the dough in a parchment paper lined skillet (below picture. Kenji's recipe include spraying with vegetable spray but I do not see the need for that and skipped that process).
Place this uncovered in the proofing box (the box has a water tray providing moisture to prevent a skin from forming on the dough). Let it rise for the second time for 1-2 hours.
Meanwhile, put the cast iron pot in the oven and preheat the oven to 450F at least 30 minutes before the second rise is done.
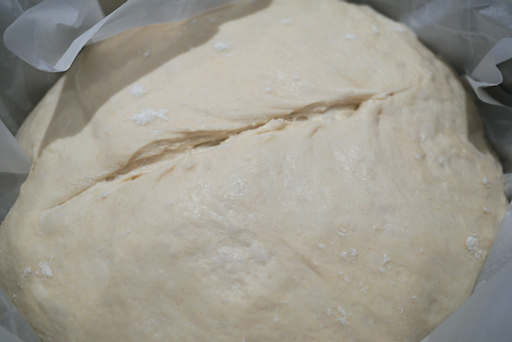
Using a lame, slash the top of the dough (see below).
Transfer the dough to the hot cast iron pot using the parchment paper.
Bake for 30 minutes with the lid on and 5-10 minutes more minutes with lid off. 
As you can see in the picture below the resulting loaf was picturesque. It actually came out exactly like the picture in the book (on the front cover of the book).


Let it cool down completely (at least several hours or more) on a cooling rack before slicing.

When I mixed the dough, I thought this is too dry and would not work. But after 8 hours of rising, the dough was quite wet but it could be handled and kneaded. Using the parchment paper made transferring the dough to the hot cast iron pan much easier and safer. It also didn’t result in somewhat deflating the dough as happened with other method. Since the dough can be formed and slashed, it came out exactly like in the picture.

We lightly toasted a slice, lavishly buttered it and tasted. The crust was crunchy and the interior moist. The flavor was wonderful. The vinegar and beer emulated the sour dough taste complex and added real depth of flavor. This is definitely the best bread of this kind I ever made. 

Thursday, February 18, 2021

Milk bread with condensed milk and tangzong コンデンスミルクと湯種のパン

This is continuation on the theme of Japanese milk bread. My wife found this recipe somewhere on the Internet. This recipe uses condensed  milk and “tangzong” or “yu-dane” 湯種. The version I made used “tangzong” but no condensed milk. My wife’s previous version used condensed milk but no “tangzong”. This one uses both. So she was curious how this would turn out. Interestingly, it did not rise as much as the other iterations.


The cut surface also shows a bit larger holes compared to the previous milk breads we made. Nonetheless it is very soft and slightly sweet.


Ingredients:
for the tangzong
20 g (2 Tbs. + 1 tsp.) AP flour
75 g (1/3 cup milk) (the recipe called for water, I used milk)

for the dough
115 g (1/2 cup) whole milk
12 g (1 Tbs. sugar)
5 g (1 1/2 tsp yeast)
320 g (2 2/3 cups AP flour)
3 g (1 tsp. salt)
60 g (3 Tbs.) sweetened condensed milk (I have used up to 90g of condensed milk which worked just fine.)
1 large egg
55 g (4 Tbs. butter, melted)

egg wash (optional)
1 large egg
1 Tbs. whole milk

Directions:
for the Tangzhong: whisk the flour and milk together in a sauce pan. Heat until it thickens. Set aside and let cool.

for the dough: Warm the milk and add the sugar. Cool to 110 F and use it to bloom the yeast. In a stand mixer combine the flour and salt. Add the condensed milk, egg, melter butter, tangzhong and yeast mixture. Mix until a dough forms. Knead for 7 to 10 minutes. Shape to dough into a ball. Add to a bowl and coat with a thin coating of oil. Put bowl in a warm place (we used the proofing box) until doubled in size. Punch dough down. Shape into a loaf and put into a greased bread loaf pan. Back into the proofing box until doubled in size. If using the egg wash, mix the egg and the milk then brush over the loaf. Cook in a preheated 350 degree oven for 28 to 30 minutes until it is golden brown and sounds hollow when tapped. Let cool on a wire rack.

The main difference between this bread and previous versions was the texture. It was still very light but there appeared to be a lot more holes. It was still very soft and moist. It almost melted on the tongue. It also didn’t rise as much as the previous versions. It had a buttery slightly sweet flavor. This was still a wonderful bread lightly toasted and buttered.

Monday, February 15, 2021

One spoonful appetizers a.k.a baby food for adults 一口スプーンの前菜第二弾

This is another iteration of one spoonful appetizers. I am making more purées or what I refer to as “baby food for adults” to use as one gulp spoonfuls of food. In any case, the below are three such appetizers. From left to right: Kabocha potage カボチャのポタージュ, seasoned soft boiled egg 味卵 with ikura salmon roe イクラ and cauliflower puree with ikura.


I also strewed the plate with simmered kabocha カボチャの煮物 (left lower corner), braised cauliflower モンパルナスのカリフラワーand blanched sugar snap in salt broth スナップ豌豆の塩びたし.


The below was what I served for another evening. This time I made broccoli puree which I garnished with flowerets of blanched broccoli. The other two are the same cauliflower puree and Kabocha potage shown in the pictures above.


I made broccoli puree from the stem of broccoli, onion, and parsnip. It has very good and interesting flavors. When I ask my wife to taste it, she thought it had asparagus.


I made the broccoli puree without a recipe but the basic is very similar to any potage or puree.


Ingredients:
Broccoli stem, hard bottom removed and hard skin removed (I used stems of two broccoli heads), cut into small cubes.
One medium onion, finely diced
One parsnip (or maybe a potato), skinned, cut into small cubes.
1/2 cup of chicken broth or more depending on the consistency of the puree (I used Swanson's no fat reduced salt)
1 tsp unsalted butter and 2 tbs olive oil
Salt to taste
Two bay leaves (optional)

Directions:
Add the olive oil and butter to the pan on medium flame and sauté the onion until cooked (2-3 minutes).
Add the broccoli stem and parsnip and coat with butter/oil and add the chicken both to cover.
Add the bay leaves and simmer until soft (15-20 minutes)
Remove the bay leaves and puree using an immersion blender until smooth (add more chicken broth for desired consistency).
Season with salt

These appetizers are nice. The spoonful is just the right amount for a satisfying gulp. They provide a nice range of flavors although the consistency seems, well consistent. It is lovely and smooth but I can’t help but think of it as sophisticated “baby food for adults”. I’ll have to come up with something different.

Friday, February 12, 2021

Perfectly pillowy cinnamon rolls 完璧に柔らかなシナモンロール

This recipe  is from King-Arthur flour. The recipe was on a card that was enclosed with the collapsible bread proofing box we recently bought from them. This recipe piqued my wife's interest because it is made with "tangzhong" 湯種 and, of course, because it is a "sweet" bread. So she made this one day. She also added raisins but omitted the icing called for in the original recipe.


Some of the raisons on the surface got a bit dried up and hard but otherwise these were wonderful cinnamon raisin rolls. When they came out of the oven they were really soft but after a few days in the refrigerator, they did get a bit chewy but were still flavorful. My wife slightly reduced the sugar in the filling so they were pleasantly sweet but not too sweet, perfect for breakfast.


Ingredients:
for the Tangzhong
1/2 cup (113 g ) whole milk
3 Tbs. (23 g) bread flour

for the dough:
2/3 cup (151 g) cold whole milk
2 1/2 cups (300 g) bread flour
1 tsp. salt
2 Tbs. (25 g) sugar
2 tsp. yeast
4 Tbs. (57 g) butter softened
1 cup raisins or nuts (optional)

for the filling
1 Tbs. (14 g) butter, melted
1/2 cup (107 g) light brown sugar, packed (amount reduced slightly or increased to taste)
2 Tbs. (15 g) bread flour
4 tsp. (10 g) cinnamon
pinch of salt

For the icing (optional) I did not use it.
3 Tbs. (42 g) butter melted, divided
1/2 tsp. vanilla
pinch salt
1 1/2 cup (170 g) confectioners sugar, sifted
1 to 2 Tbs. (14 g to 28 g) milk

Directions:
For the tangxhong: in a small saucepan, whisk together the milk and flour and cook over medium heat until thickened. Transfer to a large bowl.

For the dough: Immediately add the dough ingredients to the bowl with the tangzhong in the order listed. (The order is important because the cold milk cools the tangzhong to the right temperature for the yeast). Mix and knead to make a smooth, elastic, somewhat tacky dough. Knead for 7 - 10 minutes. Put in a bowl and move to the proofing box set to 81 degrees until the dough rises and is puffy.

To assemble: Transfer the dough to a lightly greased work surface and pat into a 10 X 12 inch rectangle. Stir together the filling ingredients and sprinkle over the dough, leaving a 1/2 inch strip uncovered on one of the long sides. Distribute the raisins or nuts over the filling. Starting with the filling covered long side, roll the dough into a log. Slice into 12 slices. Put the pieces on a parchment lined baking sheet spaced about 2 inches apart. Tuck the tails underneath each roll to keep them from unravelling as they rise. Back into the warmer until they about double.

Bake on a rack in the upper third of a preheated 375 degree oven for 14 to 18 minutes until light golden brown. Remove from the oven and brush with 1 1/2 Tbs. of melted butter.

For the Icing (optional): Mix the remaining 1 1/2 Tbs. (21 g) melted butter with the remaining icing ingredients. Ice the rolls while they are just lukewarm.

These rolls have just the right amount of sweetness and the butter cinnamon mixture is very nice. While they were baking and when they were lightly microwaved before serving the yeasty cinnamon aroma was one of the pleasures of these rolls.

Tuesday, February 9, 2021

Pork curry with almond sauce アーモンドソースポークカレー

 We like to roast pork in our Weber but because of Covid, the cuts we usually use for roasting are not always available and we have had to make do with whatever we can get. Case-in-point, we recently got a bone-in shoulder pork roast. This cut was very large. In addition, it contained a portion of the scapula bone which I removed requiring some further “at home” butchery to get the various sizes and portions that we wanted. In this case I removed the bone and divided the roast into three segments. The first segment was the meat around where the bone was removed. I cut it into small chunks for stew or curry. The remaining two segments consisted of a smaller portion of roast which I used for “ni-buta” 煮豚 or simmered pork and a larger portion of roast which I barbecued in our Weber. 

I commissioned my wife to come up with a dish using the small chunks and suggested a curry. This time, my wife wanted to make a new curry she had not tried before. She chose one from Madhur Jaffrey’s cookbook “Indian Cooking. In addition to using quite a few spices (#1 & #2 below), it also includes pulverized almonds which is something we have not used before. The resulting curry is shown in the picture below. It was a lunch one day. I served the curry over rice with tomato (Skinned Campari tomato), blanched sugar snaps and broccoli which I warmed up in the curry while the curry was being heated.


I also served Japanese pickles which traditionally accompany Japanese curry. The red on the left is “Fukushin-zuke” 福神漬け (people from Hokkaido call it “Fukushin-zuke”a but the rest of Japan will call in “Fukujin-zuke” (a mixture of daikon, lotus root, egg plant and cucumber, soy sauce flavored) and the white objects on the right are “rakkyo” らっきょう (pickled small onions).


Ingredients:
2 garlic cloves
1 inch sized ginger cube coarsely chopped
5 Tbs. slivered almonds, roasted
3/4 to 1 cup of chicken stock
2 lbs. of pork shoulder cubes
1/2 tsp. cardamom
1 tsp. cinnamon
1/4 tsp. cloves
2 medium onions finely chopped
1 tsp. ground coriander
2 tsp. ground cumin
1/4 tsp. cayenne pepper
1 1/4 tsp. salt
1/4 tsp. garam masala

Directions:
Put the garlic, ginger, almonds and 6 Tbs. chicken stock in a blender (we used an immersion blender) and blend until you have a paste (#3).

Add several tablespoons of peanut oil into wide frying pan. Add the cardamom, cinnamon and cloves and cook until they “bloom” becoming fragrant. Put in the onions and cook until lightly browned (#4). Put in the almond paste as well as the coriander, cumin and cayenne pepper (#5). Stir until it browns slightly. Add the meat the salt as well the chicken stock (#6). Cover and cook on simmer for several hours until the meat gets tender. Add the garam masala before serving.

Just a Note: The meat did not get tender in the sauce even after several hours so I removed it and put it in a sauce pan covering it with chicken stock. I simmered it that way for about an hour. It got nicely tender and made additional sauce in the chicken stock. I added the meat back and sauce into the curry and it was much better.


This was very good. We've never had anything like this before. It had plenty of depth of flavor but was not too (spicy) hot. The almonds gave it a creamy texture and added a note of nuttiness that was very nice.  The additional veggies I put in as it was being heated up added some bright notes of freshness as well as additional flavors. It made a great lunch.