We were having some very extremely cold and snowy weather recently. One of the best dishes for this kind of cold weather is sukiyaki すき焼きand similar nabe 鍋 dishes. We recently got thinly sliced (2mm in thickness) beef rib eye for sukiyaki from Weee. This is not top quality beef but it is very reasonably priced and quite good. So, one very cold evening, we cooked sukiyaki at the table and had it with hot sake 燗酒. The package included 1lb of beef, which was more than we could eat in one sitting so besides the leftover sukiyaki, we had leftover uncooked beef as well. Thinly sliced beef is used in many Japanese dishes but we usually do not have beef (we usually have chicken or pork and occasionally lamb) so I did not have a favorite “go-to” recipe to use the beef. I looked through some beef recipes on the web but ended up with my own variation (picture #1). We had a cake of kon-nyaku (konjac) 蒟蒻, and an end piece of daikon 大根. So I included those in this dish. Many Japanese dishes call for small Japanese green pepper called “pea-man” ピーマンwhich is quite different from American green pepper. Instead I used, seeded and deveined Jalapeño pepper. For the seasonings, I added “Douban-jang”. 豆板醤 to add slight heat. For an impromptu dish, everything came together rather nicely. This is a just note to myself so that I can recreate it in the future.
Ingredients:
150gram thinly sliced beef, cut into thin strips (picture below, this was rib eye) (picture #2)
One cake of kon-nyaku 板コンニャク, washed, par-boiled
One small carrot
2 inch of daikon
One large Jalapeño pepper, seeded and deveined
1 tbs vegetable oil and 1 tsp dark sesame oil
Seasonings:
1 tsp douban-jang (or more if you like spicy)
2 tbs sake
1 tbs mirin
2 tbs soy sauce (I used x4 Japanese noodle sauce)
Directions:
I tried to cut all the vegetables in the same, thin rectangular pieces. I halved the kon-nyaku cake in thickness, added shallow criss-cross cuts on both sides and cut into the similar rectangular shape but some came out a bit thicker and larger. (Picture #3 from left to right are kon-nyaku, carrot, Jalapeño pepper and diakon).
I added the oil in a non-stick frying pan on medium flame (vegetable plus sesame oil). I added the beef and cooked until almost done and added the remaining vegetables and the kon-nyaku and stir fried for 2-3 minutes.
I added the sake, mirin, and soy sauce. When coming to the boil I added douban-jang (picture #4) and mixed well. Placed the lid on and let it simmer for 5-7 minutes.
I removed the lid and turned the flame to medium high and stirred until the liquid was almost gone. I tasted and adjusted the seasoning. In this case, it came out slightly sweeter than I intended but it had a nice sweet and salty flavor and a mild spicy kick. Certainly, the beef added more flavor. I could have cut the daikon into thicker pieces since it became very soft. The kon-nyaku absorbed the seasonings and added nice texture. We like this dish. It will go with rice or drinks. In our case, probably the latter.
Showing posts sorted by date for query nabe. Sort by relevance Show all posts
Sunday, January 28, 2024
Thursday, December 7, 2023
Electric Sake Warmer 電気酒燗器
We usually drink sake cold. For drinking sake cold, we like a crisp, clean, and fruity flavor profile of daiginjo 大吟醸. Some junmai 純米 and junmai ginjo 純米吟醸 sakes also have this flavor profile. Our house sake, curretly, is “Tengumai 50 Junmai Daiginjo” 天狗舞純米大吟醸. We enjoy it cold and it has a nice clean, dry, crisp, and fruity flavor. Now, not going into the details, somehow, by mistake (not mine), we ended up with a case of “Tengumai yamahai-shikomi junmai”天狗舞山廃仕込純米 instead of our favored house sake. As I mentioned previously this sake has a more savory, yeasty and mushroomy flavor when tasted cold or at room temperature. Then I read that this sake changes its flavor profile if heated. Almost in desperation, we tried it warm (at 120F or “Atsu-kan” 熱燗). We were pleasantly surprised that the flavor profile changed completely and became smooth and mild. We thought “Ah-Ha” the secret is that this sake should be consumed warm which would be particularly appropriate during the winter months when we have dishes like hot pot “nabe” 鍋 dishes, “sukiyaki“ すき焼き, or “oden” おでん. But the main reason we rarely drink sake warm is that one additional step of warming it up and the difficulty of maintaining the temperature while enjoying it warm. So, we decided to splurge on an electric sake warmer 電気酒燗器.
We bought it at Amazon but it came from a seller in Japan. The sake warmer sits on top of the heating unit. The server holds about 240ml (1号半). It heats up to the specified temperature in10-15 minutes. The temperature control is continuous (not discreet steps) and ranges from about 35C to 60C (95F to 140F). Using my digital thermometer and water, the actual temperatures are higher (by about 5-10F) than it indicated. We usually like “Atsu- kan” *.
*ranges of warm sake temperature
“Jouon” 常温, room temperature 20℃ (68F)
”Hinata kan” 日向燗 sunny side 30℃ (86F)
”Hitohada kan” 人肌燗 skin temperature 35℃ (95F)
”Nuru kan” ぬる燗 luke warm 40℃ (104F)
”Jou kan” 上燗 warm 45℃ (113F)
”Atsu kan” 熱燗 hot 50℃ (122F)
The sake warmer works extremely well. We can have it sitting next to us and as we are enjoying the warm sake, we can add more sake to the server. By the time we are ready for the next serving, the sake has reached the proper temperature. The only challenge is to warm up enough but not too much sake and to consume it at just the peak of time it has been warming. This is because any leftover sake once heated will not be good the next day for example. Also,warming up the sake and keeping it warm more than 1 hour is not good either. In any case, this was a great improvement break through. We are glad that we can now enjoy Tengumai junmai sake this way. So the mistake which had us end up with a case of tengumai-junmai instead of our favored house sake was indeed a “blessing in disguise”. It introduced us to a sake variation which we now enjoy but would never otherwise thought of trying.
Friday, February 10, 2023
New Induction Cooker Compatible Do-nabe IH 対応、銀宝花三島万古焼土鍋
Japanese “Nabe” 鍋 hot pot is a dish that is cooked at the table while you eat. Classically, a portable butane-canister gas cooker is used with a “Do-nabe” 土鍋 earthen-ware pot. We used to have a butane table top cooker for nabe and sukiyaki すき焼き but because of safety concerns, which mainly stemmed from the age of our canisters and cooker, we looked for an alternative which turned out to be a table-top induction cooker (or the Japanese term is “IH”, short for induction heater). For this to work, you have to use IH compatible pots and pans. Traditional Japanese nabe earthen-ware pots are certainly not IH compatible. We eventually found an IH compatible nabe from Kinto which worked great. Only complaint (which may not be important to many) is that while the pot worked well it is a very modern-appearing ceramic and does not have the traditional look of nabe. (I missed the homey nostalgic feel of a nabe which just the sight of the traditional design pot can evoke for me.)
Recently, I found an IH compatible nabe which is made of traditional “Banko-ware” 万古焼 pot called “Gipo Hanamishima Banko-yaki pot” 銀宝花三島万古焼土鍋 in an on-line store called “Japanese taste”. This is where we got dried persimmon or “hoshigaki” 干し柿. The “Japanese taste” ships items directly from Japan but it comes relatively quickly*. In any case, we got this “IH compatible do-nabe” pot last year but did not have a chance to use it until now. In the picture below, the left is “Kakomi” IH donabe from Kinto and the right is new Ginpo IH compatible donabe.
*We later learned that this pot is available at Amazon USA.
To make a donabe IH compatible, a magnetic metal disk needs to be present between the induction cooker surface and donabe. Both these induction compatible donabes took a bit of a different approach.
Kinto donabe has a metal disk embedded into the bottom of pot as seen below. It can be used on gas, induction, and or halogen (electric heating element) cook tops. But not in a microwave oven.
Gipo comes with a stainless steel perforated disk which snaps into the inside bottom of the pot (apparently Ginpo has a patent). There are metal hooks and the inside bottom of the pot is formed to accept and secure this disk. It can be removed for cleaning and using the pot in a microwave. We initially tried it on our old induction cooktop (at least 18 years old which works with our cast iron sukiyaki pot and Kinto donabe). The Gipo donabe, however, did not work with the old induction cooker. The cooker issued an error message which essentially read “NO-CAN-DO”. I read the instructions that came with the Gipo donabe and found out that it may not be compatible with older IH cookers. Great. Which meant we would be getting a new table top induction cooker to complete the set. It was not too expensive.
The new one is much better; the surface is completely covered with glass and easy to clean and the controls are more advanced. The new cooker worked with the Ginpo donabe. Actually, it boiled the liquid inside much quicker. I assume that because the metal disk is in contact with the liquid.
We enjoyed our nabe dish. The main protein was cod and oyster. The cod was great. The oysters, however, were a different story. Digression alert: We are having a difficult time getting good oysters, especially Pacific oysters. For this dish we got small (eastern) frozen oyster but they tasted terrible. Luckily they did not ruin the flavor of the rest of the nabe. We ended up throwing out the remainder of the oysters in the package.
The other items in the nabe included nappa cabbage, tofu, diakon, mushrooms (enoki, oyster, shiitake and shimeji). I also added “fu” 麩 gluten cake. I made a broth with dried kelp and a dashi pack and, and for a change, seasoned the simmering liquid with miso (miso, mirin and sake).
Somehow, this new do-nabe is esthetically more pleasing (at least for me) and works great. Since this is a genuine earthen ware pot, you should not keep the contents in the pot over night.
Wednesday, February 24, 2021
Seafood nabe on a snowy day 雪降りの夕の海鮮鍋
As the weather got colder our thoughts turned to having Japanese hot pot or nabe 鍋 for dinner. This week we had some snow and our backyard was transformed to a winter wonderland; perfect time for nabe. So we decided to have one using whatever ingredients we had on hand.
We used to cook nabes on a portable gas cooker with a butene fuel canister but both the cooker and the canisters became so old we started worrying about how safe they were. Fortunately after we used up the canisters several years ago. We switched to a table top induction cooker (or Japanese will say IH or induction heater). Making Sukiyaki すき焼き on this type of cooker works well because a sukiyaki nabe pot is usually made of cast iron but other earthenware or pottery pots or nabes won’t work. Then, we discovered an induction-cooker-compatible nabe pot. (It has a magnetic metal disk embedded in the bottom). With it, we can do a nabe at the table without having to use a gas canister fuel source.
I started the broth by soaking kelp in the nabe pot in cold water for several hours. In the evening, I put the pot with the kelp in it on the induction cooker. Once the water came to a boil, I removed the kelp. I then added the shrimp shells and once the color of the shells changed I continued simmering for a few minutes, I the removed the shrimp shells. I seasoned the broth with white dashi “Shiro-dashi” 白だしand light colored soy sauce making a very gentle broth. I started cooking the hard part of the nappa cabbage as well as the other vegetables. We also had some decent firm tofu from Whole Foods which I added. Next came daikon, carrot and potato, all precooked in the microwave oven.
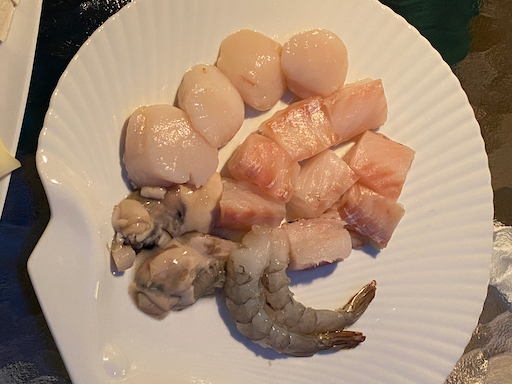
Our seafood lineup is shown below (all frozen, and thawed in the refrigerator). It included shrimp, scallop (from Great Alaska Seafood), Pacific oysters (from Vital choice wild sea food and organics) and cod (from Whole foods). This was the second time we used frozen Pacific oysters. The first time I made fried oysters. These were much better than the small fragmented fresh or pasteurized oysters we sometimes get.
The picture below shows the vegetables which waiting to be put into the nabe; the leafy portion of nappa cabbage, tofu, shiitake mushroom, precooked daikon, potato, and carrot.
I checked our freezer and refridgerator and decided we could do a sea food nabe or “kaisen-nabe” 海鮮鍋. We defrosted, scallops, cod, pacific oyster (this is the second time we used frozen Pacific oyster which worked well as a fry) and shrimp. We also had fresh shiitake and nappa cabbage but not other green leafy vegetables. In any case, we set up our nabe feast.
We made sure the seafood was not overcooked. We also used ponzu sauce as we were eating. This was a fun dinner perfect with the snowy winter outside and the steaming body warming nabe inside. We had warm sake (“Hakutsuru Ginjo 白鶴吟醸) to boot. Of course, there were leftovers. Classically, Japanese will end the nabe by adding rice or noodles into the remaining broth to make a “shime” 〆 final dish but we were too full and the next day, we made rice porridge with eggs for lunch.
Tuesday, January 28, 2020
Warm sake and oden on a cold winter's evening 厳寒の冬の夕燗酒とおでん
Since we had some very cold wintery days recently, we enjoyed warm sake several times. One such evening, we had the Japanese classic of hot sake with oden. After I found Hakushika junmai and junmai ginjo 白鹿純米、純米吟醸 (sake in a box) at our Japanese grocery store, these have become our favorite sake served warm or "kanzake" 燗酒. The sake sold this way is usually not the best sake but is still good quality as is the case with these two. Also sake sold in a box costs significantly less than the same sake sold in a bottle. For these reasons, we think these are a good buy. (Other packaging variations may include "cup-sake" or "sake-in-a-can". Cup-sake could be even daiginjo class).
Of course on a cold winter evenings, warm sake is best paired with either oden おでん or nabe 鍋dishes. This time, I made oden. Usually boiled eggs in oden end up hardboiled even if they are soft boiled when put in the broth. So this time I made soft boiled eggs with runny yolks which I kept separate from the rest of the oden, then just 5 minutes before serving I warmed them in the broth. I put mochi in the deep fried tofu pouches or "abura-age" 油揚げ. Instead of regular potato I used "sato imo" 里芋 or taro.
Although the eggs did not absorb the broth's flavor, the runny yolks were nice for a change. The cylindrical item is fish cake stuffed with burdock root or "Kobo-ten" ごぼう天. The rest of the items were tofu, shitake mushroom, blanched broccoli and carrot.
On a cold winter evening, this is very warming and comforting.
Sunday, December 29, 2019
Grilled feta, olive and grapes
My wife found this recipe in the food section of the Washington Post. It's a rather simple dish but we really like it. It makes a good appetizer and goes well with wine. We served it with mini-baguette.
The original recipe suggested cooking this in a cast iron skillet. We thought that might be too big for the quantity we wanted to make so we cooked this is a small anodized cast aluminum pan (this was a Japanese style pot (mini version) with a wooded lid for an individual "nabe" dish) which worked perfectly.
The cubes of feta cheese get brown and crispy on the outside but soft inside. My wife thought it is also good just to enjoy without bread. The combination of spices (fennel seeds, red pepper flakes and ground black pepper), salty olives and sweet grapes all worked well.
Ingredients:
1 tablespoon extra-virgin olive oil, plus more as needed
1/2 cup (2 3/4 ounces) seedless red grapes, (we cut the amount in half).
1/3 cup (1 1/2 ounces) pitted and halved Kalamata olives. (We used a combination of the different olives we had on hand. We cut some of the large ones in half.)
1/2 teaspoon fennel seeds, crushed
1/2 teaspoon crushed red pepper flakes
Freshly ground black pepper
8 to 10 ounces feta cheese (in a block)
Good, crusty bread slices, for serving
Directions:
Preheat the oven to 425 degrees with the rack in the middle (we used our toaster oven on convection mode on the bottom rack). Oil a small, oven-proof casserole dish or cast-iron pan. Add the grapes, olives, 1 tablespoon olive oil, fennel seeds, red pepper flakes and a few grinds of black pepper, and stir to combine.
Break the block of feta up into irregular pieces, then nestle them among the grapes and olives. Drizzle with more olive oil, then bake, 20 to 25 minutes, until the grapes are softened and the feta is browned in spots.
This is a really good dish. We had only a small portion the night we made it and reheated it later in the microwave which worked well. My wife kept reminding me as I made the dish, "a little bit of fennel goes a long way". Don't over do it' the fennel actually made the dish. The combination of fennel, olives and grapes were made for each other and the total went remarkably well with red wine. Definitely this will join to our line up of "regular" dishes.
Sunday, April 15, 2018
Nabe cooked on an induction cooker, IH 適応土鍋で鱈ちり
Some years ago, when we remodeled our kitchen, and were exiled to cook in the basement for the duration of the construction, we got a tabletop induction cooker. We also had a butane canister gas table top cooker from our days in California. Although we used it for Nabe and Sukiyaki dishes, the gas cooker and the canisters were almost 30 years old and we were worried about their integrity. Despite their age, they seemed to work fine but we did not buy extra gas canisters after we used them up. Although our Sukiyaki pot was cast iron and compatible with induction cooking, we could not use our Japanese "Donabe 土鍋" earthen pots. So I just cooked our nabe dishes on the regular gas range and served them at the table which is not as much fun as tabletop cooking.
Induction cookers are much more popular in Japan than in the U.S. and are called "induction heaters" or "IH" for short. As a result, IH-compatible "donabes" have been available in Japan for some time. Although I wanted to purchase one, as far as I know, it is expensive to ship to the U.S. even if the Japanese companies would be willing to ship it. Then, I came across Kinto store where they sell rather modern design Japanese table- and kitchenware. One of these items is an IH compatible Nabe (it came in two colors - black or white and two sizes - 40 and 82oz).
Instead of traditional earthenware, this is made of a much less porous heat-resistant porcelain with a special induction compatible plate embedded on the bottom. It comes with a steamer insert as well. It was reasonably priced and above a certain price break-point, shipping was free. I bought a small nabe (40oz) with some other items (so shipping was free). It is not a traditional design but we like the modern and clean line. This nabe can be used on gas, electric heating element, induction or in the oven. So, I took out our old induction cooker and decided to make "Cod and vegetable nabe" or "Tarachiri" 鱈ちり鍋 on the table. I would have used edible chrysanthemum or shun-giku 春菊 as a green if it had been available but I could not get it. So, I used a small bunch of whole spinach. I also added scallion, fresh shiitake 椎茸 and hen-of-the-wood 舞茸 mushrooms, nappa cabbage 白菜 and tofu 豆腐.
I got some black cod filets with the skin removed. If the skin had not been removed (but hopefully cleaned and scaled, which is not always the case, here, when the skin is left on the fish) it would have helped hold the the fish meat together better and added a different texture and flavor. I salted the filets a few hours prior to cooking and kept them in the refrigerator uncovered before cutting them into chunks.
As condiments, I prepared thinly sliced scallions and grated daikon with Japanese red pepper (the daikon turned out to be too spicy for us).
For a change, we cooked and ate this in our sunroom. The pictures were not really good since it was getting dark and the lighting was quite dim by the time we had this.
Traditionally, the cooking liquid is just kelp broth without seasoning and the cooked food is served with "ponzu" dipping sauce and the garnish. I made a minor deviation and made the broth with kelp and dried bonito flakes and added sake, mirin and a small amount of "usukuchi" light colored soy sauce. I first put in the vegetables and tofu and when they were almost done, I added the cod.
We used Ponzu sauce (from the bottle). As I mentioned the grated daikon was too spicy even without the red pepper flakes. We really enjoyed the tabletop cooking. There is something very comforting about the steam rising from the pot, the soft sound of the the liquid bubbling and lovely cooking smells. We ate much more than we thought we would. In Japan, the end of this nabe dish would include adding noodles or rice to the remaining broth, which, by the end of the dinner, would have built up some very nice flavors from the vegetables and fish or whatever ingredients were cooked in the pot. This broth was exquisite; very complex and slightly sweet from the veggies. Although it was really good we were too full for more than a few sips to taste let alone adding noodles or rice. Instead, the next day, we added rice to the leftover broth and whatever was left in the pot and made rice porridge with the addition of eggs as a lunch. With that we felt we had done justice to the nabe.
Wednesday, December 26, 2012
Monkfish hot pot アンコウ鍋
This is a rather standard Japanese hotpot dish with monkfish. It is perfect for a cold winter’s night. In Japan, you can buy a package of Monkfish for “nabe” . The package usually contains monkfish meat, some with skin attached, bone -for broth-, other innards and the most important item, the liver. In an authentic ankou nabe, at least, the liver must be included. The only Monkfish I can get here, however, is a fillet or the tail meat. In terms of seasoning, for the nabe you can season it with soy sauce or miso. Sometimes people use both soy sauce and miso. This time I decided to make a soy sauce flavored “ankou” nabe.
More about Monkfish: Japanese eat almost all parts of the monkfish with the liver being the most valued and cherished ("ankimo" あん肝). So-called "Seven tools of Monkfish" or "Nanatsu dogu" 七つ道具 include: 1. liver, 2. tail and ventral fins, 3. gills (!!), 4. ovaries, 5. stomach, 6. skin, and 7. tail meat. By the way, we only eat female monkfish. The male is tiny-winy and not worth considering for food.
Broth: I used a combination of kelp and dashi pack with “iriko” いりこ or “niboshi” 煮,干small dried fish, to make a broth. A combination of kelp and bonito flakes is also good. I started with cold water (about 4 cups) and placed a 2x3 inch rectangle of kelp and one dashi pack and simmered it for 10 minutes before removing them.
I added mirin and soy sauce (1:2 ratio) as I tasted but I could have added either salt or more soy sauce. If you do not like a dark colored sauce you could use a combination of salt and light colored soy sauce or 薄口醤油.
In addition to the fish, you could use whatever vegetables or tofu you like. I used nappa cabbage or “hakusai” 白菜, threads of devil’s tongue* or “shirataki” 白滝 (see below for additional preparation), tofu, fresh shiitake mushrooms and snap peas.
(*"Shirataki" preparation: After removing from the package, I washed it in cold running water and then parboiled it. I drained it before putting into the nabe. This is important since it has a peculiar smell which is not particularly pleasant).
Monkfish: I used a bit less than 1 lb of monkfish fillet. I removed the slimy membrane and cut into large bite size pieces. If you use bone, skin or other parts of the monkfish (especially innards), you may have to pour hot water over the pieces to remove any fishiness but for the tail meat, it was not needed.
Instead of cooking the nabe at the table, I cooked this nabe on the stove. I added vegetables and devil's tongue threads and put on the lid. After a few minutes, when the vegetables are almost done I added tofu and then the Monkfish. It only takes few minutes for the fish to cook.
I served the nabe in individual bowls with some broth. As condiments, I served small wedges of lemon (since I did not have “yuzu” ゆず), finely chopped scallion, Japanese red pepper flakes or ichimi tougarashi 一味唐辛子. Hot sake may be the usual choice for libation but we had cold sake.
Tuesday, September 18, 2012
Sautéed Monk fish medallion and liver アンコウのメダリオンとあん肝のソーテー
Monkfish or "ankou" 鮟鱇 is not a very popular fish in the U.S. and unlike in Japan, the only portion of fish being sold and consumed is the tail meat. For Japanese, the most precious part of monk fish is, of course, the liver. The most common preparation of ankou in Japan must be ankou nabe アンコウ鍋, in which most of the various parts of the fish including skin and liver beside the meat are used. Here is the iron chef Morimoto showing off his skill of disassembling this rather ugly deep sea bottom dwelling fish.
In any case, we have not seen monkfish for some time in the grocery stores but, the other day, we happened to come across fresh monkfish fillets at a near-by market and got it. I have posted several ways of cooking monkfish fillets as well as liver (not raw but previously processed and frozen, which is the only monkfish liver I can get my hands on. Since we had a package of frozen monkfish liver or ankimo あん肝 in the freezer, I decided to make a dish with the both monkfish fillet as well as liver.
Monk fish fillet: I removed the grey slippery membrane which covers one side (skin side) of the fillet without wasting too much meat underneath. If you do not removed this, it will became a tough membrane after cooking and will also shrink more than the meat. I marinated the cleaned fillets in sake for 24 hours (Since I could not cook this immediately, this is a good way to preserve and also removed any fishy smell). Next day, I removed the fillets, dried them with a paper towel, cut into 1 inch think medallions. I seasoned with salt and pepper.
Monk fish liver: This comes in a cylindrical shape in a plastic wrap (shaped into cylindrical shape and steamed) then vacuum packed in an aluminum pouch. I just defrosted it in running cold water. I made 1 inch thick medallions to match the size of the monk fish fillet medallions and dredged in flour.
Cooking: I put light olive oil in a frying pan on low heat and fried three garlic cloves (smashed) for 5-8 minutes until the garlic flavor is transferred to the oil. I then took the garlic out of the pan. I turned the flame to medium high and put in the monkfish fillet and liver medallions. I cooked for less than one minute on each sides and finished in a 400F oven for 5 minutes. After 5 minutes were up, I let it rest for 5 minutes (This is one of the rare fish which, like meat, benefits from resting after cooking).
Sauce: I thought about making a Ponzu-based sauce but settled for my ususal sauce made of orange marmalade and soy sauce. I first put orange marmalade (3 tbs, I used a “fancy” marmelade with large orange peels in it) in a small frying pan on low heat and added just a small amount of hot water (1 tsp) to facilitate the melting. When the orange marmalade was melted, I added soy sauce (1 tsp). This may sound like a very sweet sauce but it goes well with monkfish liver (or duck breast).
I placed three medallions of monk fish fillets on the bottom and topped each pieces with monk fish liver and drizzled the sauce as you see in the first picture. This is a great dish if I say so myself. The firm texture of the fillets is like lobster tail and the liver is like foie gras, soft, buttery and unctuous. This combination is sublime and the sauce went perfectly. Although this dish could go well with a nice acidic and crisp white wine such as sauvignon blanc, we were drinking cold sake at this point, which was great with this dish.
Of course, before this dish, I served ankimo in a very simple traditional way with ponzu, grated daikon which was sprinkled with Japanese one flavored red pepper flakes or ichimi tougrashi 一味唐辛子. This was mighty fine too!
Saturday, June 9, 2012
Blanched Mizuna 水菜のおひたし
Mizuna 水菜 is a Japanese green, sometimes called Japanese mustard green, which is often used in a Japanese hot pot dish or “Nabe” 鍋. It has a very subtle piquant flavor. The other day, we were in the near-by Japanese grocery store and, somehow, I thought, I picked up a package of edible chrysanthemum or shungiku 春菊 but when I opened it several days later, I discovered it was Mizuna. My wife, who likes edible chrysanthemum, was disappointed. Since I was not planning on making a nabe dish, I made this simple but a classic “ohitashi” dish.
“Ohitashi” means “soaked”. Originally, vegetables (mostly leafy greens) were boiled and then “soaked” in a broth or dashi 出汁. The excess liquid was then squeezed out and it was seasoned with soy sauce. More commonly, however, the soaking step was omitted and the boiled leafy vegetable with soy sauce on top is called “Ohitashi”.
Mizuna: One package of mizuna was composed of about 6 individual plants measuring about 12 inches long. As with any leafy vegetable, it looked like a lot but after cooking the volume decreased quite a bit. I washed the stalks and lined them up so that all the leafy parts were on one side and the root ends on the other. I cut off the root end and cut the remainins stalks in half so that one bunch was mostly leafy and the other was mostly stalks.
I first cooked the stalks in salted boiling watr for 30-40 seconds and then added and cooked the leafy part for another 30 seconds. I drained the cooked greens in the colander. Spread the cooked mizuna flat and cooled it down by fanning. You could shock it in ice cold water but this is easier and the mizuna will not get too watery.
Dressing: Instead of “broth” which may have been used in the original form of “ohitashi”, I made mustard/soy sauce mixture or “karashi shouuyu” 芥子醤油. I put about 1/2 tsp of Japanese hot mustard (from a tube), sugar (1/4 tsp) and soy sauce (2 tsp) in a Japanese mortar or “suribachi” すり鉢 and mixed all together using a pestle or “surikogi” すりこ木.
I squeezed out any excess moisture from the cooked mizuna and then cut into pieces about 2 inch long. I dressed with the above karashi shouuyu. I placed it in a small dish as seen above. I garnished with dried bonito flakes “Katsuobushi” 鰹節 (pre-shaven and came in a small plastic pouch). Just before eating, you may want to moisten the bonito flakes with a bit of additional soy sauce (which we did).
This is more for the texture than the taste of the green itself but, nevertheless, very refreshing small dish which can go well with your Japanese style dinner/breakfast or drinking snack. “Ohitashi” can be made any vegetables but the most common is using spinach. When using spinach, especially the Japanese variety, you should soak the spinach in cold water after boiling to remove oxalic acid.
Sunday, April 1, 2012
Lamb loin chops with reduced red wine sauce with garlic and mint flavor 子羊肉の赤ワインソース
Did I tell you my wife likes lamb very much. Although lamb is not a popular meat in Japan (especially in the old days when I lived there), it was widely enjoyed by Hokkaidian 北海道人. The dish is called "Genghis Khan" nabe or "Jingisukan-nabe"*. This may be because livestock production including dairy and raising sheep is very big in Hokkaido. (You may recall the famous sheep hill in Sapporo).
* The old Sapporo beer brewery was converted into a cavernous "beer garden" with all-you-can-eat Jingiskan grill. (Now, I learned that it was fruther converted into a beer museum with an adjacent restaurants). Since I knew my wife liked lamb, I took her there. Jungiskan nabe is a convex cast iron grill with ridges and grooves on which rolled and thinly sliced mutton/lamb is grilled.
Since the Japanese, in general, do not like the true flavor of mutton or lamb, they do everything and anything to cover it up with either strong marinades (before cooking) or dipping sauce after cooking--or both. As a result, my wife's review of the dish was, "You say this is made of lamb? I couldn't tell, all I tasted was soysauce".
One week end, we cooked loin chops of lamb which may not be the most popular cut of lamb but the meat is tender and tasty. Since I had a bottle of Bordeaux which did not meet our lowest drinkability standard, I also made reduced red wine sauce with garlic and mint.
I served this with a side of baked greenbeans and parmesan couscous (from the box, just add chicken broth, a pat of butter. When it comes to a boil, add couscous, remove from heat and let it stand for 5 minutes. Fluff with a fork).
I sliced garlic cloves (3-4). I fried the garlic in olive oil (2 tbs) in low heat until the garlic was fragrant, slightly browned, and the garlic flavor transfered to the oil. I seasoned the lamb loin chops (4) with salt and pepper. Using the garlic infused oil, I seasoned and browned both sides finishing them in 350F oven for 5-8 minutes.
I removed the meat and set it aside on the plate loosely covered with aluminum foil. While the meat was resting, I made a sauce. I blotted the excess oil from the pan using a paper towel and put the pan back on the medium flame. I deglazed it with red wine (happend to be Bordeaux, about 1/2 cup) and added back the garlic. After it reduced in half, I added Balsamic vinegar (1 tbs) and further reduced the mixture (final amount was just coating the bottom of the pan). I added back any juice accumulated in the plate where the lamb chops were resting. Since I realized I am out of fresh mint, I just added dried mint leaves (1/2 tsp).
A good Austrarian shiraz (maybe MollyDooker BlueEyed boy) is a good match but I think we had this with California Cab (I do not remember which one).
(From http://www.japan-guide.com/e/e5300.html)* The old Sapporo beer brewery was converted into a cavernous "beer garden" with all-you-can-eat Jingiskan grill. (Now, I learned that it was fruther converted into a beer museum with an adjacent restaurants). Since I knew my wife liked lamb, I took her there. Jungiskan nabe is a convex cast iron grill with ridges and grooves on which rolled and thinly sliced mutton/lamb is grilled.
Tuesday, February 21, 2012
Cellophane noodle, chicken skin and cucumber salad 春雨と雛皮の和え物
This was a small starter dish one evening. Again, I used what I had at hand to make this simple but tasty dish. The only item I cooked specifically for this dish was the cellophane noodle or "harusame" 春雨. This means "spring rain" which is a poetic name for Japanese-style cellophane noodles. Although this noodle is originally Chinese, the Japanese version is made from potatoes and corn starch (instead of mung bean startch). The other ingredient in the salad was the microwave "sakamushi" chicken which I made the day before. The blanched bean sprout was leftover from making the "kinchaku" oden dish.
Noodle: On the left is a package of "harusame" noodle. It is dried and comes as brittle white straight noodles but once it is cooked, it becomes semi-transparent noodle with a unique texture--somewhat slippery, soft yet al dente. (The package touts "mochi mochi" mouthfeel). This noodle can be used in soup, nabe, or braised or stir-fried dish. The initial cooking needs to be adjusted depending on how you use it. In my case, I used it in a salad. So, I cooked it fully (about 7 minutes) in boiling water. I drained and washed the noodles immediately in cold running water. I cut the noodles into three segments for the ease of eating. The amount of noodle is totally arbitrary but I used 1/4 of the package. When cooked, the volume of the noodle increases about 4-5 fold.
Cucumber: I washed, salt-rubbed, washed again one American mini-cucumber and sliced it on a slant thinly first. I then julienned it. I salted, kneaded and squeezed out the excess moisture.
Bean sprout: Mung bean sprouts blanched which was leftover from making "kinchaku" oden item. I had about 1/2 cup.
Golden thread egg: This is an extra but I decided to make "kinshiran" 金糸卵. I used one egg beaten and seasoned with salt. I made a very thin omelet by cooking it on a very low flame using a non-stick frying pan coated with a small amount of vegetable oil and with the lid on. After it finished cooking, I cut it into 4 strips and then julienned.
This is a perfect small Izakaya dish to start. You could used chile oil instead of tabasco and sesame oil but this combination is one I always use in leu of chile oil. The combination of the noodle and bean sprout created very good textures and the chicken skin added favor. For instant dressing, the subtle heat from Tabasco and sesame flavor are excellent.
The amounts are all arbitrary but we had about 4 servings of the salad by the time I finished it (small servings as seen above).
Noodle: On the left is a package of "harusame" noodle. It is dried and comes as brittle white straight noodles but once it is cooked, it becomes semi-transparent noodle with a unique texture--somewhat slippery, soft yet al dente. (The package touts "mochi mochi" mouthfeel). This noodle can be used in soup, nabe, or braised or stir-fried dish. The initial cooking needs to be adjusted depending on how you use it. In my case, I used it in a salad. So, I cooked it fully (about 7 minutes) in boiling water. I drained and washed the noodles immediately in cold running water. I cut the noodles into three segments for the ease of eating. The amount of noodle is totally arbitrary but I used 1/4 of the package. When cooked, the volume of the noodle increases about 4-5 fold.
The sakamushi or sake-steamed chicken: I removed the skin of one breast and thinly sliced. I also sliced the meat (3 slices per serving).
Cucumber: I washed, salt-rubbed, washed again one American mini-cucumber and sliced it on a slant thinly first. I then julienned it. I salted, kneaded and squeezed out the excess moisture.
Bean sprout: Mung bean sprouts blanched which was leftover from making "kinchaku" oden item. I had about 1/2 cup.
Golden thread egg: This is an extra but I decided to make "kinshiran" 金糸卵. I used one egg beaten and seasoned with salt. I made a very thin omelet by cooking it on a very low flame using a non-stick frying pan coated with a small amount of vegetable oil and with the lid on. After it finished cooking, I cut it into 4 strips and then julienned.
Dressing: This is an instant dressing made of ponzu souyu ポン酢醤油 (from the bottle, about 3 tbs), dark sesame oil (about 1 tsp), and tabasco (to taste).
I dressed everything except for the golden thread egg. I put the cucumber and chicken slices in a shallow bowl and served the salad in the middle and garnished it with the golden thread egg.
This is a perfect small Izakaya dish to start. You could used chile oil instead of tabasco and sesame oil but this combination is one I always use in leu of chile oil. The combination of the noodle and bean sprout created very good textures and the chicken skin added favor. For instant dressing, the subtle heat from Tabasco and sesame flavor are excellent.
Thursday, January 26, 2012
Yuzu-koshou mayonnaise 柚子胡椒マヨネーズ
Yuzu-koshou 柚子胡椒 is one of the most useful and versatile Japanese condiment/seasonings. It is a mixture of salt, chopped peel of a Japanese citrus called "yuzu" 柚子 and chili pepper (usually green chili pepper but it could also be red chili pepper). Chili peppers are called "koshou" in Kyushu Island 九州. In the rest of Japan, "koshou" usually means either ground black or white peppercorns and chili peppers are called "Tougarashi" 唐辛子. One could make this from scratch if yuzu is available but, yuzu, even if available, in the U.S. is too expensive to attempt this.
The mixture of yuzu flavor and spiciness really adds even to store-bought mayonnaise.
The next best thing is to buy ready-made yuzu-koshou in a tube as seen in the left. This will keep at least a few weeks or more in the refrigerator after opening. Yuzu-koshou is usually used as a seasoning or condiment for Nabe dishes, noodles in broth, and cold cubes of tofu but it could be used in any dish. I use it to season meat mixtures for hamburgers or Japanese "Tsukune" dishes.
Another way to use yuzu-koshou is as a dressing. The easiest combination is to mixed it with mayonnaise. Like wasabi-mayonnaise, you could add quite a bit of yuzu-koshou, since the mayonnaise dampens the heat. I usually make it with a ratio of almost 1:1 of mayo and yuzu-kosho but this is totally up to your taste. You could also add soy sauce in addition.
Here are two examples of how I used yuzu-koshou-mayonnaise.
The first one below is steamed haricot verts dressed in mayo-yuzu-koshou. This was served as a side for Paprika-cumin rubbed low-temperature (350F) baked pork tenderloin slices, homemade cranberry sauce, my wife's mushed potato seasoned with soy sauce and butter.
On another occasion, I served curry flavored chicken wing and drumet with steamed broccoli dressed in yuzu-koshou-mayo.
Here are two examples of how I used yuzu-koshou-mayonnaise.
The first one below is steamed haricot verts dressed in mayo-yuzu-koshou. This was served as a side for Paprika-cumin rubbed low-temperature (350F) baked pork tenderloin slices, homemade cranberry sauce, my wife's mushed potato seasoned with soy sauce and butter.
Tuesday, April 12, 2011
Simmered "tarako" cod roe 鱈子の煮付け
This is another tarako dish which is a perfect Izakaya style drinking snack and goes perfectly with sake. I made this dish since I thawed a set of tarako roe (called "hitohara" 一腹 or "one belly" which consists of two roe sacs connected at one point). I made tarako omelet with one sac and the other sat in the fridge for two more days and needed to be quickly prepared.
Seasoning liquid: This is a rather easy dish, especially in my case, since I had leftover broth from making "Negi-ma nabe" ねぎま鍋 the other day. I just strained the broth and adjusted the seasoning by adding sake, mirin and soy sauce. If you are making the both from scratch; dashi broth (200ml), mirin (2-3 tbs), sake (2tbs) and soy sauce (2-3 tbs) will do it. Some like it sweet and add sugar but I do not. I also add julienne of ginger root (3 thin slivers cut into fine julienne).
You could serve this cold, at room temperature or reheated. I served this with blanched broccolini* (which looks somewhat like Japanese mustard green or "nanohana" 菜の花 but does not taste like it) dressed with karashi-zyouyu 芥子醤油 (Japanese hot mustard, sugar, and soy sauce). For good measure, I added fresh fine julienne of ginger or hari-shouga 針ショウガ as garnish. This dish has a nice chewy and interesting texture which is quite different from uncooked tarako and rather bright ginger flavor. A really nice dish.
*This was developed by a Japanese seed company but is much more popular in the U.S than in Japan for some reason. If you are interested, here is a story about broccolini (in Japanese).
Tarako: Some recipes call for "raw" or unpreserved tarako. The only raw roe available around here is shad roe, which may also be used in this dish but I have not tried. So I used the usual salted tarako. It is interesting that the saltiness of the tarako reduces to the saltiness of the simmering liquid when it is cooked. So I do think either raw or salted tarako will work in this dish. I first cut one side of the membrane along the long axis and then cut it in 1 inch segments. I like this way rather than keeping a roe sac intact while cooking and then slicing it when serving. The way I prepared it made the tarako "blossom" when cooked like you see here in the picture, since the sac membrane will contract and invert the roe. This, to me, is more presentable and gives a better texture.
When the seasoning liquid came to a simmer, I added the tarako and simmered it gently for 15 minutes and let it cool to room temperature in the simmering liquid (Picture below).
*This was developed by a Japanese seed company but is much more popular in the U.S than in Japan for some reason. If you are interested, here is a story about broccolini (in Japanese).
Monday, April 4, 2011
Tuna and scallion hotpot ねぎま鍋
I found fresh yellow-fin tuna at the near-by grocery store where we buy pasteurized eggs. Although it was said to be "sashimi" grade and looked and smelled fresh, I wasn't going to take any chances. I decided to make this nabe dish called "Negima" nabe ねぎま鍋. "Negi" 葱 is scallion and "ma" is a short for "Maguro" 鮪 or tuna so this is a nabe dish with scallion and tuna. If you have Japanese "naga negi" 長ネギ or Tokyo scallion, which is much thicker than regular scallion, and more closely resembles small leeks, this dish would be better. I, however, had no choice but to used regular scallion (close to Japanese "ban-nou negi" 万能葱 or "asatsuki" 浅葱). Again, there are many variations of this dish but "negi" and "maguro" are two name-sake must-have items.
Broth: I first made "dashi' broth using kelp and bonio dashi pack (about 500ml). I added sake (2ts), mirin (2 tbs) and "usukuchi" or light colored soy sauce (4 tbs).
Ingredients: As you can see below, I cut tuna into pieces that were a bit larger and thicker than sashimi size (1 lb). I also cut the scallion into pieces about 1 inch long on a slant (6, I chose the thickest ones I can find), and tofu (one). Other possible ingredients could include some leafy greens, fresh mushrooms (either enoki or shiitake), and shirataki 白滝.
I think this is an Ok dish but I am not a big fan of cooked tuna. Good tuna is best eaten raw. But on cold nights such as we were still having, this is a very warming dish. Yuzukosho gave a spicy citrusy counter taste to the rather bland taste of cooked tuna. This dish went perfectly with sake.
Wednesday, January 19, 2011
Fried oyster redux カキのフライ再登場
This is a repeat of my post from about one year ago. The reason I am posting this again is that this was one of the best fried oysters I have ever made and probably I have ever tasted (kindly allow me to boast). Although the oysters came in a glass jar pre-shucked, they were quite large and equal in size without any broken pieces. I proposed several options including an oyster nabe to my wife. After my report of the quality of the oysters, she said fried oysters, and I gladly obliged.
The recipe is the same as before. This time, though, because of the good quality of the oysters and the fact that I fried them perfectly (just luck). They were light and crunchy outside and juicy, soft and flavorful inside. We just enjoyed them with a squeeze of lemon and cold sake. We both thought the quantity of oysters was a bit too much for us to finish, but both of us ate everything. The side was the usual, my variation of coleslaw with honey mustard dressing.
Thursday, December 30, 2010
Salmon "Ishikari-nabe" hotpot 石狩鍋
Ishikari 石狩 was a small coastal town which is located near Sapporo 札幌 where I grew up. Ishikari river 石狩川 drains into Ishikari bay 石狩湾 and to Sea of Japan 日本海 after winding down the ishikari plain. The river flooded often and meandered around. In the interest of efficiency, human intervention made shortcuts and straightened the water ways. As a result scimitar shaped lakes called "Mikazuki-ko" 三日月湖 were left behind. These lakes are mostly located in the area called "Barato" 茨戸, which is between Sapporo and Ishikari. They were separated from the main river but provided good fishing. Over the years Barato has become a suburbs of Sapporo 札幌. It is well developed but some pockets of wilderness remain.
Ishikari nabe was originally a simple fisherman's stew cooked on the beach using salmon caught in the mouth of the Ishikari river. In the past, salmon were extremely abundant and ran up the ishikari river. The salmon fishery declined drastically for some time but it is making a big come-back because of the continuos release of the hatchlings over many years and improved river management.
We enjoyed this with sprinkles of 7 flavored Japanese red pepper flakes and warmed sake. We have not had warmed sake for ages but I just wanted to try it again. I thought Gekkeikan "Black and Gold" (US brewed) is perfect for drinking warm since it is very gentle sake. It took some effort to find the "ochoushi" お銚子 flask for waming the sake. My wife finally found one (Hagi ware 萩焼) in the back of the cupboard. I gently warmed the flask in a hot water to 118 F (I measured the temperature using a digital instant meat thermometer). Guinomi ぐいのみ is made by an American artist Peggy Loudon, which my wife acquired at one of the Smithonian craft shows held at the building museum in Washington, DC. The warm sake was perfect with this nabe on this cold night--especially since we were anticipating a big snow storm which luckily just missed the Washington area by a hair. We probably will go back to drinking cold sake...warm sake is good on certain occasions but in general we prefer cold sake.
P.S. This recipe was featured in "The Jerusalem post" by Johanna Bailey.
Although Barato is now within commuting distance of Sapporo when my late brother and I were in grade school (9 and 6 respectively) getting there to go fishing was a great adventure--we had to take a bus, which ran infrequently from downtown Sapporo. On one such adventure we were supposed to meet a friend of my father's to go fishing at one of the lakes. He was supposed to wait for us at the designated bus stop in Barato but we somehow missed the stop and ended up at the beach of Ishikari, the terminus of the bus line. The kindly female conductor (this was a time when all buses had conductors) took pity on us and promised to get us to the right bus stop on the return run to Sapporo. Unfortunately, as I mentioned, the bus ran only infrequently and the return trip did not occur until that afternoon. So there we were, two waifs, stranded at the desolate Ishikari beach for several hours getting hungry. The kind conductor once again took pity and bought us a bowl of Ishikari-nabe, for which the city is known, from the near-by eatery where she and the driver were eating lunch. I cannot tell you how great it tasted. The dish I made today was Ishikai-nabe. Making it, smelling it and eating it brought back the long ago memory and evoked this long preamble.
Ishikari nabe was originally a simple fisherman's stew cooked on the beach using salmon caught in the mouth of the Ishikari river. In the past, salmon were extremely abundant and ran up the ishikari river. The salmon fishery declined drastically for some time but it is making a big come-back because of the continuos release of the hatchlings over many years and improved river management.
There are many variations of this dish but, the original form is very simple; put whatever ingredients are available (you must have salmon, though) in a pot. The broth is ususally seasoned with kelp broth and miso. The secret of making a good Ishikari nabe is to put the miso seasoning in after the vegetables are cooked. The other secret is not to cook the salmon too long.
The above picture of Ishikai-nabe is in a small one person pot (8 inch wide), which my wife and I shared. This time I used, daikon (2 inch long, peeled cut thinly in half moon shape), carrot (one medium, cut thicker than daikon in half moon shape), potato (one medium, cut into half inch thick half moon shape) and cabbage (3 leaves, hard veins removed and roughly chopped). In addition, I used fresh shiitake mushrooms (2), shirataki (1/3, parboiled) and scallion (3, cut in a slant) and salmon fillet (whatever amount you like). I thought of adding tofu but the pot was full and I decided not to use tofu this time. You could add other vegetables, sea food, fish cakes etc if you like.
I started by soaking kelp (4-5 inch long) in about 3 cups of water for 30 minutes or longer or until it gets hydrated and soft. I put the pot on a medium flame and when the water started to boil turned down the heat and took out the kelp. I put the vegetables which takes a long time to cook in the pot first (cabbage, potato, daikon and carrot) and cooked them for 20-30 minutes on a low flame.
Preparation of the salmon: I had one medium size fillet of salmon (1 lb). After washing and removing any scales and bones if present, I removed the thin fatty belly part or "harashu" ハラス for another dish. I cut the remaining fillet into one inch wide strips and then cut the strips in half to make good sized rectangles. In order to reduce the strong or gamey taste of the salmon, I parboiled it in boiling water with a small amount of sake for just 10-20 seconds. Then I washed the pieces in cold running water and set aside.
Seasoning mixture: I disolved miso (3 tbs) in sake (1 cup) and mirin (3 tbs) in a measuring cup and set aside. You could adjust the sweetness by increasing or decreasing the amount of mirin.
When the vegetables were done, I added shirataki and shiitake. After few minutes of cooking (with lid on), I added the seasoning mixture above. After coming back to a simmer, I added the salmon and scallion and cooked it until salmon was just done (3-4 minutes). Some people add butter or milk at the end but I did not.
We enjoyed this with sprinkles of 7 flavored Japanese red pepper flakes and warmed sake. We have not had warmed sake for ages but I just wanted to try it again. I thought Gekkeikan "Black and Gold" (US brewed) is perfect for drinking warm since it is very gentle sake. It took some effort to find the "ochoushi" お銚子 flask for waming the sake. My wife finally found one (Hagi ware 萩焼) in the back of the cupboard. I gently warmed the flask in a hot water to 118 F (I measured the temperature using a digital instant meat thermometer). Guinomi ぐいのみ is made by an American artist Peggy Loudon, which my wife acquired at one of the Smithonian craft shows held at the building museum in Washington, DC. The warm sake was perfect with this nabe on this cold night--especially since we were anticipating a big snow storm which luckily just missed the Washington area by a hair. We probably will go back to drinking cold sake...warm sake is good on certain occasions but in general we prefer cold sake.
P.S. This recipe was featured in "The Jerusalem post" by Johanna Bailey.
Wednesday, December 15, 2010
Oyster and tofu "nabe" in miso broth 牡蛎の味噌鍋
It is getting cold especially in the morning and evening here in DC. We even had snow. We are definitely getting into "Nabe" 鍋 season. When I posted "Nabemono" 鍋物, I mentioned "Dotenabe" 土手鍋, which is famous in the Hiroshima 広島 region. It uses miso smeared (or "schmeared" in NY and NJ) around the rim of a pot (resembling a "bank" made of soil, "dote" 土手 in Japanese, along the river) with dashi broth poured in the center of the pot. You dissolve the miso into the broth as you cook. Oysters, for which Hiroshima is famous, among other ingredients, have to be included, in this nabe dish. I found a variation of this dish in the 1st volume of "Otsumami Yokocho" おつまみ横町 P149, I decided to make this nabe dish. When I was choosing which vessel I was going to use for this dish, I found this one (below). I completely forgot that we had it. It is a miniature (about 7-8 inches), imitation cast iron (I guess it is made of cast aluminum with anonized surface) "nabe" with a wooden lid. It is a perfect vessel for this dish.
Here it is when the lid was lifted and the oysters were revealed. When I read the recipe, I immediately thought I had to modify this. The seasoning broth, as instructed, would be too salty and way too sweet for our taste. Besides, I needed some green.
Oyster: The oysters we got were not the best. I bought some already shucked and in a plastic container (I am no sure if they had been pasteurized, probably not). There were a total of 10-12 medium to small oysters. I washed them in salted water, drained and put them on layers of paper towels.
Tofu: I used 3/4 leftover tofu from when I made other dish. I cut it into cubes as seen above.
Miso broth: This is where I deviated from the recipe. I mixed sake (1/2 cup), miso (1.5 tbs or a bit more), and sugar (0.5 tbs). The original calls for sake (1/4 cup), miso (3 tbs) and sugar (1 tbs). In addition, imitating the traditional "dotenabe" flavor, I char the surface of the miso lightly using a small kitchen blow torch (every home cook should have one) to enhance the fragrant flavor of miso before dissolving it in sake.
After the miso broth came to a simmer, I added the tofu and when it was warmed through, I added the oysters and scallions and cooked for a few minutes or until the oysters are just cooked. Although this may not be enough even for one (you big eaters out there), we shared this. I served this in small individual bowls and, before eating, we sprinkled "sansho" 山椒 powder. You have to have sake with this. The broth was surprisingly good. Even though I reduced the amount of sugar, the broth was slightly sweet but also very delicate and excellent. Although this dish was wonderful and we enjoyed it, we could have had better quality oysters. Especially when you use oysters which can be eaten raw, slightly undercooking oysters is the best way to enjoy this nabe.
Subscribe to:
Posts (Atom)