Showing posts sorted by relevance for query sukiyaki. Sort by date Show all posts

Sunday, March 27, 2011

Sukiyaki すき焼き

When I think of Sukiyaki, it conjures up two unrelated memories in my mind. One is a Japanese popular song called "Ue-o muite arukou" "上を向いて歩こう"; translated into English, as "Let me gaze up while I am walking (and holding back my tears)". This was sung by Kyu Sakamoto 坂本九, who was later killed in a tragic commercial airplane crash in 1985. This is a melancholic song without any reference to food but, for some reason, was named "sukiyaki" when it was introduced to the U.S. The lyrics of the song and this English title have absolutely no relation to each other whatsoever except that both were from Japan--it is the equivalent to introducing "Moon River" as "Beef Stew".) Despite this, it was reportedly #1 on the Billboard magazine hit chart in June 15 of 1963.

Sukiyaki also reminds me of the very first time my wife and I visited Kyoto together so many years ago. Although we had visited Japan frequently we usually headed straight to Hokkaido occasionally staying only a few days in Tokyo. So the Japan my wife knew consisted of only Tokyo, Sapporo and other parts of Hokkaido. For her, Kyoto was an eye-opening experience--until then she thought all of Japan was like Hokkaido and was surprised to see how different it was. 

On that trip, one evening, we stolled along a narrow and crooked alleyway in Pontocho 先斗町. Since I did not do good research ahead of time (this was a time way before internet Tabelog and food blogs), we did not have any idea which restaurant we should try. Then, I found what appeared to be an old Kyoto house with a small wooden sign saying "Sukiyaki". Although it looked more like a residence than a restaurant, I made an executive decision and we went in. As we said "hello" or "konbanwa" at the small and deserted  "genkan" 玄関 entrance, a kimono clad "nakai" san 仲居さん or waitress, came out from behind the sliding "shoji" screen and greeted us. After removing our shoes, we were ushered up into a large Japanese room (10 tatami-mat room or 十畳間) upstairs which was just for us. We did not see any other customers and the "nakai" san made conversations with my wife (through my translation) and I while preparing sukiyaki at the table. It was such a different and pleasant eating experience. The room was elegant in a slightly shabby chic. It was so quiet and peaceful after the bustle on the streets below. I do not remember exactly but it was not outrageously expensive. (In later years, we visited Kyoto many more times. Every time we visit Pontocho, we see that the stores in the alleys have changed and new (chain?) restaurants and girly bars have started replacing old traditional restaurants and drinking places. Although we tried, we were not able to find our "sukiyaki" restaurant again. That meal turned out to be one of those poignant but fleeting experiences--kinda like the song. 
(Image borrowed from http://shigeking.exblog.jp/10388168/). 

This dish, sukiyaki, was invented after the Meiji restoration (1868) when Japanese adapted to eating meat (beef) and also is one of the Japanese foods accepted and popularized in the U.S. long before sushi and sashimi became popular. Sukiyaki 鋤焼 (suki means a type of Japanese spades and "yaki" 焼き means to grill or cook. But I am not sure that was how this dish was originally cooked.) has two distinct styles; Kansai 関西 (includes Kyoto) and Kanto 関東 (Tokyo) -styles. Mine must be a Hokkaido 北海道 style. Actually, when I was growing up, my mother used to make sukiyaki with thinly sliced pork rather than beef, which was (and maybe still is) common in Hokkaido.

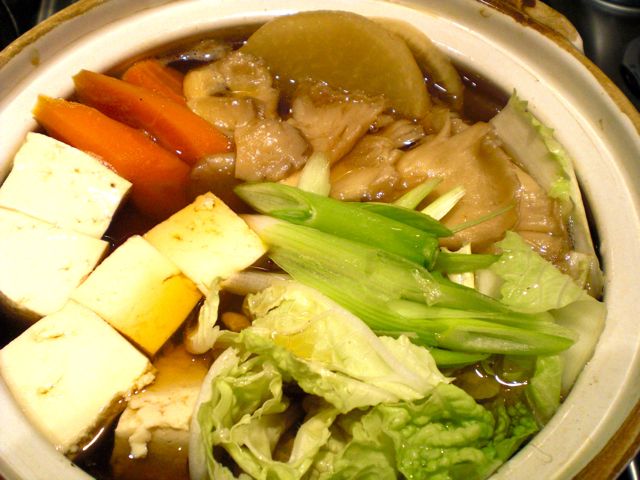
We have not made sukiyaki for ages but I found thinly sliced sukiyaki beef (frozen), which was not as nicely marbled as Japanese beef, at a Japanese grocery store and decided to make sukiyaki. Sukiyaki is traditionally cooked at the table and "the man of the house" is supposedly in charge of cooking and seasoning sukiyaki even though he usually does not cook. A traditional sukiyaki pot or すき焼き鍋 is made of cast iron、round and shallow with folding handles like one you see here. 

Ingredients: Besides thinly sliced beef, the most common items include tofu (especially grilled tofu or 焼き豆腐), Konnyaku thread or shirataki (白滝) (boiled for few minutes in water and washed in cold running water to remove its distinctive (read:awful) smell, shiitake mushroom (I used shimeji here), onion (either regular, thinly sliced, or Japanese "negi" scallion cut in 1-2 inch long on a slant), some type of greens such as spinach (I used a mixture of spinach and arugula here, which were very briefly blanched). My wife likes the more traditional edible chrysanthemum or shungiku (春菊)*. As seen on the left in the image below, I arranged the ingredients on a large plate before starting.

(*We love shungiku for its distinctive taste and even tried to grow it without much success. You could occasionally get it fresh at the Japanese grocery store but the availability is sporadic at best.)

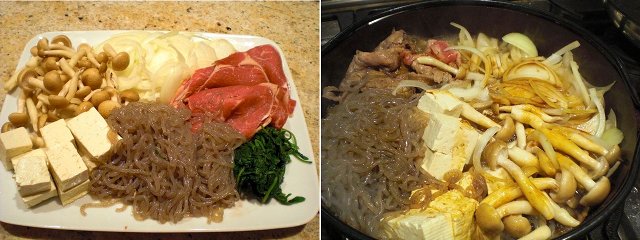
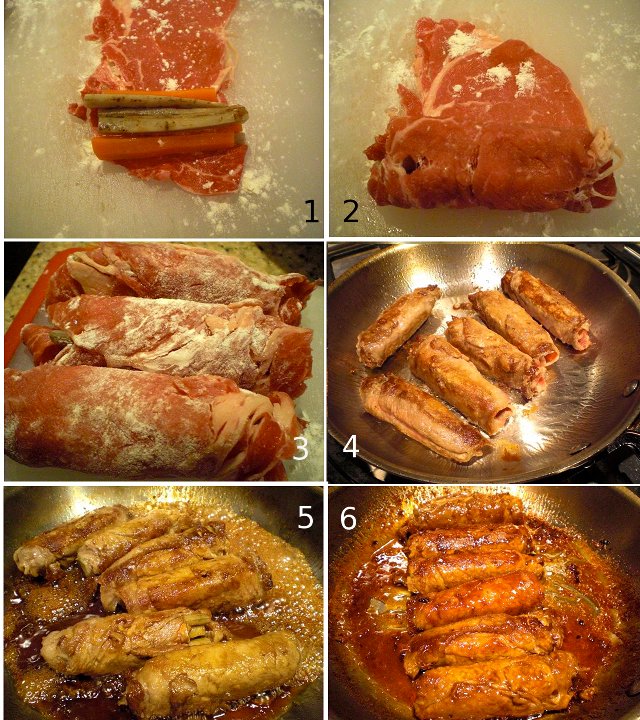
Seasonings: You should have your seasonings handy while cooking sukiyaki; soy sauce, sugar, and sake. I do not use a premixed seasoning liquid or warishita 割り下. Just add these seasonings as you add more ingredients; sprinkle sugar, splash soy sauce and then sake. Since this is done by the man of the house, he does not measure anything (right, image above).

Cooking:  We did not cook the sukiyaki at the table this time. I placed a sukiyaki pot on the stove on medium low heat. I first melted a bit of butter (or you could use a chunk of beef fat) and spread the beef over the butter. The proper and traditional way of serving sukiyaki, is to season the meat after it has browned with sake, sugar and soy sauce. Then all the diners taste a small portion of this first cooked meat, since this is the only time browned meat was available to taste. (The rest of the beef added later is just cooked in the seasoning liquid). I do not see much advantage in this custom and I cooked everything together as you see on the right in the picture above. The vegetable and tofu exude water but if the liquid is not enough or the seasoning is too strong you could add more sake or dashi. I put on the lid and cooked it for 5 minutes or until the onion was done.

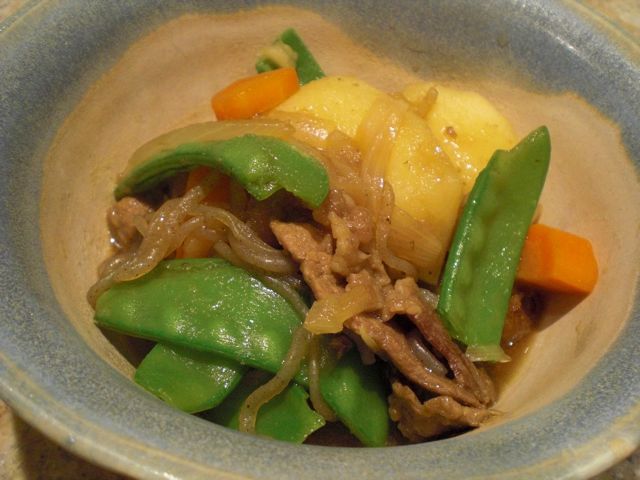
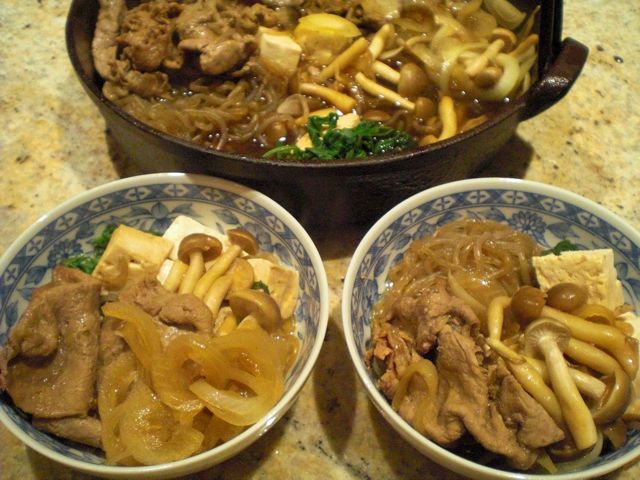
Serving: The classic way is to serve a raw beaten egg in the bowl as a dipping sauce (shown in the second picture above.) (of course, I used pasteurized shell eggs for this). The egg will cool the suskiyaki and make it taste better for sure. We just had this as a drinking snack rather than a meal with cold sake. This is such a classic dish and even the inferior quality of the beef did not detract.

Friday, March 3, 2023

Sukiyaki Made with Beef and Edible Chrysanthemum from Weee すき焼き

We have not had “sukiyaki” すき焼き for a long time. One of the reasons is that two of the main ingredients “shungiku” 春菊 edible chrysanthemum (edible mum)*  and thinly sliced beef for sukiyaki or sukiyaki-meat すき焼肉 are generally not readily available. Although frozen sukiyaki meat is available at our Japanese grocery store, it is rather expensive and appears to be just thinly sliced rib eye steak. I considered getting a meat slicer which could slice a frozen block of beef so I could make my own sukiyaki beef but decided it was not worth it. Every-now-and-then, our Japanese grocery store has shungiku but it is “ hit or miss” with mostly miss.

Recently, we started getting Asian groceries from Weee, and found a leafy green vegetable called “Tang Ho 茼蒿, chrysanthemum green”. In addition, I also found they had a product called “Little Sheep Marbled Beef Sliced for Hot Pot”. So we got both to try them for sukiyaki. The package indicated the beef was sold by a company called Little Sheep Company (子羊). We learned that this company runs Mongolian hot pot chain restaurants and also sells meat like the one we just got. The Chinese writing on the package indicated the meat was “Wagyu 和牛” or Japanese beef but did not indicate what country the meat actually came from. Nonetheless it was just the right thickness for sukiyaki and had some marbling, (although not as much marbling as shown in the Weee website picture).

*Although spinach can be substituted for edible chrysanthemum it does not have the unique flavor which characterizes shungiku and is such an integral component of the sukiyaki taste experience. Shungiku is relatively easy to grow from seeds and we were able to raise it for some years in our herb garden. Then the rabbits discovered they liked it too. They ate not only all the edible mum out of the herb garden but every other chrysanthemum related plant we had in the yard edible (for us) or not. As a result we have not been able to raise mums of any kind.

The below are the ingredients I prepared for the sukiyaki. From 12 O’Clock clockwise are sliced onion, Tofu, “fu” 麩 gluten cake (flower-shaped), shira-taki*, shimeji and shiitake mushrooms and the center is enoki mushroom, beef and the green is chrysanthemum.

*Thread form of  konnyaku, washed and blanched and cut into shorter segments.


The picture below shows a detail of the meat. It is frozen in rolls. I served half of the package (about half a pound).


For the chrysanthemum green, I removed the leaves from the stem, washed and blanched them. Although the plant looked slightly different it tasted exactly like Japanese “shungiku”.


Using these ingredients we had sukiyaki using a cast-iron sukiyaki pot and our new table-top induction cooker. The seasonings were  my usual sugar, soy sauce, and sake (Kansai style 関西風) as opposed to using the premixed seasoning liquid “warishita” 割下  (Kanto style 関東風).


We really enjoyed this sukiyaki. The meat was not the best but certainly much better than what we had been previously getting. In addition, the price was very reasonable. Although the shungiku looked different, it tasted the same as the Japanese version and was very good. The assorted mushrooms (all came from Weee) are also very good. So, we are happy that the ingredients essential for making good sukiyaki can be bought at Weee.

Sunday, December 26, 2021

“Shoga-yaki” ginger pork bowl “tei-shoku” lunch 豚の生姜焼き丼定食

A few weeks ago, my wife suggested that it has been quite a while since we had sukiyaki すき焼き and it would be nice to have some. I agreed, but when I went to the Japanese grocery store, I forgot to get the frozen "Sukiyaki meat" すき焼肉. So, the next time I went I was proud of myself for not forgetting the meat. But apparently I picked up the wrong thing. My first clue was when my wife said, “I didn’t know sukiyaki is made with pork, I thought it was beef.” Instead of sukiyaki beef, in my haste I had picked up thinly sliced pork for "shouga-yaki" 生姜焼き. Since this package was next to the "shabu-shabu" シャブシャブ beef, I assumed it was also beef but for sukiyaki. In my enthusiasm I bought not one but two packages of the stuff. All was not lost, however, as I may have mentioned before, in Hokkaido 北海道, where I am originally from, many families use pork instead of beef for sukiyaki as was the case in my family. So, we went ahead and used one of the packs of pork to make sukiyaki. It was not good. The pork was too lean and too thickly cut. It got hard when cooked as sukiyaki. (So note to self: next time when at the Japanese grocery store get appropriate sukiyaki beef). Meanwhile, since I had bought two packages of this pork, I had one package left and it was clear that it would not be used for sukiyaki. So, one weekend I decided to use the pork as originally intended and made “shoga-yaki” ginger pork. Pork shoga-yaki 豚の生姜焼き is a very popular dish in Japan. When I was a college student, coffee shops near the university served lunch in addition to tea and coffee. In addition to  “Western-style” lunches such as sandwiches or spaghetti, most of the coffee shops also served Japanese-style  bento 弁当 or teishoku 定食* and shoga-yaki was among the popular ones. I am sure this has not been changed even now.

*Digression alert: I am sure it is no need to explain “bento” but here it goes anyway. When “bento” is served in restaurant/coffee shop, it is usually a lidded rectangular box which contains the entire meal but unlike pre-packaged bento, the rice and dishes are warm or just made. "Teishuku" (please follow the link for illustrated guide) is the Japanese concept of a "complete" meal or "meal set" which includes a bowl of  rice, soup, tsukemono 漬け物 (pickled or more likely salted vegetables), main dish (protein) and small "kobachi" 小鉢 side dish or bowl. In many "Taishu-shokudo" 大衆食堂 or "public" eateries which serve those who want drinks with food and those who want a complete meal, many different teishoku are available (the main protein dish varies and can be grilled fish, sashimi, or meat etc) but the remaining items, or “sides” such as soup, tuskemono, are usually the same for each available teishoku. The main and side dishes can be had as a single dish without other items (this is great especially if you are just drinking). It could also be "teishoku" for the price of a few more yen. 

So, this is  my rendition of "shoga-yaki" donburi teishoku 生姜焼き丼定食. In this case, the main protein and rice were combined as a donburi.


The main dish shown in the next picture is a bed of rice to which I added pork shouga-yaki with onion, seasoned shiitake mushroom (this was from dried shiitake and seasoned in "ama-kara" 甘辛 or sweet and salty with mirin and soy sauce) and blanched broccoli.


Miso soup is wakame ワカメ sea weed, "abura-age" 油揚げ fried tofu, silken tofu 絹ごし豆腐 and chopped scallion ネギ.


The "Kobachi" side dish was simmered root vegetable including "renkon" lotus root, "gobo" burdock root, "takenoko" bamboo shoot, shiitake mushroom, and "konnyaku" devil's tongue and blanched sugar snap in salt broth.


The tsukemono is cucumber, daikon, nappa cabbage, jalapeño pepper, and ginger (I salted this a bit stronger than I usually do; with salt 3% of the weight of the veggies instead of usual 2% and also added a dash of Vodka which makes it last much longer without changing the taste. (With this preparation it can easily last for at least one week in the refrigerator).


How to make pork shouga-yaki ginger pork (Although I posted "shouga-yaki" over 11 years ago, this time,  I am using a more appropriate, albeit not perfect, cut of meat). I am sure that there are so many variations and preferences and, of course, you could use other meat such as beef but this is what I made.

The essence of this dish is thinly sliced meat sautéed and seasoned sweet soy sauce flavored with ginger. Using lean meat can make tough shouga-yaki and using fatty cuts such as thinly sliced pork belly will prevent that but the traditional cut to be used is "pork roast" meat 豚のロース cut thinly (thin enough but not paper thin).

Ingredients:
Thinly sliced pork, 4-5 slices for one meal size serving (in Japan, specially packaged "shouga-yaki" pork is available widely. The one I got here is a bit too lean, the perfect cut has more fat. I used the entire package which is about 20 slices).
2-3 tsp neutral oil
Onion slices, optional

For marinade:
Mirin, soy sauce, and sake (1:1:1) ratio, enough to marinate the meat plus more to add while cooking.
Grated ginger (amount arbitrary, totally depends on your taste, I used whole grated ginger but you can use just the juice from grated ginger).
Dash of dark sesame oil
(optionally, grated onion).

Directions:
Marinate the meat. The amount of the marinade is enough to cover all meat slices and a bit more (additional 1/4 cup). I marinaded for 1 hour in the refrigerator.
I drained the marinade (the excess marinade reserved) and spread the meat slices on a paper towel to remove excess marinade.
In the non-stick frying pan, add 2 tsp neutral oil on medium flame. 
Add onion slices and cook until soft and somewhat transparent, set aside
Cook the meat slices, spread out without over lapping, in batches. One side 30 seconds and the other side 15 seconds. Do not overcook (the meat will finish cooking when cooked with the marinade later).
Set aside the cooked meat slices.
When all the slices are cooked, add the marinade to the pan (if not enough add more sake, mirin and soy sauce).
Add back the cooked meat with the accumulated juice and the onion .
Quickly cook and coat each slice with the marinade. Take it out and set aside.
Since I was planning to make a doumburi, I added a small amount of water at the end and heated the marinade to make sauce.

Assembly:
Top the rice with the shouga-yaki pork slices (I used 3 slices per bowl).
Pour in the sauce from the frying pan (just slightly moisten and season the rice).
Add any other garnish or topping (such as ginger julienne in vinegar or "benishouga" 紅生姜). I added seasoned shiitake mushrooms and blanched broccoli.

Compared to the sukiyaki we made with this pork, the shouga-yaki came out much better. The meat was tender and well seasoned. Perfect lunch for the weekend.

Monday, August 20, 2012

Beef stroganoff with bamboo shoot 竹の子入りビーフストロガノフ

This is a hybrid Western-Japanese dish that I concocted one evening. I had frozen Sukiyaki beef in our freezer which I decided to use before it got any more freezer burned than it already was. Instead of regular Sukiyaki すき焼き, I used about 1/3 for beef negimaki ねぎ巻き or beef scallion rolls. I suggested several dishes to my wife which were essentially Sukiyaki-like dishes to use up  the remainder of the beef. She challenged me to think outside the box and come up with something different. I also found a package of vacuum packed boiled bamboo shoots in the refrigerator which I bought few month ago.  This is what I came up with.
CIMG5184
I was thinking of some kind of stir fried dish. This dish had morphed during the cooking since I changed my mind midway through but the end result was something akin to beef stroganoff.

Beef: This was what left of the sukiyaki meat. It was thinly sliced and previously frozen. I thawed it completely in the refrigerator over night (about 300 grams or about 10 oz). I seasoned it with soy sauce (1 tbs), mirin (1 tbs), and sake (1 tbs) I also mixed in potato starch or katakuriko 片栗粉.

Bamboo shoot: I quartered the bamboo shoot along the length and washed away the white chalky substance from the inside of the bamboo shoot. I then thinly sliced crosswise.

Onion: I had leftover onion (small, half) which I sliced into thin strips.

I added light olive oil to a frying pan on medium flame and sautéed the onion until soft. I then added the seasoned beef and cooked until the color changed. Next I added the bamboo shoot and sautéed for one more minute. Then I thought the seasoning was too close to Sukiyaki. I added Worchester sauce (2 tsp), chicken broth (3-4 tbs) and added florets of broccoli. I stirred and put on a tight fitting lid and let it braise/steam for 2-3 minutes. When I removed the lid, because of the potato starch, the sauce/liquid was slightly thickened. I added cream (3-4 tbs) and reduced it further to make a relatively thick sauce. I tasted it and adjusted the seasoning with salt and black pepper.

Since I did not have cooked rice or noodles, I just served this as is as a small drinking snack. Although it tasted OK, unfortunately, the broccoli was too crunchy for my wife’s taste. I get some points, however, for comeing up with this unique dish. The texture contrast of the beef and bamboo shoot and an interesting hybrid taste of the sauce were OK, however, I think, I will not make this dish again. I like a more traditional Japanese style seasoning (sweet and salty or “ama-kara” 甘辛) for thinly sliced beef.

Sunday, January 28, 2024

Beef with Kon-nyaku and Vegetable “Kimpira” Stir-fry 牛肉と蒟蒻の金平

We were having some very extremely cold and snowy weather recently. One of the best dishes for this kind of cold weather is sukiyaki すき焼きand similar nabe 鍋 dishes. We recently got thinly sliced (2mm in thickness) beef rib eye for sukiyaki from Weee. This is not top quality beef but it is very reasonably  priced and quite good. So, one very cold evening, we cooked sukiyaki at the table and had it with hot sake 燗酒.  The package included 1lb of beef, which was more than we could eat in one sitting so besides the leftover sukiyaki, we had leftover uncooked beef as well. Thinly sliced beef is used in many Japanese dishes but we usually do not have beef (we usually have chicken or pork and occasionally lamb) so I did not have a favorite “go-to” recipe to use the beef.  I looked through some beef recipes on the web but ended up with my own variation (picture #1). We had a cake of kon-nyaku (konjac) 蒟蒻, and an end piece of daikon 大根. So I included those in this dish. Many Japanese dishes call for small Japanese green pepper called “pea-man” ピーマンwhich is quite different from American green pepper. Instead I used, seeded and deveined Jalapeño pepper.  For the seasonings, I added “Douban-jang”. 豆板醤 to add slight heat. For an impromptu dish, everything came together rather nicely. This is a just note to myself so that I can recreate it in the future.


Ingredients:
150gram thinly sliced beef, cut into thin strips (picture below, this was rib eye) (picture #2)
One cake  of kon-nyaku 板コンニャク, washed, par-boiled
One small carrot
2 inch of daikon
One large Jalapeño pepper, seeded and deveined
1 tbs vegetable oil and 1 tsp dark sesame oil

Seasonings:
1 tsp douban-jang (or more if you like spicy)
2 tbs sake
1 tbs mirin
2 tbs soy sauce (I used x4 Japanese noodle sauce)


Directions:
I tried to cut all the vegetables in the same, thin rectangular pieces. I halved the  kon-nyaku cake in thickness, added shallow criss-cross cuts on both sides and cut into the similar rectangular shape but some came out a bit thicker and larger. (Picture #3 from left to right are kon-nyaku, carrot, Jalapeño pepper and diakon).


I added the oil in a non-stick frying pan on medium flame (vegetable plus sesame oil). I added the beef and cooked until almost done and added the remaining vegetables and the kon-nyaku and stir fried for 2-3 minutes.

I added the sake, mirin, and soy sauce. When coming to the boil I added douban-jang (picture #4) and mixed well. Placed the lid on and let it simmer for 5-7 minutes.


I removed the lid and turned the flame to medium high and stirred until the liquid was almost gone. I tasted and adjusted the seasoning. In this case, it came out slightly sweeter than I intended but it had a nice sweet and salty flavor and a mild spicy kick. Certainly, the beef added more flavor. I could have cut the daikon into thicker pieces since it became very soft. The kon-nyaku absorbed the seasonings and added nice texture. We like this dish. It will go with rice or drinks. In our case, probably the latter.

Sunday, December 25, 2011

Edible chrysanthemum with black sesame sauce 春菊の黒ごま和え

Edible chrysanthemum or "shungiku" 春菊 is one of my wife's favorite Japanese vegetables. We even grew some from the seeds for few years.  The harvest, however was was quite meager and the plants frequently got leggy consisting mostly of stalks with few leaves so we stopped growing it. Only sporadically, do I see fresh shungiku at the Japanese grocery store. This green is usually used in "Sukiyaki". My wife, however, gets quite creative with it, claiming that "shungiku in not just for sukiyaki any more." She shocked several of my Japanese friends by using it as lettuce in a salad..."but it is never eaten this way in Japan", they exclaimed. My wife asked, "why not?"

I bought shungiku last weekend but did not have a chance to prepare it. Rather than let them go waste, I decided to make this simple dish.
Shungiku: This started out as a good sized bunch but once cooked, like spinach, it reduced tremendously. I first cut off the largest stalks on the bottom and blanched the bunch in salted boiling water for about 1 minute and immediately shocked it in ice water. Using paper towels, I wrapped the shungiku and squeezed out any excess moisture as much as I could. I then wrapped the shungiku in nori sheet to make a cylindar. I sliced the cylindar into 4 pieces (2 pieces per serving as you can see above).

Black sesame sauce: This is exactly as I posted before. I used black sesame paste from the pouch (2 tbs), sugar (1 tsp), soy sauce (1-2 tbs), if needed, sake or mirin to adjust the consistency.

The flavor of shungiku is very unique. It is not spinach and really taste like "chrysanthemum". This is rather healthy but quick good dish. Next time, when I get fresh shungiku, I have to make sukiyaki--unless my wife comes up with something else first.

Thursday, March 31, 2011

Burdock "gobo" beef roll 牛蒡の牛肉巻き

When I made sukiyaki 鋤焼, I used a portion of the sukiyaki beef to make this dish. This type of roll is very common in Japanese cooking and they are popular in izakaya as well as side dishes in a bento box. This time I used gobo and carrot in the center and seasoned it in a teriyaki style.  I could have used asparagus, green beans, scallion (famous "negimaki" 葱巻き) or other vegetables by themselves or in combination. This dish can also be made with chicken or pork as well (pound it thin). Other options are to season it with a miso-based sauce or breading it to deep fry. My version is a relatively healthy drinking snack.

To make this dish I prepared the vegetables ahead of time (1 day before) which makes this dish quicker and easier.

Vegetables: I scraped the skin off the gobo with the back of my knife and cut it into small batons (2-3 inches long and 1/3 inch thick). I soaked it in acidulated water for 10-15 minutes with several changes of water. I cut the carrot in the same shape and size. I cooked the gobo and carrot together in salted water for 15-20 minutes and then drained. I let them cool.

Meat: I used the kind of very thinly sliced beef used for sukiyaki. If this is not available, you may have to pound the beef into very thin pieces.

Assembly: I spread out one sheet of beef and dusted it lightly with flour. I placed 3 gobo and 3 carrot sticks on the near end (#1) of the meat and started rolling as tightly as possible (#2). I also dusted the outer surface of the rolls with flour as well (#3). I made a total of 6 rolls.

In a frying pan, I added vegetable oil (2 tbs) on a medium flame. I browned the surface of the rolls (#4) starting from the seam side. You have to make sure all the surfaces are browned by turning the rolls 90 degrees after browning one side. I then added sake (1 tbs), mirin (1 tbs) and soy sauce (2 tbs) (#5).( Be careful about flare-ups). I shook the pan and turned the rolls so that all the surface was coated with the sauce. After 4-5 minutes, the sauce reduced and caramelized (#6). I made sure all the roll surfaces were evenly coated.

Here is the cut surface.


I cut the roll into 4 pieces and served.  It was nice eating this hot but this also tastes great at room temperature or even cold. The gobo has a nice crunchy consistency and all the flavors are very nice. After wolfing down the roll I served as a starter dish, my wife asked why I was being so stingy only serving one roll per person as a teaser. I told her that more dishes were coming and we did not want to fill up with this one dish. After a pause she said that was OK because the remaining rolls would only taste better the next day after the flavors had more time to meld...and she was correct. This dish will go with any drink perhaps a good sturdy Cabernet but we are partial to cold sake here.

Sunday, April 15, 2018

Nabe cooked on an induction cooker, IH 適応土鍋で鱈ちり

Some years ago, when we remodeled our kitchen, and were exiled to cook in the basement for the duration of the construction, we got a tabletop induction cooker.  We also had a butane canister gas table top cooker from our days in California. Although we used it for Nabe and Sukiyaki dishes, the gas cooker and the canisters were almost 30 years old and we were worried about their integrity.  Despite their age, they seemed to work fine but we did not buy extra gas canisters after we used them up.  Although our Sukiyaki pot was cast iron and compatible with induction cooking, we could not use our Japanese "Donabe 土鍋" earthen pots. So I just cooked our nabe dishes on the regular gas range and served them at the table which is not as much fun as tabletop cooking.

Induction cookers are much more popular in Japan than in the U.S. and are called "induction heaters" or "IH" for short.  As a result,  IH-compatible "donabes" have been available in Japan for some time.  Although I wanted to purchase one, as far as I know,  it is expensive to ship to the U.S. even if the Japanese companies would be willing to ship it.  Then, I came across Kinto store where they sell rather modern design Japanese table- and kitchenware. One of these items is an IH compatible Nabe (it came in two colors - black or white and two sizes - 40 and 82oz).

Instead of traditional earthenware, this is made of a much less porous heat-resistant porcelain with a special induction compatible plate embedded on the bottom. It comes with a steamer insert as well. It was reasonably priced and above a certain price break-point, shipping was free. I bought a small nabe (40oz) with some other items (so shipping was free). It is not a traditional design but we like the modern and clean line. This nabe can be used on gas, electric heating element, induction or in the oven. So, I took out our old induction cooker and decided to make "Cod and vegetable nabe" or "Tarachiri" 鱈ちり鍋 on the table. I would have used edible chrysanthemum or shun-giku 春菊  as a green if it had been available but I could not get it.  So, I used a small bunch of whole spinach. I also added scallion, fresh shiitake 椎茸 and hen-of-the-wood 舞茸 mushrooms, nappa cabbage 白菜 and tofu 豆腐.


 I got some black cod filets with the skin removed.  If the skin had not been removed (but hopefully cleaned and scaled, which is not always the case, here, when the skin is left on the fish) it would have helped hold the the fish meat together better and added a different texture and flavor. I salted the filets a few hours prior to cooking and kept them in the refrigerator uncovered before cutting them into chunks.


As condiments, I prepared thinly sliced scallions and grated daikon with Japanese red pepper (the daikon turned out to be too spicy for us).


For a change, we cooked and ate this in our sunroom. The pictures were not really good since it was getting dark and the lighting was quite dim by the time we had this.


Traditionally, the cooking liquid is just kelp broth without seasoning and the cooked food is served with "ponzu" dipping sauce and the garnish.  I made a minor deviation and made the broth with kelp and dried bonito flakes and added sake, mirin and a small amount of "usukuchi" light colored soy sauce. I first put in the vegetables and tofu and when they were almost done, I added the cod.


We used Ponzu sauce (from the bottle). As I mentioned the grated daikon was too spicy even without the red pepper flakes. We really enjoyed the tabletop cooking. There is something very comforting about the steam rising from the pot, the soft sound of the the liquid bubbling and lovely cooking smells. We ate much more than we thought we would. In Japan, the end of this nabe dish would include adding noodles or rice to the remaining broth, which, by the end of the dinner, would have built up some very nice flavors from the vegetables and fish or whatever ingredients were cooked in the pot. This broth was exquisite; very complex and slightly sweet from the veggies. Although it was really good we were too full for more than a few sips to taste let alone adding noodles or rice. Instead, the next day, we added rice to the leftover broth and whatever was left in the pot and made rice porridge with the addition of eggs as a lunch. With that we felt we had done justice to the nabe.

Friday, February 10, 2023

New Induction Cooker Compatible Do-nabe IH 対応、銀宝花三島万古焼土鍋

Japanese “Nabe” 鍋 hot pot is a dish that is cooked at the table while you eat.  Classically, a portable butane-canister gas cooker is used with a “Do-nabe”  土鍋 earthen-ware pot. We used to have a butane table top cooker for nabe and sukiyaki すき焼き but because of safety concerns, which mainly stemmed from the age of our canisters and cooker, we looked for an alternative which turned out to be a table-top induction cooker (or the Japanese term is “IH”, short  for induction heater). For this to work, you have to use IH compatible pots and pans. Traditional Japanese nabe earthen-ware pots are certainly not IH compatible. We eventually found an IH compatible nabe from Kinto which worked great. Only complaint (which may not be important to many) is that while the pot worked well it is a very modern-appearing ceramic and does not have the traditional look of nabe. (I missed the homey nostalgic feel of a nabe which just the sight of the traditional design pot can evoke for me.)

Recently, I found an IH compatible nabe which is made of traditional “Banko-ware” 万古焼 pot called “Gipo Hanamishima Banko-yaki pot” 銀宝花三島万古焼土鍋 in an on-line store called “Japanese taste”. This is where we got dried persimmon or “hoshigaki” 干し柿. The “Japanese taste” ships items directly from Japan but it comes relatively quickly*. In any case, we got this “IH compatible do-nabe” pot last year but did not have a chance to use it until now. In the picture below, the left is “Kakomi” IH donabe from Kinto and the right is new Ginpo IH compatible donabe.

*We later learned that this pot is available at Amazon USA.


To make a donabe IH compatible, a magnetic metal disk needs to be present between the induction cooker surface and donabe.  Both these induction compatible donabes took a bit of a different approach.

Kinto donabe has a metal disk embedded into the bottom of pot as seen below. It can be used on gas, induction, and or halogen (electric heating element) cook tops. But not in a microwave oven.


Gipo comes with a stainless steel perforated disk which snaps into the inside bottom of the pot (apparently Ginpo has a patent). There are metal hooks and the inside bottom of the pot is formed to accept and secure this disk. It can be removed for cleaning and using the pot in a microwave. We initially tried it on our old induction cooktop (at least 18 years old which works with our cast iron sukiyaki pot and  Kinto donabe). The Gipo donabe, however, did not work with the old induction cooker. The cooker issued an error message which essentially read “NO-CAN-DO”. I read the instructions that came with the Gipo donabe and found out that it may not be compatible with older IH cookers. Great. Which meant we would be getting a new table top induction cooker to complete the set. It was not too expensive.


The new one is much better; the surface is completely covered with glass and easy to clean and the controls are more advanced. The new cooker worked with the Ginpo donabe. Actually, it boiled the liquid inside much quicker. I assume that because the metal disk is in contact with the liquid.


We enjoyed our nabe dish.  The main protein was cod and oyster. The cod was great. The oysters, however, were a different story. Digression alert: We are having a difficult time getting good oysters, especially Pacific oysters. For this dish we got small (eastern) frozen oyster but they tasted terrible. Luckily they did not ruin the flavor of the rest of the nabe. We ended up throwing out the remainder of the oysters in the package.

The other items in the nabe included nappa cabbage, tofu, diakon, mushrooms (enoki, oyster, shiitake and shimeji). I also added “fu” 麩 gluten cake. I made a broth with dried kelp and a dashi pack and, and for a change, seasoned the simmering liquid with miso (miso, mirin and sake).


Somehow, this new do-nabe is esthetically more pleasing (at least for me) and works great. Since this is a genuine earthen ware pot, you should not keep the contents in the pot over night.

Wednesday, November 15, 2023

Simmered “Shirataki” Konjac Noodle and Deep-fried Tofu しらたきと油揚の煮物

A few days ago, we had sukiyaki すき焼き. I thought the whole bag (400 gram or 14.1 oz) of “shirataki” 白滝 (meaning white cascade) or noodle form of konnyaku (or konjac) was too much to use all of it for sukiyaki. So after I preparing it (i.e. washed, boiled, washed again and cut into convenient length) I kept 1/3 in water in the refrigerator. I was pondering how I could use this and came across this recipe on-line and decided to make it. This appears to be Kyoto “o-banzai” おばんざい style home cooking and has nice gentle and comforting flavors.


Ingredients:
1/3 package (about 100 grams) of “shirataki”, washed, boiled, washed again and cut into convenient length
1 small carrot, peeled and julienned
1 abura-age, hot water poured over (to thaw and remove excess oil), water squeezed out and then cut into thin threads
1 scallion finely chopped
300 ml Japanese dashi broth
30 ml sake
15 ml mirin
20 ml soy sauce (I used x4 concentrated Japanese noodle sauce)

Directions:
Add, the shirataki, carrot, and abura-age in a pot add the broth and cook for 5-10 minutes.
Add the seasonings and cook until the liquid is reduced by 1/3.

The original recipe calls for sugar but I did not add it. Japanese noodle sauce does have some sweetness which compensated for not having any sugar. This could be a side dish for rice but it is also perfect for a drinking snack.

Wednesday, February 24, 2021

Seafood nabe on a snowy day 雪降りの夕の海鮮鍋

As the weather got colder our thoughts turned to having Japanese hot pot or nabe 鍋 for dinner. This week we had some snow and our backyard was transformed to a winter wonderland; perfect time for nabe. So we decided to have one using whatever ingredients we had on hand.


We used to cook nabes on a portable gas cooker with a butene fuel canister but both the cooker and the canisters became so old we started worrying about how safe they were. Fortunately after we used up the canisters several years ago. We switched to a table top induction cooker (or Japanese will say IH or induction heater).  Making Sukiyaki すき焼き on this type of cooker works well because a sukiyaki nabe pot is usually made of cast iron but other earthenware or pottery pots or nabes won’t work. Then, we discovered an induction-cooker-compatible nabe pot. (It has a magnetic metal disk embedded in the bottom). With it,  we can do a nabe at the table without having to use a gas canister fuel source. 

I checked our freezer and refridgerator and decided we could do a sea food nabe or “kaisen-nabe” 海鮮鍋. We defrosted, scallops, cod, pacific oyster (this is the second time we used frozen Pacific oyster which worked well as a fry) and shrimp. We also had fresh shiitake and  nappa cabbage but not other green leafy vegetables. In any case, we set up our nabe feast.


I started the broth by soaking kelp in the nabe pot in cold water for several hours.  In the evening, I put the pot with the kelp in it on the induction cooker. Once the water came to a boil, I removed the kelp. I then added the shrimp shells and once the color of the shells changed I continued simmering for a few minutes, I the removed the shrimp shells.  I seasoned the broth with white dashi “Shiro-dashi” 白だしand light colored soy sauce making a very gentle broth. I started cooking the hard part of the nappa cabbage as well as the other vegetables. We also had some decent firm tofu from Whole Foods which I added. Next came daikon, carrot and potato, all precooked in the microwave oven.


Our seafood lineup is shown below (all frozen, and thawed in the refrigerator). It included shrimp, scallop (from Great Alaska Seafood), Pacific oysters (from Vital choice wild sea food and organics) and cod (from Whole foods). This was the second time we used frozen Pacific oysters. The first time I made fried oysters.  These were much better than the small fragmented fresh or pasteurized  oysters we sometimes get.


The picture below shows the vegetables which waiting to be put into the nabe; the leafy portion of nappa cabbage, tofu, shiitake mushroom, precooked daikon, potato, and carrot. 


We made sure the seafood was not overcooked. We also used  ponzu sauce as we were eating. This was a fun dinner perfect with the snowy winter outside and the steaming body warming nabe inside. We had warm sake (“Hakutsuru Ginjo 白鶴吟醸) to boot. Of course, there were leftovers. Classically, Japanese will end the nabe by adding rice or noodles into the remaining broth to make a “shime” 〆 final dish but we were too full and the next day, we made rice porridge with eggs for lunch.

Saturday, October 28, 2023

Fig and Edible Chrysanthemum Salad 無花果と春菊の甘酢あえ

A few days ago, we got some mission figs. Since figs tend to get moldy rather quickly, I processed them meaning I quartered them and then marinated them in Triple Sec (this is our standard method for prolonging the shelf life of many fruits). Since we had a lot of other fruit (especially grapes) to eat, we forgot about the figs for a while. When I checked, they were still good thanks to the liquor. Instead of eating them as is, I made this small salad with edible chrysanthemum. This was inspired by this blog I follow. The edible chrysanthemum is from Weee. Some time ago, we got it for sukiyaki but somehow we did not have the sukiyaki. So, I blanched and froze it. I thawed and used it for this dish. The fig was quite nice and sweet which made this dish.


This is not a quite a recipe but I used my home-made sweet vinegar and a dash of x4 concentrated noodle sauce for dressing. I served this one evening as part of an “Otsumami” drinking snack line-up. The figs were sweet and slightly sour from the vinegar in the dressing with a slight crunch from the seeds. The chrysanthemum provided a slightly bitter contrast that added to the overall complex flavor of the dish.

Friday, April 3, 2015

Edible chrysanthemum roll 春菊ロールと煮浸し

The other day, I saw fresh edible chrysanthemum or "shungiku" 春菊 at the Japanese grocery store. Since this is my wife's favorite Japanese vegetable and only sporadically appears in the grocery store, I got it. Although the most classic way to enjoy shungiku is in sukiyaki すき焼き, we were not having sukiyaki this time. So, I made a small appetizer with shungiku and served it with a skewer of chicken tenderloin in yakitori style with pickled plum 梅肉 and perilla 大葉 as a starter one evening.


I decided to make it a bit interesting and made a roll wrapped with thin omelet and a nori sheet.


In addition, I made the thick stem part into "Oshitashi" おひたし or "Nibitashi" 煮浸し garnished with bonito flakes.


I should have taken the pictures while I was making the roll but I did not.

Preparation of shungiku:
I washed and removed any wilted leaves and cut off the very end of the stems. I removed the leaves with thin stalks and separated the thick stems.

Cooking:
In a large pot, I cooked the thick stems first in salted boiling water for several minutes until cooked but still crunchy in the center. I scooped them up with a large slotted spoon and let them cool on the plate until I could handle them. I cut them into 2 inch logs.

I cooked the remaining shungiku for less than 1 minute, drained, and let cool on a paper towel lined plate.

Seasoning:
Thick stems (3rd picture):
I immediately soaked them in warm seasoned broth (dashi broth, soy sauce and mirin). Once it came to room temperature, I placed it in the refrigerator. I served it garnished with dried bonito flakes.

Leaves (1st and 2nd pictures):
After I squeezed out the excess moisture, I dressed them in karashi shouyu からし醤油 (Japanese hot mustard, sugar and soy sauce). It could be served as is (after cut into a reasonable size) but I made a roll with thin omelet and then dried nori sheet using a bamboo mat. I let it sit wrapped in plastic wrap for few minutes or until the nori sheet adhered to itself. I cut it in 1 inch cylinders.

Shungiku has a very unique nice flavors. Using two different ways of preparing, both were quite good as small starter dish for sake.

Wednesday, March 3, 2010

Beef and potato stew 肉じゃが

I meant to make this dish much earlier and I finally managed to make it now. This is a Japanese version of "meat and potatoes" and is the ultimate home cooked comfort dish. As such, it is also one of the most popular Izakaya dishes. As usual some variations exist but I think my recipe is middle-of-the-road. One of the major variations of this dish is what kind of meat to use. Most commonly it is thinly sliced beef (for sukiyaki) but some make it with pork (bara or sanmai niku バラ肉、三枚肉). Actually, when I was growing up, my mother made it with pork. Here I took a more traditional way and used beef.

The ingredients are 1) potates, 3-4 medium size, peeled and cut into a large bite size, and sharp edges beveled (called "mentori" 面取り to prevent the potatoes from crumbling while cooking), 2) beef, thinly sliced for sukiyaki, 250 grams, cut into a bite sized pieces, 3) onion, 2 large, cut in half and then cut into half inch wide wedges, 4) carrots, 2 small, cut into small half moon bit sized pieces, 4) "konnyaku" thread 糸蒟蒻, one package, cut into 2-3 inch long and parboiled for 1 minutes and drained, 5) green beans or snow peas (I used snow peas 15-20), ends trimmed.

In a large sauté pan, add 2-3 tbs of light olive or vegetable oil on a medium high flame. When the pan is hot, I first saute the onion until it is wilted (4-5 minutes). Then add and saute the beef until it loses its red color.  Add the carrot, konnyaku thread, potatoes (including the scrap from beveling the sharp edges of potatoes) and coat the vegetables with oil. Since some brown "fond" will develop on the bottom of the pan, I deglaze using 2-3 tbs of sake and then add dashi broth to cover the vegetables (I did not measure but I guess about 500ml or more). As it started boiling I turn it to simmer and skim off any scum that floats to the surface several times and let it cook for 15 or more minutes until the potates are cooked (test with a skewer). Now it is time to season. I often "eyeball" everthing and add sugar, mirin, sake, soy sauce directly into the pan but this time I tried to measure and premix the seasoning; sake, mirin, soy sauce (3 tbs each) and sugar (1 tbs). I added the seasoning mix to the pan and, with the lid off, cooked another 20 minutes on a medium flame, occasionally shaking the pan. The liquid should be reduced in half or more at the end of cooking. I taste and add more soysauce and/or sugar if needed (I added a few more tbs of soy sauce toward the end). I then add snow peas and cook an additional five minutes (you could pre-cook green the beans or snow peas, in that case, add just at the very end and mix).

This is a classic! Such a wonderful combination of flavors and textures. For potatoes, the starchy kind such as white or Russet works best. We ended up getting a second helping and filled ourselves up. This is a whole meal in a bowl. This goes well with any drink.

Tuesday, May 1, 2012

Chicken teriyaki 鶏腿肉の照り焼き

"Teriyaki" 照り焼き was popularized in the U.S. early on as a Japanese dish, probably in the same period "Sukiyaki" was getting popular. It has been incorporated in American home cooking (especially backyard BBQ) and you can buy a bottle of "Teriyaki" sauce (from Kikkoman and others) in any grocery store. I am not sure American-style "Teriyaki" even qualifies as an authentic Japanese dish. Usually, the teriyaki sauce is used as marinade and/or like a BBW sauce for meat. The meat is then grilled. 

The original Japanese cooking technique of "Teriyaki" is braising not really grilling. "Teri" 照り means glossy surface or luster and "Yaki"  焼き means grilled but "Yaki" in Japanese could mean braised as in "Sukiyaki". So, any dish braised in a sauce (usually soy sauce based with sugar) until the sauce is reduced and thick (due to the sugar content) and coats the surface of the food items is called "Teriyaki" either meat or fish. 

If I am making teriyaki chicken from scratch, I prefer to use thigh meat, deboned but skin on. I butterfly the thickness part to make the entire piece even thickness. I could marinate (mirin and soy sauce or sake and salt) but that is optional. I cook it from the skin side first in a frying pan until the skin is well browned (removing some excess oil by blotting with a paper towel) and cook the other side. In this occasion, I used leftover thigh meat which was salted and grilled (two thighs, that had been grilled in a George Forman's grill) so I skipped this process. Since the chicken was already cooked I went directly to the "saucing" step.

I then poured in "Teriyaki sauce"* and put the lid on for a few minutes (in this case, I really did not need to cook the chicken further). With the lid off, I turn up the flame and reduced the sauce until it became thick; clinging to the surface of the chicken giving "teri" or luster to the surface. Just to be slightly different, I sprinkled Chinese 5 spices (or Japanese "sansho" 山椒powder) to finish.

*You could use a bottled one but I just use a mixture of soy sauce and mirin (about 1:1).

Since this was made from leftover grilled salted chicken, it took less than 5 minutes to make. This was a sort of cannot-go-wrong type of small dish if not exciting. The cinnamon flavor of the Chinese 5 spices came out rather prominently. If you do not like this, stick to "Sansho" powder.

Wednesday, August 8, 2012

Beef scallion rolls 葱巻き

This is a classic home cooked dish, especially for bento boxes, as well as an Izakaya dish. It is also a very common item you will find in American Japanese restaurants. Since I had thinly sliced frozen beef for sukiyaki (#2 in the second picture) and it would not improve with time, I decided the time had come to thaw it.

Rolling thinly sliced meat, either beef or pork, around a core of vegetables or any cylindrical edible object (even a hotdog) is a very common Japanese technique.

It so happened that we were short of any vegetables except scallion so I made this scallion roll. The amounts are for three rolls perfect for two small servings (Picture above).

Scallion: I removed the outer layer, the root ends and green part of about a dozen scallions (#1).

Beef: This was thinly sliced beef for sukiyaki (frozen). I used 2-3 slices per roll depending on the integrity and size of the beef slice and 3-4 scallions in the center and made three rolls (#3).
With the seam side down, I seared the meat using a non-stick frying pan on medium flame with a small amount of oil (I used light olive oil) (#4). I seared all four sides and then added the seasoning.

Seasoning: This could be any store bought teriyaki-style sauce. I did not want to make it sweet so I used an equal amount of sake (2 tbs) and concentrated noodle sauce or “mentusyu” from the bottle (2 tbs). You could use mirin instead of sake to make it more classic teriyaki flavor (i.e. sweet). (#5).

I put a tightly fitting lid on the pan and steam/braised it for few minutes (#5). When the sauce was reduced, I remove the lid and moved the pan back and forth to roll the beef scallion rolls in the sauce to completely coat them(#6).

I sliced one roll into 4 pieces and served (the first picture). This is a rather mundane dish but my wife really liked it. If available, I would have used “Tokyo scallion” or “Naganegi” 長葱 but multiples of regular scallions is just fine and probably much more tender.

Saturday, November 14, 2009

Pork and Vegetable Stew 豚と野菜の煮込み

Pork and Vegetable Stew 豚と野菜の煮込み (Mark's book Page 28)

This is from Mark's cook book (P28). This dish definitely resembles a very popular homey dish called "buta jiru" 豚汁; a Japanese soup containing various root vegetables and pork seasoned with miso. I remember this was one of the most common dishes we made when we had a school cookout picnic on the floodplain 河原 of a nearby river when I was in grade school. This was called "suiji ensoku" 炊事遠足. The cookout was a traditional event and was meant to be educational as well as fun. A group of pupils had to plan what to cook and buy ingredients within a given budget.  On the floodplain, we set up a fire and arranged large stones around it to make an outdoor cooking pit. We usually cooked a one-pot meal using a large cook pot. I do not remember whether we used a charcoal or wood fire. I just googled "suiji ensoku" (in Japanese)  and learned that it appears to be peculiar to Hokkaido (the northernmost island of Japan). That makes sense since I grew up in Sapporo, Hokkaido. It also appears this wonderful tradition is still carried out in Hokkaido.

Again, I have to start by saying, I deviated from the orginal recipe, not intentionally but by necessity. I usually have "konnyaku" コンニャク in our refrigerator and I did not even check before starting this dish. It turned out that I did not have regular konnyaku but had "shirataki" 白滝 which is a konnyaku made into thin noodles (the most common use of this is in "sukiyaki" すき焼き). So, I had to substitute konnyaku with shirataki.

The specific cut of the pork, pork belly, required in the recipe ("bara-niku" or "sanmai-niku" バラ肉、三枚肉), which is a very common cut in Japan, is difficult to get here in a regular grocery store (bacon and salt pork are made from pork belly. I think that salt pork can be used for this dish after soaking it in water and parboiling it but I have not tried it yet). you could buy fresh (not smoked and/or salted) pork belly from speciality butcher stores or over the internet (sometimes from the producers directly) but I have not tried it. I found that meaty pork spareribs, after removing the bones, comes very close to this cut which I used here. Otherwise I followed the recipe in Mark's book.

To briefly reiterate, cut pork (1/2 lb.), daikon (1 lb.), carrot (1 medium) in 1/2 inch cubes. Boil the pork cubes in water (starting from cold water) for 10-15 minutes skimming the scum which floats on the surface, then, rinse the pork in running water. Cook 1 pkg of shirataki in boiling water for 5 minutes and rinse in running water. Combine all the ingredients and cover them with "konbu" or kelp broth (about 1 qt or liter). Add 1 crushed garlic clove, 2tbs soy sauce and 1tbs sugar. Cook for several hours until all all ingredients are soft. Just before serving,  dissolve yellow miso (2-3 tbs) for the desired saltiness. To dissolve the miso paste, I use a Japanese contraption called "misokoshi" 味噌濾し, but you can use a small strainer and a spoon. Garnish with chopped scallion and Japanese seven flavored hot pepper (Sichimi Tougarashi).

We like this very comforting dish. The original "buta jiru" is also equally good but this one is a bit more refined and the pork melts in the mouth. But, my wife said that this dish cries out for potatoes. Next day, I added cubed potatoes, more parboiled pork, and additional Kelp broth to the leftover soup (before adding miso) and cooked another 30 minutes or so and finished with miso. It tasted much better with a nice texture and added sweetness from the potatoes. Now I said, I should have added onions! I think we are converting this dish to the more classic "buta juru"!

Saturday, November 27, 2010

Nabemono 鍋物

Nabe 鍋 means "pot". Nabemono is an all inclusive term of any hot pot dish but often the dish itself is called "nabe". Any dish you cook (usually on the table) in a pot (most often earthenware) with broth is called "nabe" or "nabemono". Sukiyaki  すき焼き, shabu-shabu しゃぶしゃぶ and oden おでん may be considered types of nabe in a broad sense but I do not think it is appropriate to include them in "nabemono". Depending on the ingredients and seasoning of the broth, you have many variations and many names of "nabe". Whatever the name, in cold winter days, nabemono is one of the most comforting  and warming dishes. The types of broth seasonings could be;

1) Dashi without seasoning; When your broth is not seasoned, you use a dipping sauce such as ponzu. Tarachirinabe タラちり鍋. Mizutaki 鶏の水炊き, and Yudoufu 湯豆腐 are three such examples.
2) Dashi and soy sauce based; Yosebabe 寄せ鍋 is the best example.
3) Dashi and miso based; Chankonabe  ちゃんこ鍋, Ishikarinabe 石狩鍋, and Dotenabe 土手鍋 are three such examples.

Since other ingredients will impart lots of flavor to the broth, the starting broth is usually a simple kelp broth. In terms of the ingredients, you could limit them to only a few items (like yudoufu in which only tofu or tofu and nappa cabbage are usually used) or you could add anything including sea food, meat, vegetables, tofu, fish cake and more, as is done in chankonabe and yosenabe. There are no rules (although there are some guide lines). The name of the nabe changes based on the ingredients, locality, and types of broth.
Here is one example I made one evening in a small one person pot. I am not sure what I should call this. A type of yosenabe but I used mostly vegetables and at the very end decided to add shrimp. I first made dashi from kelp and a "dashi pack". This is like a tea bag but instead of tea, combination of pulverized bonito flakes, dried fish and kelp (there are several different kinds) are placed in the bag. It is much better than granulated instant dashi but still very convenient. I seasoned the broth with mirin, sake and soy sauce (to taste, since I did not measure). I started with the ingredients which take the longest time to cook. In my case, I added daikon (halved and thinly sliced) and carrot (sliced a bit thicker than the daikon) first, then after 10 minutes or so, I added the white part of Nappa cabbage or Hakusai 白菜, tofu 豆腐, followed by (after 5 minutes) maitake mushroom 舞茸, green parts of Nappa, scallion, and finally shrimp.

The ingredients I could have added include fish (usually a white meat, hardy fish such as cod), chicken (cut up thigh meat), fish cakes, and shell fish. As a condiment, I used seven flavored Japanese red pepper powder 七味唐辛子. To finish the meal, I could have added cooked rice to make porridge, or noodles such as udon noodles but I was too full just eating the items I cooked. Traditionally, warm sake is the choice of drink but we like cold sake even in winter and with nabe.