Friday, September 25, 2015

Pumpkin cheese spread パンプキンチーズスプレッド

This is another installment in the pumpkin puree recipe series. This was originally a cheese ball recipe but we did not make it to balls and just used it as a cheese spread. This is perfect with sipping wine.


Ingredients:
8 ounces goat cheese,
2 cups grated manchego,
3/4 cup pumpkin
1/2 teaspoon each smoked paprika and kosher salt.


The original recipe said "pulse" the goat cheese but that does not work--the goat cheese is too thick to "pulse" successfully. (sometimes you have to wonder if the folks who publish the recipes have actually made them.) After the food blender stalled out I removed the half blended ingredients and mixed them by hand with a spatula (you can see the white specks of unblended goat cheese in the picture). My suggestion is to cream the goat cheese in a mixer then add the other ingredients. It would probably also be useful to have all the ingredients at room temperature

In any case, the mixture of manchego and fresh goat cheese gives very nice texture and taste. The addition of smoked paprika and pumpkin puree adds an interesting and complex flavor with a slight sweetness. We like this as a cheese spread and as I said before it tastes great with red wine.


Tuesday, September 22, 2015

Pumpkin pancake パンプキンパンケーキ

Our favorite pancake is blueberry butter milk pancake. During blueberry season we make a batch of these pancakes almost every weekend and freeze the extras we make. They freeze very well. After making the “super secret” pumpkin bread we had canned pumpkin left over so, in keeping with the season, we decided to make pumpkin pancakes. I usually use 4 identical non-stick 8 inch frying pans to make a batch of pancakes. I could make the pancakes without oil or butter in the pan but my wife informed me that the oil is essential for the crispy "fried" edges she likes. My wife found this recipe on line.


Compared to our buttermilk pancakes, these really puffed up much higher. We enjoyed them with small amount of maple syrup and a side of espresso coffee.


The below is a direct quote from the original recipe (italicized) with our modification in parentheses.

Ingredients:
2 cups all-purpose flour
2 tablespoons packed brown sugar
1 tablespoon baking powder
1 1/4 teaspoons pumpkin pie spice
1 teaspoon salt
1 can (12 fl. oz.) Evaporated Milk (We made our own
1/2 cup Pumpkin puree
1/4 cup water
1 large egg
2 tablespoons vegetable oil
Chopped pecan (we first roasted and chopped) 
Instructions:
Toast about a cup of pecans, mix flour, brown sugar, baking powder, pumpkin pie spice and salt in large bowl. Combine evaporated milk, pumpkin, water (we actually just used regular milk), egg and 2 tablespoons oil in small bowl; mix well. Add to flour mixture. Stir just until moistened; batter may be lumpy. (Stir in chopped pecans.)

HEAT griddle or skillet over medium heat; brush lightly with oil. Pour 1/4 cup batter onto hot griddle; cook until bubbles begin to burst. Turn and continue cooking for 1 to 2 minutes. Repeat with remaining batter. Serve with  Pumpkin maple syrup (We just used straight maple syrup). 
This made a total of 10 pancakes. Here is the picture of the 8 remaining pancakes (we ate two). In addition to the pumpkin pie spice called for in this recipe, we did not have evaporated milk either. We have not used or bought evaporated milk for ages. So in addition to making our own pumpkin pie spice, we also made our own evaporated milk. I know what you are thinking; that we have entirely too much time on our hand to do something as silly as that but there were extenuating circumstances. First, we really wanted to make these pancakes, second we had some excess milk that we were wondering what to do with before it went bad. We consulted the internet and found it was fairly easy to make evaporated milk--just simmer a quart of milk until it is reduced by half. (While the process of actually making the evaporated milk was easy, cleaning the pan was not. Trust me, it is worth it to buy it in a can). It took half a day to make and the end product had chunks of "scum" or "membrane" (I assume from the milk protein). We strained the liquid and the end result was fairly thick, deep cream color and tasted pretty good. The funny thing is that this recipe calls for evaporated milk and then adds water. Why not just use regular milk? After all that work we were not about to add water so we used enough regular milk to make the batter of pouring consistency. We have a feeling that just adding milk or a mixture of milk and cream may do just as well as evaporated milk and water.

We really like this pancake. It has a nice pumpkin and pumpkin spice flavor and is nicely moist and fluffy. The canned pumpkin adds some mild sweetness. The toasted pecans added a nice crunch. These pancakes, like the blueberry pancakes also freeze very well. We took these to work for breakfast and they revived nicely in the microwave oven.

Saturday, September 19, 2015

Pacific saury "Sanma" Fry さんまのフライ

We have been enjoying sanma sashimi at Tako Grill in the past few weeks (seasonal sanma from Japan), when we get frozen sanma ourselves, we like it simply salted and grilled on a charcoal fire.  Since I got another frozen sanma from the Japanese grocery store, I decided to do something I have not done before—fry it, especially since I saw fried sanma in one of the food blogs I follow.


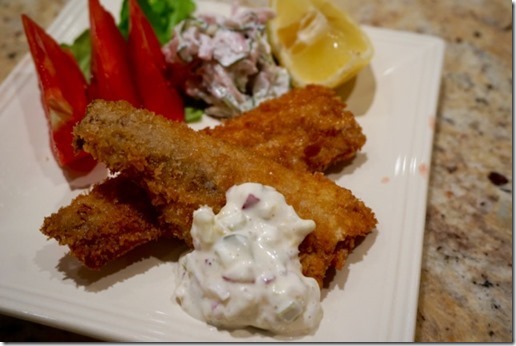
I served with my version of tartar sauce and a side of tomato and cucumber onion salad.


The preparation takes some effort since you need to filet and debone the sanma or "san-mai-ni-orosu  三枚におろす" in Japanese.  "San-mai" is what you end up with after filleting. It means three sheets ("mai" is the counter for sheets of paper or something  thin). There are 3 pieces; two filets and one back bone. (#1 in the picture below). To do this, I first washed and gutted the sanma. I then fileted sanma starting by inserting my filleting knife just beneath the front fin, and cutting perpendicular into the fish. When I hit the bone, I turned the blade 90 degrees, parallel to the back bone and cut through while applying some pressure on the skin side of the filet with the flat of my palm. I repeated this on the other side and viola I had two filets and back bone (#1).

Using a Japanese bone tweezer, I removed all the small bones  (belly part and along the center line of filets). Since the belly portion does not have much meat and with the bones removed mostly skin remains I merely cut off the excess skin. I made four cleaned sanma filets (#2). I removed the moisture using paper towels and salted both sides. I placed it on a paper towel lined plate and left it in the refrigerator until I was ready too fry them up (for several hours).

sanma prep composit

I blotted the excess moisture which appeared on the surface of the filets. I cut the filets in half (for easier fit into my frying pan) and dredged in flour, coated in egg water and then rolled in panko crumbs in the same manner as any cutlets (#3). I fried in a 350F oil for 1-2 minutes each side turning once until done (#4).

I made a quick tartar sauce. I chopped up coins of "bread and butter" pickles. I also chopped up one slice of pickled jalapeno pepper since I had it for some heat. I added these to some store-bought mayonnaise, a bit of lemon juice and zest of the lemon (micrograted).

The sanma fry was crispy and good. The only thing is that once it is fried up, somehow it tasted like any blue skin fish. We still enjoyed this sanma. Call me traditional, but I still like salted and grilled sanma with grated daikon the best.

Wednesday, September 16, 2015

Pumpkin Quesadilla カボチャ入りケサディヤ

 After making the "super secret" pumpkin bread we were on a "pumpkin" roll. My wife came across this recipe and we tried it one day as a snack.


When we make any kind of quesadilla, instead of using the authentic one-tortilla-folded method, we usually use two tortillas mostly for efficiency. The recipe also calls for the "sauce".


Ingredients:
  • 1 tsp canola oil (we used light olive oil)
  • 2 Tbsp finely chopped red onion
  • 1 Tbsp minced jalapeno pepper (we de-seeded and de-veined)
  • 1 small garlic clove, minced
  • 1/3 cup black beans, drained and rinsed
  • 1/4 tsp ground cumin
  • Kosher salt and freshly ground black pepper, to taste
  • 1/4 cup pure pumpkin puree, canned or homemade (we used canned)
  • 1/2 tsp chipotle hot sauce, (such as Tobasco) or more to taste (we used Sriracha)
  • 1 Tbsp chopped fresh cilantro, optional
  • 1 whole wheat tortilla (We used regular wheat tortilla)
  • 1/2 cup freshly grated 50% reduced fat jalapeno cheddar cheese (We used combination of smoked cheddar, gruyere, and Manchego just because they were available, sliced)
  • we added thinly sliced roast pork
For sauce or pumpkin crema
  • 1/4 cup plain 2% Greek yogurt (we used home made from 1% milk)
  • 1 Tbsp pure pumpkin puree, canned or homemade (We used canned)
  • 1/2 tsp chipotle hot sauce, or more to taste (we used Sriracha).
Pumpkin quesadilla ingriedients

Directions:
  1. Heat oil in a medium non-stick skillet set over medium heat.
  2. Add in the chopped onion and minced jalapeno, and cook, stirring often, until softened, about 3-5 minutes. Add in the minced garlic and cook, stirring constantly, until fragrant, about 30 seconds.
  3. Reduce heat to medium low. Add in the drained black beans, cumin, and salt & pepper to taste. Cook, stirring often, about 2 minutes. Add in the pumpkin puree, hot sauce, cilantro (if using) and stir until warmed through, about 2 additional minutes. Transfer mixture to a bowl and wipe out skillet.
  4. Sprinkle half of the cheese evenly over 1/2 of the tortilla (we just covered with slices of cheeses). Spoon the pumpkin & black bean mixture evenly over the cheese. Top with remaining cheese and fold empty half of tortilla over filling like a book (we used two tortillas and also added thinly sliced roasted pork).
  5. Place filled tortilla into the clean skillet and cook, turning halfway through, until the cheese has melted and the tortilla is crisp, about 4 minutes total.
  6. Meanwhile, prepare the chipotle pumpkin crema: in a small bowl, whisk together the yogurt, pumpkin puree, and hot sauce until smooth and well combined.
  7. Cut the quesadilla into wedges and serve with the crema.
Pumpkin quesadilla assembry

This was mighty fine! The pumpkin went very well with the black beans making a very creamy flavorful mixture. The addition of the hot sauce in the pumpkin mixture and crema gave it a pleasant spicy buzz. BTW the crema is a must! It adds another textural element. We never would have imagined this recipe but once we found it we'll make it again.

Sunday, September 13, 2015

"Super secret" pumpkin bread 秘密のパンプキンブレッド

This "super secret" pumpkin bread recipe was graciously given to us by one of our friends. Since Halloween is coming and we just took out the pumpkin decorations, it was appropriate to make this bread. 


This is indeed a great bread.


The original recipe given was said to make 6 loaves in 8 ½ x 4 ½ x 3 inch loaf pans so we halved the recipe. Our loaf pans must have been larger and made 2 loaves. The below (indented and in italic) is the original recipe.

Ingredients:
5 cups AP flour, 4 ½ cups sugar,1 tablespoon baking soda,2 teaspoons salt, 2 teaspoons ground cinnamon,*2 teaspoons ground nutmeg*, 1 teaspoon pumpkin pie spice*, 1 ½ cups vegetable oil,1 cup water, 6 XL eggs, two 15-ounce cans pumpkin,1 regular size package of chopped walnuts (2 cups or so).
The picture below is half of the above amounts. Since we did not have store bought "Pumpkin pie spices" we made it by mixing cinnamon 1/2 tsp, ginger powder 1/4 tsp, nutmeg 1/8 tsp, allspice 1/8p which makes 1 tsp of pumpkin pie spices (see right upper image, we used half of what was shown). Also we roasted walnuts before chopping.

Pumpkin bread ingriedients compo

Note:  The spices are all measured as heaping.  Don’t heap if you don’t like extra spicy but I think it makes a nicer loaf.  This recipe is my tweaked version, which has extra pumpkin, therefore extra spices.  It makes six loaves.  I get the little foil pans and spray with butter flavor Pam.  You can also get the mini loaf pans and make mini loaves.  Just check frequently when baking.  I’ve never had trouble getting a loaf out.  For freezing, wrap loaf in plastic and then in foil.  Can stay in the freezer FOREVER and is good to take out when company comes.  Practically foolproof. Instructions:Combine flour, sugar, soda, salt, cinnamon, and nutmeg in a large mixing bowl; mix with a wire whisk to combine.  Add oil, water, eggs and pumpkin; beat at medium speed of an electric mixer until thoroughly blended.  Stir in walnuts.  (You can leave out walnuts if you don’t like them.  The bread will come out just fine without nuts.)  Pour batter into 6 greased 8 ½ x 4 ½ x 3 inch loaf pans.  Bake at 350 for 1 hour, or until loaves test done and tops are golden brown.  Serve hot or cold with butter or cream cheese.  Yield: 6 loaves.
Since our loaf pans were larger than specified, we poured the batter in two pans.


After one hour at 350F, it came out nicely. After some cooling, we tipped the loaves out to cool further on the cooling rack.


We could not wait for the bread to cool down completely and sliced the edge and tasted it. When it was still warm, the center looked wet but after it cooled to room temperature, the moisture distributed throughout the bread. The texture of the bread was very moist and plenty of pumpkin pie flavors. We thank our friend for divulging this “super secret” and excellent recipe. We really appreciate that our friend chose to share her coveted recipe with us and the readership of our blog.