Sunday, June 26, 2016

Barbecued leg of lamb and white navy beans ラムのバーベキューとネービービーンズ

This was our Memorial day barbecue. Strictly speaking, this is not a barbecue according to the traditional definition of a barbecue as "low temperature long cooking with smoke".  Nonetheless, for our purposes, we will call it barbecue. While thinking about what we could serve with the lamb, I mused that it would be nice to have something different. My wife remembered that several times in the past we served lamb with beans and found this recipe for navy beans ネービービーンズ . The navy bean dish was a group production. I was chief-in-charge of chopping (and as you will see there is a fair amount of chopping involved.)  My wife prepared the beans, spices, put it together and cooked it.  I made an instant reduced port wine sauce to pour over the meat and sautéed green beans as a side .


Lamb and beans (both the navy and green) are a good combination .


The original recipe was called "Braised lamb shanks with white beans". We just used the white bean part of the recipe and served it with our barbecued leg of lamb.

Ingredients: (4 servings):
For beans
    2 tablespoons extra-virgin olive oil
    2 small onions, chopped fine
    2 small carrots, chopped fine
    2 celery ribs, chopped fine
    3 garlic cloves, minced
    2 cups cooked white beans (preferably Great Northern or navy). We used canned Navy beans rinsed and drained.
    chicken broth just to cover beans
    2 tablespoons unsalted butter
    1 bay leaf

For gremolata
    3 tablespoons chopped fresh parsley leaves (preferably flat-leafed)
    1 teaspoon freshly grated lemon zest (about 1 lemon)
    3 garlic cloves, minced

Directions:
For Beans
  1. In a saucepan heat oil over moderately high heat until hot but not smoking and cook onions, carrots, celery, and garlic, stirring, 2 or 3 minutes (#1, below). 
  2. Add beans, enough chicken broth to just cover the beans, butter, and bay leaf and cook over moderate heat, stirring occasionally and adding enough remaining broth to keep beans moist and to reach a creamy consistency, about 30 minutes (#2, below). 
  3. Discard bay leaf and add half of gremolata and salt and pepper to taste (#4, below).
For gremolata:
I hand chopped garlic, parsley and prepared the lemon zest using micro-grater. (#3 below)


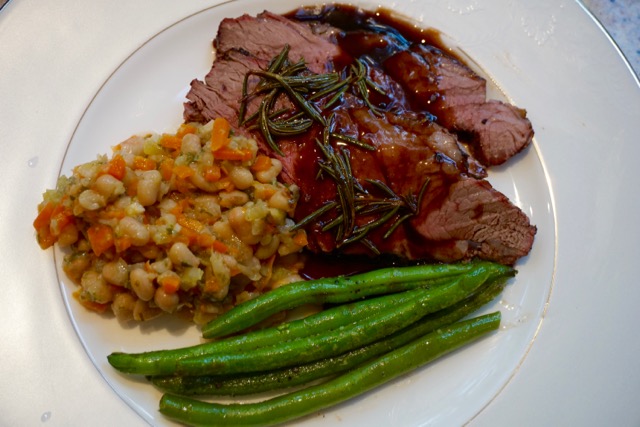
We tasted the white beans (#1, below). Because of the gremolata, it had a nice bright fresh taste of lemon, garlic and parsley. The white beans were creamy with the savory and slightly sweet flavors of all the carrots, celery and onion that was added. The leg of lamb was deboned, seasoned with salt, black pepper and chopped fresh rosemary mixed with olive oil. Using indirect heat, I barbecued it in my Weber grill with added wood chips until the thickest center registered 140F (#2, below). I let it rest for 10 minutes. It was pink inside but I could have  cooked it a bit less. During the rest period, quite a good amount of au jus accumulated. I decided to make a quick sauce (#4, below). I poured the au jus into a frying pan, added port wine (cheap Taylor port I keep for cooking), threw in sprigs of fresh rosemary and reduced it by half, I added a small amount of balsamic vinegar and finished it with pats of cold butter.


This was a quite satisfactory Memorial day barbecue. Although a bit overcooked, the lamb had a nice lamb-y flavor and rosemary scent was a perfect combination. The sauce added a slight sweet and sour taste and moisten the meat. The white beans were a perfect accompaniment for the lamb. I am sure I opened a nice red for this dinner but at this point, I cannot remember what we had.

Thursday, June 23, 2016

Egg-in breakfast muffins 卵とベーコン入り朝食マフィン

My wife cannot resist interesting bread recipes especially ones that involve some kind of stuffing inside. She found this recipe on line and she had to try it. These breakfast muffins have cheese and bacon in the dough and encase an egg; either a whole or scrambled. It is an all inclusive portable breakfast. (If served on a stick it would classify as a "breakfast-on-a-stick" at the local state fair).  We were thinking that we might take this to work for breakfast and decided to make the scrambled egg version since this can be, reportedly,  be frozen while the one made with a whole egg cannot because the egg white becomes rubbery. We served this as a weekend lunch with my wife's ribbon salad.


As you can see, the scrambled eggs are stuffed inside.


Ingredients:
Flavorings (#4)
4 strips of bacon, cooked crisp, drained on paper towel (#2) and chopped (#4).
½ cup shallots, chopped, sautéed in bacon fat using the same pan in which the bacon was cooked and excess dripping poured out (#3).
2 cups grated cheddar cheese (we used smoked gouda and English cheddar)

Scrambled eggs: 5 eggs plus cream, seasonings and butter (#1).

Dry Ingredients
2 1/2  cups All purpose flour
2 tsp baking powder
1/2 tsp baking soda

Wet Ingredients (#4)
1 cup buttermilk
1 tsp salt
10 tsp Greek yogurt (original recipe called for sour cream)
4 tbs  melted butter
2 eggs


Directions:

  1. Preheat oven to 180C/350F. 
  2. Grease muffin tins with with butter (original recipe calls for "Texas muffin tin to accommodate a whole raw egg in each muffin, we used a regular muffin tin and scrambled eggs crumbled into small pieces).
  3. Place Dry Ingredients in a bowl and mix to combine.
  4. Whisk Wet Ingredients in a separate bowl.
  5. Pour the Wet Ingredients into the Dry Ingredients until just combined. Do not over mix. 
  6. Fold in Flavorings, including cooked bacon (#5).
  7. Place 3 tbsp of the batter into 4 muffin tin. Bang the tin to flatten the batter.
  8. Make a divot in the batter and put in the scrambled egg (or crack in a raw egg if using a larger tin and so prefer). (#6)
  9. Divide the remaining batter between each hole to cover the egg. (#6) shows covered eggs in front and uncovered eggs in back.
  10. Brush the muffins with melted butter (optional), then bake for 20 minutes or until golden brown.
  11. Remove from oven and allow to rest for 5 minutes before turning out onto a cooling rack. (#7 and 8)
  12. Best served warm.


This was good and the smell when cooking was divine but the amount of work and fat content may make us think twice before making this one again. We could possibly achieve the same effect by just baking a biscuit, cutting it in half horizontally and adding scrambled egg. Nevertheless, the idea is very interesting and we will take this to work for breakfast next week.


Monday, June 20, 2016

Tuna tartar variation with Jalapeno pepper 鮪のなめろうハロペニョペッパー入り

This is "a variation on the theme of tuna namerou 鮪のなめろう".  I think two of our favorite ways  to enjoy the block of low-quality but readily available frozen yellowfin tuna are "namerou" and "negitoro" ネギトロ. I could have made this tuna namerou as before but the limitation of what I had in terms of the ingredients forced me to make some changes. I also borrowed some ideas from making "negitro".  I garnished it with thin slices of Jalapeno pepper hinting at  what this namerou contains.

These two servings are made from a half of the tuna block but it turned out to be  quite a lot (for us, at least). 


Making this is rather simple. This time, modifications included using Vidalia onion (in stead of scallion) and Jalapeno pepper.  I cut the tuna into small cubes, added finely chopped, deseeded, and deveined Jalapeno pepper (half of large one), finely chopped Vidalia onion (half of medium sized) and miso (I added a bit more later after I tasted it). In addition, I added the Spanish olive oil we really like. As I "hit" or "tataku" 叩くit with my heavy chef's knife, I gradually added the olive oil to incorporate (instead of using mayonnaise when making negitoro) until it became the pasty consistency and still some small chunks are remaining. I also add a little bit more olive oil on the top as I served this.


Although we started the evening with a Napa cab, we switched to cold sake (We happened to have "Dassai" 獺祭 daiginjo 大吟醸 from Yamaguchi 山口県 prefecture). We thought the addition of Jalapeno to this dish was a good one. It added a fresh pepper taste without adding any heat (since I removed the veins and seeds). Although quite subtle, the addition of olive oil also added to the  unctuous texture.  The amount of miso was just right and we could really taste nice miso flavors with nutty-saltiness. I had a few more dishes planned but at this point, we were quite full.

Friday, June 17, 2016

Fried bamboo shoot stuffed with pork and shrimp たけのこの贅沢揚げ

This recipe used the top 2/3 of the bamboo shoot left over after I made "Tosa-ni"土佐煮. The bamboo shoot is stuffed with a mixture of pork and shrimp based on a recipe I saw on line. Since I did not have access to "kinome" 木の芽, I simply added fried green beans as a green.


Here is a close up of another serving.


Ingredients (2 servings):
Bamboo shoot, one package, pre-boiled, top 2/3 (or "Hosaki" 穂先), cut into 6 wedges (#1), carefully cut from the outer surface to make a pouch but not cut it through.
Ground pork, 40g (I hand chopped pork butt I had).
Shrimp, 60g (I used frozen, thawed and chopped finely until it had a paste like consistency)
Scallion, one, white part, finely chopped.
Ginger root, finely chopped (to taste)
Salt, to taste
Soy sauce, 1/2 tsp
Sake, 1/2 tsp
White pepper, to taste

Flour for dredging
Oil (I used peanut oil) for frying

Directions:
Mix all the ingredients above except for bamboo shoot (by hand or using a silicon spatula) until everything sticks together (#2)
Dredge the wedges of bamboo shoot with flour including inside the slits and stuff the meat (#2) into the slits. Dredge the surface of the stuffing as well (#3).
Shallow fry (1/2 inch deep oil), turning frequently to slightly brown the stuffing and to make all sides crispy (flour makes thin crust).
Drain the oil and serve hot.


This is a very nice dish. It was very hot and my wife had to wait several minutes for it to cool down. By frying, bamboo shoot developed very good strong bamboo shoot flavor while still retaining a nice crunch. The stuffing of pork and shrimp is very flavorful with a nice texture. The shrimp really give a nice firmer texture.  We had this with cold sake which was a perfect match.

Tuesday, June 14, 2016

Tuna, asparagus and poached egg 鮪漬けの炙りとアスパラガスの温玉添え

The type of tuna sashimi blocks 鮪の刺身の冊 I can get at our Japanese grocery store is limited to frozen ahi or yellowfin tuna キハダマグロ, which was treated with carbon monoxide to give it a bright red color (carbon monoxide sounds bad but it is no health hazard when used on food like this). I always keep a tuna block in our freezer "just-in-case". I have to rotate the stock every several months since unlike wine, the tuna does not improve with time.  Since I bought a new tuna block when I stopped by our Japanese grocery store this weekend, I took the old one out of the freezer to thaw. I have posted  many times how to make this low-quality tuna sashimi palatable. One of the ways is to make "Zuke" 漬けor marinated tuna.  So, I sliced half of the tuna sashimi block and marinated it in a "Goma-dare" ゴマだれ (see below) the night before. This time, I did not do "Yubiki" 湯引き or cooking the surface by dunking it in boiling water and then ice water to halt the cooking.  I was not sure how I would serve this "zuke maguro" (marinated tuna) until I learned we were starting the evening with red wine. Then the "path" became pretty clear;


I had to come up with something that went well with red wine.  This dish was the result. I was inspired by  this picture in one of the food blogs I follow. This dish is grilled asparagus, poached egg with grated Pecorino Romano and botargo.  Since I did not have botargo or karasumi からすみ, I omitted it and used grated Parmigiano-Reggiano instead of Pecorino Romano. Seared zuke tuna is my addition. I poached the eggs as I posted before


Since I prepared green asparagus that morning, this was an easy dish to put together once I decided what I would make. 


Tuna preparation:
  1. I thawed the frozen block of tuna overnight in the refrigerator. I sliced half of the block into half inch thick slices.
  2. This time I made "Goma-dare" for marinade.  I first dry roasted white sesame seeds in a dry frying pan (1 tsp) until slightly darkened and fragrant (the sesame was already roasted but re-roasting it add much more flavor). I ground the seeds in a Japanese Suribachi すり鉢 mortar. I then added mirin, sake and soy sauce in a ratio of 1:1:2.
  3. I placed the tuna and the marinade in a Ziploc bag to make sure all the surface of the tuna was covered with marinade and removed as much air from the bag as I could. I sealed the bag and kept it in the refrigerator overnight.
  4. The next evening, I took out the tuna slices, blotted the excess marinade from the surface (picture below) and cut one slice into two.


I thought searing one of the surfaces would add texture and a beef-like flavor which would go better with red wine. I seared the pieces two ways; one by using a kitchen blow torch (those are the ones with the black specs in the picture below) and the other seared in a frying pan with melted butter (the shiny ones on the tops row and right of bottom row).  


Asparagus prepration:

I got thick spears of green asparagus from our grocery store. I removed the bottom by simply bending and breaking it. Using a vegetable peeler, I peeled the bottom half of the skin and blanched the stalk in salted water. Just before assembling this dish, I quickly sautéed it in melted butter and seasoned with salt and black pepper.

Assembly:

I cut the asparagus on the bias into 3-4 pieces. I arranged the pieces to look like a whole uncut asparagus spear, resting diagonally on a square plate. I arranged the two kinds of seared tuna squares on one side of the asparagus and placed a poached egg on the other side. I grated Parmisiano-Reggiano on top.

This dish followed my octopus carpaccio and we enjoyed it with a glass of Louse M. Martini Napa Cab as before. The tuna was seasoned well from the marinade and became firmer than non-marinated tuna. Searing added beef like flavor but we could not tell the differences between torched vs. pan seared. The combination of runny warm yolk and asparagus cannot go wrong. This dish really went well with the California Cab we were having.