Monday, July 19, 2010

Pasteurized eggs and homemade mayonnaise 滅菌卵と自家製マヨネーズ

When I made cold ramen noodle, I discussed the risk of Salmonella food poisoning when eating raw or undercooked eggs. Since we like runny egg yolks and many Japanese cuisines call for raw or undercooked eggs, we have been using "free ranging and organic" eggs for these purposes, which are reportedly safer than regular mass produced eggs. Now we found we could get pasteurized eggs. The price appears to be about the same or even slightly cheaper than free ranging organic eggs. As you can see, eggs have red  "P" in a circle stamped on them indicating it is "P"asturized.
When I cracked open the shell, it looked exactly the same as any raw egg since the temperature for pasteurization is not high enough to cook the eggs. Using our first pasteurized eggs, I decided to make home-made mayonnaise. My mother makes it even now in Japan but I stopped making it many years ago. I used to make it using a hand mixer by drizzling oil in gradually. But I have seen in several cook shows where chefs made it very quickly using an immersion blender, so that is what I tried.

In the mixing cup of an immersion blender, I put two egg yolks, lemon juice and rice vinegar (1 tbs each), salt (1/2 tbs), Dijon mustard (1 tbs, smooth kind), a pinch of sugar and vegetable oil (1 cup) plus olive oil (1/2 cup, extra-virgin olive oil). I put the immersion blender to the bottom of the mixing cup and pulsed it several times as emulsion develops in the bottom. As more emulsified material appears, I continuously blend and also raised the tip of the blender off the bottom to mix everything. In 30 seconds, nice mayonnaise is made.
It tastes good. Because of the extra-virgin olive oil I used, it looks slightly greenish and you can taste both olive oil and egg yolk with nice acidity. Yolks from the pasteurized eggs work exactly same as yolks from regular eggs. Sunny-side-ups also look and taste identical to regular eggs, although the egg white looks slightly firmer than one in a regular egg.

Saturday, July 17, 2010

Braised Shirataki with Tarako roe 鱈子と白滝の炒り煮

This is another small dish perfect for "Otoshi" お通し. It is made of "shirataki" 白滝 (a noodle form of konkyaku 蒟蒻) and "tarako" 鱈子 roe.  I often had this dish with additional ingredient of sliced "chikuwa" 竹輪 fish cake and seasoned with soy sauce and mirin as a side dish when I was a child (obviously not as "Otoshi" for a drink). I modified the way my mother used to make this dish and seasoned it with soy sauce and sake but no sweetness added (no chikuwa, either), so that it may go better with a drink of cold sake.

I decided to make this dish because I found frozen tarako in our freezer which appears not to be high in quality (I must have bought it frozen sometime ago). Shirataki, which means "white cascade" in Japanese, is Konnyaku or Konjac made into thin noodles by extrusion and is often used in Sukiyaki. It does not have many calories and, for that matter, not much taste but can absorb any flavor you add to it.

Tarako mixture: First, remove the tarako roe by slicing the membrane and, using a back of the knife, scrape off the roe from the membrane and put it in a small bowl. For the one package of shirataki, I used two small sacs of tarako but the amount is totally arbitrary. I add 1-2 tbs of sake and a dash of Tabasco (optional) and mix so that it will have nice thick saucy consistency.

Shirataki: I drain and wash one package of shirataki and cut into three portions to make the noodles more manageable and cook it in a boiling water for 1 to 2 minutes (mostly to remove the peculiar smell konnyaku and shirataki always have) and drain. Put the shirataki noodle in a dry non-stick frying pan on a medium flame. Stir to let the excess moisture evaporate (so that it can absorb more liquid seasoning). I add sake and soy sauce (1 tbs each) and stir until the liquid is almost all gone. You could add mirin here to make this dish a bit sweet. 

Add the tarako mixture and keep stirring until the color of the tarako become white and cooked through. Since tarako is salty you may adjust the amount of soy sauce accordingly. I mix in chopped chives (or scallion). I garnish with chopped chives when serving.

This dish has an interesting texture contrast of cooked roe and shirataki noodle. The addition of Tabasco adds a  very slight and slow acting pleasant heat to the dish. Sake is definitely called for.

Friday, July 16, 2010

Omelet with tarako and nori 鱈子と海苔入り卵焼き

I made this dish at the same time I made "Braised shirataki and tarako" since I had extra tarako. This is one of many variations of Japanese omelet called "tamagoyaki" 卵焼き which I posted one previously.

Tarako mixture: First, remove tarako roe by slicing the membrane and, using a back of the knife, scrape off the roe from the membrane and put it in a small bowl. For three eggs, I used two small sacs of tarako but the amount is totally arbitrary. I add 1-2 tbs of sake and dash of Tabasco (optional) and mix so that it will have nice thick saucy consistency.

For two to three servings (two to three slices per serving), I crack eggs (three, large) in a bowl  and add mirin (1 tbs). I then add the tarako mixture and coarsely crumbled nori (half sheet),  beat it using chop sticks to mix well. I also add chopped chives but this is optional.

As usual I use a Japanese square frying pan. On a medium flame, I add vegetable oil (1/2 tbs) and add 2/3 of the egg mixture and gently scramble until it is semi-solid. Using a silicon spatula, I push the egg mixture to one end of the square frying pan to make it into a rectangle shape. If needed, I add more oil in the empty portion of the frying pan and add the remaining egg mixture. Again using the spatula, let the egg mixture flow under the rectangle of the eggs by lifting the rectangle. Wait a few moments until the egg on the bottom is set but the surface is still wet. Start rolling the rectangle of eggs so that the surface is all covered with the last layer of the egg mixture. Make sure the end of the seam is well set (you may have to flip it over several times so that all four surfaces are set). I take it out and wrap it in parchment paper to shape (if need be, further wrap it in a bamboo sushi mat to shape - I did not do this this time) and let it cool. The end result is like the image below, a nice rectangular shaped omelet.

I sliced it and served it with grated daikon or "daikon oroshi" 大根おろし (add soy sauce just before eating), finely cut myouga and salted and vinegared cucumber cut in jabara 蛇腹. This is, again, a perfect small dish for sake. Myouga really added to this dish. Myouga flavor is very difficult to describe but it is not scallion or ginger-like and it is just unique.

Thursday, July 15, 2010

Marinated tuna sashimi マグロのづけ

The quality of tuna sashimi we can get from Japanese grocery stores in the U.S. is a far cry from what you can get in Japan from such places as "depachika" デパ地下 or basement (Gourmet food) floors of Japanese department stores. Even in the U.S., New York, Los Angeles and San Francisco areas may be the only areas in which you may have better luck getting some decent sashimi items. Oh, I almost forgot San Diego, home of Catalina Offshore Products. I have posted a few dishes I make from low-grade frozen "saku" (a block for sashimi) of yellowfin tuna. Although this is always available in our near-by Japanese grocery store (the one which is still open), and I can keep it for couple of months in our freezer, it is not good---very lean with a mealy texture.  Among the many techniques used to make this kind of sashimi more palatable is marinating in a mixture of soy sauce, sake and mirin, which is called "zuke" 漬け or づけ. Of course, you can use this technique for a good quality tuna as well if you so prefer. I often use this "zuke" technique for the tuna in my Yamakake やまかけ mostly for the taste even when I have a descent quality tuna. If you marinate the tuna over night, the texture will change to a more "slimy" (this is not an appropriate word since it has a negative connotation for Westerners. The Japanese word will be "nettori" ねっとり, which does not have a negative connotation) texture. I do not particularly like this texture but some (Japanese) people love this. This time, I made this dish based on the recipe I saw in the Asahi Newspaper Web and I kind of like it. It changes the texture but not to the point of sliminess and makes this low-quality tuna sashimi much more palatable.

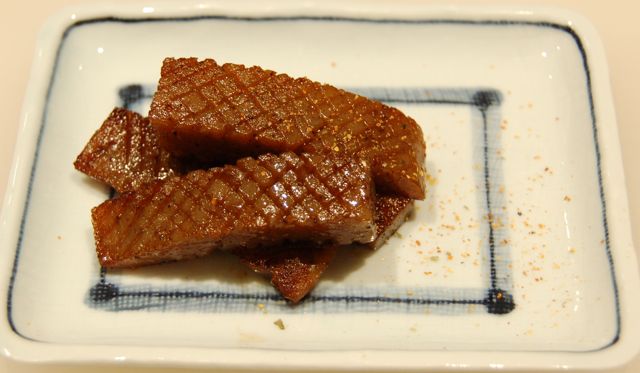
Tuna block or "saku": First, I thaw one "saku" 柵 of frozen yellow fin tuna in the refrigerator overnight. I then do a "yubiki" 湯引き or "shimofuri" 霜降り process of plunging the tuna into boiling water for 5 seconds and then soaking it immediately in ice water for a few minutes until the tuna is ice cold again. Only the surface becomes white. This is similar to "Tataki" たたき technique which involves brief grilling instead of boiling. I dry the surface with a paper towel after taking it out from the ice water. I slice it on a slant (slice about 50-60 degree, instead of 90 degrees, from the horizontal surface of the saku) to make a less than 1/2 inch (or about 1 cm) thick but larger slices as compared to ones you slice perpendicular to the saku.
Marinade: Mix sake (1 part), mirin (1 part), light colored or "usukuchi" soy sauce 薄口醤油 (1 part) and regualr or "koikuchi" soy sauce 濃口醤油 (2 parts) with dry roasted coarsely ground white sesame seeds (2 tbs) and the juice from grated ginger (1 tbs). Although white sesame seeds you get from a Japanese grocery store are already roasted, I roast them again in a dry frying pan for 5 minutes or until the sesame seeds become fragrant and just start popping. I coarsely grind them in a "suribachi" すり鉢 or a Japanese mortar. This step is really worth the effort. You should smell a nice fragrance of sesame.

Marination: In a flat sealable container, I put the marinade and the tuna slices in one layer so that all the surface of the tuna is covered with the marinade. I let it marinate at room temperature for 10 minutes and then for 2 hours in the refrigerator. The timing is rather important since the taste and texture (especially the texture) will change depending on the length of the marination. I found two hours to be perfect.

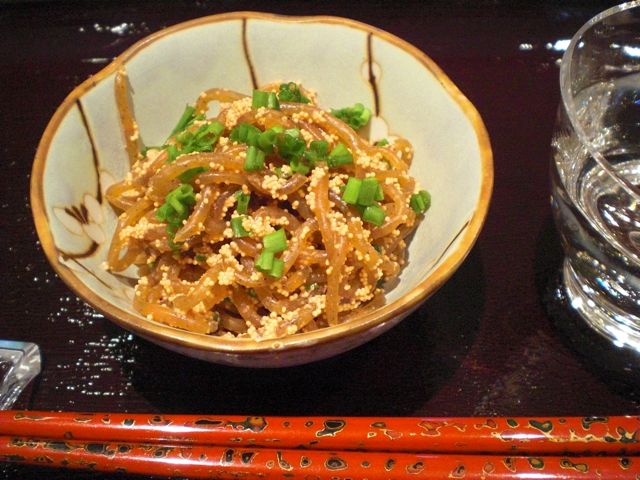
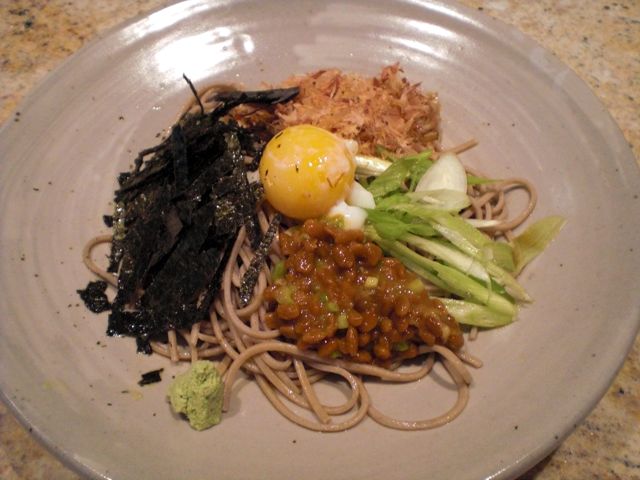
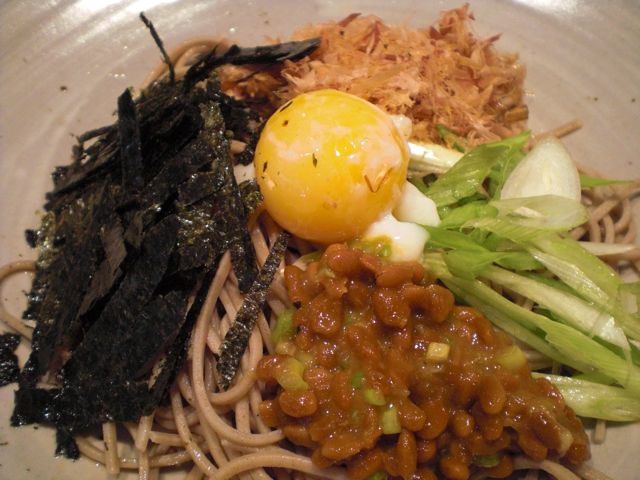
I serve this like sashimi with a Chiffonade of perilla leaves, chopped chives and thin slices of the white part of scallion (or whatever fresh herbs you like to use) with a dab of real wasabi. I think the timing of the marination, addition of sesame seeds, and ginger juice all work. Mixing light (colored) and regular soy sauce made the color of tuna sashimi darken to just the right color and make this low-grade sashimi taste and look like much better quality tuna sashimi. It tasted very good with a scant smear of wasabi. Only problem I had was that it tasted a bit too salty for me and I may reduce the proportion of soy sauce next time (my wife thought it was just fine). You could make a donburi どんぶり by placing the marinated tuna sashimi on (sushi) rice. This is indeed a great way to upgrade a low-quality tuna sashimi.

Tuesday, July 13, 2010

Grilled squid with lemon and thyme レモン、タイム味のイカ焼き

This is a type of dish that sounded great in concept but had some problems in execution. I did not follow any particular recipe but thought that having thyme and lemon flavoured grilled small squid would be a nice appetizer.
 
The type of squid I can consistently get here is a small pre-cleaned (previously frozen) kind which tend to be loaded with water (They must absorb water during the preparation process). I had too-much-liquid-coming-out-of-the-squid problem before.
 
I marinated the squid in olive oil, lemon juice, grated lemon zest and fresh thyme, salt and freshly cracked white pepper for several hours in the refrigerator. I grilled the squid on a very hot charcoal fire but it failed to get nice char marks and sort of steamed. I have to assume it had so much water in the meat that the surface temperature did not rise high enough to form a char despite the hot charcoal fire. It was certainly edible but it did not have enough flavour and was somewhat tasteless. What a disappointment.

Sunday, July 11, 2010

Grilled squid, wakame and myouga in vinegar miso sauce イカとワカメ, 茗荷の酢みそ和え


This is a made-from-leftover dish and very similar to  the dish I posted previously but since we harvested the very first myouga 茗荷, this is a preview of the myouga dishes to come. We grilled marinated squid (in lemon zest, olive oil, fresh thyme etc) few days ago but it was not a roaring success. I used this leftover squid, combined with a type of sea vegetable called "wakame" 若布, and cucumber to make this small starter dish. I added the star attraction--a garnish of myouga.

I thinly sliced cucumber (American mini cucumber) and salted the slices. I squeezed out the excess moisture and lightly dressed it with sushi vinegar. For "wakame", after re-hydration, I squeezed out the excess water and also lightly dressed it with sushi vinegar. Before dressing with  a "sumiso" sauce, I again squeezed out excess liquid from both the cucumber and wakame. I sliced the left over grilled squid into thin rings.

Karashi sumiso sauce: This is my regular sumiso sauce with miso (I used red miso this time without any particular reason), sugar and rice vinegar with Japanese hot mustard.

After dressing everything in the sumiso, I garnished with a perilla leaf, sliced Campari tomato, and fresh myouga (just a cameo appearance of myouga here). Because of the karashi sumiso, the squid tasted better and the myouga has such a unique taste it really added to the dish.

We are still waiting for the myouga to get a bit larger.

Saturday, July 10, 2010

How to make a perfect grilled rice ball with crispy crust all around. 完璧な焼きおにぎりの作り方

Grilled rice balls 焼きおにぎり are the most common "shime" 締め dish for us when we fire up the grill, either the Konro or Weber. My wife really likes the crispy brown crust and encourages me to maximize the crust around the entire rice ball. But it is difficult to get crispy crust on all sides since the rice ball usually does not stand on the side by itself. At my wife's suggestion, I made a rice ball that does, in fact, stand on its side. I did this by making triangular-shaped rice balls with wider and perfectly flat sides. I shape the rice ball by placing an amount of cooked rice in the middle of a piece of plastic wrap. I gather the ends of the wrap together and form a ball. Then I shape the ball into a triangle. Since the rice ball is wrapped in plastic, I flatten the sides and then test to see if the rice ball will remain standing on the counter top without any support. If it rolls over I flatten the sides and test again. I do this on all three sides). Here they are! Standing up on their sides very proudly without any support. We now have the perfect grilled rice ball, nicely crunchy and brown crust all around. Toward the end of the grilling, I brush all the surfaces with either yuzumiso 柚子味噌 or mirin-soy sauce mixture. This time, I used Yuzumiso. In most Izakayas, grilled rice balls are not grilled long or thoroughly enough and certainly do not have a crunchy crust on all sides. Hope other Izakayas will emulated this (not likely).

By the way, a small white half moon shaped item is a Japanese turnip (ko kabu こかぶ) which was grown by our friend. It turned out that this kabu is rather spicy (hot).

Thursday, July 8, 2010

Natto soba 納豆蕎麦


Several things came together to inspire me to make this dish. First the cover picture on the cookbook "Takashi's Noodles" triggered the memory of a similar dish I occasionally had for lunch at a Soba restaurant in downtown Sapporo. Second, it has been really hot and muggy here--the kind of weather that calls for cold soba.  In Japan, soba is a very popular lunch item and there are many restaurants specializing in soba and they do a brisk business during lunch. The combination of cold soba topped with natto 納豆 is rather classic and called "Natto soba" 納豆蕎麦 which was one of my favorites. I made this as a "shime" dish one night and found out my wife never had this before.

This is not a recipe per se since this is just a plate of soba and various garnishes which happened to include natto. A raw egg yolk usually accompanies this dish. Raw or undercooked eggs here in the U.S. are always iffy because of the potential for Salmonella contamination. We use "free-ranging" and "organic" brown eggs for dishes that are not fully cooked or have runny yolks. We do not know, however, if there is scientific or statistical evidence that these eggs are indeed safer than regular supermarket white eggs. (P.S. I found an article indicating that there is a lower risk of salmonella contamination in organic and free ranging eggs, although the risk is not zero. I also found that pasteurized shell eggs* are going to be available more widely in very near future.) We have been eating soft boiled eggs, poached eggs, and sunny side ups for many years and so far, (knock on wood) we have not experienced any ill effects. This time I used egg yolks from  "Onsen tamago" 温泉卵, which I made from the brown eggs.  This is a very peculiar Japanese way of cooking eggs, which, I am sure, I can describe in more details in a separate post.

I cooked dried soba noodle as per package instructions and washed them in cold running water and drained. I diluted a bottled noodle (concentrated) sauce in cold water to my liking. Natto was prepared my usual way. Other garnishes include thinly sliced (on bias) scallion , dried bonito flakes, thin strips of nori and an egg yolk from the onsen tamago. Just before eating, I poured on the dipping sauce. I took a dab of  wasabi and worked it in by mixing all the items well. This is a perfect dish for hot summer days. By the way, my wife, who is not a card-carrying member of the Natto fan club, liked this dish.


* P.S. 2: We found Davidson's Pasteurized shell eggs in our neighborhood market (one we have not been before). I will have a separate post for the pasteurized shell eggs in the near future.

Tuesday, July 6, 2010

Grilled Capelin 焼き ししゃも


Shishamo ししゃも is a small salt sea fish endogenous to Hokkaido 北海道 and the name is derived from a native Ainu language meaning “willow leaf fish”. The name of this fish in Kanji 柳葉魚,  is a classic example of “ateji” 当て字 in which the meaning of the kanji letter is “willow 柳”+”leaf 葉”+ “fish 魚” but there is no way to pronounce this Kanji as “shishamo”. Although you can still get true shishamo in Hokkaido, unfortunately,  the vast majority of “shishamo” you buy and eat at an Izakaya nowadays is not true “shishamo” but its cousin “Karafuto Shishamo” or Capelin. (see P.S. below) That includes the one shown here which came from Canada. Although my memory of eating shishamo while bar-hopping in Susukino 薄野 is a bit foggy (whether because it was such a long time ago or because I was, in fact, bar-hopping), the shishamo tasted much better in Hokkaido. Whether it was “true” shishamo or “Karafuto shishamo” I was eating, like the rest of the memory, is somewhat unclear.

In any case, this fish is among the Izakaya favorites and the female with eggs or “Komochi Shishamo” 子持ちししゃも is much better to eat than the male fish without eggs. The  eggs of this fish “Capelin roe” are often seasoned and artificially colored (wasabi flavoured etc) and served as “Masago” or sometimes “Tobiko” at a sushibar. “Tobiko” should be  flying fish roe, so there are lots of substitutions and confusing naming when it comes to fish.

We get these fish frozen and I grilled them in a toaster oven unthawed and serve it with grated Daikon and soy sauce. This may not be the true “shishamo” but it goes well with a drink of sake.

P.S. Jon provided me with an eyewitness evidence that, indeed, some Izakayas serve true Hokkaido shishamo 北海道本ししゃも. I believe this is the menu from "Honoka". This is something I can look forward to next time we visit Japan. Thank you, Jon.


Monday, July 5, 2010

Myouga Harvest 茗荷の収穫

This may look like small bamboo but these are myouga (myoga) plants. Some years ago, Chef Kudo of Tako Grill gave a cutting (root) to us after he served us his home-grown myouga and learned that we both love myouga. We planted it in several spots in our backyard but it chose to grow in this one under the Japanese plum tree. It is good that this is confined to the raised bed, this plant keeps sending underground shoots and could overtake the entire yard under the right conditions.


This is a very strange plant (and I guess it could be said that those who grow, harvest and eat it may be also be considered somewhat eccentric--including us). In any case, the portion of the plant which we eat grows underground. Around this time of the year, the plants send out subterranean buds. These will produce a delicate white flower that eventually makes its appearance above ground. The flower looks like a white butterfly floating just above the soil in the dark shade under the foliage. While this flower is beautiful and indicates that the bud is just below the surface once it has made its appearance it is too late--the bud which is the part that we eat is "past its prime". Once the buds flower they become mushy and lose their flavor.

Because the edible buds of the plant are literally buried, they are extremely difficult to find. You have to literally dig down into the soil, scrabbling with your fingers to search for the hidden delicacy which frequently can only be found by feel.  If you use a tool, it is highly likely you will damage the buds. Add to this difficulty the fact that the myouga grows in the part of our back yard heavily under the domain of "dark friends" (mosquitoes). These small Asian mosquitoes are quite vicious to anyone entering the part of the yard they claim as their own. But never fear when it comes to purloining a Japanese delicacy for her husband, my intrepid wife fearlessly sallies forth. She dons a black "Ninja suit" consisting of a long sleeved hoodie (with hood pulled up and tied) balloon pants with cuffs tucked into black socks as protection against the mosquitoes--black because mosquitoes seem less attracted to dark colors. With head deeply buried in the foliage she scrabbles bare-handed in the hard dirt in search of the tasty little buds sometimes buried inches under the soil. (Harvesting myouga wrecks havoc on a manicure). As I said those who grow, harvest and eat myouga may be considered somewhat eccentric--including us


After some searching, my wife found one. (the picture shows the bud after it has been partially dug out). The buds are still very small and it will probably take another week for them to grow to a good size. But if you let it go too long, everything will bloom when you least expect it and its "game over" until next year. Oh, well, my wife will just have to go back out again.

Here are what we harvested today but maybe, next week we may have a better luck. Dishes using myouga will definitely be forthcoming.


Sunday, July 4, 2010

Grilled potato with butter じゃがバタ

Hokkaido 北海道 where I am originally from is the Northernmost island of Japan and the climate is more like New England.  Many cold weather crops and non-traditional Japanese (i.e Western) crops are produced. Two of these are potatoes and corn. One potato cultivar "May Queen" is particularly famous in Hokkaido. We do not see this variety in North America. In addition, Hokkaido is also different from the rest of Japan in that dairy farming is a major agricultural activity. As such, both potatoes (called "jagaimo" ジャガイモ) and butter are speciality products in Hokkaido. The combination is simply called "jagabata" ジャガバタ in which the whole potato is cooked (boiled, steamed, microwaved) and eaten with butter. People in the U.S. may think 'nothing unusual about that' but in Japan, it is, at least it was, a rather exotic local food. In the downtown park in Sapporo 札幌, called "Odori koen" 大通公園, during the tourist season which starts in the early summer, you can buy "jagabata" and grilled corn on the cob or "yaki toukibi" 焼きとうきび from food carts. Since the crop is not harvested until July, the corn and potatoes available in the early tourist season are from the previous year. Besides being a favorite tourist snack, "Jagabata" has now become a popular Izakaya food in Hokkaido and elsewhere. In terms of salty seasonings for your potato, you usually have three choices; salt, soy sauce, or shiokara 塩 辛 (squid and guts), for which  "Hakodate" 函館, the Southernmost large port city of Hokkaido, is famous. Our version of "jagabata" is a cross between this and French fries and modeled after "jagabata" at Tako Grill and served with salt. Until you add butter, this is a much healthier food than French fries but you have to have the butter.

I first microwaved whole white potatoes (skin on, washed, with the "eyes" removed) in a microwave oven-proof vessel with a lid on until I can insert a bamboo skewer easily to the center. Be careful not to over zap it. I cut it into quarters. You could do this step a few hours or, maybe, a day ahead. Just grill the potato on the charcoal fire until all the surfaces are nicely brown/crunchy and heated through (about 5 minutes). Add pats of butter and let them melt, dip it in salt and enjoy. Extremely simple but satisfying dish.....!!MM!!!MmmmmmmmMMmmMMMM!!. (hope Jon did not trade mark this).

Friday, July 2, 2010

Miso grilled chicken thigh 鶏のももの味噌焼き

We had a few very nice days in June so we fired up our Konro grill on our deck. This time, I marinated chickens thigh in miso and grilled them. I did not follow any recipe but this is sort of the standard way (along with Teriyaki) to grill marinated chicken in a Japanese style.

Chicken thigh: In Japan, chicken parts are usually sold as whole legs--the thigh and drumstick are usually attached together 骨付きもも鶏肉 which is often grilled such as "Teriyaki" 照り焼き. Here I just used the thigh without the drumstick (4 for 2 servings). Debone and remove excess fat and excess skin. Butter fly one side of the thigh meat since it is thicker that the other side so that the entire thigh will have an uniform thickness. This preparation will shorten the cooking time significantly. It ensures even cooking and also prevents the surface from charring too much (which I managed to do despite these preparations).

Marinade: Mix red miso (4 tbs) and mirin (3-4 tbs) with splashes of Yuzu juice (from the bottle) to a saucy consistency. Add sake or mirin to adjust the consistency (more mirin will make it sweeter). Coat the surface of the thigh meat with the miso marinade and then put it in a Ziploc bag. Massage the meat in the bag to make sure the meat is evenly coated and let it marinate 2-3 hours in a refrigerator.

Take the meat out of the bag and, using your fingers, remove the excess marinade (see above image). I grill the skin side first. Because of the miso and mirin, it is easy to burn. (which is what I immediately did). It will take 3-4 minutes per side. The meat comes out very moist and flavorful. The skin gets crispy and despite the fact I got it a little too "high done" and it looked very dark it still tasted very good. For serving this in Izakaya style, I cut into strips and serve with a wedge of lemon. I could have done a better job of presenting this but it is too late.

Wednesday, June 30, 2010

Cold ramen noodle 冷やしラーメン

Regional name differences and variations of this and similar dishes and who invented this dish etc are quite complicated. In Hokkaido 北海道 where I grew up, this dish is called “hiyashi ra-men” 冷やしラーメン.  The rest of Japan including Tokyo, this dish is usually called “hiyashi chuka” 冷やし中華 which is short for “hiyashi chuka-soba” 冷やし中華そば. “Hiyashi” means cold and “chuka-soba” means Chinese “soba” or noodle. Although this is more of a summer lunch item and not an Izakaya food, Izakayas in Hokkaido often serve “ra-sara” ラーサラ which is short for “ramen salad” throughout the seasons. This is a variation with some more vegetable toppings resembling a salad more than a noodle dish. It is said to have been invented by the chef at the Sapporo Grand Hotel for their Beer Hall (Bierhalle) when it was opened for the first time in the 1980s. I have not made this dish for a long time. An intrepid Japanese food and culture explorer I know announced his intention to thoroughly explore cheap Chinese food and “hiyashi chuka” in the Kanda 神田 area during hot summer days in Tokyo. This combined with the unseasonably hot weather we are having here in the DC area made me think of this dish. In contrast to regular ramen, which appears to invoke profound emotions among “rameniacs" out there, this dish is very low-key and cool-as-a-cucumber--no high emotion required.


Ramen noodle: The dried ramen noodle I had in my pantry this time is made in Yamagata prefecture 山形県, which is located in a northern part of the mainland Japan. It is rather thin and straight but has a nice firm texture, I have no idea what style of a ramen noodle this is (Yamagata style??). I prepared it as per the package instruction and washed it in cold water and drained (Do not ask me how many times I have to shake a “spider” strainer or a flat “zaru” strainer, I just use a good American colander.)

Sauce: Again, there is no complicated preparation for the sauce (you need not to boil whole birds, pig heads, bones, and other secret ingredients for days and months in a cauldron while saying secret mantras). It is essentially a vinegar, soy sauce, mirin with some sesame oil; so I just used a bottled good quality ponzu (shoyu) sauce (this one specifically said “with Hokkaido kelp broth”--my kind of ponzu). I dressed the noodles with a small splash of dark roasted sesame oil before plating it and added the ponzu sauce over it (not too much). All the topping should be cut into thin match stick strips (or “julienned” as Julia[n] Child used to say) and top the noodle with the individual toppings arranged in a radial fashion rather than randomly scattering them (just a tradition). You can mix it up yourself before eating. I had a leftover miso-marinated grilled chicken thigh, so I used that. I also used cucumber, scallion, perilla, pickled ginger root, and golden thread egg (kinshiran 金糸卵). You could add strips of nori sheet, sprouts, carrot, corn, etc but now you are getting dangerously close to  the “ra-sara” territory.

I garnished it with Campari tomato and served it with a dab of Japaneses hot mustard. This was a lunch and we ate it on our back deck which is perfect especially in this rather hot and muggy weather.

Tuesday, June 29, 2010

Hijiki and chicken salad and Stewed Hijiki ひじきと鶏肉のサラダ、ひじきの煮物

Hijiki ひじき is one of the several "kaiso" 海藻 or sea vegetables (sounds better than "seaweed") which has been a part of Japanese cuisine for a long time. Japanese consider hijiki to be a healthy food with high fibers and minerals. As I was growning up, we had hijiki occasionally, but it was, by no means, my favorite dish as a kid. It does make a nice small dish for a drink, however, and as such, I like hijiki now. (Regarding arsenic contained in Hijiki, please refer to the footnote.)

Hijiki comes dried and usually has two different kinds; "Me-hijiki" 芽ひじき consisting of the buds or tips of hijiki, and "Naga-hijiki" 長ひじき consisting of the stalks of hijiki. I happened to get dried "Naga-hijiki" and decided to make two dishes. In dried form, hijiki is very hard and black like tangles of black metal wires. To prepare, after washing in cold running water in a colander, I soak it in large amount of cold water initially for 30 minutes. At the end of the 30 minutes, the volume of hijiki increases something like 10 fold and you can see the dark brown shapes of the original hijiki plant with the fresh smell of the ocean. I drain and wash in cold running water in a colander.  I then soak again in fresh water. I repeat this several times over the period of about 2 hours (you do not really need this long soak and changes of water but I like to leach out as much of the small amount of arsenic as possible, see the footnote). If I am not ready to cook this immediately I keep it in a container with water and place it in the refrigerator.

1. Hijiki and chicken salad ひじきと鶏肉のサラダ

Since I had some leftover cooked (barbecued) whole chicken, I used the breast meat for this dish. If you are making this from scratch, you should either steam in sake or "sakamushi*" 酒蒸し or microwave the chicken breasts.

*add 2-3 tbs of sake in a small frying pan and add a chicken breast (skin removed). Put on a tight fitting lid and braise/steam for 4-5 minutes or until the chicken is done in a low flame.

In a small frying pan, add olive oil with a dash of dark roasted sesame oil. When the oil is hot, add a desired amount of hydrated and drained hijiki and saute for 1-2 minutes and then add coarsely shredded (by hand) cooked chicken breast and saute for aother minute and season with salt and pepper.  Tip them out in a bowl and add soy sauce with dissolved yuzukosho 柚子胡椒 (from the tube) or wasabi. You could also use ponzu (soy sauce) ポン酢醤油 with or without the spicy stuff. Here, I made a half and half mixture of soy sauce and yuzukosho and added the mixture in several increments as I tasted it to my liking. I garnished it with cooked and shelled edamame. I serve this at a room temperature. This is a good dish. Mild zing and flavors of the yuzukosho is very nice.

2. Stewed Hijiki ひじきの煮物

This is as classic as hijiki dishes go. There are many variations to this. Some add cooked (yellow or ripe) soy beans "mizuni daizu" 水煮大豆 and other vegetables. Carrot and deep-fried tofu pouch "abura-age" 油揚げ are most common ingredients in this dish. I used carrot, sweet potato, edamame  枝豆 and deep fried tofu pouch in mine.

I made a large batch with the remaining prepared hijiki which is about 3 cups after hydration. I added broth (I used granulated instant "dashi" dissolved in water) (1 cup) add small cubes of carrot (one large) and sweet potato (1/2 large) and simmered for 10 minutes or until vegetables were cooked (not too soft) and set it aside in a bowl with the liquid. I added peanut oil (1tbs) with a dash of dark sesame oil in a sauce pan on a medium flame and saute the prepared hijiki and thin strips of abura-age (2 small squares or "koage" 小揚げ, blanched, squeezed of water and cut into thin strips) for 1-2 minutes and add the cooked vegetables with its liquid. Simmer for 5 minutes and I season it with sake, mirin and soy sauce (1:1:2 parts), I will go easy on soy sauce at first since it will cook until the liquid is almost all gone. I taste when the dish is almost done and add more soy sauce if needed (I did not). After turning off the heat, I mixed in cooked and shelled edamame and let it sit and come to the room temperature before serving. This has a classic taste of hijiki "nimono" dish.  I found  old "ichi-go Masu" 一合升 in the back of the kitchen cabinet and used it to serve this dish.

We had both hijiki dishes at one sitting. Both dishes are quite different in taste and texture (although it may look similar) and went well with cold sake.

*Footnote regrading arsenic in Hijiki:
I did not know this until I read Hiroyuki's blog some time ago. It appears that the amount of inorganic arsenic is not high enough to have a serous health concern if you consume hijiki in moderation (meaning not eat tons of hijiki everyday). There is no known case of arsenic health effects even in Japan where people tend to eat more seaweed than anywhere else including hijiki. It is also reported that If you soak hijiki for 1 hour and if you boil it for 5 minutes after hydration, . This time, I soaked much longer than needed with multiple changes of water which, I am surmising, reasonably reduced the arsenic content. So it appears that consuming hijiki cooked this way is not to be of any health concern. A (professional) well-informed Japanese food blogger appears to take a similar position.

Sunday, June 27, 2010

Grilled rosemary lamb chops with barley risotto ラムチョップと大麦のリソト

Well, I am, again, deviating from the Izakaya theme. This is a type of a Bistro cuisine but apparently some Japanese bars serve this type of dish. I used a rack of lamb and cut it into individual chops. This rack was not as well prepared as the ones we usually get and I had to remove some silver skin and excess fat but I left some fat just above the chop since the fat imparts a good lamb flavor (if you like lamb flavor).

I marinated the lamb chops in fresh rosemary (chopped up, 1 tbs, from our herb garden), crushed garlic (4-5 cloves), olive oil (3-4 tbs) and cracked pepper (1/2 tsp) in a Ziploc bag overnight in the refrigerator. Just before cooking, I removed the meat leaving the garlic and marinade in the bag (I noticed that one of the garlic cloves went with the meat to the grill judging from the picture below). I then salted the meat. I was too lazy to fire up the charcoal grill so I used an electric grill outside (see below left).

I cooked the chops 2-3 minutes for medium doneness (this grill cooks from both sides). I turned the chops 90 degree in the middle of the cooking time to make nice grill marks. This dish had a more assertive lamb flavor than the oven roasted rack of lamb but if you like lamb this is a very straightforward nice dish.

Barley risotto: My wife made this dish and I assisted by chopping up the ingredients. I finely chopped onion (large, half), shiitake mushroom (5 medium, stem removed), and garlic (3 cloves). In a small pot, add olive oil (1 tbs) and saute the above vegetables for 2-3 minutes on a medium flame, season with salt and pepper. Add one cup of pearled barley and saute to coat the grains with the oil. Add 2/3 cup white wine (we used sake) and cook until the wine is completely absorbed. Add 3 and 1/2 cups of chicken broth (our usual Swanson reduced salt no-fat version). After it comes to a boil, cover and turn the heat down to simmer and cook for 30 minutes or more, stirring once or twice during cooking, until done. (It should be creamy but all the liquid should be absorbed). Add crumbled fresh goat cheese (2 tbs) and fresh thyme (from our herb garden) to taste. Adjust seasoning if needed. We also added small cubes of oven roasted root vegetables (this was leftover from a previous dish. sweet potato, onion and carrot were tossed with olive oil and seasoned with salt and pepper, roasted with garlic and onion at 350F for 45 minutes to one hour).

As an accompaniment, we served barley risotto and oven roasted green beans. This was a very satisfying "comfort" food type dish. The barley has a nutty flavor with a rich mouth feel and a slight "al dente" crunch. Of course, a good red wine is called for. We had a nice Spanish Temperanillo, Caro Dorum 2005.

Friday, June 25, 2010

"Hanpen" fish cake stuffed with perilla and cheese はんぺんのシソとチーズ挟み焼き

This is another quick dish and variation of a sauteed "Hanpen" fish cake. This time, I used butter instead of olive oil and stuffed it with perilla and Raclette cheese.

I thawed the "hanpen" and cut it into 4 equal squares. I then cut into the middle of the thickness to make a deep pocket taking care not to cut through. I cut the slice of Raclette cheese to the size of the pocket. I wrapped the piece of cheese with a leaf of perilla and inserted the wrapped cheese into the pocket. I sauteed the packet in butter over a medium flame for a few minutes on each side until the cheese melted and the hanpen nicely browned. I served it with a dab of grated ginger and soy sauce for dipping. It is another simple but good dish which will go with any drink.

Wednesday, June 23, 2010

"Mozuku" and "Nagaimo" in sweet vinegar モズクと長芋の甘酢

The Japanese eat anything which comes out from the sea and also like combining slimy food with slimy food (double slim or, sometimes, triple slim). I got inspired (??) from the reportedly mediocre dish I saw in Jon's posting. I occasionally get a type of slimy sea vegetable called "Mozuku" もずく, which is already prepared in sweet vinegar and packaged in a plastic cup, which I get frozen. The southernmost archipelago of Japan, Okinawa 沖縄, is famous for Mozuku. Since I had an end piece of "Nagaimo" 長芋 left over, I simply peeled, sliced and made it into match stick shaped pieces. I used sushi vinegar to lightly dress it and placed it over the mozuku and garnished with another type of aquatic vegetable called "aonori" 青のり which is dried and comes as small flakes.

 It was an exceptionally nice day for mid June and we fired up the Konro grill outside and this was a part of the starter dishes pictured below. I already had stewed "hijiki" which I had made previously (middle). The cut glass tumbler from Kitaichi glass (on the right) is tall and a bit unstable so I used "masu" 升, a square wooden Japanese measuring cup, to stabilize it.  This happens to be the common way in which sake is served in an Izakaya. They intentionally pour sake to overflow the cup and let the sake spill over into the "masu" underneath as a gesture of generosity. Although we need not to do that since we are quite generous to ourselves when it comes to sake, I recall Dave was not too happy at Shuto-an 酒徒庵 since they did not serve sake this way.

The nagaimo has a nice crispy texture with some sliminess (but nothing compared to grated nagaimo) and mozuku has a bit similar characteristic and is the perfect match. The sweet vinegar is very gentle and we slurped whatever was left in the cup. Actually, I served this in a crystal sake cup "guinomi" ぐいのみ also from Kitaichi glass, so this was a very natural thing to do.

Monday, June 21, 2010

Plum wine, Supplement 梅酒、追加

We harvested "aoume" 青梅 or unripe green plum last weekend for 2010 umeshu.


Although I posted umeshu when I bottled the 08 vintage, I decided to add a few more images and a description of how to make umeshu. We usually use 1 lb of plums, 1/2 lb of sugar and 1.75 liter of liquor (either Vodka or brandy), but we started using 2 lb of plums with the 2008 vintage since our tree produces so much fruit. Traditionally, rock sugar or "koorizatou" 氷砂糖 is used but it is difficult to find rock sugar here in the U.S. and we cannot detect the difference in the end product, so we use regular granulated sugar. I think the reason for using rock sugar is that it will slowly melt producing a saturated sugar containing liquid layer. Since this layer has a high specific gravity (as compare to the remaining liquid) the saturated layer will remain in the bottom for some time extracting plum juice. I try to achieve the same effect by coating the fruit with sugar and leaving it over night to extract the plum juice before adding the liquor as described below.

The image below left is of washed and dried plums (2 lb) in a container with (1/2 lb) of sugar added. I just gently rotate the container several times so that each plum is coated with sugar. The picture on the right is after the plums have been in the sugar over night. You can see the plum juice came out and the sugar is wet.

I use brandy for one batch and Vodka for two other batches as you can see below. For brandy, I use Christian Brothers, not Remy Martin XO, but that is up to you. I also use the cheapest Vodka I can find.

I gently pour in the liquor so as not to disturb the sugar in the bottom. As you can see below, undissolved sugar can be seen in the bottom. My hope is that the sugar will melt gradually and produce a concentrated sugar layer in the bottom of the jar.

I just place the containers on a shelf in the basement or where ever they will not be in your way and wait for one year before bottling and drinking. Just don't forget about it.  (I forgot to bottle the '08 vintage for 2 years but the result was still good. So if you do forget, a few extra years don't seem to hurt.) Several years of bottle aging will make umeshu better.

Sunday, June 20, 2010

Pizza Margherita and Pizza with caramelized onion ピザ

When we had our wine party/tasting, I made pizzas as a starter. They were a big hit but were eaten so fast we did not have a chance to take pictures. So, next day, I made a half-and-half pizza Margherita (left) and pizza with caramelized onion (right) from the left over ingredients. I already posted my pizza dough recipe. (Please note this image was not doctored up by Gimp or Photoshop.)

Garlic infused olive oil: I just crush several cloves of garlic using a garlic press and add good extravirgin olive oil and mix. Use this to brush pizza dough and crust.

Tomato sauce: Tomato sauce was made similar to my Marinara sauce but I added a small amount of port wine (Cheap Ruby port from Taylor) and simmered it longer so that the moisture level was very low.

Cheese: I used fresh cow's milk mozzarella. I usually use smoked mozzarella for the caramelized onion pizza but I used up all the smoked cheese I had for the pizzas at the wine party. So, for this pizza I used regular mozzarella and small chunks of fresh goat cheese. I do not shred the mozzarella but slice it (the reason becomes clear in the assembly part below). It is easier to cut thin slices when the mozzarella is cold using a thin bladed knife. 

Caramelized onion: Simply saute halved and thinly sliced onion in olive oil. This requires some patience until the onion become wilted and dark brown (15 minutes or longer). When enough brown "fond" appears on the bottom of the saute pan, I deglaze it with small amount of water which helps to color and flavor the onion but you need to saute further to evaporate most of the liquid.

Pine nuts: We keep pine nuts in a freezer. Just dry roast them in a frying pan until slightly brown.

Assembly: I sprinkle corn meal on a pizza peel and place the stretched and formed pizza dough on the corn meal before starting the assembly. Give the peel a quick tug to make sure the dough moves freely before adding the topping.

Pizza Margherita: I brush the garlic infused olive oil on the prepared dough. I put the slices of mozzarella cheese on the pizza first and then place a small amount of the tomato sauce on top of the cheese slices. (Usually the sauce is put on first and then the cheese). While my method is the opposite of what is usually done, I think this makes a better pizza since the cheese protects the crust from the moisture of the sauce. The result is a crispier crust.

Caramelized onion: The same as above but I spread the caramelized onion over the slices of cheese and then dot it with small chunks of the fresh goat cheese and sprinkle the pine nuts.

Baking: I bake for 8-9 minutes directly on a hot pizza stone by sliding the assembled pizza off the pizza peel. I preheat the oven for at least 30 minutes to 450F before baking--with the pizza stone in.

Take the pizza out and brush the edge of the crust with olive oil and grated Parmesan cheese. For Margherita, I garnish with a chiffonade of fresh basil.

We had this with the leftover wine from the day before, The 2005 Clos Mogador (about half the bottle left). The wine was much better than the first time we tasted it. The funky nose was totally dissipated. This wine has a very nice complex taste and went particularly well with the caramelized onion.

Friday, June 18, 2010

Eggplant gratine two ways; Marinara and Yuzu-miso sauce with cheese

Last time we had a chance to grill outside, I grilled a small Italian eggplant trying to make "yakinasu"  やきなす or Japanese style grilled eggplant but it was not really good. So, when I saw a nice Zebra eggplant in the market, I had to get one. Since It was not feasible to fire-up a grill outside, I asked my wife how she like the eggplant cooked. I got a bit ambiguous answer. So I decided to halve the eggplant and make one in an Italian style with Marinara sauce and cheese and the other half in a Japanese style i.e., "citrus miso dengaku" with cheese, so that I can not go wrong.

I cooked the eggplant in my usual way. I cut the eggplant in half length wise. Then I cut the meat around the edges close to the skin and in cross-hatch pattern but not cutting through to the skin (This is hasten and make cooking uniform). I put about 2 tbs of light olive oil in a frying pan on a medium flame. When the oil is hot and shimmering, I put in the eggplant the cut side down. The eggplant eventually absorbs all the oil. After 1-2 minutes, I put on the tightly fitting lid and turned down the flame to low and let it cook about 10 minutes. The eggplant should be soft and thoroughly cooked with the cut surface nicely brown. I transferred the eggplant halves to a baking sheet (or ramekin) and layered one with Marinara sauce and the other with Yuzu-citrus miso. Then I topped them with grated cheese (I used a mixture of Cheddar and Raclette here but any melting cheese will do) and put them in a 400F oven (I used a toaster oven) for 5 minutes or until the cheese melts.

Marinara sauce: I placed olive oil (1/4 cup), 3-4 cloves of garlic (minced), and red pepper flakes (optional), in a small deep pot on a low flame. When the garlic became fragrant,  I added canned whole tomato, drained and crushed (16 oz can), dried oregano and basil (1/2 tsp, each), salt and freshly ground black pepper. I simmered this sauce for 30 minutes. I tasted and adjusted the salt and pepper. You may want to add a pinch of sugar to cut the acidity.

Yuzu-miso sauce: Mix red miso (3 tbs), sugar (2tbs), and mirin (3 tbs) in a small sauce pan on a low flame. Keep stirring until nice thin saucy consistency is attained (about 5 minutes). I added 1 tsp of dark roasted sesame oil (optional) at the end and mix well. Off heat, I add Yuzu juice (from a bottle) (1 tsp) and zest of one lime (using a micrograter) or just lime or lemon juice and zest.

In the above picture, on the left is the eggplant with Marinara sauce and on the right is the one with Yuzu-miso sauce. I garnished the Yuzu-miso eggplant with the zest of a lime and, if I had fresh basil, I would have garnished the marinara sauce side with chopped basil. You can have this with wine, beer or sake. We had this with Poggio Il Castellare Sant Antimo Cervio Cabernet Sauvignon 2007, which taste  more like California cab rather than Super Tuscan, but it went very well with this dish nonetheless.

Wednesday, June 16, 2010

Chicken liver and tofu terrine 鶏レバーのテリーヌ風

Believe it or not this recipe came from "Appetizers and a la carte small dishes for Izakaya" by Tadashi Shinojima.  Judging from the title of the book, by definition, this must be an Izakaya food. Although this looks and tastes like a chicken liver pate (actually it is more pate than terrine), there are a few Japanese touches; one is the inclusion of tofu and the other is the addition of "edamame" 枝豆. Since I bought a container of chicken livers for Yakitori, I decided to make this dish; a situation similar to the previous time I made braised chicken liver and onion.

I used about 180 grams of chicken liver. After removing the fat and connective tissue, I soaked it in ice cold water for 15 minutes. I added a bit of sake to the water and boiled the liver for 4-5 minutes until thoroughly cooked. Meanwhile, I wrapped a firm or "momengoshi" tofu 木綿ごし豆腐 in paper towels and microwaved it for several minutes. I re-wrapped it in new paper towels and placed a heavy plate on the top for 10 minutes to squeeze out any excess water. I used about 150 grams (after removing the excess water) of tofu. In the mixing cup of an immersion blender, I added the cooked liver (180grmas), tofu (150grams), beaten egg (1/3), cream (1 tbs), grated onion (1 tbs), salt and pepper and blended them until smooth. I then folded in the shelled edamame (I used about 20 of the frozen kind, cooked and shelled). I also added small cubes of left over steak (the recipe called for cubes of roast beef).  I then poured the mixture into small (disposable) loaf pan and baked for 30 minutes in a preheated 400F oven in a bain-marie. The original recipe was a bit vague about how this dish is to be cooked (the author said "mushiyaki" 蒸し焼き or steam-bake in an oven) but I interpreted this to mean bake using a bain-marie. I let it cool down to room temperature and stored it in the refrigerator overnight before slicing.

The recipe suggested serving this with a "white cream sauce" but I chose to serve it like a pate with cornichon pickles on toasted small squares of cocktail bread. The texture is great and the edamame and cubes of steak made an interesting texture contrast and color. If you are not told, you would not have guessed that close to half the bulk came from "tofu". It has a nice irony liver pate taste but it needs more distinctive spices (maybe more onion, black pepper and salt). For a fusion pate with tofu, this is not bad. Does Tofu make this dish a healthier dish? - maybe.

Monday, June 14, 2010

Spicy Konnyaku stir fry コンニャクのぴりから炒め

Spicy Konnyaku stir fry コンニャクのぴりから炒め

Since I have been posting non-Izakaya items for some time, I am going back to a simple Izakaya affair here. This is another very quick dish using Konnyaku 蒟蒻 and a perfect small dish with sake. I used a dark unbleached version of konnnyaku. After I wash and blanch the cake of konnyaku, I cut the thickness into two by cutting through horizontally as I press the cake of konnyaku against the cutting board. I then make shallow crisscross cuts on both sides as you can see in the above image. This is to make any seasoning penetrate the konnyaku. I cut them into a bit less than one inch wide strips.

I put 1/2 tbs of peanut oil with a dash of dark roasted sesame oil in a frying pan on medium flame. I fry each side of konnyaku strips for 1-2 minutes so that the surface become slightly congealed and crunchy (small bubbles will come out on the surface). I then add 1/2 tbs of soy sauce and quickly sauté until soy sauce become fragrant and absorbed. I sprinkle a Japanese 7 flavor red pepper powder 七味唐辛子. This is a sort of nothing dish but nice to have with sake. This time I made it a bit too spicy and registered a mild compliant from my wife. Sorry.