Friday, August 10, 2018

Squid stuffed with caramelized onion イカのアメ色たまねぎ詰

As usual, when I go to a grocery store and see cleaned small squid I end up getting it. I thought I should make something different with it this time. While I was searching for squid recipes I stumbled across a short video of a PBS cook show on YouTube by Jose Andreas. The video was a bit sketchy but I filled in some of the missing parts and made this dish.


I served this immediately off the frying pan and made a quick sauce by deglazing the pan with white wine. I garnished it with our favorite Spanish olive oil and parsley and served with wedges of lemon. My wife added small slices of baguette to soak up the sauce/juice.


This was quite good but when we cut into it while it was still hot the stuffing tended to separate and fall out. The next day, I served this cold. This time I sliced the squid before serving and the stuffing stayed put. We like this dish cold. The sweetness of the caramelized onion gets milder or smoother. I served it with a bit of the olive oil and our home grown arugula.


Ingredients:
1 lb cleaned squid with tentacles (I got 11 bodies and tentacles)
2 medium onion, cut in half and sliced
1 jalapeno pepper, de-veined and seeded, cut into thick julienne (original recipe uses green pepper)
2 tbs olive oil
1 clove garlic, minced (original recipe calls for crushed garlic without removing the skin)
1/2 cup of white wine (I used sauvignon blanc from France), devided into two potions
Salt and pepper to taste

Directions:
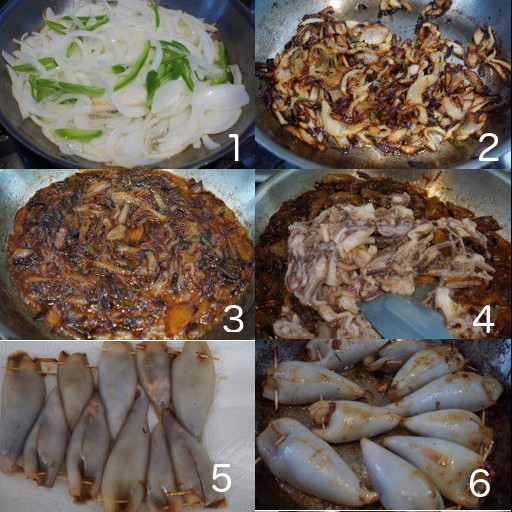
Sauté  the onion, garlic and pepper in olive oil on low-medium flame (#1)
Keep sautéing until caramelized (#2)
Deglaze the pan using 1/4 cup white wine (#3)
Add the tentacles (I cut them up into bite sized pieces) and sauté until done (1-2 minutes (#4) and season with salt and pepper.
Using a small spoon stuff the body of the squid with caramelized onion/tentacles mixture and close the end with toothpicks (original recipe does not closed the open end before cooking) (#5)
Add a bit more olive oil to the pan and cook one side for a few minutes and turn over and cook for another few minutes (#6)
I added 1/4 white wine and put on the lid to steam cook for 1 more minute. Remove the squid.
Reduce the wine while scraping any brown bits on the pan to make pan juice/sauce.


I used "Francois de La Roche Touraine Sauvignon Blanc 'La Coulée' 2016" in the sauce and also enjoyed "sampling" it while cooking. I served it with the squid dish.

Either warm or cold, this is a good and unique squid dish. The caramelized onion is very sweet and squid legs add additional texture. Using the same wine we are drinking somehow connects the dish and wine. Although we rarely drink white wine especially sauvignon blanc (sort of boring nothing wine usually). This one is not too bad. It had citrus and melons flavors and minerality with crisp acidity. By the time, we got to drinking this wine with the squid dish, the wine warmed up enough to have the flavors come alive. We really enjoyed the wine and the dish.

Tuesday, August 7, 2018

Polenta with tomato sauce and meatballs ポレンタとトマトソース

This was also inspired by a recipe in "Perfect Pairings" called "Baked Polenta Casserole".  The idea is to put polenta on the bottom of the casserole and add tomato sauce and pecorino cheese and bake it. In the" Perfect Pairings" book this dish was paired with Sangiovese. My wife makes polenta loaf every-now-and-then. She usually slices it into half inch thick slices, wraps it in plastic wrap and then aluminum foil and freezes it. So we usually have slices of her frozen polenta loaf in the freezer. I also made marinara sauce and meatballs several days ago. So we have all the ingredients to make this dish plus meatballs. We also added more vegetables (to make it healthier?) and used a combination of cheeses.  We had this with Cabernet from Napa (Do not remember which one) and the wine went very well.


The bottom is composed of one slice of the polenta loaf.


First, place three slices of polenta on the bottom of a small Pyrex baking dish, add sliced meat balls with marinara sauce. Add blanched broccoli and sugar snaps.


Top with slices of double Gloucester cheese and smoked Gouda.


This turned out to be a quite good dish. Since we already had all the ingredients ready to go, it was a synch to put it together. This went well with our red wine.

Saturday, August 4, 2018

Cold "shippoku" udon noodle with simmered vegetables 冷製卓袱うどん

Since we had several hot and muggy days recently in the Washington DC area, I made this cold noodle dish from ingredients I had on hand. I had cold simmered vegetables and prepared udon noodles (which were leftover for making cold fresh tomato pasta dish). I call this cold "shippoku" udon 冷製卓袱うどん. This (warm version) is a popular dish in the Southern islands of Japan (Shikoku 四国 and Kyushu 九州). I do not know the exact definition of it but I take it as a noodle (either soba or udon) dish with lots of cooked veggies and other toppings. I made this all cold for a hot summer day.


Cold cooked vegetables included daikon, carrot, skinned Campari tomato and sugar snap. Since I had Chinese-style simmered pork or "Chashu" チャーシュー (this one is made from pork butt and has much more fat than meat made from pork loin), I cut it into batons and added it to the dish.


The original simmered vegetables included daikon, carrot, shiitake mushroom, Campari tomato (simmered in Japanese broth which was lightly seasoned with light colored soy sauce and mirin. After the veggies were soft/done, I let it cool and then refrigerated it). We ate the veggies by themselves for several days so by the time I made  this dish only a few pieces of daikon, carrot and tomato were remaining. The sugar snap was just blanched and cooled. For the broth, I added more concentrated noddle sauce from the bottle to the broth in which the veggies were cooked.

This was all leftover control but it was nice cold refreshing dish, perfect for our lunch over the weekend.

Wednesday, August 1, 2018

Indian-style pork "Vindaloo" curry with pickles インド風ポークカレー

I asked my wife to make this curry from leftover barbecued pork butt since it was getting to the end of it's life. This is my wife's version of pork "Vindaloo" which we posted few years ago. Instead of using uncooked pork, she used barbecued pork cut into cubes this time. Since I used dry rub (roasted cumin, smoked paprika, salt and pepper) for the barbecue, these spices were automatically added to the curry.


She added roasted mustard seeds, you can see the seeds in the curry which gave small pops and bursts of mustard  flavor. Instead of coconut milk, she used yogurt (since we do not particularly fond of the taste and flavor of coconut milk), it broke a bit but still tasted good. Despite the addition of yogurt and reduce cayenne pepper to 1/4 of the lower end of the amount suggested in the original recipe (about 1/4 tsp), this curry was hot enough for us. Despite using cooked pork, it was tender and quite enjoyable. This is another way for taking care of leftovers.


Since I had a fresh green and yellow zucchini (really yellow zucchini not yellow squash), I added panfried coins of zucchini seasoned with salt and pepper, grilled fig with balsamic vinegar. In addition, I added pickled cucumber and carrot I made.


I just used the sweet vinegar I used to make pickled myouga since we used up the pickled myouga from this container. I placed cucumber (American minicucu), carrot and skinned Campari tomato into the leftover sweet vinegar. I let it pickel for several days in the refrigerator.


We decide to have a store bought mini baguette (which was partially baked and frozen). I  finished baking in 350F toaster oven in convection mode for 15 minutes. This went well with the curry. Next time, we will make naan, though.

Sunday, July 29, 2018

Homegrown arugula salad 自家製のルッコラサラダ

Leafy salad is not one of our favorite foods. Among the green leafy vegetables, however, we do like arugula. In Japan, this is best known as "Rukkora" ルッコラ (phonetic translation of "rucola" in Italian) or ロケット (roquette  or rocket in Europe). Arugula has a nice peppery fresh taste even without any dressing. Store-bought arugula, however, especially "baby" arugula, does not have much taste. So, this spring, when we were updating our herb garden, my wife bought a small seedling of arugula. It grew to the point where we had to harvest it or it would bolt and the season would be over before we even tasted it. So, we made this salad with our home grown arugula.


Besides the arugula, I added cucumber (American minicucu), skinned Campari tomato, avocado and toasted walnuts.


Since I also had blanched sugar snaps, I added them too.


For dressing, I made my usual honey mustard dressing without shallots or garlic (Dijon mustard, honey, rice vinegar, salt and pepper). I dressed all ingredients except the arugula itself. I didn't dress it so we could enjoy its own taste. This was very nice. This arugula had such an intense peppery taste even without the dressing.  Of course, as we were eating some of the dressing got onto the arugula which was also nice. This homegrown arugula was so much better than any arugula we would get from the grocery store.  It was well worth planting. Once we finish with this batch of  arugula, we may have to plant another batch to enjoy in the fall.

Thursday, July 26, 2018

Perilla tea and perilla rice 大葉茶と大葉ご飯

Our green perilla (a.k.a "Aojiso" 青紫蘇 and "Ooba" 大葉) is proliferating vigorously in our herb garden. Since we have so many plants and this is similar to the family of mint, my wife asked me if we can make a tea from it like mint tea. I quickly checked the Internet and found a few recipes/descriptions. The recipes are slightly different for red versus green perilla. (The red one requires acid to make the pink color to develop). I chose a recipe that specified the torn green perilla leaves should be boiled in water for 15-20 minutes with an addition of salt.  I made this green perilla tea and was surprised to find that it tasted just like "Umeboshi" 梅干し or "salted" plums.   I was not sure if this was supposed to be a drinking tea or a "health tonic". My wife tasted it and because of the umeboshi taste suggested we should make rice using this perilla tea. So I obliged and made perilla rice.  Since we got a whole Spanish mackerel the day before and I made my usual miso simmer mackerel 鯖の味噌煮 and also mackerel dumplings in a broth 鯖のつみれ汁, I served this perilla rice as an ending "shime" dish one evening.


I further fortified the perilla flavor by adding a chiffonade of green perilla and store bought "Yukari" ゆかりsalt which is made of dried red perilla and salt.


This time, I used match sticks of daikon and carrot in the mackerel dumpling soup.


The miso simmered mackerel is our favorite dish.


Ingredients for perilla tea:
20 green perilla leaves, washed and torn (amount appears to be arbitrary)
1/2 tsp salt
8 cups water


Add hand torn perilla leaves and salt to the water when it starts boiling then turn down to simmer and cook for 15-20 minutes. I let it steep until cooled to room temperature and remove the perilla leaves.


Although I did not take pictures, the resulting "tea" has a slight brown color with a strong perilla smell. We just used the perilla tea instead of water in our rice cooker to make the perilla rice. When the rice was done, it definitely smelled like perilla although the taste did not come through. By adding a chiffonade of fresh perilla leaves and "Yukari", this was a quite pleasant seasoned rice. Of course, my wife added a pat of butter to her rice to make it "better"(or maybe "butter").

Monday, July 23, 2018

Beef tongues: Gift from our friend 牛タン、友人からのプレゼント

One of our friends who has a farm in the area and raises cattle, chickens and other livestock gave us two fresh grass-fed beef tongues. The cattle were never stressed in the process and the tongues were promptly vacuum packed and frozen before we received them. I was concerned that we may be depriving her of a delicacy but she assured me that the tongues otherwise would have been discarded. Since she read our blog about beef tongue, however, she decided to send them to us. She told me that the smaller one was from a 3/4 Dexter* and 1/4 Angus and the larger one from a half Dexter and Angus. We decided to cook up the small one the morning we received them. I prepared it exactly as before. After it was boiled, we tasted the slices and made a beef tongue stew and later we made tongue sandwiches.


The stew was made from the middle and back portions of the tongue.


We made sandwiches from the remaining tip portion with pumpernickel bread. I served this as a lunch with green salad consisting of our home grown arugula, blanched broccoli, sugar snap, skinned and sliced  Campari tomato, feta cheese. Dressing is my usual honey mustard with rice vinegar and olive oil.


As before, I simply toasted the bread with one side smeared with mayo and the other whole grain Dijon mustard.


This is a cut surface of the tip portion of tongue. I think it is leaner than the store-bought.


I sliced rather thinly to make this sandwich.


This was an extremely (meaning only) rare occasion on which we had access to fresh tongue from totally organic and grass-fed happy cattle. When I started preparing the tongue, the first thing I noticed was that the slightly unpleasant gamey smell usually associated with store-bought tongue was (thankfully) absent.  Also, another sign of the freshness of the meat was that I had some difficulty removing the skin after boiling. Generally it is very easy to remove the skin from a store-bought tongue.

While we mentioned in previous blogs how good the store-bought tongues were, we had no idea how really good beef tongue could be until we tasted this. The difference between store-bought and this was amazing; This made clear what beef is really all about. In both the stew and sandwiches, especially the sandwiches, the flavor was a bright, fresh, strong (in a very pleasant way) clean taste of beefiness. (While it may sound like the flowery language used to describe wine I don't know how else to describe it.) I would say compared to this, the taste of even steak is cloudy. In both dishes, the meat maintained its integrity but it was so tender it seemed to melt in your mouth. Especially with the simple tongue sandwich, the difference between the store-bought and the one gifted to us became much more prominent. My wife was ecstatic. She said, while the store-bought was good, this one really tasted exactly like the one she remembered and transported her back to her childhood in rural Pennsylvania. This has become a new flavor benchmark for us. Many, many thanks to our friend for this wonderful gift. We really enjoyed it and will savor it while looking forward to eating the second one.

* Dexter: I had never heard of Dexter cattle before my friend mentioned it. It is an Irish origin breed described as friendly and the smallest in Europe. It is versitile serving triple-pourposes; milk, beef and drafting.

Friday, July 20, 2018

Tofu cutlet with scallion sauce 豆腐のカツレツねぎソースのせ

This was inspired by the "Perfect Pairings" book. The original recipe is a tofu cutlet with scallion sauce. I happened to have several thick rectangles of marinated tofu that I would use to make spicy marinated tofu which I usually cook in a pan frying. Since I had heated up some oil and had breading ingredients all ready to deep fry egg whites for my wife's deviled eggs, I decided to bread and deep fry the marinated tofu too. Since the tofu was on the thick side, I cut it in half  before  serving.


The sauce in the recipe appears to be a variation of a Japanese scallion "negi" sauce ねぎソース with  chopped scallion, vinegar and olive oil. I reduced the amount of oil and added light colored soy sauce to make it closer to the "negi" sauce.


Ingredients:
One block of firm tofu, cut in half horizontally, and cut into equal sized rectangles.
Oil for deep frying

Marinade (optional):
2 tbs soy sauce
2 tbs mirin
1tsp rice vinegar
1tsp dark sesame oil
1tsp (or more) Suriracha hot sauce
1/4tsp grated ginger root

Breading:
AP flour for dredging
1 egg and water for egg water
Panko

Sauce:
2 finely chopped scallion, white and green parts
2tbs rice vinegar
2tbs light olive oil
1tsp light colored soy sauce

Directions:
For the American tofu I used, I boiled it in water for a few minutes with a dash of sake to remove the "smell". I drained it and let it cool to room temperature (for better quality firm tofu, this process can be skipped).
I placeed the marinade in a Ziploc bag and added the tofu. I removed as much air as possible, sealed the bad and let the tofu marinate in the refrigerator overnight or for a few days (optional).
I removed the tofu from the marinade and dredged it in flour, then the egg water and roll it in panko to coat.
I deep fried it in 350 F oil turning once. When all sides developed a crust, I lowered the oil temperature to 250 F and fried it for 5-7 minutes.
Then I raised the temperature to 350 F again and cooked for 1-2  minutes more.


When done, I drained the oil. When it was cool enough to handle, I cut the tofu in half horizontally.


I arranged the tofu alternating the cut surface and crust (the first picture).
I added a line of the "negi" sauce.

Although we did not taste much of the marinade (my usual, pan fried and then simmered in the marinade makes the taste much stronger and spicier), the combination of crunchy crust and soft center and the "negi"sauce go very well. The cookbook suggested paring with Pino Grigio.  I do not remember what we had for wine.

Tuesday, July 17, 2018

Deviled eggs for 4th of July デビルドエッグ

For the 4th of July, we did not do any barbecue this year especially since we had lots of food we prepared in the refrigerator (we tend to cook more than we can eat). Instead, my wife wanted to make deviled eggs. We had already made potato salad, macaroni salad, and coleslaw so we decided to have these instead of our usual barbecue. This time my wife made two interesting variations on deviled eggs. Again, I made guacamole. Having guacamole is very convenient since a glob of it on the plate under the deviled egg makes a base so the eggs won't slide around on the plate and, of course, it provides additional flavors.


This is a new one. The egg white was breaded and deep fried.


This is the classic.


MY wife came up with this one by mixing in salmon salad.


Ingredients :
#1 with deep fried egg white

2 tbs of Greek yogurt
1 tbs mayonnaise
1 tsp Worcestershire sauce
1 tsp mustard
a sprinkle of onion salt to taste
Sriracha hot sauce to taste
Oil cured olive for garnish
Hard boil the eggs. Peel, cut in half and remove the yolks. Dredge the egg whites in flour, egg water, and panko and fry (See picture below).  Mix all the ingredients listed above into the mashed egg yolk, then put mixture back into fried egg whites.


#2 The classic

2 tbs of Greek yogurt
1 tbs mayonnaise
1 tsp Worcestershire sauce
1 tsp mustard
a sprinkle of onion salt to taste
stuffed olive for garnish
Hard boil the eggs. Peel, cut in half and remove the yolks. Lightly season all the egg whites with salt. Mix all the ingredients listed above into the mashed egg yolk, then put mixture back into egg white.

#3 with salmon salad.
Flaked cooked leftover salmon (about 1/3 lb).
Celery finely diced, 2 stalks
Vidalia onion (small, half) finely diced
Mayonnaise (2 tbs)
Greek yogurt (2 tbs)
Dijon mustard (1 tsp),
Fresh dill, finely chopped, 2 tbs
lemon juice (1 tsp), salt and pepper.
(mix the above, I made this few days ago. My wife took whatever amount appropriate for this deviled eggs)
Hard boil the eggs. Peel, cut in half and remove the yolks. Lightly season all the egg whites with salt. Mix all the ingredients listed above into the mashed egg yolk, then put mixture back into egg white.

All three types of deviled eggs were good. We really liked them. The one with breaded and fried egg white was very unique. The frying gave and interesting flavor and texture. If they are served soon after coming out of the fryer they are a bit crispy. Otherwise the fried breading gives a nice dimension to the flavor profile. These deviled  eggs are  perfect for starting the evening.

Saturday, July 14, 2018

Bolivian spicy cheese cornbread ボリビアのスパイシーなチーズコーンブレッド

It would appear that my wife is "binge baking"...something I fully endorse. This recipe comes from "Milk Street". She decided to make it because we had several ears of fresh corn left over after making corn souffle and she thought this would be an interesting way to use them. We've never seen a corn bread recipe that used raw fresh corn this way.


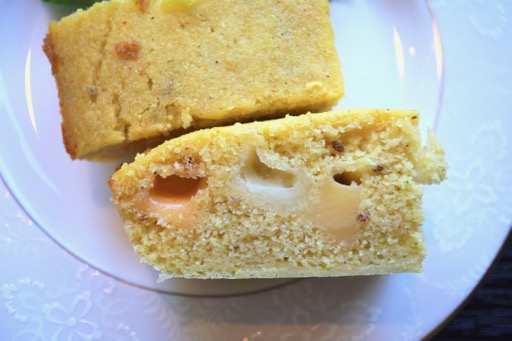
On the cut surface, you can see the melted cheeses. You can also see the hole that is left when the cheese melts into the bread. The original recipe calls for Monterrey Jack. Maybe we will use that next time.


Ingredients:
2 1/2 cups cornmeal
1/3 cup white sugar
1 Tbs. aniseed
2 1/2 Tsp kosher salt
2 Tsp. baking powder
1/4 tsp. cayenne pepper (or more if a hotter bread is preferred)
3 cups corn kernels
1 jalapeno pepper diced
1 1/2 cups whole milk
4 large eggs
1 1/2 sticks salted butter melted and slightly cooled
8 Oz. pepper jack cheese cut into 1/2 inch chunks (we used double Gloucester, smoked Gouda and Gruyere)

Directions:
Grease a 9 x 13 baking dish. (I greased the dish then added parchment paper cut to size and greased it as well. I have found this is a sure proof way to keep the bread from sticking.)

Put the cornmeal, sugar, aniseed, salt, baking powder, and cayenne pepper in a mixing bowl and stir to combine. Combine the corn, jalapeno and milk in a food processor. Process until very smooth. Add the eggs and butter and process until smooth again. Pour the corn mixture into the flour mixture and mix until smooth. Add half the batter into the prepared baking dish. Dot the surface with the cheese squares (#1) then cover them with the rest of the batter.


Cook in a 375 degree oven for 30 to 35 minutes until a toothpick inserted at the center of the bread comes out clean (#2). Let the bread rest for 20 minutes before serving.


This is  a pleasantly spicy bread with a rich moist texture. The cheese chunks add a nice burst of cheese flavor. (We suggest using cheeses that hold their form when heated like the smoked Gouda. We found the melting cheeses such as Gruyere melted into the bread leaving a small hole behind.)

Wednesday, July 11, 2018

Nattou and avocado salad 納豆とアボカドのサラダ

I had several ripe avocados in the refrigerator. Whenever we have extra avocados, I usually make guacamole. This time, I remembered a Japanese recipe I saw that used nattou 納豆 and avocado. Since I had frozen nattou which was getting old, I decided to make this dish. As usual, I took the liberty of changing the recipe using my common sense. Since nattou is involved, I served with cold sake (our house sake "Mu" daiginjou 八重垣『無』大吟醸) as a first dish .


As a garnish, I used a chiffonade of basil and dried nori strips. The only reason I used basil instead of perilla was that some cuttings of basil which my wife had harvested were sitting in a glass of water on the counter in front of me. I served more nori strips on the side so we could add more as we ate the salad and mixed the ingredients together.


The avocado and tomato were dressed with Mayer lemon juice (I happened to have one. We love the flavors of Meyer lemon), olive oil and Kosher salt.


Ingredients (for 2 small servings):
1 small package of nattou, previously frozen, thawed, prepared by adding the sauce and mustard that comes in the package with the nattou. Using my nattou mixing contraption, I mixed well (a few hundred times). This will reduce the smell making it to palatable for my wife.


Half ripe avocado, stone and skin removed and cut into bite-size cubes
2 Campari tomatos, skinned (by blanching) and cut into bite-size cubes


Kosher salt, olive oil (we used our favorite spicy Spanish olive oil), and lemon juice from one half of a Meyer lemon (it has the taste between orange and lemon juice).
Several leaves of basil, cut into fine chiffonade
1 package of seasoned nori sheets, cut into thin strips

Directions:
Add the lemon juice to the avocado and tomato and coat well, season it with salt and drizzle olive oil.
Top it with half of the prepared nattou
Garnished it with chiffonade of basil leaves and nori strips

Before eating mix everything together and add more nori strips.

Although nattou was a bit sticky, at least, there was no strong smell (which is good for my wife). This is a really interesting combination and the addition of olive oil and Meyer lemon juice was a key to this dish.

Sunday, July 8, 2018

Ravioli with wonton skin ワンタン皮のラビオリ

My sister-in-law gave me a cookbook called "Perfect Pairings"(special issue of "Food and Wine"). One weekend, my wife and I were browsing through it and found several interesting recipes. My wife really wanted to try this ravioli recipe which was paired with champagne in the book. Since it was a very hot summer day, we had this with a rather inexpensive rose wine from Provence called Domaine du Garde Temps 'Tourbillon' Côtes de Provence Rosé 2016 (made of 50% Cinsault, 30% Grenache, 20% Syrah). We started by trying to follow the recipe. When we realized the recipe used 12 oz. of cheese and made over 60 ravioli, I intervened and decided to "wing-it" in my usual style. I used most of the ingredients for the stuffing (without measuring) and took a shortcut using store-bought "wonton" skins instead of making a pasta dough. We served this as a first dish with the aforementioned (a bit over-chilled) rose wine.


For sauce, I simply made a brown butter sauce with capers and Meyer lemon juice with a side of basil leaves. I included a quarter of Meyer lemon just in case we needed more acidity in the sauce.


The next day, I made a sauce of finely chopped shallots sautéed in butter with basil leaves added at the end just to wilt them. I topped with grated Parmesan and just before eating squeezed on some Meyer lemon juice. This was a better sauce for the ravioli.


Ingredients (made about 32-35 ravioli):
For filling
1/2 cup whole milk ricotta cheese
1/4 lb prosciutto, thinly sliced and then minced into small pieces (We used Boar's Head brand which appears to be imported from Italy).
1 whole egg
1/4 cup Parmigiano Reggiano, grated
One package of baby spinach, cooked without adding additional water, moisture pressed out and chopped.

Instead of using a pasta sheet I used one package of Wonton skins (We ran out of the skins leaving a small amount of filling which we cooked in a ramekin in the toaster oven).
Mixture of flour and water to form a glue to seal the ravioli

For sauce
3 tbs unsalted butter
1-2 tsp of capers, drained, roughly chopped
1/2 Meyer lemon juice
salt and pepper to taste

Directions:
Mix all the ingredients for the filling in a bowl (#1).
Using a small ice-cream scoop, place the filling in the center of the wonton skin and paint the skin with the flour and water mixture (#2).
Take another wonton skin, paint one side with the flour glue and press both wonton skins around the filling try to not to trap any air (#3).
Using an appropriate sized cookie cutter cut around the filling making the square into a round  (#4).
Repeat until either all the filling or all the wonton skins are used up.  We ran out of wonton skins a tad earlier than the filling) (#5 and 6).
Boil the ravioli in rapidly boiling water (salt and olive oil added) for 2-3 minutes or until they float (#7).
Drain and let it cool briefly on metal rack (#8)
After they cooled we stacked the ravioli on a large square plate with parchment paper brushed with olive oil to make multiple layers and keep them from sticking together.  At this point, I suppose you could serve, refrigerate or freeze them.


For serving:
Melt the butter in non-stick frying pan until slightly brown, add the capers.
If needed season it with salt (prosciutto is rather salty, so do not over season).
Add the ravioli and warm it up, squeeze on the lemon and serve immediately.

Making ravioli even when using pre-made pasta skins is a bit of work. My wife and I worked as a team. I filled and sealed the ravioli and she cut them into rounds with the cookie cutter. She over saw cooking them and I prepared the "landing pad" so they would not stick together. But it was worth it. Although I thought I may have used a bit too much prosciutto when I was making the filling (I was trying to use it up), it was just the right amount.  It amalgamated into the Ricotta and spinach mixture adding a nicely complex meaty, salty flavor. The Meyer lemon added a bright note which was both lemony and orangey. This went well with our rose from Provence. The wine is very light with some acidity which went well with acidity provided by the lemons.  The fresh basil leaves were also great. Next time, I may just add few basil leaves to the butter sauce itself. Since we serve only a few ravioli at a time, we will be enjoying them for some time to come. (Good thing we didn't follow the recipe and make 60!)