Tuesday, May 4, 2021

Peanut butter muffin ピーナッツバターマフィン

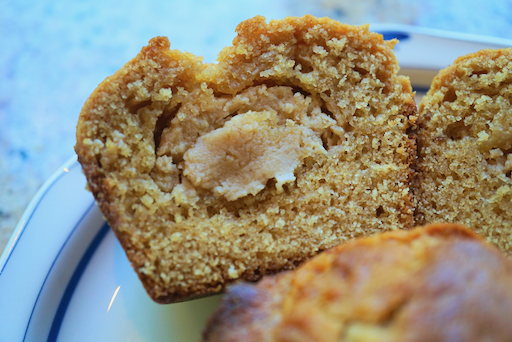
This is another one of my wife’s muffin projects. The original muffin recipe came from “Mostly Muffins” published in 1984 which we rediscovered recently tucked away on a bookshelf. The original recipe used peanut butter in the dough and called for a stuffing made of semi-sweet chocolate chips made into a fudge. (The peanut butter chocolate combo reminiscent of Reeses Butter Cups?) But my wife thought that a stuffing of chocolate candy would be too sweet for us so she came up with a stuffing made of a mixture of cream cheese and peanut butter. We have jars of peanuts used to feed squirrels but we did not have any peanut butter. So we ended up making peanut butter as well. (Sorry squirrelys) The muffin came out nice and very peanut-y.


Actually, although the stuffing is almost 1/2 cream cheese, it has a very strong and pure  peanut flavor.


Ingredients:
For muffin
1 2/3 cups AP flour
1/2 cup brown sugar
1 Tbs. baking powder
1/4 tsp. salt
3/4 cup milk
1/2 cup peanut butter
1/3 cup peanut oil (to accentuate the peanut flavor. Vegetable oil is OK too.)
1 egg lightly beaten
2 tsp. vanilla

for peanut butter filling
1 block cream cheese
enough peanut butter to bring the total weight of the cream cheese and peanut butter to 225 gm.
2 tsp. sugar
2 tsp. salt

For chocolate fudge filling (I did not use this but it is another alternative filling)
1/3 cup semisweet chocolate chips
1 tbs. butter

In a small saucepan melt the chocolate chips and butter until melted then set aside

Directions:
To make the peanut butter filling: Put the peanut butter (#1) and cream cheese in a stand mixer with a paddle and beat first on lower speed to incorporate. Add the sugar and salt and beat on a higher speed to whip until light and slightly fluffy. Set aside

for the Muffins:
In a bowl mix the dry ingredients (from flour thru salt). In another bowl mix the wet ingredients (i.e the rest of the ingredients) (#2). Put 1/2 of the dough into the bottom each of 12 heavily greased muffin tins (2nd smallest scoop). Top with about 16 gm of the peanut butter filling (smallest scoop). Make sure none of the filling touches the side of the muffin tin. Cover the filling with the remaining batter (#3). Bake in a 400 degree oven for 15 to 20 minutes until the surface feels firm when lightly touched. Cool 5 minutes before removing from the tins. 


These are muffins for the tried-and-true peanut butter devotee. The muffin has a tender texture and a very mild slightly sweet peanut flavor. The peanut butter cream cheese stuffing adds an additional slightly creamy texture and a very pleasant pure peanut kick. The cream cheese does a good job of making the peanut butter a manageable addition to the muffin. This is the kind of muffin where you eat the first one and say “um...pea-nutty” then, “could I have another one”?

Saturday, May 1, 2021

Homemade peanut butter 自家製ピーナッツバター

 My wife wanted to make some peanut butter muffins from a recipe she found in a long forgotten and recently re-discovered "Mostly Muffin" cookbook. We did not have any peanut butter (I can't even remember the last time we even had a jar of peanut butter in the house) but we did have jars of roasted peanuts which we keep to feed the squirrels and friendly birds. My wife suggested, "we have peanuts, we should be able to make our own peanut butter". A quick search on the internet produced many recipes/instructions on how to make peanut butter from peanuts. This is the result. It came out really well.


Ingredients and directions for peanut butter.
1 16 oz. jar of dry roasted unsalted peanuts
Place the peanuts in a food processor with a cutting blade.
Keep the food processor running. The peanuts will go from light crumb, to clumps and finally to a smooth peanut butter consistency. This will take some time and is a bit nerve wracking to have the food processor running for so long and the way it thumps and bumps through the various stages.

This peanut butter was the epitome of peanut-buttery-ness. It was characteristically sticky with a clear deep flavor of peanuts which lingered long on the tongue.  The taste evoked childhood memories of PB&J lunch sandwiches for my wife. (Not for me since peanut butter was not a childhood delicacy in Japan when I was growing up).  My wife came up with her "adult" version of PB&J; a peanut butter canapé to have with wine. 


Ingredients: for PB&J canapé
1 slice of white bread toasted and cut into 4 piece
A slather of homemade peanut butter on each piece
Top 2 with Strawberry puree (I made this with strawberries, sugar and triple sec whirred in the food processor).
Top 2 with fig puree (this was a leftover of fig stuffing my wife made for the fig muffin).

My wife declared "Yup this was prototypical PB&J all right". It was astounding at how well the peanut butter went with the red wine. Needless to say the wine component bumped it up to "adult" status. 

Wednesday, April 28, 2021

Japanse dried "hoshigaki" persimmon compote 干し柿のコンポート

 I am not sure how this came about but I asked my wife if she had ever tried dried persimmon or "hoshigaki" 干し柿 and her asnwer was "no". There are many ways to convert "shibugaki" 渋柿 or bitter/tannic persimmons to edible sweet persimmons. Certain cultivars will become sweet when ripened. Drying it to make "hoshigaki" is another way to accomplish this.  I searched the internet to see if there was a place I could buy "hoshigaki". I found an interesting site called "Japanese taste" that sold Japanese food and other items . Through this site (located in Japan), I bought "hoshigaki" and other Japanese sweets from Hokkaido, Japan 北海道 where I grew up. The hoshigaki I got was called "Ichida-gaki" 市田柿 and is produced in a specific area in Nagano prefecture 長野県.  According to their English webpage, this is produced using a very labor intensive and long process including "hand massaging" the fruit after a certain level of dehydration is reached. In any case, this arrived from Japan about 1 week after I ordered it.


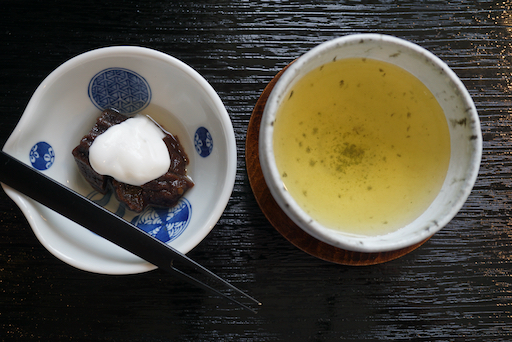
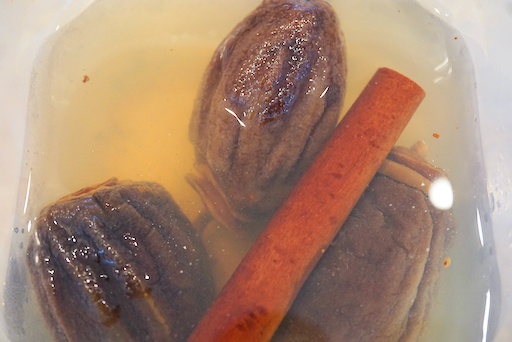
Of course, you can eat the persimmon as is but I also made a few dishes from it. The first one is called "hoshi-gaki compote" 干し柿のコンポート. The recipe came from a popular cooking program on NHK Japanese TV channel  on-line recipe . I served this with some yogurt my wife made and green tea.


The hoshigaki became softer and the cinnamon flavor is very nice. The slightly tart yogurt goes well with sweet persimmon.


Ingredients:
4 (four) Hoshigaki
1 cup water
3/4 white wine (I used French dry sauvignon blanc since I had it)
50 grams sugar
1 cinnamon stick

Directions:
Add the water, wine, sugar and cinnamon in a pot and let it boil.
Add the hoshigaki and let it come to boil again and then turn off the flame.
Let it steep and cool to room temperature and store it in the refregerator (should last 2 weeks)


This is how it looked the next day. I suppose you could serve this as is but I cut off the stem end, and cut it in half and removed the seeds.


This is certainly a better and elegant way to serve hoshigaki.

Sunday, April 25, 2021

Four appetizers in new small bowls 御通し4種類と新しい小鉢

We have a good number of small Japanese-style bowls and plates but for some reason my relationship with breakable dishes ends up with them getting broken every-now-and-then. So I am always on the look out for potential replacement small Japanese style dishes/bowls. (Also, since enjoyment of food is visual in addition to taste, I just like different bowls in which to present what I make to complete the entire experience). I found these small bowls on Amazon. They came in four different patterns/colors in a set of four (i.e. total of 16 bowls) . I ended up getting all 4 sets. So, this is the first time I used this set to serve 4 appetizers. The first picture, from left to right, are "salmon nanban" 鮭の南蛮漬け, "hijiki seaweed stir-fry" ひじきと油揚げの炒めのも and Japanese "dashi-maki" だし巻き卵 omelet, "Wood ear"* mushroom, cucumber and wakame seaweed sunomono" キクラゲ、ワカメ、胡瓜の酢の物, and  "shredded chicken tenderloin and asparagus in sesame dressing" 鳥のささみとアスパラの胡麻和え. 

*Wood ear mushroom is so-called because it grows out of the surface of wood like an ear sticking out. Japanese call it "ki-kurage" meaning "jelly fish of the wood" because the crunchy texture is similar to dried and salted edible jelly fish. It is interesting, however, when it is written in "kanji" ideograms, it is  木耳 which means wood 木 ear 耳. There is no way you can pronounce 木耳 as "ki-kurage" but the meaning of these two ideograms indeed mean "wood ear".


The second picture is the salmon dish I usually make, fried and marinated in sweet vinegar with vegetables. In order to serve multiple appetizers, it is necessary to pre-make a number of them and have them last long enough to serve over several days. Due to the vinegar this dish lasts a few weeks in the refrigerator. So this salmon dish is a good one to serve as an appetizer. Perfect with sake but not with wine. The pattern of this bowl is not classic Japanese but nice—also the color complements the color of the salmon.


The third picture of hijiki seaweed is a dish that also lasts for some time in the fridge. I served it with Japanese "dashimaki" omelet which goes well with the seaweed dish both visually (yellow and black) and by taste (sweet and salty). The pattern of the bowl is classic Japanese wave pattern.


This is a variation of my usual "sunomono" dish. Besides cucumber and wakame, I used wood ear mushroom. We can get this mushroom usually dried. One of the problems with hydrating the dried items like this is after hydration, the volume increases much more than expected. This was a case here and I used wood ear in several dishes including fried rice for lunch one day. In any case for this dish, I cut the wood ear into thin strips like jelly fish. I also added ground sesame and sesame oil in the dressing. The wood ear really adds crunch exactly like jelly fish.


I froze sous vide chicken breast a few months ago and decided to thaw one. It came out exactly like it was just cooked. I made the chicken salad I usually make which was really good but I kept the tenderloin part of the sous vide chicken for this "goma-ae" 胡麻和え dish. I tore the tenderloin along the meat fibers to make thin strands. I dressed this with sesame dressing ("nerigoma" 練りごま sesame paste, roasted and ground sesame, sugar, rice vinegar and soy sauce. I kept this dressing in the fridge which made it stiff. So I added small amount of warm water to loosen the dressing) with blanched asparagus (stem cut into thin pieces at a slant and garnished with tips of the asparagus). The meat was so juicy and tender.


These small dishes are nothing special but I make slight variations which make it interesting and adds to the enjoyment of sake.

Thursday, April 22, 2021

Fig (stuffed) muffin 無花果入りのマフィン

Recently, we reorganized our book shelves and during this process, my wife found quite a few cookbooks which we forgot we had. One of which was a small book called "Mostly Muffins". It was published in 1984 but it appears to be still available on Amazon. As a devotee of stuffed muffins, my wife could not pass this one up. So this is a fig muffin (first picture). She managed to place the stuffing in the center without any gaping space around the stuffing.


The fig stuffing definitely gave nice slightly sweet and figgy taste and nice slightly chewy texture.


As usual, I ask my wife to take over the rest.


Ingredients:
For fig filling
1/2 lb dried figs, trimmed and chopped
1/2 cup triple sec (original recipe calls for freshly squeezed orange juice which we did not have).
3 tbs honey
1 1/2 tsp fresh squeezed lemon juice

For muffin batter
1 1/4 cup AP flour
3/4 cup whole-wheat flour
1 tsp baking powder
1/2 tsp. baking soda
1/2 tsp salt
1/2 cup unsalted butter melted and cooled
1/2 cup sugar plus 1 Tbs. molasses (original recipe calls for dark brown sugar)
1/4 cup honey
1 egg, lightly beaten
1/2 tsp orange flavoring
3/4 cup triple sec (original recipe calls for orange juice).

Double recipe:
Ingredients:
For fig filling
1 lb dried figs, trimmed and chopped
1 cup triple sec (original recipe calls for freshly squeezed orange juice which we did not have).
6 tbs honey
 Tbs. fresh squeezed lemon juice

For muffin batter
2 1/2 cup AP flour
1 1/2 cup whole-wheat flour
2  tsp baking powder
1 tsp. baking soda
1 tsp salt
1 cup unsalted butter melted and cooled
1 cup sugar plus 2 Tbs. molasses (original recipe calls for dark brown sugar)
1/2 cup honey
2 eggs, lightly beaten
1 tsp orange flavoring 
1 1/2 cups triple sec (original recipe calls for orange juice).


Directions:
For the filling:
In as small saucepan combine the filling ingredients and bring to a boil. Reduce the heat and simmer covered for 20 minutes. If there is excess liquid remove the cover and reduce until thickened. (In this batch all the liquid was absorbed.) Cool slightly then place in a food processor fitted with a steel blade and process for 30 seconds until puréed. Set aside.

For the dough:
Liberally grease the muffin tins. In a large bowl mix the dry ingredients. In another bowl mix the wet ingredients. Add the wet ingredients to the dry ingredients. Add half the dough to the bottom of the muffin cups. Top with the fig mixture. Don’t let the fig mixture touch the side of the muffin cups. Top the fig mixture with the remaining half of the dough. The next picture shows the muffins partially assembled; 8 muffin tins are shown half filled with the fig mixture and 4 muffin tins completely assembled with the fig mixture covered. Bake in a 400 degree oven for 15 to 20 minutes until golden brown. Let cool for about 5 minutes and remove from the tins to a cooling rack.


The next picture shows the muffins just as they came out of the oven. 


This is a quite unique and nice muffin. They actually came out much better than expected.  I am not sure what difference substituting orange flavored liquor (triple sec) for the orange juice had but certainly the end result was very good. The muffin had a very tender texture and the fig filling added a mild sweetness. The slight crunch from the fig seeds in the fig mixture was a bit of a surprise but added an additional crunch element that was quite nice. They also provided inspiration on how to make muffins stuffed with other dried fruits...like persimmon...maybe.  

Monday, April 19, 2021

Firefly squid kara-age ホタルイカの唐揚げ

 This is the dish I served using the third and the last tray of  "hotaru-ika" ホタルイカ firefly squid. This is a standard "Kara-age" 唐揚げ. This also came from e-recipe.


It is a simple recipe but requires deep frying. Since the squid contains some moisture, it splatters when it hits the oil. But it cooked rather quickly. (It was already boiled).


Ingredients: (for 2 servings).
Firefly squid, boiled, 100grams
Flour and potato starch 1 tbs. each
Salt and pepper to taste
Oil for deep frying.
Lemon wedges

Directions:
Heat the oil to 160C (or 320F)
Place the squid, flour, starch mixture, salt and pepper in a sealable bag and dredge the squid.
Deep fry for 1 minute or until the surface gets crispy. Drain and serve with wedges of lemon.

This is a great way to serve this squid. The surface and tentacles get crispy but the inside is soft.

The only problem of this dish is that the oil splatters.  Among the three dishes I made, we like the kara-age the best. Second was stir frying the squid and asparagus with butter and soy sauce. That one however, was perhaps a bit better than the kara-age in terms of ease of preparation in addition to great taste. 

The first dish of boiled hotaru-kia straight from the packing tray served with sumiso sauce was by far the easiest in terms of preparation but was not as flavorful as the other two preparations. Nonetheless we had absolutely no trouble “choking down” any of the 3 preparations. What a great way to celebrate spring.

Friday, April 16, 2021

Firefly squid and asparagus sautéed in butter and soy sauce ホタルイカとアスパラのバター醤油炒め

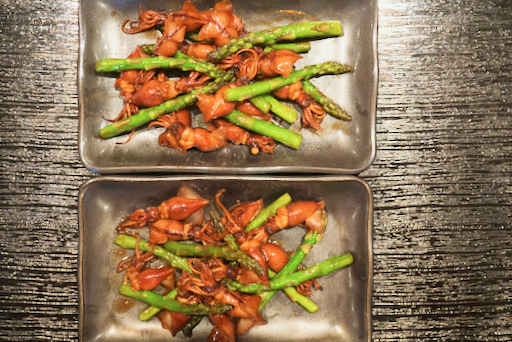
This is the dish I made from the second tray of "hotaru-ika" ホタルイカ firefly squid. This is stir fried hotaru-ika and asparagus in butter and soy sauce. The recipe came from e-recipe.  I happened to have pencil asparagus and butter and soy sauce combination is our favorite, so this was a no brainer.


Stir frying made the tentacles crispy which gave nice contrast to the texture of the softer body. Still crunchy asparagus also made a nice texture and flavor, a perfect combination for spring.


Ingredients: (this is the amount I used for this dish for two servings)
Firefly squid, boiled 100grams (eye or beak removed)
Pencil green asparagus, 10-14, root potion snapped off by bending the bottom end until it snaps naturally. (I did not bother to peel and cut the stalks in a slant as suggested in the original recipe).
Butter 1 tbs (or 15 grams)
Soy sauce 1tsp or to taste

Directions:
Melt the butter in a frying pan on medium flame.
Sauté the asparagus for a few minutes.
Add the firefly squid and soy sauce and stir for 1 minute.

This was a simple but quite good dish. We liked this more than the previous dish with sumiso dressing.


Tuesday, April 13, 2021

Sashimi big eye tuna "akami" and "Hotaru-ika" firefly squid メバチマグロの赤身とほたるイカ

 Spring is the season for a species of small squid called "Hotaru-ika" ほたるイカ or Firefly squid. It is so-called because it emits a bioluminescent light like a firefly. Some years ago when we traveled to Kanazawa 金沢 and Kyoto 京都 in spring, we really enjoyed “Hotaru-ika” at various Izakayas 居酒屋. Because this squid has parasites, it must be cooked (boiled) or frozen at -30C for 4 days. That means a regular home freezer (-22 C or 0F) is not adequate. This is not a “ DIY (do it yourself ) home project”. The squid has to come from a commercial source with the resources to at least freeze it properly. While in Kanazawa, we learned, through multiple tastings that our favorite way to eat it is “Okizuke” 沖ずけ. Although this dish is made of uncooked marinated squid it is special to Toyama prefecture 富山県 (Kanazawa city is the capital) where they know to make it safe by appropriately freezing it before making it into okizuke 沖ずけ.  “Oki-zuke” literally means “offshore marinated”. Traditionally, fishermen took the marinade with them on the boat and as they caught the squid , threw it into the marinade. By the time, they got back to shore, it was perfectly marinated. Although traditional, this method is not safe since the parasites will not be killed in a marinade. 

In any case, recently, I mentioned to my wife (who is particularly fond of firefly squid), that  it was the season and I was reading that many of the food bloggers I follow, were enjoying this seasonal delicacy. We had hotaru-ika at Tako Grill some years ago so we thought we should be able to get this in the U.S. A quick search of the internet turned up a company called “Regalis food”. They sell boiled firefly squid among other gourmet food items. They are more geared up for supplying restaurants rather than individual customers, however, so the minimal amounts required for purchase are a bit large. Nonetheless we ordered the minimum 300 grams (or three trays) of boiled firefly squid (which was shipped from Long Island) and the minimum 3 lbs. of big eye tuna akami  (which was shipped  from California). Although coming from different places both shipments arrived at the same time; (over night delivery).

The first picture shows one of the trays of hotaru-Ika.


This picture of the tuna akami is the tail portion near the back with skin on. The piece arrived whole; I cut it into portions before this picture was taken. Since I did not have much time, I did not cut the tuna into sashimi blocks (or “saku”). I just removed “chi-ai” 血合い cut it into 4 portions with skin on.  I only prepared one portion for sashimi.  The rest, I vacuum packed and froze for a later time. 


I served the akami with some vegetables. After removing the hard “eye” or “beak” from the firefly squid, I served them with sumiso 酢味噌 dressing.


The Akami of big eye tuna is not too bad. Certainly much better than frozen yellowfin tuna we often have.


Serving the squid with sumiso sauce is certainly a very common presentation. The plate of hotaru-ika shown here is half of one tray (so, the two of us finished a whole tray or 100grams). I think what makes hotaru-ika so special is that the squid are very small and each squid makes one pleasant mouthful. The first part of the experience is the pleasing texture of biting into the soft squid body followed by the  release of the lovely taste of the squid meat then the rich flavor of the innards especially the slightly bitter taste of the liver. Trust me, it tastes much better than the description sounds. 


We feel very fortunate we can enjoy the firefly squid in U.S. Hopefully we can visit the Iizakaya in Kanazawa and enjoy local sake with okizuke firefly squid again sometime soon.

Saturday, April 10, 2021

Japanese milk bread with cream cheese クリームチーズで作った日本風ミルクパン

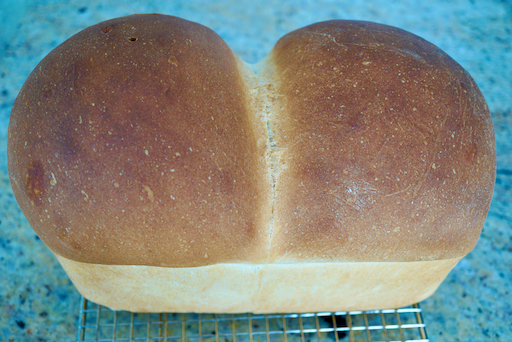
 This is an addition to the on-going saga of my wife making Japanese-style milk bread. As a gift, we received several large hard cover cookbooks; one was the “French Laundry Cookbook” and another was “Bouchon Bakery”. While browsing through the books my wife found a recipe called “Pain-au-Lait Pullman loaf”. Since she can read French fairly well, she immediately recognized this translated to “milk bread”. As she read the recipe, she found out it was indeed a Japanese style milk bread but they replaced the milk with cream cheese to make the crumb more moist. Although she thought she had already baked a full gambit of Japanese milk breads, she determined this was a variation she had not yet attempted and, besides, cream cheese is one of her favorite ingredients. So she went for it. The instructions were a bit unusual (read: incomprehensible. For example at one point it says, and this is a direct quote, “mix on low speed for 4 minutes. Continue to mix on low speed for 30 minutes” (huh??) Would that be 34 minutes of continuous mixing ?!!) So she consulted me and we decided to follow our CCK (Common Culinary Knowledge). In addition since we do not have “Pullman” bread pans, we made the bread using a regular loaf pan. It came out quite well as seen below. This is a close tie with the original milk bread I made. But a slightly different flavor due to the cream cheese. Lightly toasted with butter...perfect for breakfast with a cup of Cappuccino or Cafe latte.


Since we did not use a pullman baking pan, top are round instead of flat.


Ingredients:
547 g. AP flour
1 3/4 tsp yeast
32 g. sugar
11 g. salt
285 g. water
35 g. egg (probably one small egg)
25 g. butter (cut into cubes)
79 g. cream cheese (cut into cubes)


Recipe doubled:
1094 g. AP flour
3 1/2 tsp yeast
64 g. sugar
2 tsp. salt
570 g. water (or milk)
2 eggs
50 g. butter (cut into cubes)
158 g. cream cheese (cut into cubes)

Directions:
Put the dry ingredients in the bowl of a stand mixer with a dough hook. Mix the water and the eggs together. Slowly add the mixture to the dry ingredients until incorporated. Add the butter and cream cheese. Continue mixing until it is incorporated. Add additional flour as necessary to achieve a smooth dough. Continue kneading for 7 to 10 minutes. Put in a bowl. Coat with vegetable oil cover and put into a proofing box set at 81 degrees until doubled in size. Deflate the dough. Form into two balls and put touching together into a heavily greased loaf pan. Return to the proofing box and let rise until slightly higher than the rim of the loaf pan. Bake in a 375 degree oven for 25 to 30 minutes or until it sounds hollow when tapped. We also made this bread as a muffin (3 oz. in large pyrex). While the muffin is good we think it is better as a loaf of bread. 

This was one of the best milk breads my wife made. The texture was very soft but moist. It had a nice rich flavor and although I couldn’t taste it, my wife claimed she could taste a hint of the cream cheese which made it different from the previous variations she made. Toasted with butter...as I said perfect!

Wednesday, April 7, 2021

Senkin Muku Modern 仙禽無垢モダーン純米大吟醸無濾過

 I have not done a post just about sake for a long time but this one is worth a special post. This is called "Senkin Muku Modern Junmai daiginjou" 仙禽* 無垢 モダーン 純米大吟醸 from Senkin sake brewery from Sakura city in Tochigi prefecture 栃木県さくら市. The sake rice is Yamada-nishiki 山田錦 from the local area. According to their website, they emphasize "Domaine" like French wineries, making sake reflecting their “terroir” 風土, water 水, rice 米, and brewery 蔵. 


As soon as I took a sip of this sake I noticed a very crisp acidity reminiscent of a crisp Sauvignon blanc. It was almost effervescent. This was followed by a floral fruity taste. The crisp acidity mellowed somewhat after some time in the glass. The difference in taste between most sakes, especially “daiginjou” class, is very subtle but this one really stands out. We quite like this sake. The pictures below are of the front and back labels.


*Digression alert: “Sen-kin” 仙禽 
“Sen” in ideograms “仙” is composed of two components; one of the left means “man or human” 人 and the right means “mountain” 山. Although it appears redundant, this person also called   “sen-nin” 仙人 it is “a man living in a mountain”. This is based on an old Chinese mythology that an old man with long white hair carrying a staff  living in a high inaccessible mountain sustaining himself just on air or “kasumite” 霞. I am not sure he is a type of deity or holy man but he is immortal. 
“Kin” 禽 means “bird” since this bird is accompanying “sen-nin”, it is assumed to be a crane. The label (the picture above on the left” for exported sake), therefore, includes “immortal wing”.

Sunday, April 4, 2021

Hanami 2021 with healthy 4 Japanese appetizers 花見 2021

This year the cherry blossoms were early. We read it was the earliest full bloom of cherry blossom in Kyoto in 1,200 years. We have three cherry trees in our backyard; two were here when we moved in and one we planted 30 some years ago which was destroyed by a Nor'Easter in 2018. We replace this with a small cherry tree and it has grown but is still small. Usually these trees bloom sequentially rather than simultaneously but this year all three bloomed with some overlap in timing. So we had a few days when all three trees were at various stages of blossom and we enjoyed "Hanami" 花見. One day was warm enough for us to sit outside on the deck. Other days were cold or rainy so we enjoyed Hanami from inside. 

In the early morning on March 28 it was still a bit dark but through the cherry blossoms I spotted the full moon in the sky. This was the "Paschal moon"; the first full moon after the spring equinox. It is the moon on which the date for Easter is based i.e. Easter is the first Sunday after the Paschal Moon. True to form, Easter is next Sunday 4/4/2021. This moon is also known as "Worm moon". So named, supposedly, because worms start to emerge as the ground warms up. 


The picture below is of the cherry tree we planted in 2018 to replace the one that was destroyed in the nor’easter. It has grown a lot in the last 3 years but another 3 years will add to its role for hanami. Still it provided viewing enjoyment.


These are four appetizers I served one hanami evening. Before these dishes, we had Tuna sashimi made with frozen yellow fin tuna block from Great Alaska Seafood キハダマグロ.  As usual, I served it in marinated "Zuke" style ズケ; the surface charred with a kitchn blow torch in "Tataki" style たたき. I also  made a portion of it into imitation  “negitoro” ネギトロ,  We then had cold chawanmushi with marinated Ikura salmon roe 冷製茶碗蒸し. The four dishes shown below are the last dishes I served. They are vegetable rich and, hopefully, healthy items. 


This is a sort of salad made with dried persimmon 干し柿と大根の甘酢和え.  A recipe online was the inspiration of this dish but I did not follow the recipe. Besides the dried persimmon, which is cut into small bite sized pieces, I added daikon, carrot, sweet onion in sweet vinegar with added ground sesame and a splash of sesame oil. I garnished with roasted cashew nuts (or walnuts but the cashew happened to be available). The sweetness of the dried persimmon and the sweet vinegar dressing went well together. The dried persimmon got really soft and over time basically dissolved into the dressing.


This dish was a variation of the dish I made before from canned mackerel 鯖の水煮缶詰と大根. But in addition to daikon, I added cabbage and tofu and blanched broccoli just before serving.


This is “Hijiki” seaweed with carrot and deep fried tofu ひじきの炒め煮, exactly the same as I made before.


The last is a classic “mishime” 煮〆. It is simmered vegetables seasoned with soy sauce, mirin, and dashi broth. It includes shiitake, carrot, gluten cake “hanabu” 花麩. The rectangular pieces are freeze dried tofu or “shimidoufu” 凍み豆腐. I cooked this separately with much sweeter broth (I guess in Kyoto style). You cannot see it but there is renkon  on the bottom.


At this point, we were well fed and watered and gazing at the beautiful cherry blossoms. We were just enjoying existence.

Thursday, April 1, 2021

Tai-meshi 鯛めし

When I bought Hokkaido rice “Yumepirika” 北海道米ゆめぴりか from the  New York Rice factory, I found that they offer other items which add to the enjoyment of  rice such as “frikake” ふりかけor “umeboshi” 梅干し. One such item was a kit for making “red snapper rice” or “tai-meshi” 鯛めし. I bought the kit since this reminded me of a trip we took to Matsuyama, Shikoku 四国松山 in 2017. On that trip, we ate  “Tai-meshi” (Japanese seasoned rice cooked with pieces of red snapper). The fish is caught in the “Setonaikai” in-land sea 瀬戸内海 area and “Tai-meshi” is famous for the area.

Digression alert: Below is a picture of the restaurant called “Tai-ya” 鯛や in Matsuyama where we ate the tai-meshi. It was a converted old Japanese residential house. They only serve “tai-meshi” and only for lunch. You need to make a reservation ahead of time. I do not remember but there may have been two time slots you could choose from. For most customers, the lunch is served on a low individual Japanese table in a tatami room. We just could not sit properly on tatami to eat lunch; it was far too uncomfortable.  They were kind enough to provide us with an upstairs room with chairs and Western style table. 


Here is “Tai-meshi” that we ate. It was served in a wooden rice container called “Ohitsu” お櫃. I am sure this was cooked in a traditional Japanese rice cooking iron pot called “hagama” 羽釜. It included the bottom charred part called “Okoge” おこげ. 


The first time we bought rice from the rice factory, “Yumepirika”  was not available. As compared to “Nanatsuboshi”, this one is much softer. We like “Yumepirika” better as a straight rice but for sushi, we like “Nanatsuboshi”. We also got “Mochi-rice” 餅米 called “Hokkaido Hakuchomochi” 北海道白鳥餅. This is a type of rice from which “mochi” cake is made. I like to mix this type of rice with the regular type in seasoned rice since it gives a better chewy texture.

There appear to be a few variations of  the tai-meshi dish. It turns out that the kit I bought from New York Rice Factory was a variation close to what we had at the tai-meshi restaurant in Japan. It was very similar to what we remembered from the restaurant and was pretty good. I garnished it with “Kizami-nori” 刻みのり but I should have used “mitsubishi” ミツバ. 


This kit came in a fairly large paper bag (#1 below). It contained a good amount of cooked and marinated skin-on vacuum packed red snapper chunks, seasoning sauce, a piece of kelp, bonito flakes, and a mylar pouch containing what appeared to be freeze dried deep fried tofu and shredded carrot. Following the instructions to use 2 cups of rice  (I used one cup each of “Yumepirika” and “Hakucho-mochi” rice), I rinsed the rice and added water to the level indicated in the rice cooker for two cups. I then mixed in the tai fish with its marinade, and freeze dried items and placed the kelp on the top (#2). 


Once the rice finished cooking the freeze dried items coated the surface of the rice (#3). After removing the kelp. I mixed the items coating the surface into the rice (#4).  We were quite impressed with the results. The large chunks of marinated fish were very good, the seasoning was authentically close to the dish we had in Japan. The inclusion of separate kelp and bonito flakes really added to the complexity of the flavor. The New York Rice Factory also has a kit for “Tako-meshi” タコ飯 or “octopus rice”, again famous in the In-land sea area. We may try that next when we have a chance. In any case, making and tasting “Tai-meshi” bought us back to this memory. We will have to be satisfied with such memories until we can get past this covid thing and travel again.

Monday, March 29, 2021

Pork with chick-pea (and navy beans) curry 豚肉と雛豆のカレー

This is another curry/stew made from the trimmings of skin-on and bone-in large pork butt roast we have been getting. As usual, after removing the skin and bones, I made two roasts; one for barbecue in the Weber and another for simmered pork. The remaining meat was cut up for stew. I simmered the stew meat ahead of time in chicken broth and kept it in the refrigerator with the broth. I then commissioned my wife to make something from it. She consulted her trusty Indian Cookbook by Madhur Jaffrey. The original recipe was supposedly pork chops with chickpeas. But as indicated above the pork stew meat was substituted for the pork chop. In addition by mistake, my wife opened a can of navy beans as well as a can of chickpeas. So navy beans were substituted for some of the chickpeas. (Note from Wifey: Both cans showed white beans on the label and I was concentrating on the inventory control of using the cans with the oldest expiration dates. I didn’t notice the cans were for different beans until I opened them) So as usual the ordinal recipe was basically “advisory”. This is not spicy hot but lots of spices went in. Like other curry, I served this over rice, with blanched broccoli and Japanese curry accompaniments, rakyo (white items in the picture below) and fukishinzuke (red one).


Since we precooked the pork in the broth, it came out extra tender. The combination of navy beans and chickpeas worked well.


As usual, I ask my wife to provide the recipe.

Ingredients
1 can of navy beans
1 can of chickpeas
3 garlic cloves
1 1/2 inch cube of ginger sliced
3 Tbs. chicken stock
1/4 tsp. cardamom
4 bay leaves
1 inch cinnamon stick
3 medium onions peeled and coarsely chopped
1 Tbs. ground cumin
1 Tbs. ground coriander
1 Tsp. ground turmeric
3 medium tomatoes peeled
3 parsnips peeled and cut into pennies (original recipe called for potatoes)
1 Tbs. salt
1 cup of mushrooms sliced
1/2 tsp. cayenne pepper or to taste 

Directions:
Put the ginger, garlic, and chicken stock in a food processor with a blade. Pulse until it forms a paste.
Put several Tbs. oil in a frying pan. Add the cardamom, bay leaves and cinnamon. Heat until the spices bloom and become fragrant. Add the onions and stir until they are partially caramelized. Add the ginger garlic paste and stir until the garlic smells fragrant and the mixture has been incorporated with the onions. add the cumin, coriander, and turmeric stirring until they become fragrant. Add the parsnips (or potato) and tomato. Mash the tomato. Cook gently until the parsnips become soft. Add the beans and the stewed pork with the liquid in which it was cooked. Cook for 20 minutes until all the flavors meld. If the curry looks too soupy reduce it on low heat until the desired consistency is reached.

This was a pretty good curry. The mixture of chickpeas and navy beans worked out well. They absorb the flavor of the spices and add a creaminess to the curry sauce. The pork was deliciously tender. The parsnips added their characteristic sweetness. Although the curry was not hot (my wife forgot to add the cayenne pepper) it had multidimensional layers of flavor. A great way to eat pork trimmings.

Friday, March 26, 2021

Irish-style soda bread #3 アイルランド風ソーダブレッド #3

 This is the third and last of my wife’s Irish soda bread baking binge. This one is quite different from the “traditional” recipe. This came from “Nancy Silverton’s Pastries from the La Brea Bakery”.  It is much more complicated than the traditional recipe. (It wouldn’t be La Brea if it wasn’t). It is a muffins/roll and uses eggs, butter, sugar and Caraway seeds. This one is accordingly called  “Irish-style”. As a result, it has a very different flavor from the traditional. (Although I used an Easter bunny plate for the picture, my wife pointed out that I covered up the “bunny’s” face with the bread when I took a picture below so only his feet are showing). (Sorry).


Like all the other Irish soda breads my wife made this has the same rough brown texture on the crust.


I will ask my wife to fill in the rest.

Ingredients
3 3/4 cups AP flour
1/2 cup whole wheat flour
1/4 cup sugar
1/2 cup wheat flakes (I didn’t have any so I left it out)
1 1/2 tsp. kosher salt
1 Tbs. baking powder
1 Tsp. baking soda
1 Tbs. lemon zest (or 2 tsp. lemon flavoring)
2 Tbs. caraway seeds
1/2 stick (2 oz.) butter cut into 1/2 inch cubes and frozen
1 3/4 cup buttermilk
1 egg

Directions:
In a bowl whisk together the dry ingredients from the AP flour to the the caraway seeds so they are well distributed. In the bowl of a food processor with a steel blade add some of the mixed dry ingredients with the butter and pulse until it resembles fine meal. Add the rest of the mixed dry ingredients and continue pulsing. (I found this works better to fully incorporate the butter. If all the mixed dry ingredients are added at once the butter remains in cubes.) Put the dry mixture into a large bowl. Mix the buttermilk and egg. If using lemon flavoring add it to the buttermilk now. Mix the buttermilk egg mixture into the dry mixture. Mix just until everything is incorporated. (I found I had to add more buttermilk for the dough to form otherwise it would have been just crumbs and not held together). Turn out onto a floured surface and gently pat into it together. (The original recipe calls for patting it into a 1/2 inch thick rectangle and then cutting it into various shapes using about 1/2 cup of dough for each shape.) I just took a 1/2 cup measure. filled it with dough and turned it out onto a cookie sheet lined with parchment paper. Bake in a 375 degree oven for 35 to 40 minutes.

This was without a doubt the most complex and refined version of the Irish soda breads my wife made. It had depth of flavor. The caraway seed with the slight hint of lemon was a very good addition. It had the familiar rough crunchy crust and soft moist interior. Traditionalist would say, “but it is not genuine soda bread.” Next time my wife said she would make it even less so by adding raisins.

Tuesday, March 23, 2021

Irish soda bread #2 アイルランドソーダブレッド #2

After making one Irish soda bread, my wife is on a roll and made this Irish soda bread from her favorite bread recipe book “Beard on bread”. This one used whole wheat flour.


Because of the whole wheat flour, the flavor is a bit different from the first bread she made but came out also nicely moist.


I will ask my wife to provide the recipe.

Ingredients:
3 cups whole wheat flour
1 cup AP flour

1 Tbs. kosher salt
1 tsp. baking soda
3/4 tsp. baking powder
1 1/2 to 2 cups buttermilk

Directions:
Combine the dry ingredients and mix thoroughly to distribute the soda and baking powder. Add enough buttermilk to make a soft dough. It will be the consistency of biscuit dough but should be firm enough to hold its shape. Knead for 1 or 2 minutes until smooth and velvety. Form into a loaf and place in an 8 inch pie pan well buttered or lined with parchment paper. Cut the traditional cross on the top of the loaf. Bake in a 375 degree oven for 35 to 40 minutes until golden brown and sounds hollow when tapped.

This was a nice variation on the Irish soda bread theme. The whole wheat flour gave it a slight nutty flavor. The texture was fairly dense but also moist. It tasted great slightly microwaved and slathered with butter.