Friday, May 19, 2023

Cookie Butter Swirls クッキーバターバンズ

Since we got Brod and Taylor’s folding proofer for bread, we are on their mailing list which includes new products and recipes. One of these had a recipe for a lemon and poppy seed buns. The appearance of the buns was very similar to the Swedish cardamon buns that my wife baked sometime ago. So, I drew my wife’s attention to this recipe. She was not crazy about the lemon poppy seed filling. She immediately thought of using the left-over “cookie butter” she made. (First she had excess chocolate covered cookies to use up. Now she had excess chocolate covered cookie butter to use up.) So instead of using the lemon poppy seed filling called for in the recipe, she decided to use the excess cookie butter she had as the filling. She then used the same technique of forming the buns that she used for the Swedish cardamon buns. The result was this elegant looking and good tasting sweet buns/swirls.


Ingredients (makes 12 buns):
Dough
120g (½ cup) Milk (my wife used 1/4 cups evaporated milk, since she had it, and 1/4 cup regular milk)
120g (½ cup) Yogurt, plain unsweetened
2 Eggs (one whole egg + an egg yolk for the dough and the egg white for an egg wash on the final buns.)
45g (3 tbsp + 2 tsp) Sugar
6g (2 tsp) Instant yeast
85g (6 tbsp) Butter, softened
420g (3 ½ cup) All-purpose flour
5g (1 tsp) Fine salt

Filling
370 g Cookie butter (This used up all the available cookie butter)

Glaze
The egg white from the separated egg above.
Sugar

Directions:
Set up the proofer
Set the proofer to 78°F (25°C) and put the water tray in the middle of the warming plate. Pour ¼ cup (60 ml) of water into the tray and place the rack on top of the tray.

Mix the dough:
Using a stand mixer fitted with a dough hook, combine the flour, yeast, sugar and salt in the bowl of the mixer. In a separate bowl, mix the milk, yogurt, and egg, until well combined. Add the wet mixture to the dry. Add the butter. Mix on low speed for 2 to 3 minutes until no dry remains and the butter in incorporated. Turn to medium speed and mix for 7 to 10 minutes until the ingredients form a smooth elastic dough.

1st fermentation: Transfer the dough to a greased bowl and place in the Folding Proofer for 1 to 1 ½ hours until doubled in size.

Roll the dough:
Turn the dough out onto a floured surface. Roll into a rectangle measuring about 10.5" x 16" (27 x 40cm).
With the dough facing you lengthwise, spread filling over the entire surface of the dough.
Spread the cookie butter in a thin layer (#1)
Fold the dough into thirds like a letter. To do so, take the left side and fold it in toward the center. Take the right third of the dough and fold in to the center on top of the fold just made.
Refrigerate it for about 15 minutes which will make it easier to cut and shape.
Roll the dough out again to a 16.5" x 8.5" (42 x 22cm) rectangle (#2). Do the letter fold again and re-roll it out to 16.5” x 8.5” again.
Line two sheet pans with parchment paper. Set aside.
Cut the dough into 12 strips. To do this, mark the dough with 3 lines making 4 section. Then mark each of these 4 sections with 2 lines making a total of 12 sections. Then go back and cut the entire length of the dough where marked (#2). Take one dough strip and twist each end in opposite directions until the entire strip is twisted (#3).
Starting at one end coil the strip to form a circular bun, tucking the tail underneath (#4).
Place on the prepared pan. Repeat until all 12 buns are shaped and placed 6 on each of the 2 trays (#4). (The buns are placed 6 to a tray and each tray is cooked individually. This allows each bun to receive even heat and expand without touching another bun).

Final proof: The cookie sheets do not fit in the proofer. Cover it with a plastic wrap, and place the trays on the towel so they are not resting on the cold table top. Cover with another towel. Allow the buns to rise for about 1 hour.

Glaze the surface: First paint on the egg white then sprinkle on the sugar
Near the end of the proofing time preheat the oven to 375° (190°C).
Bake: Bake the buns at 375°F (190°C) for 18-20 minutes (#6).


My wife is really getting good at forming these swirl/buns. Her idea of using the cookie butter (this is made of chocolate cover cookies) really worked. The buns were sweet but not too sweet with a subtle chocolate flavor and slightly crunchy surface and soft inside.

Tuesday, May 16, 2023

Miso-marinated Sable Fish 銀鱈の味噌焼き

This is the second dish I made using the sable fish (black cod) or gindara 銀鱈 we got from Vital choice. The last time, I made “Nitsuke” 煮付け, simmered in soy sauce-based broth.  So this time, I made “miso-yaki 味噌焼き. I marinated the fish in a miso and mirin mixture before cooking. Unlike Japanese households where full-size ovens are rare but almost all kitchen stoves have a special fish grill*, we do not have one. Using the broiling element on the regular oven or toaster oven is feasible but it tends to make smoke and the splatters from the fish as it cooks making the inside of the oven dirty. So I decided to try using non-stick aluminum foil on a dry frying pan. This way I would not need to use any oil to prevent the fish from sticking to the pan and I thought this would best emulate grilling, which sort of worked.

*Japanese “gas stove” is called “Gasu-konro” ガスコンロ. “Konro” appears to have originated from a Chinese word 火炉. Japanese gasu-konro almost always have a grilling unit which is optimized for grilling fish with minimal smoke and grills both sides of the fish at once.

I served the fish with a Japanese “dashi-maki” だし巻き omelet and stir fried asparagus and shiitake mushroom seasoned with the same marinate I used for the fish. We also had freshly cooked rice. This fish is amazing. So soft, moist, flakey with a lot of oil. The skin did not get crispy like salmon but was quite good.


Ingredients:
2 filets of “gin-dara” sable fish, skin on, thawed
White miso and mirin mixture (about 1:1 ratio) for the marinade

Directions:
Smear the marinade on a sheet of plastic wrap, place the fish in the center the skin side up, smear the marinade on the skin side and wrap (#1), refrigerate for several hours

Unwrap and remove the marinade (either scrape off using a silicon spatula or wash and pat dry with paper towel) (#2)

Place a sheet of non-stick aluminum foil on a stainless steel frying pan on medium low flame and place the fish skin side down (#3) without added oil or liquid

Put on the lid and cook for 5 minutes or until the fish is 80% done (the meat side becomes opaque) (#3)

Flip it over and cook the meat side for 1 minute (#4)

I flipped it over again in an attempt make the skin crispy (#5) but, in retrospect, this is not needed.

Meanwhile, in a separate frying pan, I sautéed the finely chopped shallot, asparagus and shiitake mushroom in olive oil and seasoned with the above miso marinade (#6)


We think that sable fish (gin-dara 銀鱈) and Chilean sea bass or Patagonian tooth fish (gin-mutsu 銀むつ) are two of the best fish especially in the category of  “white meat fish”. Sable fish “nitsuke 煮付け” and “miso-yaki” are both excellent but nitsuke may have a slight edge especially when enjoyng with white rice since the simmering liquid is perfect to season the rice.

Saturday, May 13, 2023

Crab Cake with Shrimp Mousse エビ入りクラブケーキ

We really like  crab cakes and make them every-now-and-then.  We bought an 8oz container of pasteurized lump crab meat some time ago and decided to make a crab cake (other choices would include a California roll or cream crab croquet). I usually make crab cakes without using much in the way of binders (just mayo, Dijon mustard and a small amount of bread crumbs). My philosophy is the less binders/fillers the better to let the taste of the crab shine through.  But sometimes this technique makes it difficult for the crab cakes to keep their shape while cooking (especially flipping). I remembered seeing a recipe using shrimp meat (mousse) as a binder. I looked for the recipe and came across a video from America’s test kitchen demonstrating how to use shrimp as a binder for crab cake. As usual, I made some modifications but we really like this version of crab cake. You do not taste the shrimp and the crab cakes stay together without adding any unwanted texture or flavors. Of course, using a good lump crab meat is important to making a good crab cake. I served it with coleslaw I had just made and blanched rapini.


The original recipe calls for breading but I did not do that. I did, however, add a small amount of bread crumbs (panko) to the crab mixture.


Ingredients (makes 4 small cakes):
8oz (270gram) lump crab (#1)
2oz (57gram) shrimp (about 1/4 the weight of the crab), thawed and cut up into small pieces
2-3 tbs cream
1 tbs Dijon mustard
2 tbs Panko bread crumbs
1-2 tbs olive oil
1 stalk of celery, finely diced
1 small shallot, finely diced
1 small Jalapeño pepper, seeded and deveined, finely diced (optional)
1 tbs olive oil for sautéing the above
Salt and pepper to taste

Directions:
Sauté the celery, shallot, and Jalapeño pepper in olive oil for several minutes, season with salt and pepper and set it aside to cool (#2, on the bottom of the bowl)
Add the shrimp in a small food processor (I used a cylindrical container with an immersion blender), add the cream and process to make a smooth mousse and add to the vegetables and crab meat (#3)
Add the Dijon mustard and Panko bread crumbs and gently fold to mix (#4)
Form 6 small disks (#5) and refrigerate at least 30 minutes
Cook crab cakes with olive oil on medium flame for 2 minutes for each side (#6)


This is a great recipe for making crab cakes. The shrimp moose does a good job of keeping the cakes together without adding unwanted texture or flavors. It does a better job than just mayo. We will adopt this recipe as our standard recipe for crab cakes.

Friday, May 12, 2023

Cheese Stuffed Romanian Flat Bread チーズ入りのルーマニアのパン

Although we have an “excess” of baked goods due to my wife’s baking binge (all hardships should be so easy), she saw an interesting recipe for “Cheese stuffed Romanian flat bread” on Washington Post and declared that she had to make it. Of course, nothing goes without a hitch. The recipe calls for cooking the bread in a cast iron skillet. We know we have a small and large cast-iron skillet plus a cast iron grill. We used to keep them in the drawer under the stove but since that is prime space and we were not using them much, we got organized and moved them somewhere else. For the life of us, we could not remember where “somewhere else” was and after extensive looking could not find them. Like pancakes, my wife made the dough and formed it,  I cooked the bread using a small non-stick frying pan instead of cast iron pan.

The bread looks a bit overdone but it tasted ok with a toasty flavor, crispy crust and the soft cheesy center. Despite some difficulties, I have to say this was a sucess.


As usual, my wife deviated from the original recipe.

Ingredients:
2 1/2 cups (313 grams) all-purpose flour, plus more as needed
2 tablespoons granulated sugar
2 1/4 teaspoons (7 grams) quick-acting or instant dry yeast
1 pinch fine salt
6 tablespoons sunflower oil or other neutral oil
1/3 + 1/2 cup milk

Filling
6 oz. Ricotta cheese (this is what my wife used)
3 Tbs. Honey
1/8 Tsp. Cayenne pepper
1/4 Tsp. Salt
6 ounces farmers cheese or cottage cheese (if using cottage cheese hang shortly in a cheese cloth to drain excess liquid).

Optional:
Honey, for drizzling
Flaky sea salt, for sprinkling (optional)

Directions:
Put the flour, yeast, salt, sugar in the bowl of a stand mixer with a dough hook. Add the oil to the milk and stir into the dry ingredients. If the mixture seems dry, add cool water, 1 teaspoon at a time; if it seems tacky, add a little more flour. Knead the dough until soft and smooth, about 10 minutes. (Cover the bowl with a clean, damp cloth and let the dough rise at room temperature for 1 hour, or until almost doubled in size. (Alternatively, cover and refrigerate the dough overnight.)

Lightly flour the work surface and turn the dough out onto it. Divide the dough into 6 equal pieces. Working with one piece at a time, roll the dough into a 10- to 12-inch-wide circle. Crumble or spread a sixth of the cheese, about 1 ounce (28 grams), in the center, leaving a 5-inch border around the cheese. Fold the sides of the round into the center in 7 to 8 folds, overlapping them slightly. The dough should cover the cheese. Then press the filled circle of dough with your hands or use a rolling pin to gently press the bread closed. Repeat with the remaining dough and cheese.

In a large, cast-iron skillet (or if you can’t find it any non-stick frying pan will do) over medium heat, heat 1 tablespoon of the oil until it shimmers. Swirl the pan so the oil coats the bottom and place one of the dough rounds in the pan. Fry until golden brown on the bottom, 2 to 4 minutes, then flip and cook until golden brown on the other side, another 2 to 4 minutes, adjusting the heat as needed. Transfer to a plate and cook the remaining dough rounds, adding more oil as needed.

Serve warm, with honey and flaky salt, if desired.


In the picture it looks like these became a bit “high-done” but they were nicely crunchy and had a toasty flavor. The mildly sweet and creamy ricotta cheese filling was lovely with the finely textured bread. These opened all kinds of possibilities for potential variations…think ham and cheese.

Wednesday, May 10, 2023

Cookie and Cream Crumb Muffin

This is another muffin made from the chocolate cookie crumbs from the chocolate covered cookies rediscovered in the pantry.


The recipe came from “Dough-eyed” website.

Ingredients: (makes 12 muffins)

For the muffins:
2 cups AP flour
2/3 cup sugar
2 tsp. baking powder
1/2 tsp. salt
2/3 cup milk
1 tsp vanilla extract
1/2 cup melted butter
1/4 cup sour cream
2 eggs
3/4 cup roughly crushed Oreos (we used our crushed chocolate covered cookies)
1/2 cup chocolate chunks (we didn’t have any so we did not include them) 

For the crumb:
1/2 cup shortening, room temp.
1 tbs. honey
1/4 cup brown sugar
1/4 cup regular sugar
2/3 cup flour
1/4 tsp. salt

(Recipe called for an additional 1/2 cup of crushed cookies. Since we didn’t have any left we did not include this.)

Directions:

For the muffins: 
Preheat the oven to 350 degrees, and line a 12 -cup muffin pan with liners of choice. Set aside.
In a large bowl, stir together the flour, sugar, baking powder, and salt. Set aside. In a small bowl, whisk together the milk, vanilla extract, egg, melted butter, and sour cream until combined.
Pour the wet mixture into the dry mixture. Add in the crushed cookies (and chocolate chunks if using them) and stir the whole mixture together with a spatula until there are no dry pockets.
Scoop the batter evenly into your prepared tin, filling each cup about 3/4 full.

For the topping :
In a medium bowl, using your hands mix the shortening, honey, brown sugar, turbinado sugar, flour, salt and (additional crushed cookies if using them).
Evenly and generously cover each tin of muffin batter with the topping. Bake muffins for 18-20 minutes, or until just golden. A cake tester should come out clean.

These muffins were amazing and very good. The topping formed a nice crunchy crust that tasted of toasted butter and honey. The muffin was fairly firm but nicely moist. Interestingly, it tasted distinctly like the cookies we had used. In fact it tasted like the cookies in fluffy format. The chocolate flavor really came through and was very pleasant. Never would have imagined something like this. We probably prefer this rendition of crushed cookie muffins more than the cookie butter crumb version.

Sunday, May 7, 2023

Cookie Butter Crumb Muffin クッキーバターマフィン

This is a continuation of my wife’s saga about finding old forgotten chocolate covered cookies in the pantry and making muffins from them. She found this recipe on the Internet. Since this recipe calls for “cookie butter”, which she did not have, she started the whole saga by making cookie butter and then proceeded to make this interesting (in a good way) muffin. 


The recipe comes from “Bake or Break”

Ingredients:
FOR THE CRUMB TOPPING:
1/2 cup (60g) all-purpose flour
1/4 cup (50g) firmly packed light brown sugar
1/4 teaspoon ground cinnamon
pinch of salt
3 tablespoons (42g) unsalted butter, cold and cut into 1/2-inch cubes

FOR THE MUFFINS:
1 3/4 cups (210g) all-purpose flour
1 teaspoon baking powder
1/2 teaspoon salt
1/4 cup (57g) unsalted butter, softened
1/2 cup (100g) firmly packed light brown sugar
1/2 cup (140g) cookie butter* (such as Biscoff or Trader Joe's Speculoos Cookie Butter)
1 large egg
1/2 teaspoon vanilla extract
3/4 cup milk

*My wife made “cookie butter” from the chocolate cookies.

Directions:
TO MAKE THE CRUMB TOPPING:
Combine the flour, brown sugar, cinnamon, and salt in a medium bowl.
Add the butter, and mix with your fingers until the mixture forms crumbs. Set aside.

TO MAKE THE MUFFINS: Preheat oven to 375°F. Line or grease a 12-cup standard muffin pan.
Whisk together the flour, baking powder, and salt. Set aside.
Using an electric mixer on medium speed, beat the butter, brown sugar, and cookie butter until thoroughly combined.
Add the egg and vanilla, and mix well. Add the milk and mix well.
Add the milk mixture to the flour mixture and mix until fully blended.
Scoop the batter into the muffin tins using a 3 tablespoon scoop (I used the second largest ice cream scoop).
Distribute the crumb topping over the muffin batter.
Bake 20 to 25 minute, or until the muffins are lightly browned and a tester inserted into the center comes out clean.Cool the muffins in the pan for 10 minutes. Then transfer them to a wire rack to cool completely.


I’m not sure what we expected from these muffins but they were quite good. The topping formed a crunchy crust and the muffins were very tender in texture and pleasantly sweet. Interestingly, the cookie flavor was completely nonexistent. If you were not told, you would never guess cookies were involved in the muffin. I may have detected a slight hint of chocolate but the predominant flavor was cinnamon. Amazing!

Thursday, May 4, 2023

Home-made Cookie Butter クッキーバター

Some time ago, we were into chocolate covered cookies; first from GODIVA and then we found a much cheaper alternative made by a German company called Bahlsen (#1, in the composite below). But over time both these kinds of cookies were sort of forgotten and migrated to the very back of the pantry. Recently, my wife found a tin of Godiva with some chocolate cookies remaining and few boxes of Bahlsen’s. We tasted them and, surprisingly, both tasted perfectly OK despite their age. My wife remembered that some time ago while leafing through the La Brea Bakery pastry cookbook there was a reference to using stale brownies, chocolate Madeleines or chocolate cake scraps and grinding them into crumbs to use as the filling in Bobka pastries such as Russian coffee cake or chocolate armadillos. She thought, ‘why not use these cookies the same way for muffins or other baked goods’.  So she started looking on the internet for recipes using cookie crumbs in muffins. She found several. Most of them used Oreo cookies but she thought, ‘substituting chocolate covered cookies should work too.’ Then she saw that the recipe she wanted to use called for “Cookie butter”. Well she didn’t have cookie butter and thought her project was “dead-in-the-water”. Then she found a recipe on line for home-made cookie butter and she was “back-in-business”.  But, before she could make the muffin she had to make the cookie butter. Since this was a work in progress we did not take a picture of the final product but the one below is very close. Cookie butters appear to be made from different kinds of cookies such as sugar cookie, peanut butter cookie, or Oreo cookie . Since this was made from chocolate covered cookies, this must be  “chocolate cookie butter”. 


The recipe is from  the “Beautiful Mess” website with some modifications. (As always)

Ingredients:
2 cups cookie crumbs (we used a chocolate covered cookie from Bhalsen called “Afrika”) (#1)
½ stick butter
½ cup condensed milk sweetened
¼ cup milk evaporated
water as needed

Directions:
Place the cookies in a Ziploc bag, seal, and crush them using a meat pounder. (#2) (We found the food processor couldn’t handle the cookies whole…it’s demonstration of displeasure with the situation was quite impressive!) Place the crumbled cookies into the food processor and pulse until it forms a very fine powder (#3).
In a small saucepan, heat the butter over low heat until melted, and then stir in the sweetened condensed milk and evaporated milk until it’s all melted together (#4).
Starting with 1/2 cup of the liquid, pour it into your cookie crumbs and mix together with a spoon.
Keep adding small amounts of the liquid until the cookie butter is just wet enough to stay together (the first picture).

(The below are direct quote from the original recipe)
Once your cookie butter is blended, allow it to cool in the fridge for an hour or two. If you want to, you can actually stop at this point, and it will taste delicious. But if you want to make the cookie butter smoother and easier to dip things in, then remove the cookie butter from the fridge and stir very small amounts of water (start with 1/8 teaspoon) into the dough. At first it will look like the water is separating from the dough, but just keep stirring and mashing. You should start to notice that the cookie butter loosens up a bit as you stir in more water. Keep adding and stirring until you get to a consistency you like and refrigerate the mixture again.  Store your cookie butter in the fridge and it should be good for at least a week or two.


In any case, we have not used the cookie butter as a spread yet but it tasted rather good. We found out that our regular grocery store carries “Lotus Biscoff” cookie butter. We ordered it and will compare it with the one my wife just made. 


This just in: The“Lotus Biscoff” cookie butter arrived and we tasted it. As you can see in the picture above that it looks like peanut butter but tastes like….wait for it….a butter cookie!!

Monday, May 1, 2023

Four Salad Lunch 4種類サラダランチ

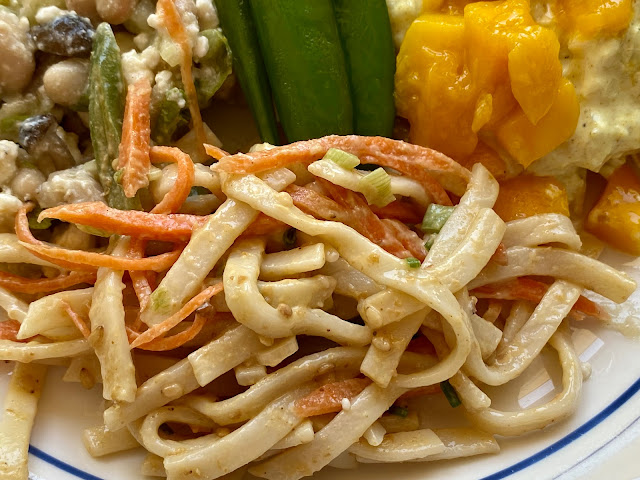
I made 4 different salads (not all on the same day) and had the 4 salads for lunch with a cold asparagus soup. We also had a small piece of “Not no-knead bread made with dried fruit”. We feel good about the fact that all salads, soup and bread were home-made. In the center of the four salads, I served snap peas which were blanched and then soaked in Japanese salt broth.


The picture below shows Israeli couscous with artichoke hearts and garbanzo beans with a nice lemony and dill dressing.


The pic below shows a celery, mushroom, and navy bean salad with feta cheese. The mushrooms make the salad. They gave an almost meaty texture and flavor.


The next is a curry flavored sous vide chicken salad. Since we had a nice ripe Champagne mango, I added small cubes of mango which went very well with this salad.


I made this udon noodle salad since I had left-over cooked udon noodles.  The dressing is sesame-flavored. I do make several versions of the sesame dressing (for example, using Japanese “nerigoma” ねりごま sesame paste or peanut butter) but this time I used Tahini with dry roasted white sesame seeds which I ground in a Japanese “suribachi” すり鉢 mortar. Other seasonings included soy sauce, sugar, and rice vinegar.


This was a surprisingly filling lunch. Beans, udon noodles, and couscous all contribute to this and, at the same time, we enjoyed so many different flavors and textures. We just have to make sure we finish all these salads before they go bad.

Friday, April 28, 2023

Lamb Tenderloin for Easter 子羊のテンダーローイン

Tenderloin of lamb is not a usual cut but we got several of them from D’Artagnan. We decided to try it for Easter dinner. I did not follow any recipes. I made a pan-sauce with red wine and balsamic vinegar.


I sort of did a reverse searing. After cooking it in the toaster oven, I seared it with sprigs of fresh rosemary which I kept in the frying pan during the searing and while I made a red wine sauce.


As sides, we served pencil asparagus and shiitake mushroom stir fry  (left) and Israeli couscous salad with marinated artichoke hearts (right). To mop up the sauce, we also served a slice of  (mini) baguette I baked.


I have never cook lamb tenderloins before. I decided to cook two of them in the toaster oven at 350F for 10 minutes and then reverse seared them in a pan with rosemary. It sort of worked but the lamb was a bit overcooked. The entire dinner was really good and for the occasion, we opened a bottle of 2014 Insignia from Joseph Phelps. Despite some age on the bottle, it was really fresh with a nice fruit flavor. It was a perfect wine for this dinner.

Ingredients (makes about 4 servings)
x2 Lamb tenderloins thawed, salted and kept in the refrigerator for 6 hours uncovered (to dry them a bit)
2 springs of fresh rosemary
2 tbs olive oil
Salt and pepper to taste

for the pan sauce
1/4 cup red wine (Not Insignia; a much more reasonably priced CA wine I already had open)
1 tsp balsamic vinegar
2 tbs of cold butter, cut into thin pats
Salt and pepper

Directions:
I seasoned the lamb with pepper (no salt; it was already salted). I roasted it at 350F in the toaster oven on convection mode for 10 minutes.
I then pan-seared it with olive oil and the rosemary for 1 minute on each side.
I set aside the lamb covered loosely with an aluminum foil, leaving the rosemary in the pan.
(I was aiming for an internal temperature of 130-135F for the lamb to be medium rare but in the end, the temperature went over)
I added the red wine and balsamic vinegar to the pan and reduced it to the point that it was just coating the bottom of the pan.
I added several pats of cold butter one by one until it reached a saucy consistency.
I seasoned with salt and pepper

I sliced the lamb tenderloin and spooned on the wine sauce then topped the dish with the rosemary sprig.

The couscous salad, asparagus with mushroom and baguette all worked well together with the lamb.  Of course, the wine made this dinner a bit special.

Tuesday, April 25, 2023

Israeli (Pearl) Couscous Salad イスラエルクスクスサラダ

The other day, we were taking inventory of our pantry and found boxes of couscous (classic and Israeli or pearled) as well as tabouleh all of which were way pass their BUB (best-used-by) date. We sniffed and did not detect any rancid oil odor so we cooked the classic couscous and the tabouleh. But once they were cooked, it was clear that in these cases the BUB date had some meaning—they tasted terrible. So we discarded those boxes and bought new ones. We decided to go ahead and try cooking the Israeli couscous* and it turned out to be OK. So we decided to use it to make a salad. We looked up recipes on the web and essentailly combined two recipes omitting some of the ingredients called for in the recipe while adding others not mentioned.

*Digression alert: While we were looking up recipes, we found that Israeli or pearl couscous was invented by an Israeli company as a substitute for rice in 1959 since there was a rice shortage at that time.In any case, the end result was a quite nice filling salad. The vinaigrette had a nice lemony flavor with dill which made this salad very refreshing.


Ingredietns:

For Couscous
1 1/2 cup (250gram or 8oz) Israel couscous
1 garlic clove, minced (I used three)
1/2 small onion, finely mince (I used one small onion)
2 tbs olive oil
1 1/2 chicken broth (I used our ususal low sodium Swanson)
1 cup water (we did not add the water. The couscous was fully cooked and the liquid was completely absorbed but although it was not scorched, the couscous stuck to the bottom of the pan. So next time we will try it with the additional water.)

For the salad
5 Campari tomatoes, skinned and cut into quarters
2 tbs dill, finely chopped
6 marinated artichoke hearts, cut into half length wise
1 can (15.5 oz) garbanzo beans, drained and skin removed (optional, but my wife insist on removing the skin)

Other items could be olives, cucumber and other greens.

For dressing
Zest and juice from one lemon
1 tsp dijon mustard
1 tsp honey
Salt and pepper to taste

Directions: {For couscous)
Add the oil in a pan, sauté the onion and garlic for 3-4 minutes, add the couscous and sauté another minute
Add the chicken broth and simmer for 10 minutes
Fluff it up with a fork and let it cool to the room temperature

Mix all the ingredients and the dressing.

Although we forgot to add one cup of water, the couscous was nicely cooked without. The lemony dressing really worked.

Saturday, April 22, 2023

Simmered Sable Fish 銀鱈の煮付け

We got frozen “Chilean sea bass” or “Patagonian toothfish” from Vital Choice. We also found they had “sable fish” or black cod. The sable fish is called “Gindara” 銀鱈 in Japanese and is considered one of the best fish. (Actually we had this fish at Yuzu some years ago as a part of “Omakase” and we really liked it). So, we got the sable fish as well. Chilean sea bass and sable fish have some similarity in that they are both white meat fish and are very moist and succulent. At Yuzu, it was served miso-marinated and grilled with meat-miso sauce. After some thought, I decided to make it simmered in a soy sauce based sauce or “nitsuke” 煮付け. I added “Gobou” burdock root and Tokyo scallion.


Ingredients (for 2 servings):
2 (4oz about 115 grams) filets of “gin-dara” sable fish, thawed
half stalk of Tokyo scallion or “Nihon-negi” 日本ネギ, cut into 4 two inch segments (new item purchased from Weee).
3-4 inch of gobou ごぼう, skin scraped off (using the back of the knife), cut into 4 segments lengthwise (I soaked in acidulated water for 2-3 minutes and precooked for 5 minutes)

Simmering liquid*:
15 gram sugar
30 ml soy sauce
30 ml mirin
60ml sake
60ml water

*Many Japanese recipes talk about the “golden ratio” of “nitsuke” seasonings. There appears to be some variations. I used the ratio of 1:2:2:4 sugar:soy sauce:mirin:sake and added water in the same amount as the sake. I thought this ratio was too sweet to our taste, however, and I may reduce the sugar by half (ie 7 grams as in the simmering liquid ingredients listed above).

Directions:
Mix all ingredients of the simmering liquid in a pan and simmer to dissolve the sugar and evaporate the alcohol from the sake and mirin.
In a frying pan, just large enough to fit the fish and vegetables, add the simmering liquid. When it starts simmering add, the fish (skin side up) and the vegetables. Put on the lid and simmer for 6-7 minutes.


Remove the lid, increase the flame and baste the fish with the simmering liquid until the liquid is reduced in half.
Serve the fish with some simmering liquid and a side of white rice.

This fish is really great. The simmering liquid is perfect for plain white rice. Unfortunately, the gobou was a bit too fibrous.

Wednesday, April 19, 2023

Broccoli Balls ブロッコリボール

Since we are getting home grocery delivery, the amount of broccoli we get per order is out of our control. For some reason they are extremely generous with the amount they provide; we get three large heads of broccoli in one order. I usually, wash and separate the broccoli into small florets and steam them. Afterwords, I divide the steamed broccoli into small batches and freeze them for later use leaving a few days worth in the refrigerator. In addition, sometimes we get free-be cookbooks with the grocery delivery. My wife was purusing one of these little cookbooks called “from Freezer to Table” and came across a broccoli-centric recipe. This combined with seeing the abundant supply of broccoli we had just received led to a conjunction of the recipe/ingredients planets and my wife decided to make her own version of this recipe.  The original recipe (as would be expected coming from a cookbook about frozen food) used frozen “riced” broccoli and cauliflower. While we had the broccoli (non-frozen, of course) we did not have the cauliflower so my wife used mashed potatoes instead…(don’t ask). In any case, this made a quite good small appetizer that also heat up nicely in the toaster oven.


Ingredients:
1 cup steamed broccoli chopped in the small food processor
1 cup shredded Mozzarella cheese (any cheese would work)
1 cup shredded smoked gouda cheese
1 cup mashed potatoes
1 cup Panko bread crumbs
2 eggs
1/4 to 1/2 tsp onion powder (to taste)
1/4 to 1/2 tsp garlic powder (to taste)
1/8 tsp cayenne
1/2 tsp oregano
1/2 tsp thyme
1/4 tsp salt (optional)

Directions:
Combine all the ingredients (#1). Using medium ice cream scoop drop scoop fulls into small muffin cups lined with muffin papers (#2). Bake in a 425 degree oven for 15 minutes or until golden brown (#3 and #4).


These were very flavorful, crispy bites perfect for appetizers. The garlic, onion and herb flavors were very rich and satisfying. The potatoes added a slightly creamy texture inside the crispness of the outside shell. One word of advice, go light on the salt. The cheese is salty. I used 1 tsp of salt and that was too much. I reduced it in this version of the recipe. These really crisp up nicely the toaster oven.

Sunday, April 16, 2023

Wheat Berry Whole Wheat Bread フィート・ベリー入りの全粒小麦粉のパン

This is another installment in the continuing saga of finding items in our freezer which are well past their “best-used-by (BUB)” date. This time it was wheat berries which had a BUB date of 2020. They smelled OK (usually we can smell rancid oil in whole and white grain flours if bad). We decide to cook it and see how it came out. On previous occasions we cooked the wheat berries several different ways but regardless of the method used we found them way too hard and chewy. Basically we didn’t like them and that was probably one reason why they languished past the BUB date in the freezer. So, this time we got aggressive in our cooking method. Using the Instant Pot, we cooked one cup of wheat berries (first toasted and then washed) with 4 cups of water under high pressure for 50 minutes, let it depressurize naturally and drained.  Amazingly they came out ok. As a matter of fact we initially thought we may have over done it and maybe they were a bit too soft but they had a much more reasonable chewy texture and firmed up as they cooled. The end result was almost 4 cups of cooked wheat berry. Next question was how we can use this? My wife looked for the bread recipes which use wheat berry and found one she wanted to try from “Bob’s Red Mill” website. The next picture shows the final product. (Note from wifey: Please observe the small piece of bread at the side of the picture with the half-moon shaped bite mark in it. While setting up the photo opportunity someone who shall remain nameless…husbandito-wa, couldn’t wait to taste the bread and took a chomp out of the end piece.)


Ingredients (makes two loaves)
1/4 cup sugar
2-1/2 cups buttermilk (the original calls for non-fat milk)
2 cups whole wheat flour
2 tsp salt
2 eggs large, lightly-beaten
4 cups unbleached white AP Flour
1 cup cooked wheat berries*
2 tbs. instant dry yeast
1/4 cup vegetable oil
1 cup of toasted walnuts (optional)

*Original recipe calls for cooking 1 cup of wheat berries with 3 1/2 cup of water. As we mentioned above this will produce nearly 4 cups of cooked wheat berry. Using CCK (Common Culinary Knowledge), we decided 4 cups of cooked wheat berry was way too much. For one thing, our largest Kitchen-Aid mixer would not be able to handle 6 cups of flour and 4 cups of cooked wheat berry. So, instead, we used 1 cup of cooked wheat berry.

Directions:
Using a standing mixer fitted with a paddle, combine the sugar, whole wheat flour, and yeast. Stir in the milk. Beat vigorously for 2 minutes. Cover the bowl with a towel and let rise for 30 minutes.

Stir down the dough to deflate it (after 30 minutes, the dough did not raise much). Switch to a dough hook, stir in the, eggs, oil, salt, and 2 cups of the unbleached white flour. Keep adding flour until a smooth dough is formed. Right at the end, mix in the cooked wheat berries. Knead the dough for 7 to 10 minutes. (I was only able to knead for 7 minutes because the mixer was at the maximum amount of dough it could handle and started to overheat.) Turn the dough out onto a work surface that has been dusted with flour. Knead in the walnuts if using them. Put the dough in an oiled bowl, turning to coat. Cover and let rise in a proofing box at 80F until doubled in size.

Coat two 8" loaf pans with unsalted butter.  Turn the dough out onto a work surface and cut in half. Shape each half into a loaf and place in the loaf pans. Cover and let rise 30 minutes in a proofing box at 80F while you preheat oven to 375°F.

Bake for 30-35 minutes, until the loaves shrink slightly from the sides of the pans and sound hollow when tapped.

Immediately remove from the pans and cool on a wire rack.


This is a great bread. The comments on the Bob’s Red Mill website warned that the wheat berries exposed on the surface got hard but we did not encounter too many. The bread has a light moist texture and whole wheat flavor is subtle but comes through. The wheat berries were not chewy but they did add a unique flavor which was very nice. In general, we really like this bread.

Thursday, April 13, 2023

Lotus Root Ball Soup 蓮根団子スープ

When I get fresh “renkon” 蓮根 lotus root, I have more choices as to what kind of different dishes I can make than when I just have boiled packaged renkon. Fresh renkon is usually available during the winter months. We can now get fresh renkon from Weee but the amount is rather large. So I have to come up with different ways to use it before it goes bad. Unlike boiled renkon, fresh renkon can be grated producing a starchy puree which  makes a good base for dumpling-type dishes, either boiled or fried. This dish is one of those grated/starchy/puree dishes and can be done only with fresh renkon. Actually, this is the second time I made this dish. The first time, I followed the recipe but the renkon balls did not hold together especially when I put them in the soup. So this time, I made it following my own (culinary) instinct which included using more ground chicken than what the original recipe called for. The renkon balls formed nicely and were very tender.  I made the rest of the soup with ingredients I had on hand. We had this as a lunch and it was rather filling and great.


Ingredients:

For renkon balls (made 8 small balls)
One segment of fresh renkon, peeled and grated, extra-moisture squeezed out (about 200 grams)
200 grams of ground chicken
2 tbs chopped scallion (3-4 stalks)
2 tbs potato starch
1 tsp soy sauce


For soup
300 ml Japanese dashi broth (I used two kinds of dashi packs, one was kelp and shiitake mushroom, the other with bonito for this)
3 tbs or more x4 concentrated Japanese noodle sauce (or soy sauce and mirin) to taste
1/2 package of shimeji mushroom, root end removed and separated (any mushroom will work)
5-6 blanched green beans, cut on the bias
2-3 tbs dried wakame seaweed,
(optional) (freeze dried)mistuba and (frozen) zest of Yuzu citrus.

Directions:
Mix all renkon ball ingredients in a bowl and mix well until it sticks together. Using a small ice cream scope, make small balls. Heat up the broth, put in the renkon balls and simmer for 5 minutes or until done. Take out the cooked renkon balls and set aside.
Meanwhile, add the mushrooms to the remaining broth and simmer for 4-5 minutes, add the renkon balls (I added 4 for 2 servings), the green beans and season with the noodle sauce to taste. I added the wakame, some yuzu zest and mitusba to the bowls. Place two renkon balls in each bowl and distribute the soup and remaining ingredients.

This was a really good soup. I think the amount of ground chicken the original recipe calls for too little. I made the balls with about the same amount of ground chicken as grated renkon which worked much better. Anything can be put into the soup but the mushroom and wakame seaweed worked well.

Monday, April 10, 2023

Firefly Squid Scallion Pancake ホタルイカ入りネギ焼き

Firefly squid season is upon us and we got some from Regalis. I am repeating myself  here but when we visited Kanazawa 金沢 in early summer many years ago, we were introduced  to firefly squid or “hotaru-ika” ホタルイカ. Our favorite way to enjoy firefly squid is “okizuke” 沖漬け but that is difficult to get here in the U.S. The ones from Regalis are boiled. We got two trays, froze one tray and enjoyed the rest. We had this with sumiso 酢味噌 dressing which is the most common and simplest way to enjoy this. The texture of the small squid and very rich flavor from the liver really makes this squid special. This evening I made two dishes; one was our favorite stir-fry of the firefly squid and asparagus shown on the right and another, (new one), was scallion pancake with nagaimo and firefly squid ホタルイカ入りネギ焼き shown on the left. This recipe came from E-recipe


Ingredients (make 4 pancakes)
12 firefly squids (3 per pancake) or more if you like
50 grams grated nagaimo (mine was near 80 grams)
9 tbs chopped scallion (I used 5 stalks)
1 egg (I used 2 eggs)
2 tbs AP flour
1 tsp granulated bonito dashi (I used “Hondashi”ほんだし)
1 tsp soy sauce
1 tbs vegetable oil

Directions:
Since I was using more grated nagaimo than the amount called for in the original recipe, I changed the amount of eggs as a binder. I did not add the firefly squid into the batter initially. I divided the batter into 4 portions and added 3 squid to each batch.

I heated up a non-stick frying pan on medium heat and added the oil. I poured in 4 potions as seen below.


After a few minutes or when the bottoms are set and brown, I flipped the pancakes and lowered the heat and continued cooking for another 2-3 minutes or until the center was done.


I served this pancake with firefly squid and asparagus stir-fly (the first picture). The pancake was very good but we did not see the point of adding the firefly squid. We did not think it did justice to the firefly delicacy since its flavor was somewhat lost in the pancake. We thought adding shrimp would have been more appropriate and that is what we may do next time. In any case, it is nice to enjoy the firefly squid which symbolze spring to early summer.

Friday, April 7, 2023

Hanami with Latest Blooming Tree 遅咲きの桜で花見

This year’s cherry blossoms have been a bit unusual. Our three cherry trees bloomed at different times.  As a result, while hanami arrived early, the staggered bloom made the “hanami” season really long. The last cherry tree to bloom was the oldest we have in our backyard. It was here when we moved in.  I am not sure what type of cherry this is but it’s blossoms are a more classic old fashioned variety such as those that appear in old Japanese wood cuts and painting. This cherry tree can be admired from the second floor window (as shown in the picture below.) As an aside; the spring cherry blossoms are a contrast juxtaposed to the Poinsettia shown in the bottom left hand corner. This plant is several Christmases old. My wife tends the plant through out the year (trimming it, feeding it, finally in the fall putting it through the required 12 week darkness setting by placing it in a closet where it is not exposed to any light for at least 8 hours at night) all to get it ready for it’s display of red, as shown in the picture, the next Christmas.


We moved to our deck and started hanami.


I just thawed a block of yellow-fin tuna. In the pic below on the left is marinated (zuke) 鮪のずけ and on the right is also zuke but one side has been torched. We used a beautiful crane-motif plate to serve this. Unfortunately, the face of the crane is covered up. The green is blanched edible chrysanthemum in Japanese noodle sauce with bonito flakes.


The second dish was cubes of tuna and avocado鮪とアボカドの角切り.


We had psuedo-negitoro 擬制ネギトロ after this.

Tuesday, April 4, 2023

Scallops With Shallot Citrus Sauce 帆立のシトラスシャロットソース

This is a continuation of our story about frozen food inventory control. This time it was scallops from Great-Alaska-Seafood. These are really good scallops and we wanted to enjoy them while they were still good. Our most common and favorite way to prepare scallops is “Hotate-no Isobe-yaki” 帆立の磯辺焼き in which the scallops are seared, seasoned with soy sauce, then wrapped in a sheet of nori. This time we tried something different. We saw an article in the Washington Post featuring 6 scallop recipes. One of them was “scallops with shallot citrus sauce”. This was perfect since we happened to have some grape fruit and oranges we’d gotten from Harry and David. So one evening we decide to make this.


To prepare the fruit is a bit of work but the this dish was really great. Nice fresh citrus flavors went well with the seared scallops.

Ingredients (2 small servings)
4 large sea scallops (we used 4 scallops for 2 servings but the standard size may be 4 diver scallops for each serving).
1 medium red grapefruit.
1 large orange
3 tablespoons olive oil, divided
1 large shallot, finely diced (about 3/4 cup)
1/2 cup dry white wine, (we used sauvignon blanc)
1 tablespoon unsalted butter
1/2 teaspoon kosher salt, divided
1/4 teaspoon freshly ground black pepper
2 teaspoons chopped fresh tarragon or basil, for serving (I used chopped fresh parsley)

Directions:
Using a sharp paring knife, trim the top and bottom off the grapefruit and the orange. Working over a bowl so the citrus segments fall into the bowl and you catch the juice, use a paring knife to remove each segment of the fruit from its membrane. Squeeze the remaining membrane over the bowl to extract more juice. Using a slotted spoon, transfer the citrus segments to a separate bowl; reserve the juice.

In a medium saucepan over medium heat, heat 1 tablespoon of the oil until shimmering. Add the shallots and cook, stirring, until they soften slightly, about 2 minutes. Add the wine, increase the heat to medium-high and bring to a boil. Cook until the wine is reduced by about half, about 2 minutes. Add the reserved citrus juice and cook until the liquid in the pan has reduced slightly, 1 to 2 minutes more. Stir in the butter and 1/4 teaspoon of the salt, then remove from the heat and cover to keep warm.

Pat the scallops all over with paper towels to ensure they are as dry as possible, then sprinkle with the remaining 1/4 teaspoon of salt and pepper. Heat the remaining oil in a large skillet over high heat, until shimmering. Add the scallops and cook, without moving them, until caramelized and brown on the bottom, 2 to 3 minutes. Gently flip, and cook on the other side until the scallops are only slightly translucent in the center, 2 to 3 minutes more.

While the scallops are cooking, add the citrus segments to the sauce, stirring gently so they don’t break up much; return the sauce to low heat until warmed through.
 Evenly divide up the scallops per serving and place on the plates. Pour about 1/3 cup of sauce on top, and sprinkle with the herbs. Serve warm.

We had this with freshly cooked rice mainly because we were running short of frozen rice (which is very convenient to have on hand).  The citrus sauce went remarkably well with the rice. We ended up pouring all the available sauce on the rice and even supplementing the dish with more fresh rice. We do not always have grapefruit and oranges on hand but when we do this is a great way to serve scallops.

Saturday, April 1, 2023

Impromptu Cookout 予定してなかった野外の炭焼き

Although the cherry blossoms in our area are in full bloom, the weather has not been really great; gray and gloomy with cloudy sky and/or rain. Then, on Sunday, a bit unexpectedly, it was very nice, sunny and warm. So, my wife suggested we have a cook-out and sort of hanami with the food we cook. We also remembered that we had three frozen “sanma” 秋刀魚 pacific sauries that had been languishing in the freezer since last fall. So we decided to wheel out the Japanese charcoal grill and grill the sauries. Fresh sauries are traditionally grilled with their innards intact but I removed them before grilling. I just simply salted and grilled the fish. We also had grilled scallops as an appetizer while the fish cooked. We grilled rice balls as shown in the picture below. (Please disregard the green box shaped bird feeder in the backround which looks like it just sprouted out of the rice balls).


My wife carefully deboned the fish after grilling. We enjoyed this with grated daikon 大根おろしand soy sauce on the upper deck where the cherry blossoms from our cherry tree are in full view.


Nothing beats rice balls grilled on a charcoal fire. After the surface was grilled, I started applying the sauce (mixture of mirin and soy sauce) which made a nice savory crunchy layer.


So this was a nice impromptu grilling to take advantage of the lovely weather and have an hanami.

Wednesday, March 29, 2023

Mapo (mabo) Tofu 麻婆豆腐

Mapo tofu 麻婆豆腐 is a very popular dish in Japan and is called “Mabo tofu”. The Japanese version with which I am familiar is quite different from the original Sichuan 四川 dish. Now, however, even in Japan, authentic mapo tofu appears very much appreciated using Sichuan peppercorn 花椒 and touban-jan or douban-jan 豆板醤 as the main spices. These spices produce a “spicy hot” and “numbing” taste—we are not great fans of “spicy” and “numbing”. I have not made this dish for some time. Since I got a fairly decent medium firm tofu from Weee, I decided to make this dish. It is sort of an amalgamation of the authentic and Japanese styles. I used a small amount of touban-jan so that it is not too spicy for my wife and I added more to my serving later. Instead of using Sichuan peppers, I just sprinkled Japanese pepper powder or kona-sansho* 粉山椒 just before serving. I think this turned out OK and we had this over rice for lunch one day.

*Digression alert: Sansho 山椒 or Japanese pepper is from a shrub closely related to but different from the Sichuan pepper plant. Japanese use the young leaves from this plant as a garnish/herb called “kinome” 木の芽 which has a very nice almost citrusy smell. The unripe fruit is used in many Japanese simmered dishes but does not have the tongue “numbing” characteristic of the mature plant. The mature and dried fruit from the Japanese pepper plant is ground into a powder called “Kona-sansho” 粉山椒 which is available in a small jar in Japanese/Asian grocery stores. It is regularly used on grilled eel dishes with sauce or “unagi-no-kabayaki” うなぎの蒲焼. It is not spicy hot and imparts a very unique flavor but, in large quantities, sansho powder does have a “numbing” effect similar to its Chinese counter part.


Ingredients:
One tofu block (I used medium firm), cut into small cubes, blanched for a few minutes and drained
2 tbs peanut oil
1 tsp minced ginger
1 tsp minced garlic
1 tsp minced shallot
1 tsp touban-jan
1 tbs miso mixed with 1 tbs mirin (in lieu of tenmen-jan 甜面醤, Chinese sweet soybean paste)
1/2 cup low sodium chicken broth
1/3 tsp dark sesame oil
2 stalks of scallion, chopped
150 grams ground pork (I used hand chopped trimming of pork)
Japanese sansho powder, to taste
1/2 tsp potato starch mixed with 1 tsp water or sake (potato starch slurry)

Directions:
Place the wok on high flame and add the oil. When hot, add the ginger and shallot. Stir for 30 seconds, add the garlic stir for another 30 seconds. Add the touban-jan and stir for another 30 seconds or until fragrant.
Add the pork and cook for one minute or until done.
Add the drained tofu and gently toss
Add the chicken broth, miso mixture. Add more chicken broth if needed.
When the mixture starts boiling add the scallion and sesame oil. Stir for 30 seconds
Mix in the starch slurry and cook until bubbly
Sprinkle the sansho powder and serve

This was just right for us. I added a bit more touban-jan to my serving. The power of Japanese pepper added its unique flavor without numbing the tongue. A few days later, we had the leftover mapo tofu as a rice bowl or donburi. Since I had a pasteurized egg, I made a slightly undercooked scrambled egg as a topping. I also added blanched sugar snaps.


In this dish, since it had been a day or so after the dish was made, the spices further melded together and got more tame and multi dimensional. Overall the flavors were great.

Sunday, March 26, 2023

Cherry Blossoms in Full Bloom 桜の満開

 The young Somei Yoshino 染井吉野 cherry tree in our backyard, which replaced the over 30 some year old cherry tree that was destroyed in the 20218 Nor’easter is in full bloom. Like many of the other cherry trees in the area this has occurred much earlier than usual. As a matter of fact, the Washington National cherry blossom festival was moved up a week because of the uncharacteristic early bloom. 


As you can see he is getting bigger than he was in 2018 as shown in the picture below. 


As you can see the blossoms are now visible while sitting comfortably on the deck. 


What a profusion of beauty! The blossoms positively glow in the morning light. 


We will do some impromptu “Hanami” 花見 this evening.