Saturday, April 9, 2016

Hanami 2016 Day 2 花見 2016 二日目

The cherry blossoms will be over very soon but we squeezed in one more day of hanami.


Still cold but nicely sunny with blue sky.


As I mentioned, previously we have three cherry trees. The newer tree, which we planted, is quite spectacular in its own right. When in full bloom the branches look like thick bottle brushes of pink cherry blossoms as shown in the picture above. The cherry blossoms on the older trees are more old-fashioned, light pink, delicately ethereal and very elegant as shown in the picture below. The two types of tree usually bloom at slightly different times. This year it was a treat that they bloomed together. 

At least, for this hanami I had a chance to go to our regular grocery store and bought a few items to make more hanami drinking snacks. I realized the garlic chives ニラ have emerged in our herb garden. So I made this dish. I did not follow any recipe but it is chicken tenderloin encased in omelet with garlic chives. I served this with green beans sautéed in butter (in the same frying pan I cooked the chicken). On the side, I put ketchup and Sriracha (small amount).  

I removed the small tendon/sinew from the top of the tenderloins, seasoned with salt and pepper. I chopped garlic chive I harvested from the herb garden.


I mixed in with a beaten egg.


I dipped the tenderloins in the egg mixture and started frying in butter. I added more egg mixture and I turned the tenderloins over so that the omelet encased the tenderloin. I repeated this process until all the egg mixture was used.


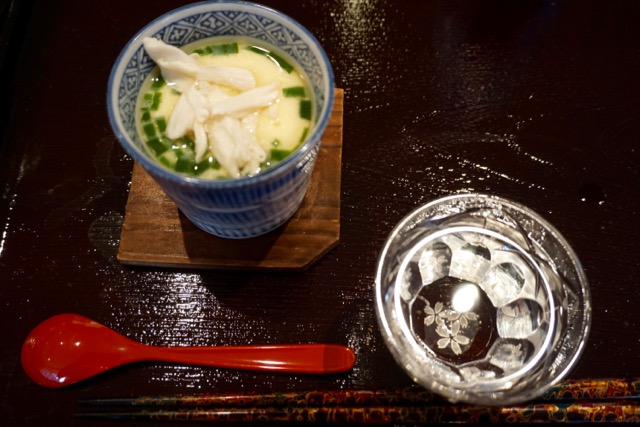
I also made my usual chawanmushi 茶碗蒸しwith crabmeat and garlic chives. I also put in some ginko nuts 銀杏 (from a can), chicken tenderloin thinly sliced against the grain of the meat.  We used our cherry blossom cut glass sake cups.


Before steaming the chawanmushi I added the smaller chunks of crabmeat to the egg mixture to be cooked into the custard. After 10 minutes of steaming, when the surface of the custard was cooked enough that the crabmeat would not sink into the custard I added the largest chunks of crabmeat.


While at the market I also got a salmon filet. As usual, I removed the belly portion and made it into a drinking snack. This time I simply seasoned with salt and pepper and pan fried it in butter. I made sure the skin was nicely crispy. I served it with asparagus which were cooked in the same pan.


So we managed to squeeze in one more day of hanami.


Wednesday, April 6, 2016

Hanami 2016 花見 2016

Again, Hanami 花見 season has come around. This year it was rather early and our backyard cherry trees were in full bloom on Easter weekend. The only problem for us was that we were out of town that weekend. We came back on Monday afternoon and found these spectacular cherry blossoms in our backyard (We were relieved that they were still in bloom). We have three different cherry trees; one that we planted and two that were already established on the property when we build the house. Usually the three trees reach peak bloom at different times but this year the two main trees bloomed at the same time making it more spectacular than usual. 


The sky was blue and sunny but unfortunately it was chilly and very windy.  We couldn't sit outside under the trees, so we had hanami looking from inside the house.


Since we just came back, we did not have anything special for Hanami so I made what I could from the cache in the freezer and also from food leftover from the trip. My wife bought these deviled eggs for a lunch on the road. They were not particularly flavorful and the worse for wear from the travel. 


I made the first snack from these sorry-looking deviled eggs. I just defrosted some cod roe or tarako たらこ. I removed the skin and mixed in sake and a small amount of concentrated noodle sauce from the bottle.


I just put the mixture on the deviled eggs (after cleaning them up a bit) and garnished it with finely chopped perilla leaves and chives. This was quite an improvement over the original and was a perfect first bite with cold sake.


I also defrosted some natto 納豆 and mozuku もずくin sweet black vinegar. I made cucumber cups and placed the tarako mixture remaining from the deviled egg course in the cups (left). I put a small dab of wasabi and a light splash of soy sauce on the top. For the natto I used the sauce in the package and added wasabi instead of mustard and mixed well using my natto mixing contraption, then I added an egg yolk (Davidson's pasteurized egg). For texture I added finely diced nagaimo 長芋 and garnished with nori strips (center). I served mozuki in sweet black vinegar as is (right).


The wasabi on the tarako was "real wasabi".


Natto with egg yolk is a good combination and the nagaimo dice gave a nice texture contrast.


Mozuku seaweed is famous in Okinawa and perfect with sake.


Using whatever I had, I also made a small simmered dish or nimono 煮物 from nagaimo. grilled tofu 焼き豆腐 and shirataki 白滝.


This may not have been the ideal for hanami; if truth be told I was hankering for some sashimi but at least these drinking snacks were adequate and how bad can it be if you can sip sake gazing at a panorama of cherry blossoms?


Sunday, April 3, 2016

Spice-roasted cauliflower with barely salad スパイスローストカリフラワーと大麦のサラダ

We saw this recipe in WSJ. Since we make roasted cauliflower and barley salad, separately this combination really caught our attention. This is a recipe from Chef Eric Ziebold who used to be the executive chef of CityZen at Oriental Mandarine hotel, where we had some wonderful meals on several special occasions. This January he opened a new restaurant of his own called "Kinship". We have not yet dined there.  Of course, we had to make some modifications to the recipe basically to accommodate the ingredients we had on hand.


The cauliflower was baked with spices but it was not "spicy" hot.


Ingredients: Serves: 4

- Kosher salt
- 1 head cauliflower, broken into florets (#2 in picture below)).
- 1/4 Tbs. ground turmeric (#1)
- 1/4 Tbs. ground cumin (#1)
- 1/4 tsp fresh rosemary, finely chopped (original recipe calls for dried)
- 1/2 tsp dried oregano (#1)
- 1/4 cup (4 tbs) olive oil, divided into 2 portions
- 2 navel oranges, use the zest, orange segments and juice from the segments
- 1 cup uncooked barley
- 2 cups of chicken stock
- 1/4 cup walnuts toasted and roughly chopped (#6). (original recipe calls for Marcona almonds)
- 1/4 cup roughly chopped mint
- 1/4 cup green olives, pitted and roughly chopped (we had almond stuffed green olives from California, which we used instead).
- Juice of ½ lemon

1. Toast 1 cup of barley in the toaster oven until it is golden brown and fragrant. Rinse the toasted barley and add it to 2 cups of boiling chicken stock. Simmer for about 40 minutes. Remove from the heat and cool. If there is left over liquid drain the barley 

2. On a sheet pan  toss the cauliflower with the spices. Use 2 tbs of olive oil and a 1/2 tsp of salt to coat the florets. (The quantity of spices we used result in fairly mild flavor for the cauliflower. For a more intense flavor we could have probably doubled the spices. But it is generally to taste.) We put the tray in a 350 degree toaster oven and toasted for 25 to 30 minutes testing to so as not to overcook. (#3 and 4). 

3. Once both the barley and the cauliflower were completely cooled we put them in a bowl, then added the orange segments, orange zest, walnuts, mint and olives. We seasoned it with the remaining oil, lemon juice and salt. Then squeezed the juice from the reserved orange membranes over the salad (#5).


This is a wonderful salad. It has so many layers of texture and taste. The cauliflower had some crunch left. At first, when we tasted the cauliflower alone, it tasted too salty but after mixing it with the rest of the ingredients, it was just fine. Our store bought mint was not as strong as we would have liked. The navel oranges were very sweet and juicy which really added to the overall flavor. Over time even the cauliflower was infused with a sweet orange flavor. It is a rather filling salad but we like it very much.


Thursday, March 31, 2016

Sake lees marinated grilled Monk fish アンコウの粕漬け

This is an experiment since I already had prepared sake lees marinade. Sake lees marinated cod was really good. We thought salmon would not be a good choice to marinate since it has a good flavor on its own which we love. I have never tried monk fish marinated in sake lees so I decided to try it. I served it witn green beans which was first blanched and then sautéed in butter. 


I grilled the marinated monk fish in our toaster oven.


Ingredients (for two small servings):
Monk fish, one filet, membrane removed and cut into 1 inch thick medallions
Kasudoko or sake lees marinade

Directions:
I salted the monk fish medallions and let them sit in the refrigerator for 1 hour uncovered. I then blotted the surface moisture with sheets of paper towel and marinated them in sake lees marinade (#1) for 3 days. I removed the fish and removed the excess marinade (#2). I washed it in cold running water and blotted dry (#3).  


Using our toaster oven under the grilling function, I cooked the fish for 5-6 minutes per side turning once until brown spots appeared and it was cooked through (#4).

This is not bad. Sake lees marinade added its flavor to the monk fish but the consistency of monk fish got really firm. I think a flaky white fish like cod is much better for this treatment.

Monday, March 28, 2016

Egg and avocado tempura 卵とアボカドの天ぷら (1,000th post!)

In the Kansai 関西 area, udon noodles are often topped with or accompanied by interesting tempura such as soft boiled egg tempura 半熟卵の天ぷら or vinegary red ginger slices tempura 紅生姜の天ぷら or chicken tempura 鳥天. Some years ago, when we visited a Kyoto izakaya "Kurakura" 蔵倉, we also had avocado tempura アボカドの天ぷら.  So, I decided to make it an "unusual tempura" evening. I rounded things out by adding sweet potato tempura which is a very "usual" but never boring tempura item.


I only made half the avocado into tempura for two. I served this with green tea salt.


The soft boiled egg tempura had a very runny yolk as seen below. I served the egg with a small amount of rice to absorb the yolk. We also added a bit of soy sauce. 


Ingredients (for 2 small servings):
Soft cooked eggs, two (see below)*
Avocado, thin wedges from half avocado
Sweet potato, two rounds, 1/3 inch thick.


*Soft boiled eggs:
There are a few things to keep in mind about making soft boiled or "cooked" eggs with runny yolks.
1. Use pasteurized eggs, either home pasteurized or Davidson's commercial ones. Although salmonella contamination of eggs in the U.S. appears to be low, it is still a possibility.
2. The best way to make soft "cooked"  eggs is the method from America's test kitchen in which you use a small amount (1/2 inch deep) of boiling water on medium flame, with the eggs directly from the refrigerator placed in the water using tongs, then covered with a lid. For soft cooked eggs, I cooked them for 6 minutes and 30 seconds. I did not believe this method would work initially but it really does! The small amount of water recovers its temperature quickly and the eggs are cooked evenly by steam not by boiling water. The timing doesn't change even if you cook more eggs.
3. I placed the eggs in ice water immediately to stop the cooking and let them cool completely (about 10 minutes).
4. I peeled the eggs and placed them in a sealed container in the refrigerator until I was ready to make the tempura.

Tempura batter:
There are so many different versions I have tried. This time I went simple and used ice cold water and cake flour (without egg and without Vodka). I made it to the consistency of runny cake batter without over mixing.

Frying Oil: 
I used fresh peanut oil heated to 350F.

For the sweet potato I cooked for 2 minutes total time turning once.  For the avocado, I cooked for 1 minute or less turning once. For the soft boiled eggs, I cooked only 20-30 seconds until a light crust was formed (below).


We really liked the tempura eggs. The yolk was warm but runny and surface had a light and crunchy thin crust. The egg tasted great on the rice with a splash of soy sauce. The avocado tempura was also good but the sweet potato could not go wrong.

P.S. We started our blog in September 2009. This post is the 1,000th post. We are not sure how much longer we can continue but we had fun coming up with the recipes and writing about them. It has also proved to be a useful personal diary of the various meals we made and the many special occasions on which we enjoyed them.


Friday, March 25, 2016

Hot cross buns ホットクロスバンズ

Every year, my wife bakes some kind of hot cross buns as Easter approaches. Among the several she's baked over the years, this one is the best so far. This is based on a recipe from King Arthur Flour. She is also into "Seasonal" decorations and, besides a collection of numerous Easter eggs and "bunnies", she also recently got two sets of Easter plates and her hot cross buns were served on one of the "bunny" plates.


According to my wife, this is her favorite bunny plate. I will let my wife take over. 


Ingredients (18 rolls):

- 1/4 cup rum
- 1/2 cup raisins
- 1/2 cup cherry infused craisins
- 1/2 cup pomegranate infused craisins 
- 1 1/4 cups milk, room temperature
- 3 large eggs, 1 separated
- 6 tablespoons butter, room temperature
- 2 teaspoons instant yeast (one packet) 
- 1/4 cup light brown sugar, firmly packed (we used regular sugar and 1 tbs of molasses)
- 1 teaspoon ground cinnamon
- 1/4 teaspoon ground cloves
- 1/4 teaspoon ground nutmeg
- zest of 2 lemons
- 1 3/4 teaspoons salt
- 1 tablespoon baking powder
- 4 1/2 cups All-Purpose Flour (plus more as needed)


For glaze: (I forgot to put the glaze on)
- 1 large egg white, reserved from above
- 1 tablespoon milk

For icing:
- 1 cup + 2 tablespoons confectioners' sugar
- 1/2 teaspoon vanilla extract
- pinch of salt
- 4 teaspoons milk, or enough to make a thick, pipeable icing


Directions:
1) Generously grease a large pyrex pan  (10" square pan or 9" x 13").

2) Mix the rum with the dried fruit and raisins, cover and microwave briefly, just until the fruit and liquid are very warm. Set aside to cool to room temperature. (By-the-way I did not intend to use so many crasins but the labeling on the package was a bit confusing. In large red letters it said "cherry" and "pomegranate" and in much smaller dark blue letters "crasins". I thought I was adding dried cherries and dried pomegranates--but the crasins worked out). 

3) I put 4 cups of all purpose flour in the bowl of the mixer added the cinnamon, cloves, nutmeg, salt and baking powder and stirred to mix into the flour. With the mixer running I added the proofed yeast (proofed in 1/4 cup warm water with some sugar added and dissolved), and milk (with lemon zest added) until blended . Then I added the two eggs and one yolk one at a time until blended (#1). At this point the dough was quite sticky. So like any other type of bread I started adding flour 1/4 cup at a time until the dough could hold its shape even though it was still quite sticky. Then I added the butter a little at a time in pats and blended into the dough as it kneaded on the hook. When I reached what I thought was the right consistency I let it knead for 7 minutes. Then I started adding the fruit and let it knead an additional 3 minutes. (I have found that it is easier to let any butter and fruit added to a bread recipe to be kneaded into the bread in the mixer with the dough hook than tring to do it by hand). Picture #2 shows what the dough looked like when it came out of the mixer. I hand kneaded it a few times until the surface became smooth (#3). I put it into a bowl that had been warmed with hot water and dried. I added some vegetable oil and coated the dough so it wouldn't dry out while rising. 

4) I let the dough rise for about 1 hour, covered. It didn't completely double in size but it was quite puffy (#4).

5) I divided the dough into balls 3 ounces each and put them in the prepared pan (#5).

6) I let the buns rise for about 1 hour, or until they were touching one another and preheated the oven to 375°F.

7) Although I forgot to do this, whisk together the reserved egg white and milk, and brush it over the buns. (I think the buns are ok even without the glaze). 


8) Bake the buns for 18 to 20 minutes, until they're golden brown. Remove from the oven, and transfer to a rack immediately to cool (#6).

9) Before serving and after the buns have cooled I mixed together the icing ingredients, and piped the icing in a cross on top of each bun.

These were extremely good. They had a rich soft texture and lots of flavor from the spices, rum and fruit. I do have to say that with all those good flavors I really didn't notice the lemon zest and may leave it out next time.  While in general I don't like icing because it is too sweet, the icing in this case added a nice flavor dimension that otherwise would have been missed. I think this will become our go-to hot cross bun recipe in future years. It is really a treat to wake up to these buns slightly warmed with a cup of cappuccino --especially when served on an Easter bunny plate. 


Wednesday, March 23, 2016

Nagaimo and natto fry 長芋と納豆の落とし揚げ


I saw this recipe on line.  It looked like a perfect drinking snack. Since I had both natto 納豆 and nagaimo 長芋 in the fridge, I decided to try it. I served it with a sprinkle of Kosher salt and wedges of lemon.


This was a qualified success. However, we would much prefer natto tempra with perilla leaves 納豆と大葉の天ぷら. 

Ingredients:
Natto, 1 pack, frozen, thawed, with a liquid seasoning pack and mustard
Nagaimo, 100g grated
Aomori, 1/4 tsp
Flour 2 tbs

Oil for frying.

Directions:
1. I placed the natto, nagaimo, and all the flavoring packs that came with the natto in a bowl.
2. I added dried aonori and flour.
3. Mixed them well.
4. Placed the batter on a spoon and dropped it into the hot oil. I fried it until the surface was crispy and  brown.


I probably should have put more flour in this dish. It was a bit difficult to fry. I had to fold it while deep drying to make it come together. I may have over cooked it as well. The result was very light and crunchy without much substance. The natto was not sticky and had a rather assertive flavor. My assessment may not be fair to this recipe since I may not have made it properly. Nonetheless we probably much prefer natto tempra with perilla leaves.