Friday, July 10, 2020

Salmon sashimi 4 ways 鮭の刺身4種類

This was made with frozen sashimi salmon from Catalina. We got it for New Year but we did not eat it since we had so much other good food. We decided it wasn't getting any better with age and the ice crystals forming inside the package was probably not an improvement. So, we defrosted and enjoyed it. Since frozen sashimi salmon from Catalina usually comes in 1 lb. packages, I always have to come up with several variations rather than straight salmon sashimi.

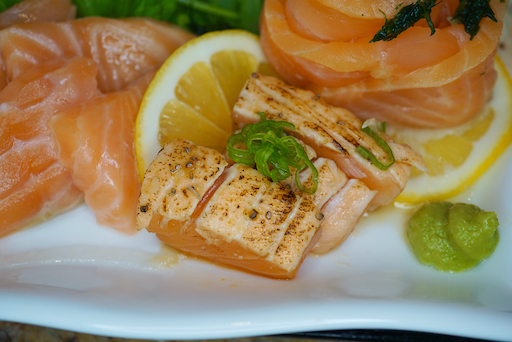
The picture below shows what I came up with this time. From the left, straight sashimi with Meyer lemon juice squeezed on it. The next item (moving to the right) is salted and scorched on one side with a kitchen torch and then briefly marinated in concentrated Japanese noodle sauce. The rose shaped item is instant gravlax made from Umeshu 梅酒, and on the right most is several hour (instead of usual 3 days) marinated "Russian" salmon 鮭のロシア漬け. I could shorten the marination time since this salmon was sashimi grade.


The following pictures are close-ups of the individual preparations. Since I had Meyer lemons, I squeezed juice over the sashimi just before serving. In only a few minutes, the surface became slightly opaque and had a nice Meyer lemon flavor. This was so tender it was almost like eating salmon belly.


The below is salmon with one side salted and seared with a kitchen  torch and then marinated in concentrated Japanese "mentsuyu" 麺つゆ noodle sauce and garnished with the thinly sliced green part of scallion. The seared portion added an almost smokey flavor and a slightly denser texture which contrasted nicely with the soft un-seared portion. 


The below is the instant gravlax, probably the best I ever made.  The marinade is composed of 1 tbs each of brown sugar (I used regular sugar and drops of dark molasses) and Kosher salt, finely chopped dill, 1 tsp each zest of lemon and orange. I also added about 50 ml of vintage umeshu which I made in 1997, from the plums grown on the tree in our back yard, using 40% alcohol vodka. I mixed and coated the small block of salmon and covered it with plastic wrap and marinated in the refrigerator for 4-5 hours. Just before serving, I removed it from the marinade, removed the excess marinade from the surface by blotting with a paper towel and sliced it. This instant gravlax had nice complex flavors. Compared to regular gravlax, it was very moist since the it is mostly raw. We really liked it.


This is the classic Russian marinated salmon which I make every New Year using a recipe I got from my mother many years ago. (This used to be a regular in her line-up of NewYear dishes). I used the belly portion of the salmon and marinated for only several hours. So, the inside was raw. This was quite a contrast with the gravlax. It was lemony and slightly vinegary but not sweet at all. I garnished it with chiffonade of perilla.


Although this is a lot of salmon, because of the different flavors and textures, each preparation was uniquely varied so the entire dish was not monotonous as would have been the case if we ate everything as just salmon sashimi. (Believe me we tried it that way one time before and it was overwhelmingly too much of a good thing). This was infinitely better approach. There was a small amount of leftover Russian marinated salmon and gravlax. Since these preparations were particularly good we were glad to enjoy it again the next day.

Tuesday, July 7, 2020

Pork belly and cabbage steamed in wine 豚バラとキャベツの塩蒸し

Because of COVIDー19, we have started using grocery home delivery. One of the problem is that when ordering on line using the descriptions and images provided we may not always end up with exactly what we wanted. This is one case in point; I thought I ordered a block of pork belly but instead, we got sliced pork belly. The slices are thicker than we expect to use in Japanese "Buta-bara" 豚バラ or "Sanmai-niku" 三枚肉.  I proposed several different dishes from the sliced pork belly but my wife wanted "Kaku-ni" 角煮 style preparation. So although I have never made kakuni from slices of pork belly before, I made that for her plus one other dish. Since I had jelled left over simmering liquid in the refrigerator from the previous pork belly (block) kakuni it was easy. I just cut the slices of pork belly into bite sized pieces and marinated them in a small amount of soy sauce for a few minutes. I then browned both sides and simmered it in the leftover simmering liquid for 2 hours. This was as good as my usual made from a block of pork belly.


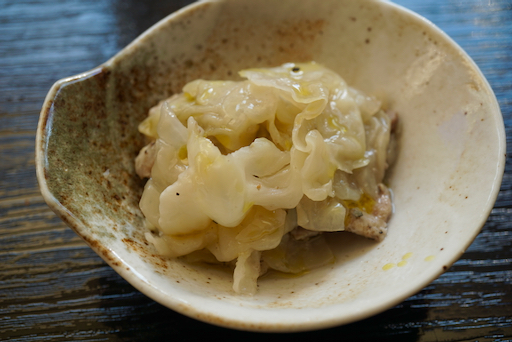
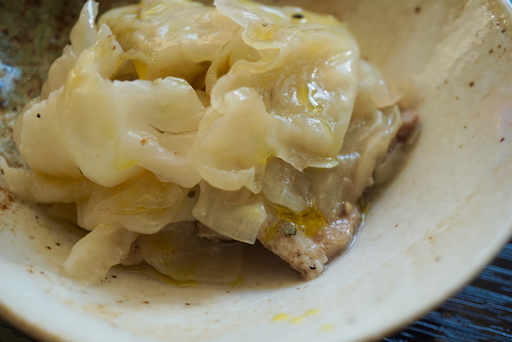
The second dish I made was based on a recipe I saw on line. Since the slices of pork belly I got were thicker than Japanese buta-bara, I flattened the pieces with a meat pounder. Since we had leftover rose wine from Provence, I used that for this dish.


This is a simple dish but quite good. I splashed it with our favorite spicy Spanish olive oil before serving.


Ingredients
1/4 Cabbage, small head, leaves separate and washed and torn into bite sized pieces.
1lb slices of pork belly (They were a bit thicker than Japanese bura-bara. I pounded them thin, and cut into a bite sized pieces).
3 tbs white wine (We had a small amount of rose from Provence left over so I used that. It was more than 3 Tbs. more like 1/3 cup).
1/3 tsp salt
2 tsp oilve oil
slat and pepper for the meat.

Directions
Season the pork with salt and pepper.
In a pan, make alternating layers of cabbage and pork.
Add the wine, salt and olive oil, put it on medium flame with a lid.
Turned down the flame to low when it starts boiling.
Cook until the pork is cooked and cabbage is soft.
Serve hot, if needed season with additional salt and pepper (I sprinkled on our favorite Spanish olive oil)

This is a simple but good dish. Since the pork was well seasoned no additional seasoning was needed. It was good that I used up the cabbage I had, the left over wine and the last of pork belly slices.

Saturday, July 4, 2020

Karikari-koume rice balls カリカリ小梅のおにぎり

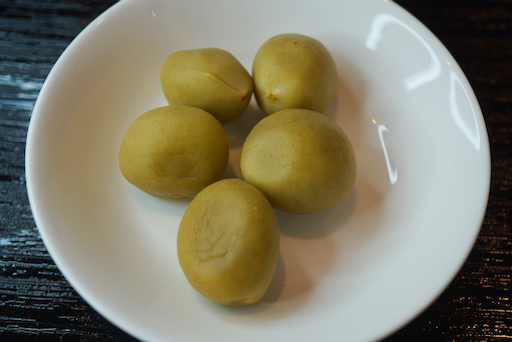
I made small crunchy salted green plums or "karikari-koume" カリカリ小梅 with the fruit we retrieved from the fruit ladened branch of the plum tree that broke in a recent thunderstorm. The recipe I followed stated, it takes several weeks' rest in the refrigerator before the salted plums can be enjoyed. Indeed, it did taste bitter when I tasted it few days after I moved the plums to a jar and placed them in the refrigerator. After a few weeks in the fridge, however, I tasted it again and the bitter aftertaste was gone. In the episode of "Midnight diner" 深夜食堂 featuring "karikari-koume", the last dish the master served was the salted plum rice balls. So, inspired by that episode, I made karikari-koume rice balls.

First, cut off the plum meat from the stone using a knife (below).


Add it to warm cooked rice.


Sprinkle roasted white sesame on top and mix well.


Make a small triangular rice ball and attach a small rectangle of the seasoned "nori" seaweed as seen below for taste as well as to provide the place you can hold the rice ball with your hand.


We had this with refrigerator-dried grilled salmon. The salted plum gave both salty and plummy flavors and a nice crunchy texture. We really liked these rice balls.

Wednesday, July 1, 2020

No Knead whole wheat bread Version2 捏ねない全粒小麦粉パン 第二弾

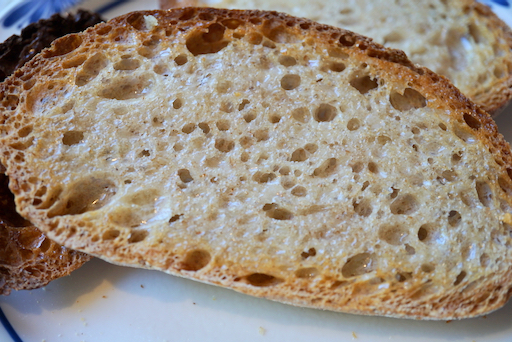
This is the second attempt at "No knead whole wheat bread". This was an unqualified success. Two changes I made were; 1. Baked at 450F (instead of 475F) and 2. I let it cool completely and sliced it the next morning. The first bread, which was baked at 475F, had a mahogany brown crust and looked very rustic and artisanal, but for us, the crust was a bit too much. The second bread (below) which was baked at 450F had a lighter more brown crust.


The holes are a bit smaller than the first one which we like better.


This is crusty enough for us and has a nice nutty flavor with a chewy but pleasing texture. It takes 2 days to make this bread but it is easy to make since you do not have to knead the dough. The only difficult and dangerous thing is not to burn yourself while trying to get the uncooked loaf into the super heated hot cast iron Dutch oven. My next bread will be the no knead rye bread.

Sunday, June 28, 2020

Small salted plums カリカリ小梅

We planted a ume fruit 梅 bearing plum tree (prunus mume) about 30 years ago. While ornamental plum trees are quite common, we had to spend some time and effort to find one that bore the plum known in Japanese as ume. (We subsequently found out it is actually an apricot tree and the Japanese green ume is basically an unripe apricot from which plum wine or "umeshu"梅 is made. Standard "Umeboshi" pickled plum 梅干し is made from yellow ripe "ume".) It arrived in the spring in an envelop as a mere twig mailed from a nursery in Oregon. It spent the summer in a flower pot on the deck but in the fall we didn't know what to do with it so in the absence of any other plan we toed it into our vegetable garden never expecting it to survive the winter. To our surprise it not only survived but thrived producing bumper crops and providing us with the basic ingredient to make some mighty fine plum wine. The last bumper crop was in 2008.  Around that time, a fungal disease (black knot galls) started spreading among plum trees in our neighborhood. Many of the beautiful ornamental plum trees lining the street leading to our house became diseased and many subsequently succumbed. Unfortunately, our plum tree did not escape this fungal disease. The branches became deformed, coated in black cankers. It stopped producing fruit. Many of the branches died. In 2012 we had a Japanese master landscaper redo our backyard. As a result, the tree was moved to a different location and the diseased branches were severely pruned back.  It struggled for several years and I had to further prune out the affected branches several times. Frankly, there was not much of it left. We thought this tree was basically lost and even discussed whether we should have it removed. Surprisingly, although it still shows residual signs of the disease, it seems to have overcome the worst of it. It miraculously survived and even started putting out new growth. This year, for the first time since getting sick and since being transplanted, it bore a large number of fruit. One of the branches had so much fruit on it that it broke during a thunderstorm and fell to the ground. The branch is pictured below. 


Although the fruit was still rather small and unripe, we decided to harvest it since the branch was already off the tree. In total, the fruit was over 1kg (Below picture on the left). I knew immediately how I could use the fruit because we happened to watch (for the second time) one of the episodes of "Midnight diner" 深夜食堂 on Netflix. This episode was about "Karikari-koume" カリカリ小梅 which is crunchy small salted plums.

Ingredients:
1kg small green plums (left in the picture below).
100g salt (10% of the plum)
2tbs white liquor (I used vodka instead).

Directions
Cull plums with any blemishes, wash, and soak it in cold water for a few hours (right in the picture below).


Remove the remnant of flower (#1) using a bamboo skewers and dry the plum. 
Put the plums in a Ziploc bag,  add the salt and vodka. 
Remove as much of the air as you can and close the bag. Distribute the salt so that all the plums are coated and make a single layer of the plums (#2 in he picture below) 
I sandwiched the plums in the Ziploc bag between two sheet pans then placed weight (about 1kg, water filled jars) (#3, in the picture below) 
Leave it for 3 days. The color of the plum will change from green to light brown and water will come out (#4 in the picture below).


I moved it to the refrigerator and  after several days, placed the liquid and plums in the glass jar with air-tight lid (I used a small amount of Vodka to "sterilized" the jar before adding the plums)  (left in the picture below). The liquid (called "Umesu" 梅酢) came 2/3 of the jar (right in the picture below).


The recipe I am following said keep it in the refrigerator 3-4 weeks before eating. I had a taste when I moved the plum to the jar. It was salty and "karikari" meaning crunchy in texture but had a slight bitter aftertaste. Hope this will disappear in a few weeks. We will let you how it goes.


Friday, June 19, 2020

Yellowfin tuna from Great Alaska Seafood 冷凍キハダ鮪

I am always looking for alternative sources of sashimi grade fish. Catalina offshore products has been a most reliable source for a long time. Other sites have come and gone such as "Fish-for-sushi" and "Sushi at home".  When it comes to sea urchin, "Maruhide" 丸秀 which sells only uni and uni products, is where I go to get them. Recently, I came across the website for "Great Alaska Seafood". I noticed they have "sashimi-grade" yellowfin tuna blocks. You have to buy a rather large amount. (In this case, 8 lbs. that is 8 blocks or "saku" of frozen tuna each weighing about 1 lb.). The price seemed reasonable. While it would have been difficult to accommodate an 8 lb. slab of frozen fish, 8 one pound blocks were do-able and the fact they were frozen made "storage" easier.  I also figured if the fish is not good enough for sashimi, I could always cook it. So I bought it.  The picture below shows one of the frozen blocks. 


The dish shown below was the first time we tasted my purchase. I made three different preparations but I did not take a picture of the third dish which was an imitation "negitro" ネギトロ.


After thawing the tuna block in the refrigerator (it took almost 2 days), I divided the block into three portions. One I made into "zuke" 漬け or marinated tuna. This time I used "concentrated noodle sauce めんつゆ from the bottle" plus ground roasted white sesame.  I sliced the tuna and marinated the slices for several hours in the refrigerator. Just for variation, I seared half of the "Zuke" tuna (far right) using a kitchen torch. The yellow item shown on the plate below is "Dashimaki" だし巻き omelet I had made earlier. I placed the tuna sashimi on top of baby arugula. I also served "Ikura" salmon roe in a cucumber cup (upper left corner).


We really enjoyed this. This is about the same as the frozen yellowfin tuna blocks we buy at our Japanese grocery store. It may be slightly better since it seemed to contain less water. (After thawing, not much water came out). The textures and taste are about the same. The "Zuke" and "imitation negitoro" preparations made very good variations.

Tuesday, June 16, 2020

Kitsune Udon and Inari-sushi 狐うどんといなり寿司

When our refrigerator went kaput, some of the Japanese frozen items thawed almost completely. One of them was "Abura-age" 油揚げ or deep fried tofu pouches. These were rectanglar-shaped full sized ones called "Ganko-oyaji-no-abura-age" がんこおやじの油揚げ (meaning "stubborn old man's abura-age*"). I decided the best way to save them was to cook them in soy sauce and sugar or/or mirin which is called "Ama-Kara" 甘辛 meaning "sweet and salty". Once cooked, they would last longer and also could also be used to make "Inari-sushi" 稲荷寿司 (right below)  and "Kitsune udon" 狐うどん (left below) which I did a week or so later and served as a lunch one weekend. I served Inari-sushi (or more accurately, Inari-zushi) with cucumber "asazuke" 浅漬け and sweet vinegar-dressed ginger (store-bought).

*This is a Japanese way of saying that this product was made with a stubborn determination of an old man who upholds a tradition of making the best product without any compromises.


Classically, Kitsune Udon is simply topped with seasoned abura-age and chopped scallion (this is a famous dish in Osaka 大阪 and they typically used the green part of the scallion as opposed to Tokyoites who uses only the white part. Since I made home pasteurized eggs in that morning, I added a poached egg as well. That makes this as "Kitsune Tsukimi udon" キツネ月見うどん. "Tsukimi" 月見 means "moon gazing" and the egg yolk is equated with the moon.


Cooking and seasoning Abrura-age:
2 rectangular abura-age, thawed, intentionally (or otherwise), if frozen, cut in half (square).
Place the abura-age in a colander and pour boiling water over it to remove any excess oil (this process is called "abura-nuki" 油抜き).
Place four squares in a single layer in a pan and add the seasoning (Japanese broth 100ml, mirin 20ml, and 20ml, add sugar if you like it sweet).
Place a "otoshi-buta" on top and simmer for 15-20 minutes until only a small amount of seasoning liquid remains on the bottom. Then let it cool.

I did this some days prior to using them and kept them in a sealed container in the "back-up/emergency" fridge.

Making "Kitsune udon"
Soup: Heat Japanese broth made from a dashi pouch (kelp and bonito), seasoned with sake, mirin and light colored soy sauce. I seasoned  it lightly and added the seasoned abura-age pouch to warm. The seasoning from the pouches leak out into the soup and when I tasted it the soup was just right.

Udon noodle:
I had cooked dried thin udon noodle. I warmed them up in boiling water for 30 seconds, drained and put it into bowls.

I poured in the warm soup, topped it with the seasoned abura-age, poached egg and thinly sliced scallion.

Assembling Inari-zushi (four square pouches):

Filling the pouches with cooked rice: the simplest would be sushi rice, which is what I basically used,  but the rice can be mixed with other ingredients such as seasoned gourd peel or "kanpyo" カンピョウ and shiitake mushsooms 椎茸. The variations are endless. I used frozen white rice (this happened to be rather expensive Japanese grown "Koshihikari" コシヒカリ rice). I microwaved it to warm it up and dressed it with sushi vinegar. I did not mention it earlier but among the thawing victims of the refrigerator's demise were two small packages of small whitebait fish called "shirasu" しらす. (At the same time I rescued the abura-age I braised these fish in mirin, sake and  soy sauce until almost dry and placed them in a small sealed container in the "emergency" fridge.) I mixed this seasoned "shirasu" into the sushi rice mixture. I prepared the pouches to be filled with the rice by pressing the abura-age pouches between two identical plates to remove any excess liquid. I then stuffed them with the rice mixture. Since the seasoning of the pouches and "shirasu" were essentially similar, this combination worked very well.


I cut the stuffed pouches in half to serve. Here you can see small fishy mixed into the rice.


For impromptu lunch with "Inari" theme**, this was quite good.

** Digression alert!:
"Inari" 稲荷 is a Japanese deity (or one of many Japanese gods) who promotes industrial and agricultural prosperity. There are some 30,000 Inari shrines that exist throughout Japan. These Inari shrines are guarded by statues of foxes (wearing red bibs for some reason). Although the fox is often confused to be the God, it is not. It is simply the Inari god's messenger. In addition, these foxes are said to be very fond of "abura-age". So, any dish made with abura-age is called "Inari" or "Kitsune (fox)".

This picture was taken by my wife when we were traveling in Kyoto 京都 and visiting  "Fushimi Inari Taisha" 伏見稲荷大社 in 2015. This is famous for numerous red torii gates 赤鳥居. This is the main or "parent" Inari shrine among the many in Japan.

When we visited there, it was very crowded. Later, we learned that visiting there at night may be less crowded.