Sunday, March 21, 2021

Traditional Irish soda bread 伝統的アイルランドソーダブレッド

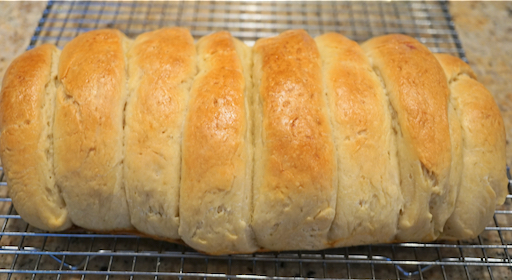
 Just a few days before St. Patrick’s day, I happened to see  a  “real Irish soda bread” recipe on the “Serious Eats” website. I showed my wife the recipe and in passing mentioned that St. Patrick’s day was coming up. Next thing I knew she has found 2 other Irish soda bread recipes and for 3 days in a row when I came home a new loaf was cooling on the rack. What a treat!  This is the first loaf she made. It was baked in an enameled cast iron Dutch oven like “no-knead bread” and produced a nice brown crust and center was moist.


She cut the traditional cross on the top but the dough was very wet and just filled in. Nonetheless you can still a light impression of the cross.


The below recipe is from “Serious eats


Ingredients
15 ounces all-purpose flour (3 cups; 425g)
1 3/4 teaspoons (7g) kosher salt; for table salt, use the same weight or half as much by volume
1 1/8 teaspoons (6g) baking soda
18 ounces low-fat cultured buttermilk (2 1/4 cups; 510g), well shaken

Directions
1.Adjust oven rack to middle position and preheat to 450°F (230°C) at least 15 minutes in advance. Roughly cover the bottom of a deep 10-inch cast iron or enameled Dutch oven with a sheet of parchment paper; no need to trim.
2.Combine flour, salt, and baking soda in a large bowl and whisk a full minute to combine. Stir in buttermilk with a flexible spatula until dough is fully moistened and no pockets of flour remain. For extra-fluffy results, stop folding as soon as dough comes together. For extra-chewy results, fold dough about 20 seconds more. Scrape sticky dough into prepared Dutch oven and smooth with a spatula into a rough boule-like shape. Score deeply into quarters with a sharp knife or razor, cleaning the blade between each slice.
3.Cover and bake until well risen and golden, 45 minutes. Remove lid and continue baking until chestnut brown, with an internal temperature of 210°F (99°C), 12 to 15 minutes longer. Invert onto a wire rack, discard parchment, turn right side up, and cool until crumb has set, about 30 minutes. Cut thick slices to accompany hearty soups and stews, or slice thinly for sandwiches. (This will be easier if bread is allowed to cool 2 hours more.) Store up to 24 hours in an airtight container and toast to freshen bread before serving.

The bread had a nice crunchy crust and the interior was moist with a nice crumb. The buttermilk gave it a subtle tang. The flavor was a bit salty. We had this with a lamb stew I made. (What else would you have for St. Patrick’s day?) This was the perfect bread to accompany the stew. 


Our plum tree was in full bloom and our backyard was filled with the nice sweet smell of plum blossom. This is the plum tree we got many many years ago. We wanted the type of plum that produced the fruit used to make Japanese salted plum and umeshu.  After some search, we finally found one at an Oregon nursery. It arrived as a twig in a small envelope but it miraculously grew into a good sized tree and provided lots of plum fruit over the years. We used the fruit to make “umeshu” plum wine. Then, a few years ago all the plum trees in the area got a fungal disease. Our poor tree was no exception. We thought it was a “goner” especially after we had to transplant it during a landscaping project. Although the tree is much smaller than it was at its peak, it appears that this plum tree is surviving. Spring is almost here.

Monday, March 15, 2021

Condensed milk bread V2 コンデンスミルクパン version2

 This is yet another version of my wife’s exploration of Japanese milk bread. This version is made with both condensed milk and cake flour so you would expect it to be very soft and fluffy...It wasn’t.


Ingredients:
3.5 cups cake flour
1 Tbs. instant yeast
1/2 tsp. salt
3/4 cup whole milk at room temperature
3/4 cup condensed milk
1 egg
2 oz. butter

Egg wash
1 medium egg
1 Tbs. whole milk

Condensed milk glaze (I didn’t use)
3 Tbs. condensed milk
1 Tbs. butter.

Directions
Place the ingredients in a stand mixer with a dough hook. Mix until dough forms. Knead for 7 to 10 minutes. Form a ball. Put in a bowl. Coat with oil. Cover and put into proofing box until it doubles in size.
Deflate the dough and form into a cylinder that will fit in the load pan. Use a sharp knife and cut the cylinder into pieces of equal thickness. Place the pieces seam side down in the lightly greased loaf pan (shown in the picture below).  Cover and let rise in the proofing box until double in size. Lightly brush the top of the loaf with the egg wash mixture. Cook in a 350 degree oven for 35 to 40 minutes until golden brown.


This bread came out hard and dry. The specified amount of cake flour did not result in a dough. The mixture was more like a batter. My wife had to add much more cake flour for it to take shape. We’re not sure what went wrong but this was a disappointment and will not be a regular on our baking schedule.

Friday, March 12, 2021

Condensed milk bread コンデンスミルクパン

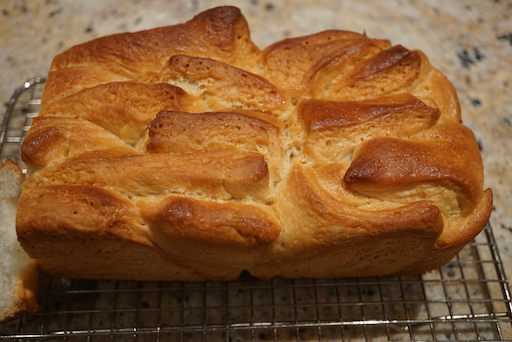
 My wife has been on a “roll” of making Japanese milk bread. She found many recipe variations on the internet and is trying a number of them. The picture below is one. The directions for making the bread that results in the irregular crust shown in the picture below seemed improbable.  But it worked. The crust has a nice crunch and the bread itself is slightly sweet.  An almost custard like filling forms in the grooves created by the irregular crust. 


Ingredients:
for the dough
200 g of bread flour
20 g of sugar
3 g salt
3 g active yeast
30 g sweetened condensed milk
130 g warm milk
20 g butter

for the condensed milk filling
20 g sweetened condensed milk
20 g butter

Ingredients ( X 2)
for the dough
400 g of bread flour
40 g of sugar
6 g salt
6 g active yeast
60 g sweetened condensed milk
260 g warm milk
40 g butter

for the condensed milk filling
40 g sweetened condensed milk
40 g butter


Ingredients X3
for the dough
600 g of bread flour
60 g of sugar
9 g salt
9 g active yeast
90 g sweetened condensed milk
390 g warm milk
60 g butter

for the condensed milk filling
60 g sweetened condensed milk
60 g butter


Directions
Add the ingredients to a stand mixer with a dough hook. Mix until a dough forms then continue kneading on low speed for 7 to 10 minutes. It is ok if some of the dough sticks to the bottom of the bowl as it is being kneaded. Turn dough out onto a board and do final hand kneading. Form into a ball. Coat with vegetable oil and put into a bowl. Cover and put into the proofing box until it doubles in size. While the dough is rising mix together the filling. by mixing the butter and condensed milk to form a smooth paste.

Once the dough is finished rising roll out into a rectangle. Evenly spread the filling over the dough (#1).
Cut the sheet into 4 even pieces (#2). Then, stack them on top of each other. Divide into 8 even pieces. Arrange each piece in a loaf pan (#3). Cover and put back into the proofing box until it doubles in size (#4). Bake in a 300 degree oven for about 35 minutes or until golden brown.


The part where the dough pieces are arranged in the loaf pan as shown in #3 is the part that seemed improbable. The pieces slipped around and barely filled the loaf pan. It seems impossible that this would result in a loaf...but it did! During the second rise the pieces melded together and when they cooked they formed a loaf with lovely crunchy irregular crust. The filling became custard like in the crevices formed by the crust. The flavor was slightly sweet and the interior texture was very soft. This was an amazing loaf.

Tuesday, March 9, 2021

Almost no-knead whole wheat bread

I am experimenting with "almost" no-knead bread  variations. This time, I made a whole wheat version and increased the hydration level to exactly 70%. As shown below it came out nicely. 

Some of the holes were a bit too large but it had a nice overall texture, crust and flavor. I am posting this just as notes for my record.


Ingredients:(everything except salt and yeast were weighed)
425gram of AP and whole wheat flour (1 cup wheat flour and I added about 3 cups of AP flour to reach the total weight of 425grams).
300 grams of liquids (Total liquid amount is most important),
80grams (6tbs) of beer (again I used Samuel Adams Boston brown ale)
13grams (1tbs) of rice vinegar
207grams of water (I just added water to the total liquid amount of 300grams)
1 1/2 tsp salt
1/4 tsp instant yeast

Hydration ratio = 70%

Direction:
Mix the ingredients in a bowl with a spatula until all the flour is incorporated (towards the end, I used my hands to incorporate all the flour. Again it looked too dry). Cover the bowl with a plastic wrap.
Place the bowl in the proofing box at 85F (with a water tray), this time, I let it rise overnight for about 12 hours.
Next morning, the dough was more than doubled and well-hydrated. Using a floured plastic dough scraper, I placed the dough on a well floured board and quickly kneaded it 15-20 times then made a boule shaped dough ball.
I placed the dough ball on a piece of parchment paper (sized to hold the whole thing) with the seam side of the dough boule down. I then placed it in a bowl or skillet in which the dough ball snugly fit.
The bowl uncovered went into the proofing box for 1 and half hours.
Preheat the oven with a cast iron Dutch oven in at least 30 minutes before the secondrise is finished.
Slash the top of the dough ball using a lame.
Lift the dough by the parchment paper and place it in the hot Dutch oven. Put the lid on and bake for 30minutes.
Remove the lid and bake another 10 minutes.
Again,hydration ratio of 70% makes a wet but very manageable dough and using the parchment paper is easier and safer than the original floured towel method.

Monday, March 1, 2021

Smothered pork スマザードポーク

Again we ended up with a bone-in cut of pork. This time, it appeared to be a "butt roast" instead of "shoulder roast" judging from the bone structure. In any case, I did more home butchering by removing the bones. I made one larger and one smaller roast (the large roast went for barbecue in our Weber grill and the small one for "nibuta" 煮豚 simmered pork). The prepared remaining smaller portions of meat around the bones were destined for a type of stew. I again tasked my wife to make something with the stew pork meat. She came up with this "smothered pork" dish based on a recipe from her favorite Indian cookbook by Madhur Jaffrey "Quick and Easy Indian Cooking". (She made alterations to the recipe based on various ingredients she had on hand). This was a lunch one weekend. We used frozen rice and added  snow peas and skinned Campari tomatoes. We defrosted the rice then microwaved the rice and smothered pork and vegetables in a bowl.


I also added pickled  Japanese “rakkyo” ラッキョウ small cocktail onion and Fukushinzuke 福神漬け.


This is really good. Lots of spices but no cayenne pepper but it had slow pleasant heat probably coming from fresh ginger. I will ask my wife to take over.


Ingredients:
About 1lb pork shoulder, cut into bit-size chunks
2 Tbs. catsup (or how every much you may want for taste). (This was a substitute for 2 Tbs. tomato paste)
2 onions roughly chopped
1 inch long piece of ginger finely chopped
3 garlic cloves finely chopped
1/2 tsp. turmeric
4 tsp. garam masala
2 tsp. cumin
3/4 tsp salt
4 compari tomatoes peeled

Directions:
For the pork:
The last time I made curry with this type of pork it was extremely tough. I ended up removing the pork from the curry and simmering it for 2 hours covered in chicken stock until it became very tender. I then added it back into the curry. This time I did the same thing but cooked the stew pork in the chicken stock before I made the curry sauce.

For the curry sauce:
Caramelize the catsup by stirring it in a frying pan until it turns brown in color. Add some peanut oil and the onions. Cook the onions until wilted. Add the garlic and cook until fragrant then add the ginger. Add the remaining spices and "bloom" them until they become fragrant. Then add the pork as well as the chicken stock in which it was simmered. Finally add the fresh tomatoes. Cover and cook for about 30 minutes to let all the flavors meld.

This was a very good curry. Plenty of flavor but just a pleasant mild heat that must have come from the ginger. The caramelized catsup added a slight hint of barbeque that was a nice addition. The pork was very tender and had absorbed the complex flavors from the curry sauce.

Saturday, February 27, 2021

One spoonful appetizers and more

These are appetizers I served one evening. Not particularly new but we had "uni" sea urchin from Maruhide 丸秀 a day before, so my one spoonful appetizers a.k.a baby food for adults got a topping of ikura with chopped perilla (for cauliflower purée) and uni with broccoli florets (for broccoli purée).


I also added three small appetizers  which I served in small lidded bowls we got from Nishiki market in Kyoto 京都錦市場. We had Dassai 45 獺祭45with this.


This is salmon "Nanban" 鮭の南蛮漬け (fried salmon marinated in sweet vinegar with carrot and celery).


This is salmon Russian marinade 鮭のロシア漬け topped with vinegar cucumber slices.


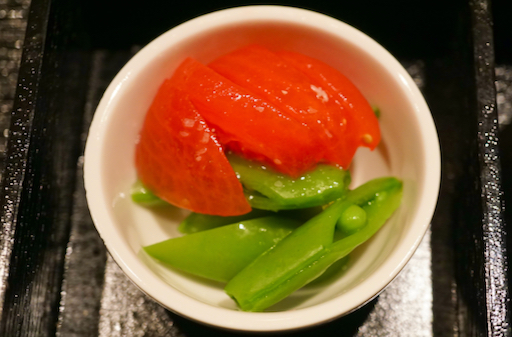
For veggies, I served blanched sugar snap soaked in salt broth スナップ豌豆の塩びたし and skinned Campari tomato.


Uni from Maruhide (both regular and in salt water) is really good. My one spoonful appetizer definitely got "kicked up a notch" with the addition of uni.

Wednesday, February 24, 2021

Seafood nabe on a snowy day 雪降りの夕の海鮮鍋

As the weather got colder our thoughts turned to having Japanese hot pot or nabe 鍋 for dinner. This week we had some snow and our backyard was transformed to a winter wonderland; perfect time for nabe. So we decided to have one using whatever ingredients we had on hand.


We used to cook nabes on a portable gas cooker with a butene fuel canister but both the cooker and the canisters became so old we started worrying about how safe they were. Fortunately after we used up the canisters several years ago. We switched to a table top induction cooker (or Japanese will say IH or induction heater).  Making Sukiyaki すき焼き on this type of cooker works well because a sukiyaki nabe pot is usually made of cast iron but other earthenware or pottery pots or nabes won’t work. Then, we discovered an induction-cooker-compatible nabe pot. (It has a magnetic metal disk embedded in the bottom). With it,  we can do a nabe at the table without having to use a gas canister fuel source. 

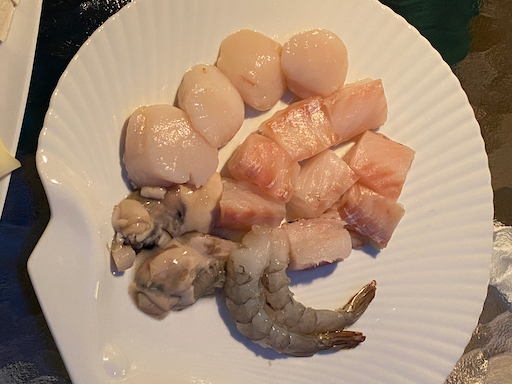
I checked our freezer and refridgerator and decided we could do a sea food nabe or “kaisen-nabe” 海鮮鍋. We defrosted, scallops, cod, pacific oyster (this is the second time we used frozen Pacific oyster which worked well as a fry) and shrimp. We also had fresh shiitake and  nappa cabbage but not other green leafy vegetables. In any case, we set up our nabe feast.


I started the broth by soaking kelp in the nabe pot in cold water for several hours.  In the evening, I put the pot with the kelp in it on the induction cooker. Once the water came to a boil, I removed the kelp. I then added the shrimp shells and once the color of the shells changed I continued simmering for a few minutes, I the removed the shrimp shells.  I seasoned the broth with white dashi “Shiro-dashi” 白だしand light colored soy sauce making a very gentle broth. I started cooking the hard part of the nappa cabbage as well as the other vegetables. We also had some decent firm tofu from Whole Foods which I added. Next came daikon, carrot and potato, all precooked in the microwave oven.


Our seafood lineup is shown below (all frozen, and thawed in the refrigerator). It included shrimp, scallop (from Great Alaska Seafood), Pacific oysters (from Vital choice wild sea food and organics) and cod (from Whole foods). This was the second time we used frozen Pacific oysters. The first time I made fried oysters.  These were much better than the small fragmented fresh or pasteurized  oysters we sometimes get.


The picture below shows the vegetables which waiting to be put into the nabe; the leafy portion of nappa cabbage, tofu, shiitake mushroom, precooked daikon, potato, and carrot. 


We made sure the seafood was not overcooked. We also used  ponzu sauce as we were eating. This was a fun dinner perfect with the snowy winter outside and the steaming body warming nabe inside. We had warm sake (“Hakutsuru Ginjo 白鶴吟醸) to boot. Of course, there were leftovers. Classically, Japanese will end the nabe by adding rice or noodles into the remaining broth to make a “shime” 〆 final dish but we were too full and the next day, we made rice porridge with eggs for lunch.