Friday, December 2, 2022

Tuna, avocado and nagaimo cubes まぐろ、アボカドと長芋の角切り

One evening, we defrosted Chutoto bluefin tuna まぐろの中トロ from Great-Alaska-Seafood. I divided it into 4 parts thinking that I will make 4 different dishes. I served one part of it as straight sashimi, and second part as imitation negitoro 擬制ネギトロ. I made the third part as “zuke” marinated slices of tuna 漬けマグロ.  I planned to make the 4th part to our usual Yamakake 山かけ but we had freshly cooked rice, so instead, we went for a small tuna donburi using the marinated tuna sashimi or “Zuke”  漬け鮪丼. This was quite filling and we decided to keep the tuna prepared for Yamakake for the next day. This was cubes of tuna marinated in x4 concentrated Japanese noodle sauce (short-cut version of “Zuke”).  Next day, instead of making Yamakake, I came up with this hybrid of Yamakake and tuna avocado cubes マグロとアボカドの角切. This turned out to be quite good with similar soft consistency of tuna and ripe avocado and crunchy refreshing cubes of nagaimo 長芋.


Ingredients:
Tuna Sashimi, 1/4 block, cut into small cubes and marinated in x4 concentrated Japanese noodle sauce (few hours but in this case 24 hours).
Half ripe avocado, cut into similar sized small cubes and dressed with lemon juice to prevent discoloration.
I inch nagaimo, peeled and cut into small cubes
One clove of garlic finely chopped
two scallion, finely chopped

Dressing:
1/2 tsp dark sesame oil
1 tbs soy sauce with dissolved wasabi
I topped with dried nori strips.

This was a quite good appetizer with cold sake.

Tuesday, November 29, 2022

Ikura and smoke salmon appetizer イクラと冷製スモークサーモン前菜

 We have been getting keta-slamon roe “Ikura” from Vital Choice. The available packages vary in size; sometimes only a tray of one kilograms is available and other time 6oz jars. In any case, we like keta-salmon roe the best among other trout and salmon roes. Our most common way to serve ikura is on blini with cream cheese and smoked salmon. This time, only small amount of ikura was left, so we made cream cheese wrapped with smoked salmon topped with ikura placed on a slice of cucumber.


This had most of the flavor and mouth feel of the blini. (Can’t beat the lovely salty burst of the salmon roe). But the cucumber was much less filling than one with blini.


Saturday, November 26, 2022

Cranberry tassie (mini-pie) クランベリーミニパイ

This is another one of the mini-pies or tassies my wife likes to make. Since the holiday season is upon us, we got fresh cranberries and I made my usual “figgy cranberry” sauce. My wife saw this and asked if she could use some for the tassie. I agreed but once she measured out the amount she needed I found I was left with a basically empty bowl and I had no choice but to make another batch. According to my wife, the original recipe was rather too simple calling for just finely chopped fresh cranberries with sugar. She thought this figgy cranberry sauce was much better. (So I decided the empty bowl was worth it.) She also added the crumble topping. The combination really worked. This is a wonderful small two bite dessert. The flavors are complex; slightly tangy and sweet cranberry with a fig aftertaste. As was the case  with the pumpkin tassie, this is a perfect small dessert for Thanksgiving and Xmas. We really like it.


Ingredients: (make 24)
For the crust
8 tablespoons (4 ounces/120 grams) unsalted butter, softened, but still cool to the touch
3 ounces (80 grams) cream cheese, softened, but still cool to the touch
1 cup plus 2 tablespoon (140 grams) all-purpose flour

For the topping:
1/2 cup (62.g) AP flour
6 Tbs. sugar (1/4 cup + 2 Tbs.)
1/4 tsp. salt
4 Tbs. (60 g) butter

For the filling:
2 cups of the figgy cranberry sauce*
2 eggs

*To make the figgy cranberry sauce: (#1)Frozen or fresh cranberries (12oz bag) (Do not thaw if you are using frozen).
Dried figs, coarsely chopped (1 cup)
Sugar 1/2 cup
White wine 3/4 cup
Orange peel, 2 long strips without pith
Salt, a pinch
Orange flavored liquor (I used triple sec), 2 tbs

1. Soak the figs in hot water for 20 minutes.
2. In a sauce pan, add the wine and sugar on medium flame. Once it starts to boil reduce the heat and mix to dissolve the sugar.
3.Add, the cranberries, drained figs, orange peel and cook for 10 -15 minutes stirring occasionally until the sauce thickens.
4. Cut the flame and add a pinch of salt and the orange liquor and mix.

Directions:(If you have read the other tassie recipes you may have “an acute sense of Deja Vu all over again” in reading this one).

To make the crust: In the bowl of a stand mixer fitted with the paddle attachment beat together the butter and cream cheese until smooth, about 2 minutes. Stop the mixer and add the flour. On low speed, mix until no streaks remain and the dough starts to come together, about 1 minute. Scrape any stray dough from the sides of the bowl, gather into a ball and flatten into a smooth rectangle or disc.

Cut the cold dough into 24 equal pieces. I did this by dividing the total weight of the dough by 24 to get the gram weight of each piece. (It came out to about 14 grams per piece). Make a small ball out of the dough, put it in the cup then using your thumb push down on the center of the ball forcing a depression in the center and the displaced dough up the sides of the cup. Use your thumb and fingers to further spread the dough up the sides of the cup. There is enough butter in the recipe that the papers were not necessary. Refrigerate uncovered, while making the filling.

To make the topping:
Mix all the ingredients together using your fingers until they form small pea sized clumps (#2). Set aside

For the filling: Add two eggs to 2 cups of the figgy sauce.

To assemble:
Scoop the figgy cranberry sauce into the pastry shells (#3). (I used the smallest ice cream scoop to fill the cups about 3/4 full.) Top each cup with the topping (#4 & #5) Bake in a 350 degree oven for about 15 to 20 minutes until the crumble and crust are golden brown (#6). Cool completely before removing from the pan.


These are a great seasonal two bite dessert. The flavor is surprisingly complex. The sharp freshness of the cranberries is followed by a lingering flavor of the figs combined with the yuzu orange rind and triple sec liquor. The pie crust and crumble top add two separate crunch dimensions. The crust is firmer than the crumble with a predominant butter/cream cheese flavor while the crumble is softer and much sweet further offsetting the tartness of the cranberries.

Wednesday, November 23, 2022

Pumpkin tassie (mini-pie) パンプキンミニパイ

 This is another example of a small bite tassie (pie) my wife made. This time it was a type of pumpkin pie (in keeping with the Thanksgiving holiday season) and  more of a dessert than an appetizer. She served this two ways. One was topped with cream cheese and toasted (grilled) (left) and the other as is. The pumpkin filling has all the seasoning of pumpkin pie, so this tasted like one bite pumpkin pie. The cream cheese butter crust added a nice crunch. The browned cream cheese topping definitely made it better.


Ingredients: (makes 24)
For crust:
8 Tbs. Butter
80 g Cream cheese
140 g AP flour

For the filling:
2 large eggs
1 cup brown sugar
1 cup pumpkin puree
2 Tbs. Evaporated milk
1 tsp. Cinnamon
1 tsp. Ginger
1/2 tsp nutmeg
1/4 tsp salt
(2 tsp. Of pumpkin pie spice could also be used instead of the cinnamon, ginger and nutmeg)

For topping
Small slice of cream cheese

Directions:
In a stand mixer with a paddle beat the butter and cream cheese until smooth, about 2 minutes. Stop the mixer and add the flour. On low speed, mix until no streaks remain and the dough starts to come together, about 1 minute. Scrape any stray dough from the sides of the bowl, gather into a ball and flatten into a smooth rectangle or disc.

Cut the cold dough into 24 equal pieces, (I did this by dividing the total weight of the dough by 24 to get the gram weight of each piece. That way they would at least be somewhat equal). Using your fingers, evenly press each piece into the bottom and up the sides of the 24 mini muffin cups, making sure there are no holes. I found the best way to get the dough into the cups was to make a small ball out of the dough, put it in the cup then using my thumb push down on the center of the ball forcing a depression in the center and the displaced dough up the sides of the cup. Then using my thumb and fingers spread the dough evenly up the sides of the cup. (First picture below). There is enough butter in the dough that the cups don’t need to be greased or paper cups don’t have to be used. Refrigerate for at least 1 hour. (I refrigerated over night).


For the filling if using canned pumpkin cook it in a sauce pan for several minutes until it turns darker in color and pulls away from the sides. (This helps remove the canned taste, moisture and concentrates the flavor). Let the pumpkin cool than mix in all the remaining ingredients together. It will look like the picture below. Scoop the filling into the prepared crust cups. (I used the smallest ice cream scoop). Cook in a 350 degree oven for 15 to 20 minutes until the crusts are golden brown and the filling has set. 


These are wonderful mini pumpkin pies which bear all the flavor of the fall season. They are good just eaten plain or topped with a small piece of cream cheese. They are best when toaster-ovened until the cream cheese becomes soft and develops caramelized spots.


Sunday, November 20, 2022

Daikon and Cheese dressed in umeboshi 大根とチーズの梅肉和え

I saw this dish on one of the YouTube episodes by the first Iron chef Japanese Rokusabuto Michiba 道場六三郎. Although he is now 91 he has a YouTube channel. In that episode, he oversaw the production of ultimate sake and, while visiting the brewery, made two dishes that go well with sake. This one is very simple and I had all ingredients so I decided to make it. This is essentially cubes of daikon and cheese dressed in salted “Umeboshi” sauce. I served it with cold sake and it surprisingly went very well.  


Ingredients:
Daikon, peeled and cut into small (5mm) cubes, amount arbitrary
Cheese (I used smoked gouda) cut into small (5mm) cubes, amount arbitrary
Two umeboshi, fresh (“bainiku” 梅肉) and skin removed and cut into paste, add a small mount of sugar (I sometimes add mirin but Michiba-san suggested to add sugar.

Directions:
Simply dress the cubes of cheese and daikon.

I kept this in the fridge for a few hours. This was a very simple dish to make and as Michiba-san suggested it went well with cold sake.


Wednesday, November 16, 2022

Feta, spinach and pine nuts in phyllo dough フェタ、ほうれん草と松の実フィロ包

This is a small finger food based on a recipe from “Frog Commissary Cookbook“. It is phyllo-covered spinach, cheese and pine nuts filling. This is very good with crispy multiple layers of phyllo and cheesy savory center. As good as it is, this was a quite tedious work to make. Unfortunately, even for my wife who patiently makes various baked goods requiring tedious multiple steps, folding the phyllo dough was a bit too time consuming and tedious. I helped toward the end since she was getting very tired. When we finally got them in the oven we concluded that in the future it may be easier to buy this type of appetizer from a holiday season gourmet catalog rather than making it ourselves. 


Ingredients: (makes about 30)
Spinach-cheese filling
1/4 lb feta cheese
1/2 log (4oz) fresh goat cheese
2 bags of baby spinach, cooked covered over low flame without adding water, squeezed and finely chopped
1/4 cup dill (we used a bit more), finely chopped
1 medium onion, finely chopped
2-3 scallion finely chopped
1/2 cup pine nuts, dry roasted in a frying pan
Olive oil for sautéing

Directions:
Sauté the onion and garlic in olive oil for few minutes and let it cool in a bowl
Add the spinach and dill
Flake and mix the feta and goat cheese
Add the pine nuts
(we made this one day before and refrigerated)

Assembly:
One roll (15 sheets) frozen phyllo dough, thawed. Cut the 15 sheets in half making 30 half sheets.
Separate one of the 30 1/2 sheets of phyllo, paint with melted butter and fold it lengthwise in half (#1) and paint again with butter. Place one tsp of the filling (approximately shaped like an Isosceles Right Triangle i.e. a right-angle triangle with two equal sides) on the left corner of the beginning of the phyllo (#2) Fold like folding a flag until to the end (#3) and paint more butter.
Bake it in a 375F oven for 25 minutes (#4).


The folding process made multiple layers of phyllo dough which was very light and crispy in contrast to the cheesy savory filling. The combination of feta and goat cheese really worked. After enjoying these for several days as appetizer, we may have modified the opinion we expressed earlier and decided it was worth it to make them again ourselves rather than buying them from the holiday gourmet catalog. Next time we will divide up the folding. My wife will fold 15 of the 30 phyllo half sheets and I will fold the other 15. If we manage to do this simultaneously it should take only 1/2 the time. Wish us luck.

Sunday, November 13, 2022

Avocado Panna Cotta アボカドパンナコッタ

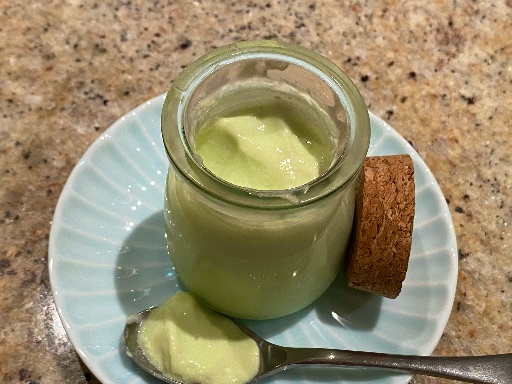
 My wife is into panna cotta and aspic. She has been collecting panna cotta recipes and some days ago, she made basil panna cotta based on one of those recipes since we have a small forest of basil on our kitchen window sill. Although she followed the recipe, it called for way too much gelatin. The end result congealed all right—in fact it solidified. It tasted pretty good. The basil flavor really came through. But it was extremely hard in texture and would have bounced like a tennis ball if dropped.  After struggling with it for a while we declared it inedible and threw it out. Somewhat in despair over the less than successful basil panna cotta she went back to the collection of recipes and decided her revenge panna cotta would be the one that  featured avocado. (Even this recipe called for too much gelatin. After the experience with the basil panna cotta and consulting the panna cotta recipes that were successful, my wife has decided the “rule-of-thumb” she will use is 1 tsp of gelatin for every 2 cups of liquid. So she reduced the amount of gelatin for this dish accordingly.)  It came out perfectly. The consistency was very creamy and with a good flavor of avocado. She made this in a small glass jar with cork lid and it was just the right amount. This is a perfect light dessert.


This recipe is from on-line but as usual, she made significant modifications.

Ingredients: (made enough for 6 small jars)
500 ml.milk
75ml cream
1 tsp. gelatin
1 ripe avocado
23 g. Sugar
1 teaspoon of vanilla extract

Directions:
Bloom the gelatin in the cream. Put the bloomed gelatin in the top of a double boiler and heat until it melts. Slowly add the milk and sugar. Allow the mixture to come close to boiling stirring constantly until all the gelatin and sugar are dissolved. Allow the mixture to cool. Add the vanilla. Pour all the mixture in an immersion blender tube container together with the avocado meat. Blend until smooth. Sieve the mixture to ensure smooth and creamy texture. Then pour the mixture into a mold or ramekin. (In this case small jars as shown in the picture below.) Chill for at least 2 hours before serving.


This panna cotta was the perfect consistency. It was congealed but very tender and smooth. It just melted in the mouth. The flavor was very subtle and sophisticated. The taste of avocado came through and went well with the subtle vanilla. My wife felt very relieved and vindicated. From here on out: 1 tsp gelatin for every 2 cups of liquid.