Sunday, October 4, 2020

Eggplant gyoza 茄子餃子

Last weekend I made gyoza 餃子. As usual, I used the trimmings from pork tenderloin. I made up a batch using wonton skins but I had more gyoza stuffing leftover. Then, I saw a Japanese recipe using thin slices of eggplant instead of Wonton or Gyoza skin. Since I happened to have a Japanese eggplant (one we can get here is a small diameter elongated eggplant. I only rarely see the other varieties of eggplant available in Japan such as "Kamo-nasu" 賀茂茄子 or "Mizu-nasu" 水茄子).  So, I made gyoza with this eggplant. A small amount of gyoza stuffing still remained after I made this dish so I stuffed a fresh shiitake mushroom to finish it up. I served this with some veggies as a starter one evening.


Since only enough leftover stuffing for one shiitake mushroom, I served three eggplant gyoza and half each of the shiitake gyoza. The veggies are sliced cucumber dressed in sushi vinegar 胡瓜の酢の物, skinned Campari tomato with sesame dressing トマトの胡麻和え, braised crunchy cauliflower モンパルナスのカリフラワー and sugar snap in salt broth スナップ豌豆の塩びたし.


Ingredients:
Gyoza stuffing is my usual. Hand chopped pork tenderloins trimmings, boiled and chopped cabbage, chopped scallions, garlic, ginger, seasoned with sesame oil, salt, and soy sauce. As I mentioned this was the leftovers after making regular gyoza.
One Japanese eggplant (one with small diameter and very long),
Potato starch (Katakuri-ko 片栗粉).
Peanut oils and sesame oil for frying

Directions:
Skin the eggplant using a peeler on both sides lengthwise, cut crosswise into 2 inch long pieces and then slice lengthwise into 3mm thick pieces and soak in about 5% salted water (#1) until the eggplant pieces get soft/limp (It took more that 30 minutes).
Drain in a colander and press using the back of a ladle to press out excess moisture and line them up on paper towels (#2) and press with another sheet of paper towel to blot.
Sprinkle potato starch or Katakuri-ko (#3)
Wrap the gyoza stuffing by folding the eggplant in half (#4).
Since I still had some gyoza stuffing left, I stuffed one fresh shiitake mushroom (#5)
Add 1tbs peanut oil and splashes of dark sesame oil in a frying pan on medium flame and place in the eggplant gyoza (#6).
After a few minutes when the eggplant is browned, turn it over and put on the lid for several minutes and finish with the lid off for 1 more minute (#8).

This time, the stuffing was well-seasoned and did not need any dipping sauce. This is not bad but both my wife and I prefer regular gyoza. We both missed the lovely crunch of the crispy wonton skin.

Thursday, October 1, 2020

No knead pizza dough 捏ねないピザ生地

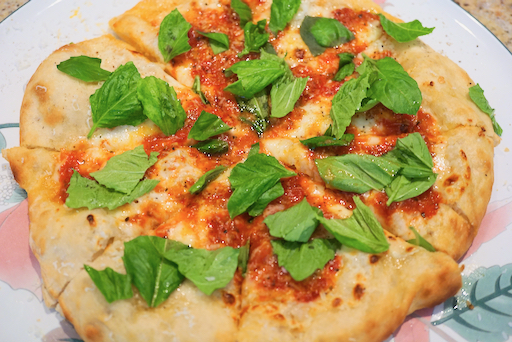
Since we are into "no knead" breads, when my wife found a recipe for "No knead pizza dough", I had to try it. Using this dough, I made my usual version of Pizza Margherita.


The pizza shown below was my wife's suggestion including several cheeses (mozzarella,  Monterey jack and smoked gouda) with baby artichoke herts, black and green olives (Devina brand).


No knead pizza dough recipe came from King Arthur flour web site.

Ingredients: (this makes two pizzas like above)
250gram AP flour
1/8 tsp instant yeast
1/2 tsp sugar
1 tsp salt
185gram lukewarm water

Directions: (only making dough part was quoted here)
1. Stir all of the ingredients together. Cover the rough, sticky dough and let it rise at room temperature for 24 hours. After this first rise, you may choose to refrigerate the dough for up to 6 days, which will help develop its flavor.
2. Divide the dough in half. Shape each piece into a ball. Place each ball seam-side down into a floured bowl.
3. Cover the bowl and allow the dough to proof (rise) for 45 minutes to an hour, while your oven preheats.
4. Scoop the dough onto a well-floured work surface and dust the top with flour. Using your fingertips, gently depress the dough, being careful not to touch the outer edge of the crust; you want it to remain thick.
5. Lift up the pizza and use your knuckles to gently stretch the dough into a circle about 10" to 12" in diameter. Move it to a well-floured pizza peel (I use yellow corn meal).

The topping and baking parts I followed my usual way. Although I cooked the pizza the usual 5 minutes, because of the high water content of the dough, retrospectively, I would have cooked the pizza longer maybe 7-8 minutes.
This pizza crust was a bit more flavorful but not that much different from my usual crust. Handling the dough was much more tricky since it was so wet. I may try it again with a longer cooking time.

Monday, September 28, 2020

Salted and grilled mackerel 鯖の塩焼き

 Come to think of it, I never cooked mackerel this basic way. When I got two whole Spanish mackerels from HMart via Instacart, there was too much to make it all into the miso-simmered dish 鯖の味噌煮 I usually make. So, I took two filets I prepared from the smaller of the two fish and made this salted and grilled mackerel. I filleted the fish and removed the small pin bones. Then I cut one filet into two and salted both sides. I let it stand for 10 minutes and blotted the surfaces using a paper towel. I made shallow cuts on the skin and re-salted it. Since I do not have a Japanese style fish grill and I did not want to cook fish in the toaster oven, I sautéed the fillets in a frying pan with a small amount of olive oil.


This is a basic simple way of cooking mackerel but it was good. On the side, I added sliced mini-cucumber (salted and moisture squeezed out) dressed in sushi vinegar. Since we had just harvested and pickled myoga, I added it too. This could have gone very well with rice. We had it as a drinking snack with cold sake.

Friday, September 25, 2020

Mackerel ball soup with myoga flowers 鯖のつみれ汁と茗荷の花

We used to get whole Spanish mackerel 鯖 or サワラ at Whole Foods but recently it has not been available.  We discovered we could get mackerel as well as many other asian food items from a local Korean market called “HMart”.  Although their main focus is Korean food, they also carry Japanese food items that are not available elsewhere. In this time of Covid, we are using a delivery service (Instacart) to "shop" HMart and it has opened new horizons for us. 

One weekend, we got 2 lbs. of Spanish mackerel which consisted of one large and one small mackerel. As usual, I prepared the fish "san mai-in-orosu” 三枚におろす meaning into three layers i.e. two filets and the remaining bone. I removed the small pin bones from the filets.  I made most of the larger mackerel filets into miso-simmered mackerel 鯖の味噌煮. With the filets of the smaller mackerel, I made a salted and grilled mackerel dish 鯖の塩焼き(subject of a future post). 

The third and final part of the preparation involved the remaining bone. I removed the meat clinging to the bones by scraping it off using a small spoon. (This is a classic Japanese technique used mostly for tuna to make sure no meat of the fish is left behind). I made the scrapings into fish balls for our usual fish ball soup or 鯖のツミレ汁 which I served as lunch one day. I rounded out the soup by adding Japanese udon noodles (we happened to have noodles already cooked), silken tofu I got from Tako Grill (beside take-out, tako grill now sells some Japanese groceries), shiitake mushrooms and topped it with myoga flowers we just harvested and freeze dried “mitsu-ba” ミツバwhich was also from Tako grill.


Unfortunately, you cannot see the fish balls because they sank to the bottom.


Although the freeze dried mitsuba did not have much flavor, the myoga flowers did. They had the subtle bitter flavor characteristic of myoga. The only way it is possible to eat myoga flowers is getting them from myoga grown in your own backyard. The flowers are extremely perishable so once the myoga blooms, it immediately loses its commercial value. It has been some time since we have been able to experience the luxury and subtle taste of myoga flowers. 

Tuesday, September 22, 2020

Myoga harvest 2020 冥加の収穫 2020

Last year, we could harvest only a few myoga (or myouga 冥加) from the new myoga rhizomes we planted in the spring of 2019 to replace the ones that had mysteriously disappeared. But this year we finally got a good harvest. This harvest was much later than usual; mid September instead of early August as in previous years. Nonetheless the myoga buds were much larger and well formed. To harvest myoga, these edible buds are under ground just below the surface. The only way to harvest them is to scrabble in the dirt with your bare hands to find them with your fingers and then dig them up. My wife is skilled and persistent at finding myoga. She can go over a patch I just harvested and dig up many more. She did comment, however, that harvesting myoga wrecks havoc on her manicure. (News Flash! She admitted she has never had a manicure). So, the below is this year’s harvest.


A few had already flowered but we harvested many just in time. I decided to leave the small ones to enjoy fresh. I made the remaining myoga into pickles (pickled in sweet vinegar). Since this year's myoga were large, I decided to halve them before making them to pickles. By halving them, I could clean them better as well.


Ingredients:
Myoga (we probably had about 4 cups), cleaned and halved (or whole if they are small)

For sweet vinegar (combine the below in a pan and heat and melt the sugar and salt)
1 cup rice vinegar
1/2 cup sugar
1/2 tsp salt

Directions:
In a sealable  container, add the myoga and the sweet vinegar. It may not completely cover the myoga but myoga will exude water and in few days, all myoga will be covered. Seal the lid and refrigerate. It can be eaten after 3-4 days. In the previous post 10 years ago, I said this will keep for at least several weeks but we have eaten the previous batch for at least 3 years. After one year, all the red color was bleached out but it was still good.

We are so delighted to have a decent myoga harvest! We had cold silken tofu (hiya-yakko 冷奴) with thinly sliced myoga and bonito flakes. Myoga has such a distinct flavor which we really missed.

Saturday, September 19, 2020

Scallops "Isobe-yaki" 帆立の磯辺焼き

We recently succumbed to one of the advertising emails we frequently get from Great-Alaska seafood. This time, the deal was 2 lbs each of wild sockeye salmon filet, colossal sea scallops and jumbo shrimp. Since the deal included three different seafoods, we thought we could handle it and ordered it. When the shipment arrived, I decided to try the scallops first. The scallops were a good size (so-called diver scallops) and nicely coated with a thin layer of ice so the outside would be protected while they thawed. I defrosted 4 scallops uncovered on a plate in the refrigerator. Interestingly, the ice coating remained intact even as the scallop itself got soft and thawed. Since I only thawed 4 to try, I made a classic Japanese snack that goes well with sake and is often served at sushi-bars 寿司や called "Hotate-no-Isobe-yaki" 帆立の磯辺焼. Whenever "Iso-be", meaning  ”near the rocky beach", is used in Japanese culinary parlance, it is a dish containing "nori" seaweed, either grilled "isobe-yaki" or fried "isobe-age" 磯辺揚げ. In this case,  it was a scallop sautéed and wrapped in nori.  At a sushi-bar, sometimes this would be handed directly to you by the sushi chef. It is literally a finger food conveyed to your mouth with your fingers as shown in the picture below--then "chomp".


The scallops are usually marinaded with soy sauce based marinade. There appears to be quite a few variations on this theme. I used a mixture of mirin and soy sauce and marinated the scallops for 10-15 minutes before cooking. Since two of the scallops were rather thick, I halved them producing 3 portions per serving. I served them with sheets of nori.


Ingredients: (for two servings of small appetizer like above)
4 scallops
Nori sheet cut into small rectangles or use packaged seasoned nori.

Marinade:
1 tbs each of soy sauce and mirin.
1 tbs unsalted butter for frying

Directions:
Place the scallops and the marinade in a small Ziploc bag (I used a sandwich bag), remove the air as much as you can and place in the refrigerator for 15 or so minutes (I am sure longer marination will not hurt). Removed from marinade and blot the excess (below).


Melt the butter and cook the scallops for 1-2 minutes each until browned (below). Add 1 -2 tsp of the marinade to the pan and put on the lid for 30 seconds. When the marinade slightly reduces, coat the scallops with sauce. Try not to over cook. (If using sashimi quality fresh scallops, the center could be raw).

Sandwich between the folded nori sheet and enjoy.

This was really good. The quality of scallops are really good. they were sweet, soft and moist. Perfect drinking snack for cold sake.

Wednesday, September 16, 2020

Marinated tuna sashimi with grated Daikon 鮪のおろし和え

This is a continuation of the “using up yellowfin tuna sashimi block”. We started with “Tuna caprese” and proceeded with the cold chawan-mushi. This was the third appetizer and second tuna sashimi dish. Without knowing specifically what I would make, I marinated 1/3 block of tuna sashimi “saku” block sliced in concentrated Japanese noodle sauce or “mentsuyu” 麺つゆ to make “Zuke tuna” 漬けマグロ. I could have served as it is or as “yama-kake” 山かけ but I did not have any nagaimo 長芋. I did have daikon 大根, however, so I made this dish.


Beside mixing in chopped scallion, I garnished it with the green part of the scallion thinly sliced. 


This is not really a recipe. I grated the daikon and let it sit in a fine meshed strainer to remove any excess moisture. I cut the marinated tuna into small cubes. I chopped one small scallion finely then mixed the tuna, grated daikon, scallion and added “Ponzu” ポン酢 (from the bottle).

This could have been a good refreshing dish but this daikon, as sometimes happens, was extremely hot (spicy) which made it difficult to enjoy. It was like eating straight wasabi or more like horse radish. We ended up scraping as much of the grated daikon as we could off the tuna. Oh well, I should have tasted the daikon before adding to the tuna. 

The last tuna appetizer was  tuna “cutlet”  マグロカツ (I did not take pictures this time but here is the previous tuna cutlet).


 We switched to red wine. Previously, I made the red wine miso sauce and had it with the tuna cutlet. We felt the sauce needed more miso flavor. I reheated the remaining sauce and added more miso. This time, the sauce was better but we think we could have even more miso in this sauce. But we finished the entire saku of yellowfin tuna.