Showing posts sorted by relevance for query yogurt. Sort by date Show all posts

Friday, May 29, 2020

Homemade yogurt 自家製ヨーグルト

We do not like low-fat or non-fat yogurt. We go for the full fat version. Our favorite is Seven Stars Farm Yogurt from Pennsylvania. The only place we can get this is at Whole Foods. Even before Covid-19, we had periods when even regular plain Dannon yogurt was not available at our grocery store. This occurred at the start of Covid-19. In the face of this shortage, my wife decided to start making her own yogurt again. This is something she did many years ago as a means of milk inventory control. She used a recipe given to her by a Palestinian friend whose family used it to make yogurt in the middle-east. Unlike other recipes which require pedantic small jars heated for a long time in a yogurt heating appliance, this recipe can make large quantities of yogurt overnight in "one sitting". This recipe uses commercial Dannon yogurt as the seed. We remembered it as a success but my wife has not made it for sometime. Nonetheless, she found the old recipe and made a batch.

According to this recipe you can use any quantity of milk with any fat content. If using low fat milk, however, add 1 1/2 cups nonfat dry milk (NFDM) for every 1/2 gallon of low fat milk. (This boosts the volume of milk solids in the milk making the resulting yogurt thicker). Bring the milk to a boil. Add the NFDM and allow the milk to cool in a bowl until it reaches 110 to 115 degrees at which point add 4 oz. of Dannon plain yogurt. (The same amount is used regardless of the quantity of milk). Wrap the seeded bowl of milk in several towels to keep it warm overnight. The next morning you have yogurt.

My wife used to heat up the milk in a dutch oven but this was the most tedious part of making yogurt since you have to continuously keep stirring it to keep it from boiling over and to prevent scorching on the bottom. She read somewhere that a slow cooker could be used to heat up the milk. So, we took our slow cooker, which we have not used for ages, out of storage. She heated the milk in the cooker set on low for three hours then turned it off. She took about a cup of the hot milk and using an immersion blender added the NFDM whipping it until all the NFDM dissolved. She then added the whipped portion to the rest of the milk and stirred it until everything was incorporated. (She did this because she found from experience sometimes the NFDM does not dissolve completely and forms an unpleasant layer in the yogurt on the bottom of the bowl). She let the milk cool for two hours until it was about 110 to 115 degrees before inoculating with the seed yogurt. She put the slow cooker bowl with the lid on into an ice chest to keep it warm overnight. The final product is shown below.


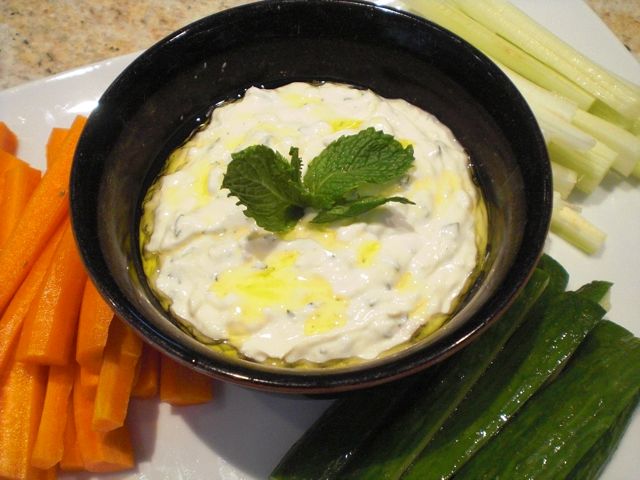
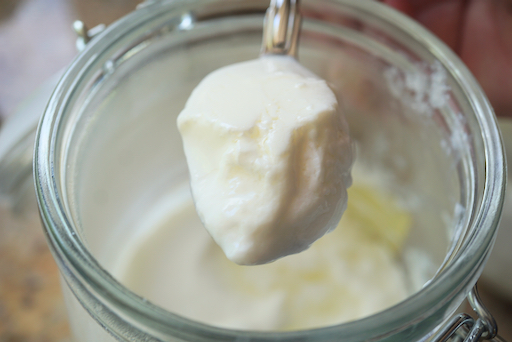
As you can see the consistency of this yogurt is quite different from the original Dannon. It is, nonetheless, quite firm and creamy. A major difference as shown by the yogurt dripping off the spoon is that it is very elastic. When the bowl is gently shaken it jiggles almost like jello. My wife made some Greek yogurt from this batch. The resulting Greek yogurt is very creamy and a dip we made using the Greek yogurt was much better than one with just strained Dannon. I also made some salmon salad and potato salad using this yogurt and it was much better and creamier than when I use the regular Greek yogurt.

My wife also learned that she was not alone in this yogurt making endeavor. While people were stuck at home during Covid-19, they were making yogurt in addition to baking bread. She read an article in the Washington Post about yogurt starters from "Culture for Health" and ordered some. The heirloom yogurt starter she got contained 4 different kinds. She used the "Viili" starter first which is described as "A Finnish yogurt variety, very mild and creamy, with a fairly thick consistency. It’s a versatile favorite that’s perfect on its own or in any yogurt recipe." According to the recipe, this starter does not require a heated environment. Following the instructions she used one cup of cold 4% milk and dissolved the starter in a glass jar, covered it with several layers of cheese cloth fastened by rubber band around the opening.

After 24 hours, it was still basically a glass of milk. The instructions said it could ferment for up to 48 hours. By then it had congealed a bit but was still basically a drink of milk rather than yogurt. She moved it to the refrigerator. The instructions recommended refrigerating it for at least 6 hours before tasting. The picture below shows the batch after a few days in the refrigerator. It firmed up a bit and had some curd. It also had a nice tangy/acidic yogurt flavor without any "off" taste. But it was way too runny.


Somewhat disappointed she fired off an e-mail to the company explaining the situation and asking for advice. They responded very quickly saying that the dried starter may take some time to fully "wake-up" to its full potential. As long as the first batch still smelled good they recommended starting a new batch using the ratio of one tbs from the 1st batch to 1 cup of cold milk. They recommended making 1 to 2 cups with that ratio (no more no less). Then they suggested she make successive batches with the most recent batch as starter until the desired consistency is attained. My wife used 2 cups of 4% milk with 2 tbs of the first batch for the second batch. After 48 hours it congealed significantly more than the 1st batch. The picture below is after 1 day in the refrigerator. It coagulated a bit more with a creamy consistency.


She then used 3 tbs from the second batch with 3 cups of milk for the 3rd batch. It was yet more solid (below picture). In addition it firmed up in 24 rather than 48 hours. We thought this consistency was not bad. She then used 4 tbs of batch 3 with 4 cups milk for batch 4. As shown below, after 24 hours this is just the right consistency and has developed a more pronounced tangy yogurt flavor. Success!


Well, now we have no shortage of yogurt. We have two options for making it and both are very good; one for low fat milk that results in yogurt that tastes like full fat and one for "high-octane" i.e. 4 % fat milk. It's a good thing we like yogurt and eat a lot of it. As long as milk is available we will no longer ever be without yogurt.

Saturday, November 5, 2016

Smoked trout spread, Greek yogurt and cheeses マスの燻製のスプレッド、グリークヨーグルト、チーズ

These are appetizers we had one day which included Greek yogurt my wife made using a special yogurt from a farm in Pennsylvania near where she grew up (left upper brown container) and smoked trout spread (lower right tan container). We also served two interesting cheeses; Blue castello (Denmark) (lower left) and Bucheron Sevre Belle (France) (upper right).


The picture below is a close up of the Greek Yogurt made from a special "high-octane" yogurt which was mixed with our favorite Spanish olive oil and seasoned with salt.


This picture shows the smoked trout dip. We used to make this smoked trout cream cheese spread often when we regularly bought artisanal apple wood smoked trout from a nearby gourmet grocery store. We haven't made it recently, however, because the smoked trout is no longer available.


The picture below shows the Blue castello (Denmark) cheese which was a nice, mild but not too mild blue cheese. It was a bit more assertive than our favorite "Cambozola". It is a bit more crumbly but has a nice blue cheese taste. Cambozola is more creamy and has "Camembert" characteristics.


Bucheron Sevre Belle (France) is aged but not too aged and even the rind was nice to eat. It is a nice cross between fresh and very aged (and fuzzy) goat cheese.


Smoked trout spread

Ingredients:
1. Hot smoked trout. We used to buy smoked trout from the grocery store but this one was made from fresh trout hot smoked in the Webber. I used soaked hickory chips and indirect heat for about 20 minutes (#1). My wife carefully deboned (#2) and flaked the meat (#3), of a whole trout.
2. One package of Philadelphia Cream Cheese, (#4).
3. Fresh dill, chopped, 1/4 cup (#5)
4. Lemon juice of one lemon
5. Horseradish to taste (we also added wasabi). 

Just put everything in the food processor and process it until creamy and homogenized (#6). Taste and adjust any seasonings you like .


Greek yogurt spread with olive oil

Ingredients:

Greek yogurt*
Olive oil (we use our favorite Spanish olive oil)
Salt

* The Greek yogurt was made using "Seven Stars Farm" yogurt from Pennsylvania which my wife found one day while cruising down the dairy isle at the local Whole Food grocery store. The name "Seven Stars Farm" and the picture of the star constellation on the package  jumped out at her from all the other packages in the cold case. She stopped dead in her tracks and exclaimed "I know where that is!!" This farm happened to be across the road from where my wife went to high school.  At that time, however, they did not make yogurt, it was just a dairy farm selling to milk wholesalers according to my wife.. We didn't have any choice but to get one--or rather, to be more exact, to get several. Although the the percentage of fat of this yogurt appears to be slightly above the usual 4% (we estimated 4.5% from their nutritional facts), it looks and tastes like it has much more fat content than that. It even has a thin layer or yogurt from cream on the top which gives it some yellow color. While we really like Danon 4% whole milk yogurt and regularly use it to make Greek yogurt, Seven Stars Farm yogurt definitely has a much "higher octane rev"; it is really something special 

Making Greek yogurt, my wife has really got this down to a precise and easy process.

First, we needed a deep conical strainer like the one you see below (#1 and #2). (if the strainer has a rounded rather than conical bottom the whey does not drain out as well and the resulting Greek yogurt will not be as concentrated.)

Second, you need a better quality cheese cloth called cheese muslin. The cheese cloth from the grocery store tends to be very fragile and coarse and lets most of the curd pass on through as a tithe to feed the "sink God" that lives in the drain.  She spreads the cheesecloth in the strainer and adds the entire container of yogurt and folds the edges of the cloth over it (#2).

Since a rather large bowl would be required to accommodate the deep conical strainer she saves space in the fridge by using the yogurt container itself (#1) to catch the whey. That container is then fitted into a small metal bowl to catch any drippings that may fall from the cloth (#2), then, the whole thing is placed in the refrigerator.

Overnight, Greek yogurt or yogurt cheese is made (#3). You will be surprised with the amount of whey accumulated (#4).


I would like to say these snacks are a bit too rich for us but, really, who would I be kidding? They went perfectly well with red wine. Although we have made Greek yogurt spread before from Danon whole milk yogurt, this Greek yogurt is in an entirely different class. You could actually see the layer of butter yogurt on the surface after it was strained. Adding the spicy Spanish olive oil and salt really makes it. The smoked trout spread was no slouch either. The horseradish and smokiness both worked well and really complemented the wine. The two cheeses were also quite good. We filled ourselves with these wonderful spreads and cheeses and the appetizers became dinner.


Thursday, January 13, 2022

Home-made yogurt; the definitive "how-to" make thick and creamy.

This is a note mostly to ourselves to chronicle the steps we use to consistently make thick, creamy and flavorful homemade yogurt. My wife has been making yogurt from the starter she got from "culture for health" for some time. Initially, following the instructions that came with the starter, the first few batches were OK but they resulted in a thin watery yogurt that we could basically drink. The yogurt was made at room temperature which worked in the summer but not in the winter. The batch she made when it turned cold was a "failure". She ended up throwing it out. When a second cold weather batch also failed, somehow dawned on her that the yogurt wasn't forming because it wasn't warm enough. Instead of throwing it out she put it in the oven with the heat off but the light on and VIOLA Le Yogurt! She then went through a "trial-and-error" process for some time and finally nailed a fail-proof process that she has been using to make a wonderful thick, creamy, slightly sweet, slightly tangy yogurt that we really like. 

During this process we realized that we needed some equipment which would allow precise temperature and timing controls. My wife did all the work of trial-and-error while I provided scientific advice and explanation.

Equipment:
1. Slow cooker (one gallon capacity) (#1 picture below)
2. Proofing box with temperature control (We use Brod-and Taylor's, #8 picture below)
3. Temperature probe with high and low temperature  alarm (we use Thermoworks  ChefAlarm® Cooking Alarm Thermometer and Timer). (#2 picture below)
4. Mason jars with an airtight lids 32 oz (need 4 to accommodate 1 gallon of milk, #7 picture below)

Ingredients:
1 gallon whole pasteurized milk
1/4 cup heirloom yogurt

Method:
1. Heat 1 gallon of whole milk in a slow cooker on "high" (with the temperature probe inserted) to 180F (This takes a few hours. Starting at 6:30AM it will reach temp about 10:30 or 10:45AM).
2. Using the cooking alarm thermometer, the high temperature alarm will sound when the milk reaches 180F.
3. Turn the slow cooker to "low" and maintain the temperature for 30 minutes (temperature will keep climbing to near 185F).
4. Turn off the slow cooker.
5. Because a skin forms on the surface of the milk (#3), skim it off and strain the milk through a fine sieve or a sieve lined the with cheese cloth (#4) into a metal dutch oven (This catches any other pieces of milk skin that may have formed). Cover the dutch oven with plastic wrap and insert the temperature probe (#6).
6.  Let the milk cool to 98 -100F (This cooling can take hours and would mean the yogurt could not be finished in one day. It would have to stay overnight. My wife cannot wait that long so she puts the dutch oven in an ice water Bain Marie to hasten the cooling ( #5) If it goes into the Bain Marie at 10 :45 it will have reached the low temp about 12:00 noon. The low temperature cooking alarm thermometer will sound when the temperature cools to 100F, #6).
8. Meanwhile, preheat the proofing box to 99F (#9) while the milk is cooling.
9.When the milk cools to 100F and feels about body temperature when tested with a finger, inoculate the milk with 1/4 cup of the previous batch of home-made yogurt.
10. Divide the mixture into 4 mason jars (#7), close the lids, and place them in the 4 corners of the proofing box (the center position is hottest part and not good for the yogurt. No need for a water tray) (#10).
8. Incubate for about 9 hours. (If the jars go in the proofing box at Noon they can be removed at around 9:00 PM.
9. Take them out and let them cool to room temperature.
10. Refrigerate at least overnight before tasting.


Semi scientific explanation of how these steps work:
1. Reason for heating the milk: The main milk protein casein coagulates or makes a protein meshwork in the presence of lactic acid as the process of making yogurt. The heating process (steps #1 and 2 above) denatures another protein; a major whey protein called "lactoglobulin". Since thick yogurt needs the participation of the most protein available to make a thicker protein meshwork and, hence, a thicker yogurt, denaturing the lactoglobulin increases the protein available for this process. If not heated, the lactoglobulin remains dissolved and does not participate in making the protein meshwork.

2. Initially my wife covered the mason jars with cheese cloth fastened by a rubber band. We later learned that an air-tight lid (step #7 above) works even better. The bacteria in yogurt (lactobacilli and others) ferment anaerobically (i.e. without oxygen) to break down lactose and other milk sugars to lactic acid. So there is no need for oxygen to be present.

3. Incubation time and temperature (steps #7 and #8): Since biochemical or enzymatic reactions accelerate with increased temperature within the range (Michaelis-Menten kinetics), the higher the incubation temperature the faster the fermentation. Some recipes use higher temperature and shorter incubation time. The temperature and time may influence the consistency and flavors (such as tartness) of the resulting yogurt. We thought slower and longer (99F for at least 9 hours) produced the best yogurt.

4. Although low-temperature (step #10) will slow the fermentation, the yogurt appears to continue developing and produces firmer but creamer texture with overnight refrigeration. We also found that over time the yogurt continues to thicken and become creamier. 

We really like this homemade yogurt. It is very creamy and smooth in texture. The flavor while mild is still distinctive. It is slightly sweet with a mild tang. We eat this yogurt almost every morning with a little fresh fruit such as blueberries or strawberries and a little bit of sugar. We will probably won't go back to a commercial brand.

Friday, September 4, 2020

Homemade Ricotta cheese 自家製リッコタチーズ

For a while during covid we were not able to get plain yogurt. In the past, my wife made yogurt using Dannon yogurt as the seed but when it was not available, she bought some heirloom yogurt starter from Cultures for Health. Recently she has been into making yogurt from the heirloom starter as well as the Dannon yogurt which is now available. The home-made yogurt from the heirloom starter lactobacillus is now in its 16th generation.  With some effort (heating and maintaining the temperature of the milk for a specific time before seeding), the consistency of the heirloom yogurt has greatly improved and it tastes much better than commercial yogurt. It is very creamy, sweet with a slight tang. Meanwhile, we noticed that the  Dannon based home-made yogurt has a slight viscous (slimy) consistency which is different from the original store-bought Dannon and is not entirely pleasant. (When my wife made yogurt many years ago using Dannon the resulting yogurt did not have this consistency). When it is made into Greek (strained) yogurt, however, it is much creamer and nicer than Greek yogurt made from store bought Dannon.  The dip made from Home-made Dannon derived Greek yogurt is really nice. When making Greek yogurt, however, it produces a large amount of whey. My wife always thought it was a bit of a waste to throw it away and wanted to find a way to use it. Finally she found a recipe for homemade ricotta using the whey from yogurt and decided to make a small experimental batch. We were a bit amazed at how good this homemade ricotta is.


Although we learned that authentic ricotta (re-cooked) is made using only whey, the ones commercially available in the U.S. apparently are mostly made from milk. The recipe my wife found uses a combination of whey and whole milk.

Ingriedients: This is the original recipe. The recipe my wife used for the small experimental batch follows.
2 gallons fresh whey (use within a few hours of straining)
1 gallon milk (optional)
1/2 cup distilled white vinegar
salt to taste

What my wife used for her small experimental amount
1 cup whey
1 cup milk (optional)
1/8 cup vinegar (she used rice vinegar)
salt to taste.

Directions
Mix the whey and milk and put in a slow cooker. Heat on low until the combination reaches 195 F. (About 2 to 3 hours). Remove from heat add vinegar and stir. The curd will form and float to the top. (When the milk reached 195 F and we took off the lid and it looked like this (picture below). Apparently, the curd had already started to form)


Drain the curd through a butter cheese cloth (picture below). One hour draining for soft ricotta. Six or more hours for firmer ricotta. Remove from the cloth, put it into a small bowl and salt to taste.


Although my wife made only a small amount, it was really good. It was creamy with a soft texture. The vinegar gave it a slight tang while it also maintained a slightly yogurt flavor and the salt really brought everything together. My wife is inspired...Watch out. 

Saturday, May 21, 2016

Greek yogurt and olive oil ギリシャヨーグルトとオリーブオイル

We had some leftover salmon, so I made my salmon salad as a starter one weekday evening. The small dish consisted of slices of cucumber, wedges of tomato (skinned), salmon salad and my wife's homemade Greek yogurt with Spanish olive oil with freshly cracked black pepper.


The Greek yogurt with the fruity spicy Spanish olive oil (additional cracked black pepper on the top) was the best. This was Spanish olive oil we got on our recent trip the Pennsylvania.  I served this with flat bread crackers with sesame seeds.


The combination of yogurt and olive oil was a surprise. The yogurt seemed to absorb and accentuate the fruity grassy and peppery flavor of the olive oil. It made a wonderful spread. It tasted great either spread over the cucumber or cracker. We had noticed before how yogurt absorbed and accentuated the taste of mayonnaise when we mixed the two together as dressing for potato or cucumber salad. Using this combination we were able to get an intense mayonnaise flavor while using just a small amount. This same characteristic seems to have extended to the combination of yogurt and olive oil and it was a great discovery that we shall exploit extensively. We were drinking red wine for sure but were so blown away by the yogurt/olive oil we cannot remember exactly what it was.

Monday, September 25, 2017

Pumpkin Yogurt パンプキンヨーグルト

Since Halloween is approaching, it is "pumpkin" season and my wife is into pumpkin dishes. Digression alert: apparently pumpkin flavor has become extremely popular. It is appearing in everything from coffee to dog food (really?).  Not be left behind by any trend, my wife was inspired to make this dish. She prepared canned pumpkin puree with pumpkin spices and mixed into plain yogurt. She decided to add finely chopped Japanese apple pear.  Here the addition of Japanese apple pear really worked well. I should have done a better presentation for the picture but this is how we take yogurt to work every day for breakfast; in small plastic containers. From my perspective, while it is very unique, it was also very seasonal and surprisingly good .


One of the secrets my wife uses for her pumpkin recipes is to heat up the puree with the spices mixed in. This gets rid of the "canned" taste in the puree, evaporates some of the water content, concentrates the pumpkin flavor and blooms the spices.


Ingredients:
One 15 oz. can pumpkin puree
1 1/2 tsp. cinnamon
1/4 tsp. nutmeg
1/8 tsp. ground cloves
1/2 cup sugar
Japanese pear finely diced
1 1/2, 32 oz. containers of plane yogurt (we use Dannon) (come to think of it we eat a lot of yogurt)

Directions:
Put the puree and spices in a sauce pan. Cook on medium heat stirring constantly for about 5 minutes or until the puree thickens, pulls away from the sides and the spices become nicely fragrant. Let cool.
Add the yogurt and sugar. Mix well add the diced apple pear.


This pumpkin yogurt gets better with time as all the flavors meld together. The asian pear exudes sweet juice that adds nicely to the pumpkin flavor.  It also adds a pleasant crunch. This is quite a unique yogurt and the addition of juicy crispy Japanese pear really worked.

Monday, March 31, 2014

Indian-style Pork "Vindaloo" curry インド風マスタードポークカレー

Although I started cooking again, here is another installment of my wife's Indian-style dishes made while I was out of commission. This one is a bit spicier than her usual but we liked it very much. We garnished it with sautéed half tomato (skinned and seasoned with salt and pepper) and fresh young cilantro which we are growing on the window sill.

She made a few of her own modification; such as the addition of dry roasted mustard seeds and instead of using coconut milk as suggested in the original recipe, she substituted yogurt. This is not because we do not have an easy access to coconut milk but we like the taste of yogurt in this dish. Coconut milk, at least to our taste, adds a sweetness and distinctive "coconut" flavor (I am sure that must be the whole purpose of using coconuts milk). Besides, yogurt is a bit healthier (we hope).

The addition of cilantro leaves (not in the original recipe) really added to the flavor dimensions. My wife added a bit more yogurt to adjust the heat just before serving.


Ingredients:
  • 2 Tbs. grainy (grey poupon) mustard
  • 2 Tsp. mustard seeds
  • 1 1/2 Tsp. ground cumin
  • 1 1/2 tsp ground turmeric
  • 1 Tsp. cayenne pepper
  • 1 Tsp. salt
  • 2 Tsp. sushi vinegar (the recipe calls for red wine vinegar but sushi vinegar is what we have on hand and I really like its mild taste in dishes.)
  • 3 Tbs. vegetable oil
  • 2 onions cut into half rings
  • 2 cloves garlic finely cut
  • 1 1/2 lb. pork shoulder cut into large cubes
  • 1 cup Greek yogurt (the recipe calls for coconut milk but we find it makes the dish too sweet and besides we like to think the yogurt is better for us.)
Put the mustard seeds into a dry frying pan and roast until they turn a slight grey color and start popping. Remove from heat a set aside (#2 in the picture above). Mix the mustard, cumin, turmeric, pepper, salt, and sushi vinegar together in a little dish and set aside (#2). Put the oil in a pan and sauté the onions until they are translucent (#1) and add the garlic (#2) and continue for a few more minutes. Then add the mustard mixture (#2) letting the spices bloom in the hot pan. (they will start to stick to the bottom but don’t panic). Then add the mustard seeds. Turn down the heat and whisk in the yogurt taking up any of the spices that have stuck to the bottom of the pan. Once everything is incorporated add the meat (#3) and simmer for about 70 minutes or until the meat is fork tender (#4, we do not brown the meat since it does not add much in this type of curry dish).

This appears to be one of my husband’s favorite curries. He asks for it frequently. I thought it would bring him some comfort while his hand healed. This is a nicely assertive curry. The processed mustard fortified with the additional mustard seed and vinegar provides a pleasant contrast to cut the richness of the pork.

Sunday, August 15, 2021

Stuffed mini waffle bowls

 After making mini-waffle bowls, my wife suggested several ideas for filling them. For desert, ice cream and fruit appear standard. She wanted something for breakfast. Since we usually eat a bowl of home-made yogurt, she suggested filling the waffle bowls with the yogurt and blueberries. This was good but kind of difficult to eat the waffle and yogurt together. If you just eat the fruit and yogurt and then eat the waffle bowl, the waffle tends to get a bit soggy. I tried to chomp on the waffle and yogurt together but it was a bit messy. Using a knife and folk, cutting a wedge sort of works. But in the end, I’d rather eat the yogurt and waffle separately.


The next morning, my wife suggested filling the waffle bowls with her favorite sweet Lebanon bologna and scrambled eggs. This sort of worked using a knife and folk to cut a wedge and then eating the waffle, sausage and egg together.


It seems the major role of these waffle bowls is in the presentation. They had a nice crisp cookie taste but its a little awkward eating bowl and contents together. Nonetheless, never daunted, I suggested stuffing the waffle bowl with ice cream then freezing the entire thing. I am not sure if my wife bought the idea. We have to see.

Tuesday, September 20, 2011

Greek yogurt dip with vegetable sticks ギリシャヨーグルトのディップ

On weekdays, when we come home and decide to open a bottle of wine, we tend to have crackers and cheese to go with it. Although we like the cheese, we were thinking we should have something (at least slightly) healthier. So one weekend, my wife picked up several different kinds of yogurt including plain Greek or strained yogurt, which is getting very popular in the U.S. She found a dip recipe on the inner seal and made it. The one shown here is based on that initial success, (this is actually the second attempt using a different brand of Greek yogurt). This one had a more appropriate i.e. thicker consistency especially for use as a dip compared to the first one*. Instead of commercial Greek yogurt, you could strain regular yogurt in a cheese cloth in the refrigerator over night.

*According to America's test kitchen, some "Greek" yogurts are not even strained but other thickeners are added. Certainly we experienced quite a difference between the two brands we tasted. The Test kitchen also taste tested non-fat varieties.

It is rather simple to make this. We just mixed in good fruity olive oil, lemon juice, chopped fresh mint, salt and pepper; all to taste. We then added crumbled feta cheese (We try not to overdo it since it will defeat the purpose of having a healthier snack). 

This time we added one cooked Italian eggplant (optional). Instead of skinning, cubing and roasting with olive oil as suggested in the recipe, we quickly microwaved it with the skin pierced multiple times to prevent an "explosion". (Quick preparation was in order, since we were making this after we came home from work). We removed the skin and cut up the meat into small pieces and mixed it in. 

The recipe also called for adding chick peas which we did in the first attempt but we omitted it this time since it did not add much and the chickpeas make it difficult to scope up the dip with vegetable sticks. 

If the dip tastes too sour, you could add honey (we added honey in the first version but we didn't need it in the current version). The dip will improve if you leave it in a fridge overnight. I served this garnished with a bit more olive oil and mint leaves accompanied by carrot, cucumber and celery sticks. If you have thin wedges of tomatoes, they also work.

As a dip, on its own, this is surprisingly good with a nice fresh minty note and good creamy texture. We also felt good eating all the veggies. The dip however, did not go well with the red wine we were having. The wine was Summit Lake Cabernet Sauvigon 2003 from Howell Mountain district in Napa. This is an interesting wine but more in the old world style. The color of the wine had a brownish hue which is more than the vintage of this wine would suggest. In any case, the dip by itself was good, the wine by itself not bad, together--not a great pairing. 

Friday, March 1, 2013

Crepe クレープ

We may have to change our blog title from “Izakaya” to “Breakfast”. This is another suggestion for breakfast from my wife. We had our share of pancakes especially in the summer when blueberries are in season. For this crepe, instead of cheese fillings such as Mascarpone, she suggested Greek yogurt flavored with Clementine orange.

Here is the crepe we had one weekend.
CIMG5766
Next weekend, we had similar crepe but with a slight variation.
CIMG5789
As usual, my wife made the batter and I cooked the pancakes.

Ingredients for crepe batter:
3/4 cup All purpose flour
1/2 Tsp. salt
1 Tsp. double-acting baking powder
2 Tbs. sugar
2 Eggs
2/3 cup milk
1/3 cup water
1/2 Tsp. vanilla
grated lemon rind

Sift together the flour, salt and baking powder and set aside. Mix together the sugar, eggs, milk, water and vanilla (make sure the sugar dissolves completely). Mix the wet ingredients into the dry ingredients.
Although some recipes call for resting the batter for 5 to 6 hrs or overnight (I suppose to relax the gluten and make tender crepes), we did not do this since we were rather hungry. Add more milk or water to get proper runny consistency.
Since we do not have a special crepe pan, rake or a crepe machine, I just used our non-stick frying pan. I preheated the frying pan for few minutes and added light olive oil (the amount of oil has to be just enough to coat the bottom). When it started to shimmer (but not smoke), it is the opportune time to add the batter. The batter has to be runny enough to spread very thin and the pan has to be hot enough that the batter can be spread thinly but the portion in contact with the bottom of pan immediately starts cooking. I tilted and turned the pan to spread the batter. I took the pan on and off heat to get the right heat level (#1). When the surface looked dry, I flipped the crepe using a spatula (#2). This definitely requires some practice. Just 10-15 seconds on the last side and the crepe was done (#3). I stacked them up on the plate (#4).
Yogurt sauce:
Greek yogurt (or regular yogurt drained using cheese cloth in the refrigerator over night)
Clementine orange, peeled and cut up in small chunks
Juice of the orange, add sugar to taste

This is quite good for a relatively low fat recipe. The original recipe calls for a mixture of Mascarpone flavored with fresh orange/orange juice as the stuffing but Greek yogurt and Clementine are good substitutes. You just can’t beat the texture and lovely mouth feel of a crepe. The mild vanilla flavor of the crepe went very well with the orange flavored yogurt.

Saturday, May 27, 2017

Ginger lemon frozen yogurt 生姜レモンフローズンヨーグルト

A long time ago, we used to make ice cream and frozen yogurt. We first used a "Frozen cylinder" device which we kept in the freezer to chill. Then to make ice cream, we added the mix and hand cranked until the ice cream formed. We felt, at the time, that the effort and quality of the resulting ice cream was not worth it; never mind that the cylinder took a big chunk out of our precious freezer space. Then, we came across a self contained (with compressor) mini-ice cream maker on sale and bought it. This was much better. We have made ice cream and frozen yogurt a few times, but them we forgot about it for a long time. While we were trying to find more space in the cupboard, we came across this old ice cream maker occupying valuable cupboard real estate. We were not sure if it still worked and decided if it did not work it was "gone/history".  But, miraculously, we flipped the switch and it still worked after all these years of neglect. So, we made, ginger lemon frozen yogurt. We served a few scoops with our favorite girl scout cookies.


We did not make it too sweet. The lemon and ginger flavor was very refreshing.


The recipe came from Alton Brown (Food network). We made some changes and also reduced the portions to fit our ice cream machine (maximum is about 2 cups).

Ingredients:
Greek yogurt 2 cups (my wife drained plain whole milk yogurt).
Lemon juice from one lemon
Lemon zest from one lemon (micrograted).
Grated ginger, 1 tsp
1/8 cup sugar
1/8 cup corn syrup
Crystalized ginger

Directions:
Mix the ingredients together and place in the ice cream machine container #1.
Put in the paddle #2, Put on the machine's lid #3.
Stir about 20 to 25 minutes with the chill unit on. #4 and #5.
When the ice cream is formed fold in the crystalized ginger, put into a container and then put into the freezer #6.


This ice cream came out nice and creamy. After few days in the freezer, it was so hard, we could not scoop it out of the container and had to microwave it for 20-30 seconds to loosen it up. Nonetheless it was very good. The lemon ginger flavor was very refreshing and would be perfect on a hot summer day.

Tuesday, June 19, 2012

Boiled cabbage salad 茹でキャベツのサラダ

I made this from left-over 1/4 small head of cabbage after making pepper slaw. This a rather healthy salad which definitely can be served in an Izakaya.


Here is a close up of the salad. The dressing is rather classic Japanese style; mayo with sesame.


Cabbage: I had a small 1/4 head of cabbage left. We had enough raw cabbage (slaws), I decided to make boiled cabbage salad. I removed the core and cut the cabbage into about 1 inch squares. For color and texture, I also added a carrot. I peeled and thinly sliced one medium carrot on the bias. I cooked both together in salted boiling water for 3-4 minutes and drained. I could have just let it to cool down but since I did not have enough time for such a lengthy process, I shocked it in ice water. I drained and then squeezed out the excess moisture by wringing the pieces in a paper towel (right in the image below.)


Dressing: I made sesame/mayo dressing. I first roasted white sesame seeds (2 tbs) in a dry frying pan for a few minutes or until fragrant. I tipped it into a Japanese mortar and ground it coarsely (left on the image above).  The roasting process really brought out the flavor and fragrance of the sesame. I mixed in mayonnaise (2 tbs) , plain yogurt (2 tbs), and soy sauce (1 tsp). Adding plain yogurt is optional (if you do not use yogurt, increase the amount of mayo). Adding yogurt does not dilute the mayo flavor but it reduces the fat in the dressing. If you were not told, you would not be able to tell that this dressing contains half yogurt.

I tossed the boiled cabbage and carrot using a half of the dressing. In the bottom of the glass bowl, I put a small mound of baby arugula and placed the dressed cabbage on the top. I skinned one medium tomato (I placed it in the same boiling water in which the cabbage was cooked for 20 seconds and then put in the ice water) and quartered. I put them on the side. I also had microwave "sakamushi" or sake steamed chicken breast and added a few slices. I then drizzled the remaining dressing over it.

This is a very nice salad. The roasted and freshly ground sesame really makes this dish. By adding plain yogurt, the dressing is not as high in fat as it tastes--which is like it is made of 100 percent mayonnaise. The cabbage was just cooked enough but still maintained a fresh and sweet taste. Even my wife who is not very fond of cabbage thought this was nice dish

We had a bottle of red wine form Ribera Del Duero, Spain, with this dish. We keep finding reasonably priced good wines from this region of Spain. This is called "Ribera del Duero Bodegas Balbas Reserva 2001". This wine is made of 100% Tempranillo. It has a nice distinctive cedar-y nose. The palate is not too flashy but very nice and black fruit upfront with spices leading to well-integrated smooth tannin. It lingers in your mouth quite sometime. For 2001 vintage, this one has a nice balance of age and youthfulness. This one got 93 from WS and we agree with this score.

"Highly Recommended'
"This spicy red shows an alluring mix of ripe fruit, with more mature flavors of tobacco, leather and cedar. The tannins are well-integrated and softening, while the acidity is still fresh and crisp."

Monday, February 17, 2014

"Kuromame" black beans in Greek yogurt 黒豆の水切りヨーグルト和え

Kuromame 黒豆 or "black beans" are practically only eaten as part of the New Year’s dishes. Reportedly, it is not related to Western "black beans" but are a type of black soybean (Recipe in English is also found here). I have not ever prepared New Year’s black beans myself but instead bought them from the Japanese grocery store. More recently, they have been included in Sushitaro Osechi.  Although we always enjoy kuromame on new year's day, we tend to forget we have kuromame and find them much later tucked in the back of the refrigerator. I saw an interesting recipe to use kuromame on the Internet and decide to try it.


I did not do a good job presenting this dish (some embellishment such as some parsley etc would have helped) but it is too late.


I used Greek yogurt (or you can drain regular yogurt to make “greek” yourself). Using my own instinct, I added a bit of good fruity olive oil and salt to the yogurt and mixed in the cooked black beans.

It tasted good but I  mainly tasted the Greek yogurt. The black beans added texture and some sweetness in contrast with the sourness from the yogurt. This is a good way to finish off the kuromame .

Tuesday, May 9, 2017

Udon with spicy miso sauce 肉味噌うどん

This is a re-purposed spicy red miso sauce with pork (niku-miso with red miso and pork 肉味噌) I made a few days ago. Since I made it a bit too spicy (I am not sure if it was due to the Sriracha sauce or the jalapeno pepper), but it was a bit much for my wife. So we added yogurt like we often do for Indian curry which made it much milder. That led me to come up with this dish as a final "shime" 締め one evening. I made the sauce for the udon noodles from the spicy red miso sauce with pork and yogurt.


Although adding yogurt may be somewhat unusual for more traditional Japanese recipe of "Niki-miso udon 肉味噌うどん", it went well. I also added spinach which my wife prepared from fresh spinach for spinach soufflé (which we did not make because we ran out of time and energy and were too full to eat it anyway).


For a impromptu dish made from re-purposed ingredients, as leftover control, this was quite good.

I warmed up my spicy pork red-miso sauce, added yogurt (did not measure, plain non flavored) and mixed. When it was warmed up, I mixed in the cooked spinach.


We used dried thin udon noodles, Sanuki undon 讃岐うどん, cooked as per the package directions and rinsed in cold running water after it was cooked and drained.


The addition of yogurt made the sauce mild and creamy without adding much additional taste but a nice smooth texture. It easily clung to the noodles and was a perfect small ending dish for us.

Thursday, June 28, 2012

Deviled eggs デビルドエッグ

This is a very old fashioned appetizer but recently it has been making a come-back. My wife made three different flavors; the one with parsley (back) is classic mayo and mustard flavor, the one with slices of conichon pickle (middle) is curry flavored and the one with red sauce (front) is flavored with Sriracha hot sauce.

Sometime ago, our dear friend who was in her late 70s served us deviled eggs as an appetizer. We really liked them and thought about making some ourselves. A few months later, my wife found a "deviled egg serving plate" (#5 in the image below) and bought it. But the plate sat unused in the cabinet for several years. One weekend, my wife, out of the blue, suggested making deviled eggs. She must have had some train of thought leading up to the idea but, from my vantage point, her statement came completely out of the blue. Since this is a perfect drinking snack and Japanese really like eggs, I thought this could be the next new craze in Izakaya cuisine (probably not).

My only task for this dish was making perfect hard-boiled eggs. I do not like overcooked eggs—you know the kind; the ones with the green surface on the yolks (ferrous sulfide forming at the interface between the yolk and white). This is how I make hard boiled or, as I prefer to say, completely cooked boiled eggs.

I took the eggs (1 dozen) from the refrigerator 30 minutes before cooking. I punched a pinhole in the air cell side (rounder end) using an egg piercer (to prevent the eggs from cracking when the air inside expands during cooking). I brought the water to a rapid boil and turned down the flame until no bubbles were coming up. I  added the eggs using a perforated spoon. In the first  few minutes, I gently stirred the eggs hoping that this would help the egg yolks center inside the shell as they cooked but I am not sure this really helps. I let them cook for 15 minutes and immediately cooled them down in cold running water. I peeled the eggs and turned the operation over to my wife.

She made three different filings; 1. classic mayo and mustard seeds (#2 in the image below), 2. curry flavor (#3 in the image below), and 3. with hot sauce ($4 in the image below).


I removed the yolks from the whites. The shells formed by the cooked eggs whites are shown in picture 1.  I gently mashed the egg yolks with a fork until they became uniformly granular. All the flavors started with the same base. I added a mixture of half mayonnaise and yogurt to the crumbled yolks. In this case I used about 3 tbs. mayonnaise and 3 tbs. yogurt. I cut the mayo with the yogurt in an effort to be health conscience…which may not make too much sense given that we are flavoring egg yolks here. Even with the addition of the yogurt, however, the overall mixture still tastes like mayonnaise. I bloomed 1 tbs. of mustard seed (bloom by putting the seeds in a dry pan and heat until the seeds start popping like popcorn). I added 1 tsp. of celery seed, 1tbs. of Dijon mustard. and 1/2 tsp of salt. I stirred the mixture until it formed a homogeneous paste. I divided the mixture into 3 equal parts.

Traditional: I added 1/4 tsp of onion salt and 1 tbs. of Worcestershire sauce.
Curry flavor: I added 2 tsp. of curry powder (I used a mild slightly sweet powder but whatever powder you prefer will do and added to your taste), I also added another tsp of Dijon mustard.
Hot sauce flavor: I added 1 tsp. of rice vinegar, 1/4 tsp. Sriracha hot sauce, 1/4 tsp. onion salt.

I mixed each flavor until the added ingredients were completely incorporated. I  lightly salted the empty egg white shells and then spooned in the flavored mixtures—one flavor per shell.  Then I turned the operation back over to my husband who immediately garnished them making them look pretty for their photo shoot.

So how decadent was this? Eating just one flavor per sitting was out of the question. All three were very good and provided interesting variety. My wife liked the curry flavor and I liked the one with hot sauce. The bloomed mustard seeds really added to the eggs by providing a pleasing texture and a little burst of flavor (they pop when you bite down on them). This dish goes with any drink. The only problem is that even with the addition of yogurt this dish is high in cholesterol.

Thursday, June 24, 2021

Homemade buttermilk 自家製バターミルク

 For the last couple of weeks we have not been able to get buttermilk particularly the brand my wife likes best. As was the case when we could not get plain yogurt at the start of the pandemic and my wife started making it, she decided to start making buttermilk too. So she ordered buttermilk starter from "Cultures for Health" (the same place she got the starter for yogurt). Unlike yogurt, however, there is little information on the internet on how to make buttermilk. Most of the entries are about what to substitute in recipes for buttermilk if you don’t have it. 

Digression alert: Buttermilk is one item that is very difficult to find or not at all in Japan even recently. When I was growing up in Japan, I never heard of it. Even in the U.S., not many people will drink buttermilk but almost exclusively use it in cooking, especially baking. It has its own unique tangy flavor which will add to the flavors of baked goods and its acidity will activate baking soda. My wife is one of the rare people I know, who enjoys drinking buttermilk. (She says, 'What's not to like? If you like sharp cheese why not buttermilk?') Originally buttermilk was the residue liquid after butter was churned. It was fermented to make buttermilk but modern buttermilk was made by inoculating and fermenting whole milk as my wife did (see below).


The resulting buttermilk (shown in the first picture) was quite thick and almost the consistency of runny yogurt but it has a very different taste... tasted like...buttermilk…actually pretty good buttermilk!


To make buttermilk

To “wake up” the culture when you first get it. 
Pour 1 quart of pasteurized milk into a glass container. 
Add 1 packet of starter culture and mix well. 
Cover the container and put in a warm spot (we use the proofing box) at 70 -77 degrees. 
Check after 24 hours to see if the buttermilk has set. If it has not leave it up to 48 hours checking every so often. 
Once it has set refrigerate at least 6 hours. (We put the container in the proofing box at 9:00 am on Friday and took it out at 8:00 PM on Saturday.) 

For subsequent batches add 1/4 cup of the previous batch to 1 quart of milk and repeat the procedure of putting it in a 70-77 degree proofing box until set. It should set in less time than the first batch, about 12-18 hours. While doing subsequent batches I realized the milk was very cold just coming out of the refridgerator and it took some time until it even reached room temperature in the proofing box. So I gently heated the milk to about 90 degrees in a pan on the stove. When it was about room temperature i.e. just warm to the touch,  I added the starter. This really accelerated the process. If the milk was started at 7:00 AM it was ready by 7:00 PM. The instructions suggest making a new batch every 7 days to keep the culture strong. It also suggests that it may take several batches for the flavor and texture to even out. 

The resulting buttermilk from our first batch, was very thick and creamy. It had a very mild flavor and even I was able to drink a little of it. 

Saturday, August 13, 2016

Prosciutto rolls 生ハムロール

This is a quick snack to have with a glass of wine. We had leftover prosciutto from the previous day's cold pasta lunch. I decided to make rolls and served it with my baked spicy tofu (served cold).


Inside the rolls, I included my wife's Greek yogurt (which she made by draining regular plain yogurt overnight in the refrigerator) mixed with olive oil and seasoned with salt and fresh cracked back pepper. I also included, cucumber, thinly sliced Vidalia onion and watercress.


I wanted the watercress to look like it was sprouting from the roll.


I suppose anything can be rolled in prosciutto. Blanched asparagus or cheese would be the common choice.  I added our favorite Spanish olive oil to the Greek yogurt. I spread the mixture on 1/3 of the slice of prosciutto added the onion and a button of cucumber (American mini-cucumber) and watercress. I simply rolled it and cut it in half and stood it up on the cut surface. I drizzled on more olive oil. Although there is no cheese on this plate but the combination of Greek yogurt and olive oil and tofu are almost like some type of cheese. This is indeed an excellent starter dish.