Tuesday, May 3, 2011

Ratatouille with a poached egg ラタトゥユのポーチドエッグのせ

We got the idea for this dish from Eric Ripert's TV show. Since we had leftover ratatouille, it is very easy to make. From our experience of trying a few baked egg dishes such as  Oeuf cocotte, we learned that baking eggs and having them come out just right instead of raw or like rubber, is very difficult. When the yolks are just done perfectly, the whites are not done or the whites are done but the yolks are overcooked. So whenever we see "baked" eggs recipes, we use "poached" eggs instead. This way we have a much better control over the doneness of the eggs.
I put leftover ratatouille in a small ramekin and warmed it in a 375F toaster oven for 20 minutes (or microwave). I then placed a poached egg on top of the ratatouille and topped with grated Parmigiano-Reggiano. Since I did not have any fresh herbs, I sprinkled dried thyme (fresh basil or thyme would be nice).

Here is the dish after the yolk was broken*. I think this is a combination which can not go wrong. This could be a breakfast or late night drinking snack.

*Please note that we use pasteurized shell eggs . Use pasteurized eggs or safe eggs from an alternative source for any dishes for which you undercook or not cook eggs.

Sunday, May 1, 2011

Curry flavored baked drumettes 鶏手羽のカーレ風味オーブン焼き

This is a variation on the theme of Buffalo wings. I thought I bought whole wings but when I opened the package, they were all drumettes and I just came up with this dish one evening. A similar dish may indeed exist but this was not based on any recipe.

I had 8 drumettes. I seasoned them with salt and pepper. I made a mixture of flour and Japanese SB brand curry powder (1/2 cup flour and 1 tbs curry powder or add more curry powder if you like it spicier) in a Ziploc bag and added the drumettes and shook the bag to coat the chicken. 

I baked them in a hot oven (450F convection oven in the top shelf) for 20 minutes turning them once half way through cooking. Although I did not add any oil, the oil from the skin made a crispy crust. The upper side of some of the drumettes still had flour left halfway through the cooking, but, by turning it over, oil from the skin turned the flour into the crispy crust (self frying). The end result was as seen above; nice crispy crust/skin with curry flavor with mild spiciness. I served them like Buffalo wings with celery sticks and blue cheese dressing. The skin and crust are almost as good as deep fried. Beer will be a natural choice but we went for cold sake.

Saturday, April 30, 2011

Sake-steamed "Sakamushi" chicken breast with scallion sauce 鶏胸肉の酒蒸し葱ソース

This is another simple dish but it is a perfect drinking snack. A Japanese cooking technique called "Sakamushi" 酒蒸し simply means "steamed in sake". There are some variations on how to do sakamushi. You could do this using a combination of poaching/steaming or purely steaming depending on the situation or the type of food items you are cooking. This technique is used mostly for fish (including shell fish) or chicken. I bought 4 split chicken breasts with bone in and skin attached. I was too lazy to debone the chicken before cooking (one of these weekday evenings). So I decided to do sakamushi using bone-in and skin-on breasts.

Chicken: I just washed and dried the chicken breasts with a paper towel. I salted it with Kosher salt (rather generously). You can be generous since much of the salt will dissolve and drip down into the steaming liquid.

Steaming: In a large Dutch oven or soup pot, I placed a metal basket steamer and poured a sake and water mixture (a 1:1 ratio) to just below the bottom of the basket. When it started boiling/steaming, I turned it down to a simmer and placed the chicken breast in the steamer basket with the lid on tight. I let it steam for 20 minutes or so or until the juice ran clear when pierced in the thickest portion. It is important to let the chicken cool to room temperature before slicing. It tastes best just as it comes to room temperature but it is also fine cold the next day or two stored in the refrigerator. You should finish it within a week, though.

Sauce: This time I served this with a type scallion sauce or "negi sosu" 葱ソース (my own, just made on a whim). It is a mixture of chopped scallion (as much as you like), ponzu shoyu sauce (from the bottle), splash of dark sesame oil and Tabasco (as much as you like). I also added a chiffonade of perilla since I had it.

Assembly: I just removed the bones by hand and sliced the chicken with the skin on (if you do not like the skin or do not want to take in fat from the skin, remove the skin). I placed the chicken on a bed of thinly sliced and lightly salted cucumber (mini cucumber). I just topped it with the scallion sauce. I was afraid that I might have been a bit too liberal with the Tabasco but it was just the right amount of spiciness for us. Especially if you remove the skin, this is a very low fat drinking snack.

You could serve the sakamushi chicken many different ways. You could use this chicken for salad, sandwich etc. You could steam an entire chicken if you wish (steaming a whole chicken is not really a Japanese way of cooking, though) but you need a large and deep stock pot for that. Another method I used to use often is a Chinese style poaching technique similar to one used in Hainanese chicken and rice. You boil a pot full of water (sans the volume of the chicken you are planning to put in, but the pot must be large enough for the chicken to completely submerge and the water volume has to be sufficient to hold the heat). You dunk the whole chicken for 30 seconds in boiling water and take it out (supposedly this initial dunk makes the skin taut and less porous to keep the moisture in) and wait until the water comes to a boil again, then, put the chichen back in, shut off the heat and cover with a tight lid. Let it poach for 1 hour or longer without any additional heat until it is done. This technique produced a really tender succulent chicken but it is a big production (I think I got this recipe from Frugal Gourmet).

In any case, poaching or steaming a chicken is not popular in the U.S. but this is a good and energy efficient way to cook chicken. We had it with cold sake.

Thursday, April 28, 2011

Parent-offspring (chicken and egg) bowl 親子丼

This was a "shime" 〆 dish I served one evening. Chicken and egg bowl or "Oyako donburi" 親子丼 is a classic "donburi" or one bowl dish. It sounds a bit gruesome when it was translated literally into English. Albeit less common, the combination of salmon and salmon roe donburi also falls into this category of "parent-offspring" bowl.


For 2 servings, I used chicken thighs (2, deboned, skin removed and cut into bite size), small onion (1, halved and thinly sliced), shimeji mushroom (root end cut and divided, or fresh shiitake mushroom stem removed, arbitrary amount or "tekiryou" 適量), some kind of green (spinach is most commonly used, here I used baby arugula, again, an arbitrary amount) and eggs (two, I used one brown and one pasteurized shell eggs for the reason you will see below).

Broth: I just used instant dashi granules dissolved in hot water (half cup), I added mirin and soy sauce (1 tbs each). You would like to have the broth a bit stronger than a soup but not as strong as a dipping sauce. I tasted and added a bit more soy sauce.

In two non-stick small (8 inch) frying pans on a low flame, I poured the broth and arranged the onion and mushroom. I put on the lids and let it simmer for 5 minutes or until the onion was almost cooked. I then added the chicken and let it cook for another 3-4 minutes or until the chicken was just cooked through. I added the greens and poured the beaten brown egg over it (divided between two pans). I put the lids back on and let it simmer for 2-3 more minutes or until the egg is almost completely cooked (image below), I turned off the fire and poured the beaten pasteurized shell egg over everything and put back the lids letting the pans steep for 1 -2 more minutes. (The beaten pasteurized egg should not be completely cooked).

I slid everything onto a bowl of warm cooked rice (I used leftover frozen rice, microwaved). By this time only a small amount of the broth remained.

This is best when the egg is semi cooked (or "hanjuku" 半熟). This is the reason, I added the beaten pasteurized egg after I cut the flame. This dish is a classic comfort food and perfect for lunch, dinner or "shime" 締め.

Tuesday, April 26, 2011

Daikon "steak" with balsamic vinegar reduction 大根のステーキ

This is a very interesting dish. This may be the best way to introduce "daikon" to the uninitiated. I had a daikon I bought sometime ago sitting in the refrigerator. I wanted to use it before it went bad. I decided to explore something I have not tried. I came across this dish in e-recipe. I deviated very slightly from the original recipe, although this was the first time for me to make this dish (my instinct makes me change the recipe on the fly).


Daikon: I first cut about 1 inch thick rounds (two) and peeled the skin. I precooked the daikon in water with a pinch of raw rice for 30 minutes. After it was cooked, I washed it in cold running water. I kept this cooked daikon in a container in a refrigerator for later use.

Several days later on a weekday evening, I decided to finish this dish. (Since this dish turned out to be very good, I made it again several evenings later, see #4 in the image below). I decided the rounds of daikon might be a bit too thick and sliced each round into two 1/2 inch thick rounds. I simply fried the daikon rounds in a flying pan on medium flame with light olive oil (1 tbs) for 2-3 minutes on each side until both sides were nicely brown (#1 in the image below).

Sauce: After I removed the daikon from the pan, I added balsamic vinegar (5 tbs) and let it reduce in half (#2). Instead of sugar or honey (as suggested in the original recipe), I added mirin (2 tbs or, as in my steak sauce, I could have added port wine here), soy sauce (2 tbs) and let it reduce further. When the bottom of the pan was just covered with liquid and the sauce was getting somewhat viscous, I added pats of butter (2 tsp or whatever amount) and finished the sauce (#3). This is the next evening when I served the same dish with drunken Camapari tomato and brocollini (#4).


My wife got these funky triangular plates sometime ago and I decided to use it for this dish (2nd image above). I garnished the daikon with chopped parsley with an accompaniment of Campari tomatoes and baby arugula. This is a very good dish. Not quite steak but it has a similar consistency and the sauce went very well with it. This arugula had a very strong peppery taste complimenting the dish. The wine we had with this is not outstanding but OK California Malbec, 2007 Dry Creek which went very well with this daikon steak. Very good and interesting fusion dish.

Sunday, April 24, 2011

Chicken breast with sesame paste dressing 鶏胸肉の胡麻和え

This is a classic small dish perfect for an Izakaya. In the original form, the chicken breast is steam cooked in sake or "sakamushi" 酒蒸 and thin strands of breast meat is teased out rather painstakingly and dressed in sesame paste dressing. This was a weekday quick dish, so I just used the leftover chicken breast which was barbecued. As a result, the chicken has a bit of smoky flavor which added a dimension of complexity to this dish. I did not teased out the chicken breast as carefully as I should have but strands of the meat were separated along the grain of the meat. The sesame dressing is made as usual; in a small Japanese mortar or "suribachi" すり鉢, add Japanese white sesame paste or "nerigoma" 練り胡麻 (2 tbs), sugar (1 tsp) and soy sauce (2-3 tabs) and mix with a pestle or "surikogi" 擂り粉木. I taste and add more soy sauce and/or sugar during the process. If the consistency is too thick, add some dashi broth or just water. Dress the chicken meat and top it with roasted white sesame seeds. I blanched "sugar snap*" peas (shocked them in a cold water to preserve the vibrant green color) and served as a garnish.

*My understanding is that these sugar snap peas are a hybrid cultivar developed in the U.S. and then introduced to Japan. This is often referred to (or at least used to be) as  "Snack" endou スナック豌豆 in Japan. Obviously Japanese misheard "snap" as "snack". Japanese government corrected this and this type of pea is now officially called " Snap" endou or スナップエンドウ.

Friday, April 22, 2011

Sautéed squid with ginger soy sauce イカの生姜焼き

Just after we got married, we rented a house that had a locally-owned grocery store within walking distance. The fishmonger there was Asian and really knew his fish. As a result, we were able to get some remarkably good and interesting fresh seafood. It is really good the store was within walking distance because the refrigerator in the house was from the 1950s and the freezer was only large enough to hold a box of frozen peas. As a result we had to stop almost everyday to buy food for dinner. One day, I came home and there was a bag of fresh squid sitting in the kitchen sink. Apparently, my wife bought fresh uncleaned squid from the fish monger. According to my wife, the cashier asked her, during checkout, if she knew how to clean and prepare squid. She answered with a definitive "NO", but said she assumed, since her husband was Japanese, he would know. Luckily, she assumed correctly. She should have realized, however, that not all Japanese, especially men, know how to clean and prepare squid. I can not remember what I made from the squid that day, just that my wife had such implicit faith (well placed or otherwise) in my culinary skills.

In contrast, where we now live, most squid is of either the previously or "presently" frozen pre-cleaned variety. To my pleasant surprise, however, I found fresh squid (uncleaned) at one of our regular grocery stores. Naturally, I had to get some. Although the freshness was nothing close to those available in Japan (many are still alive), this is much better than frozen ones. Although the exact variety is unknown to me, it was larger than most frozen squid.
I pondered what to make from this squid but decided to make it in a classic Izakaya or street food way; grilled squid with ginger soy sauce. Otsumami yokocho おつまみ横町 page 74 has a similar recipe but this type of squid dish is rather classic. I remember this type of squid (served on a stick, see image on the left) was one of my favorite food stand foods during Japanese festival days* or "en-nichi" 縁日 when I was a kid. (Image from http://wallpaper.free-photograph.net/jp/photobase/yp5821.html).

*The closest equivalent I can think of in the U.S. would be a county or state fair.

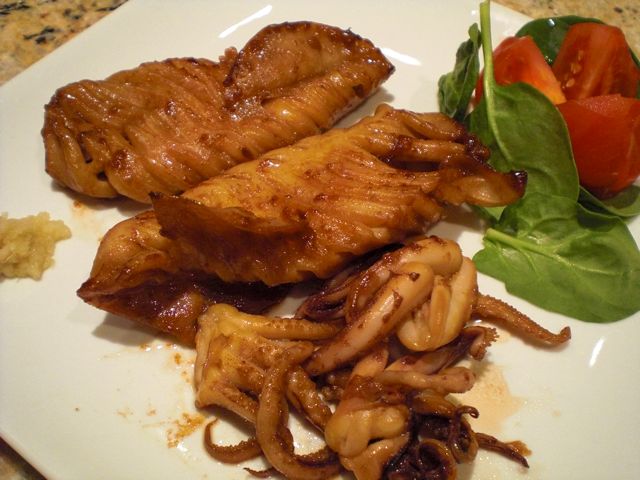
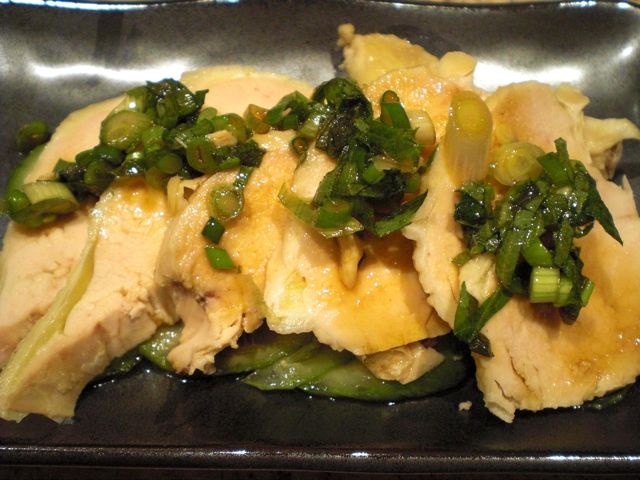
Just in case you have never cleaned squid: You first have to remove the innards by gently pulling the tentacles while holding the body. If you pull it correctly, all the innards come out in one piece. Then remove the cartilage which runs the entire length of the body of the squid. My squid must have had a hard life. The cartilage was broken in the middle in almost all of them. In that case, you have to go back with you finger into the body cavity of the squid and get the remaining cartilage out. As for the tentacles, I cut into them just beneath the eyes and go under the "beak" to cut them from the eyes and innards. If the beak was still attached to the tentacles, make sure you remove it. I then cut the tentacles at the base into two parts. I removed the skin from the body tube, although you do not have to do it. I did not remove the "fin" at the top of the body called "enpera" エンペラ. I scored the tube in an oblique fashion on both sides to make it easier to eat.

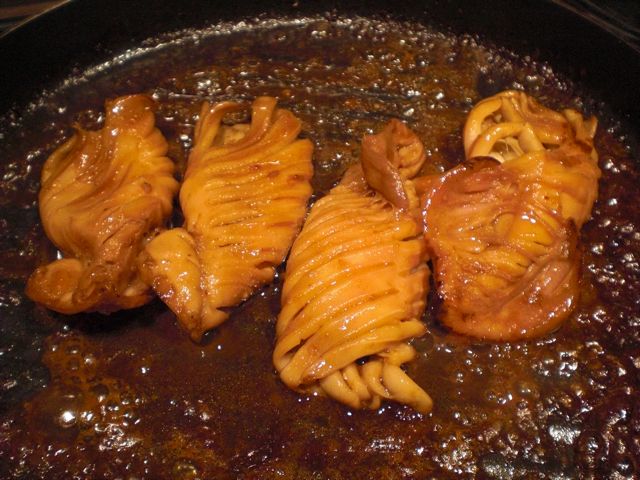
I first marinated the prepared squid in a mixture of sake and soy sauce (1:1) and grated ginger root (1/2 tbs) for several hours in the refrigerator. Since I could not have a charcoal fire to grill the squid, I sauteed it instead. After I removed the squid from the marinade, I carefully dried them with paper towels despite this liquid came out from the squid while cooking and prevented it from nicely browning. This was unavoidable since I did not grill on a charcoal fire. After a few minutes turning once I added a small amount of the marinade and reduced the heat for 2-3 minutes and made a sauce to coat the surface of the squid (see below). If I was grilling I would have brushed on the marinade towards the end of the grilling.

This was not one of my best efforts but the squid was very tender and soy sauce ginger flavor was perfect. For a good measure, I also added a small dab of freshly grated ginger root. We had this with cold sake.