

Preparing soba noodle: I used packaged dried soba noodle (#1). The first secret is to tie off one end with bucher's twine. I left enough length of the twine on one end after making a knot. I then cooked the noodles in boiling water but I kept the end of the twine outside the pan (#2) Be careful not to set the twine on fire, though. You could put the end of the twine in the water and later fish it out. I loosened the noodles as they became more pliable using a pair of cooking chopsticks. After the noodles are cooked, I pulled the end of the twine to lift them out of the water and washed it under cold running water but took care not to break the tied end (#3). After I aligned the noodle in one bundle (#4), I squeeze the extra moisture using paper towel. The second secret is to let it sit on the cutting board loosely covered with a plastic wrap for at least 30 minutes or 1 hour before rolling it. If you try to roll it immediately, the noodles have too much water on the surface and just fall apart.
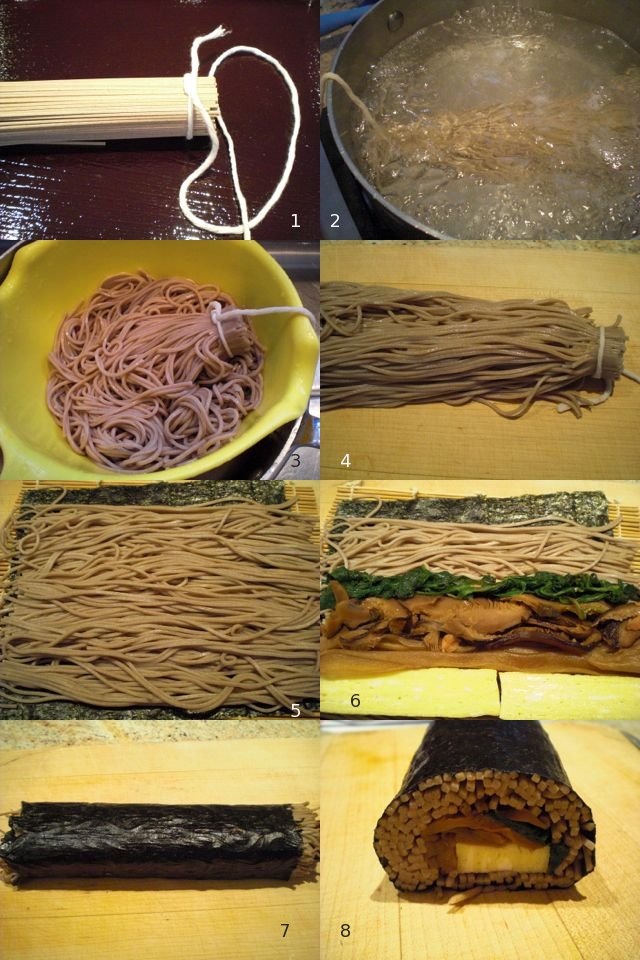
After slicing the roll like a futomaki, I served the pieces with a side of vinegared "gari" ginger and a dab of real wasabi. I served a dipping sauce (diluted from the bottle of a noodle sauce) in a shallow bowl with a wide-opening instead of a regular soba noodle dipping bowl. So that you could dip the roll of soba more easily.
This is definitely much easier to eat than slurping the soba noodles; granted, slurping may be an important part of enjoying soba. The combination of all the different tastes in one mouthful is kind of nice. Is it worth the effort? Maybe on certain occasions.
This is definitely much easier to eat than slurping the soba noodles; granted, slurping may be an important part of enjoying soba. The combination of all the different tastes in one mouthful is kind of nice. Is it worth the effort? Maybe on certain occasions.
5 comments:
What an extraordinary idea! Tying up the noodles is so clever! I love soba and love sushi maki and I'm pleasantly surprised the noodles don't fall out of the sliced maki rolls. I will certainly try it one day!
I, in truth, can not claim this as my original idea--it is fairly well known in Japan. Making this can be tricky but there are a few tips for success 1) let the soba rest so that extra surface moisture is reduced, 2) make sure you leave uncovered nori on the far end which makes full contact with the the other side of the roll , 3) keep the sushi mat until the nori adheres to each other.
I also noticed a technique of briefly heating the finished rolls in a dry frying pan to make the nori crispy as well as making it shrink a bit. I have not tried this but it sounds like a good idea. Hope you will make this.
Thank you for the explanation! I also like the pan dry frying idea!
My Japanese home stay oban used to make this, then fry the cut sections in Goma yu, and dress with sweet dashi.... oishiiiiiiii!
Thanks for your comment. Frying with sesame oil is an interesting idea.
Post a Comment