I made Ricotta and parmesan cheese meat balls from a half pound of the ground chicken we bought from the grocery store recently. From the other half, I made shrimp/chicken gyoza エビと鶏肉の餃子. I used a mixture of chicken, shrimp and cabbage as the basis for the gyoza. Somehow the shrimp took center stage taste-wise. The taste of chicken became muted and sort of disappeared leaving a nice shrimp taste and texture from the large chunks of shrimp I added. The good amount of the cabbage I added to use up the last of a head of cabbage I had in the fridge stepped back from center stage too but added a nice lighter texture. (If I wasn’t told I would never have known the chicken and cabbage were involved.) Since I seasoned the filling rather well, the dipping sauce became optional. This is a different and great gyoza. It heated and crisped up nicely in the “toaster oven”. I made a small salad with cucumber and blanched wood ear mushroom dressed in mustard/pon-zu dressing 胡瓜と木耳のからしポン酢あえ.
Ingredients (made about 40 gyoza)
6 large shrimp, frozen, (I used 6 large frozen shrimp, thawed, shell removed and cut into small chunks with some made more into almost paste.)
1/4 head of cabbage, core removed, finely chopped, blanched in salted water for a few minutes, moisture squeezed
1/2 tsp ground ginger
1/2 tsp ground garlic
1 tsp potato starch
1 tsp salt
1 tsp soy sauce
1 tsp sesame oil
1/4 tsp freshly ground black pepper
40 Gyoza wrappers (I used Myojo 明星 brand, frozen, thawed)
For cooking
1 tbs neutral oil plus a splash of dark sesame oil
4-5 tbs water
Directions:
In a large bowl, add all the ingredients (except for the wrappers) and mix well.
Separate the wrappers and moisten the half perimeter with water, add 1tsp of the filling in the center and close the wrapper (I make a half moon shape), crimp the edges in 4-5 places
Cover it with a plastic wrap and refrigerate until ready to cook
Cooking
Add the oil in the non-stick frying pan on medium flame and when the oil is hot, slide in the gyoza and cook for 2 minutes or until bottom side is browned.
Flip each gyoza and brown other side (optional but we like cripsy skin on all sides)
Turn down the flame and add 4-5 tbs of water and place the lid and let it steam for 2-3 minutes
When no more steam is escaping, remove the lid and crisp up the bottom (you could add more sesame oil if you like)
Repeat for another batch
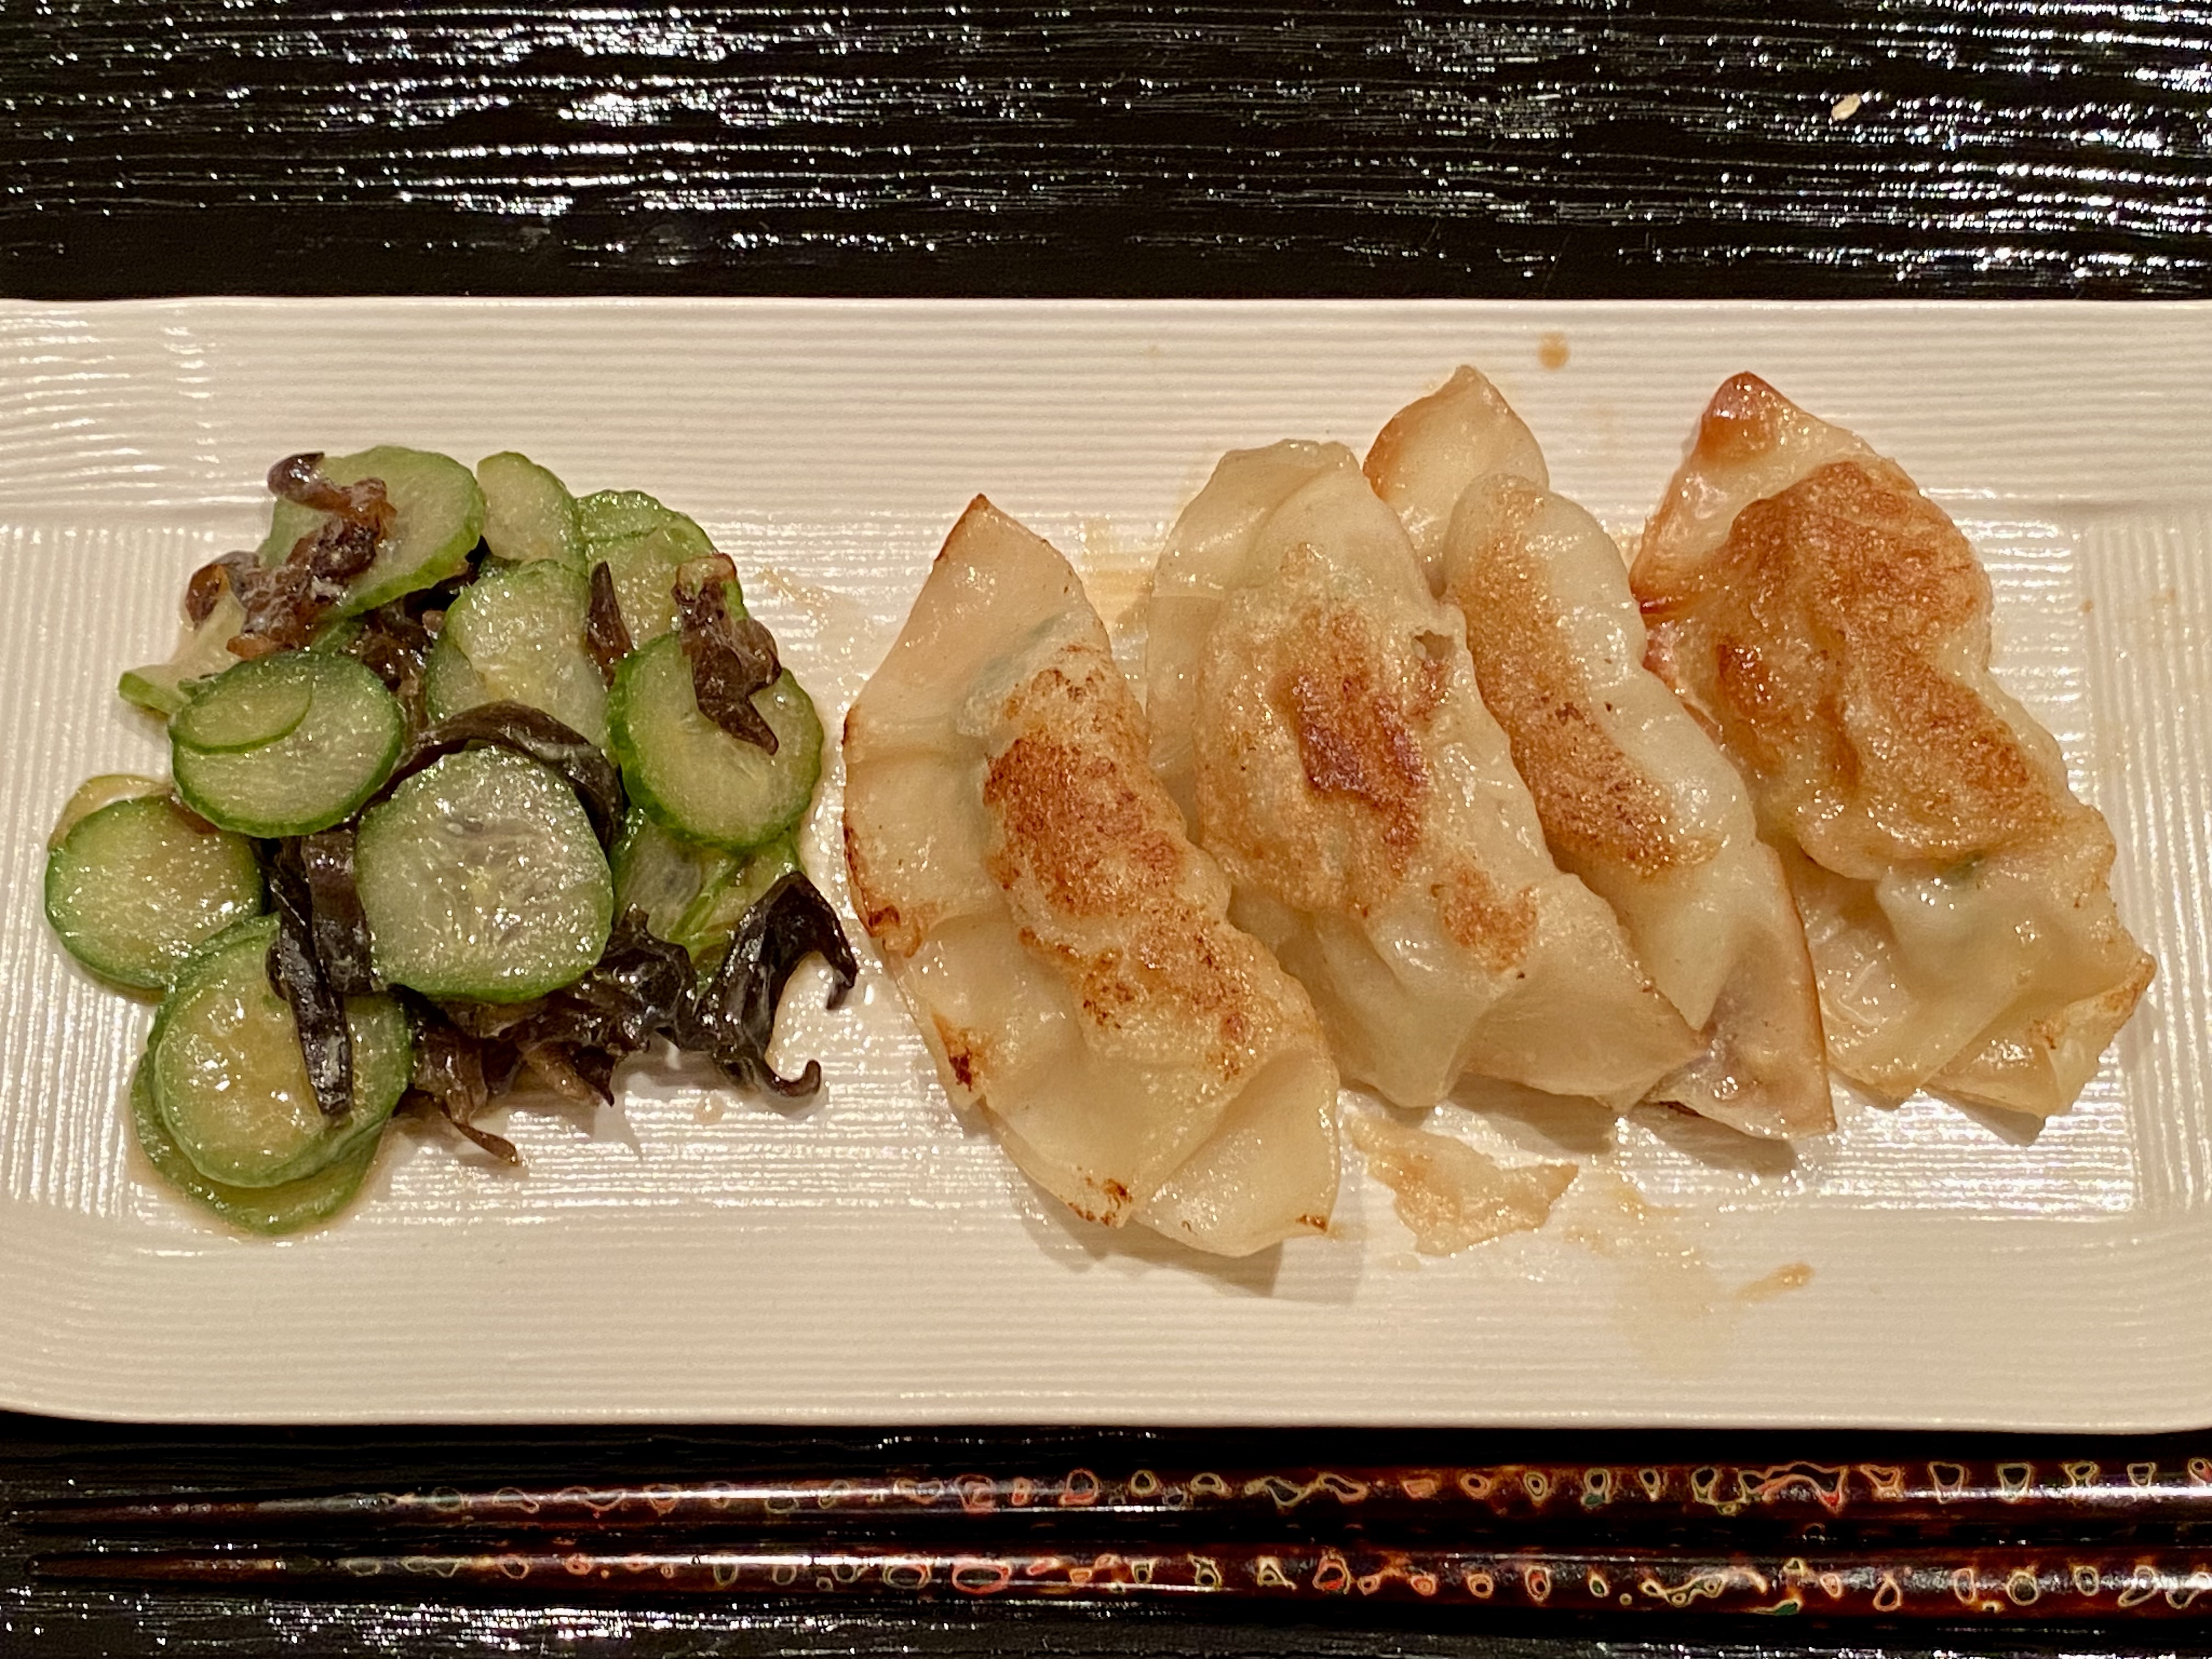
Compared to my usual pork/cabbage filling, this is lighter and with a nice delicate shrimp flavor and texture (“puri-puri” プリプリ). The myojo brand of gyoza wrappers I used was perfect because they are smaller and thinner than the square wonton skins I usually use. This delicate wrapper really let the lovely delicate shrimp flavor shine through. They crisped up very nicely in the toaster oven.
Thursday, March 6, 2025
Sunday, March 2, 2025
Anchovy Onion Cocktail Biscuit アンチョビイと玉ねぎカクテルビスケット
I made “plupo al ajillo” from boiled Spanish octopus legs from D’Artagnan. They were the last of the octopus legs we had gotten from D’Artagnan. I did this since the octopus was not getting any better in the freezer and has been facing some fierce competition from the very good ones we have been getting recently from Weee. Instead of just salt I used filets of oil packed anchovy. This came out extremely well. After simmering in olive oil for 5 minutes, the octopus was very tender and the anchovy really added nice salty and umami-rich flavor. With my mini-baguette, this was a really good appetizer.
Nonetheless after this, we were left with 4-5 more anchovy fillets. (There usually seem to be more anchovies in a can of anchovies than we can usually use). My wife came to the rescue. She found this recipe for “Anchovy onion cocktail biscuit” in the Washington Post. Given the “excess anchovy” situation and since we are big fans of savory cookies and biscuits, there was no way we could “pass”. This was a really good biscuit. It tasted so good with a glass of red wine. Caramelized onion and anchovy made this biscuit really savory and the texture was great.
Ingredients (makes 50 bite-size biscuits)
For the onions
1 medium onion (6 ounces), halved and sliced
4 anchovy fillets, minced
2 tablespoons extra-virgin olive oil
1/2 teaspoon crushed red pepper flakes (we used small amount of cayenne pepper)
1/2 teaspoon salt (adjust depending on the saltiness of the anchovy)
1/2 cup plus 1 tablespoon heavy cream (we used light cream)
For the dough
1/2 cup plus 2 tablespoons (226 grams) all-purpose flour, plus more for the counter
1 tablespoon baking powder
1/2 teaspoon salt
6 tablespoons (3 ounces/85 grams) unsalted butter, cut into 1/2-inch dice and frozen (#1 in the composite)
3/4 cup (2 1/2 ounces/71 grams) grated Gruyère cheese, plus more for sprinkling if desired (#1)
2 1/2 tablespoons (1/2 ounce/15 grams) grated parmesan cheese, plus more for sprinkling if desired (#1)
1/2 teaspoon freshly ground black pepper
Heavy cream, for brushing (we did not use)
Directions
Step 1
Make the onions: In a skillet over medium-low heat, combine the onion, anchovies, oil, crushed red pepper flakes (in our case cayenne pepper) and salt. Cook, stirring occasionally and adjusting the heat as necessary, until the onions are soft and golden, 30 to 45 minutes. Remove from the heat and let cool, then chop the mixture. Transfer the mixture to a medium bowl, add the cream and refrigerate for about 15 minutes.
Step 2
Make the dough: In a food processor, combine the flour, baking powder and salt and pulse until combined. Add the frozen butter and process until the mixture resembles a coarse meal, about 15 seconds. Transfer to a large bowl and mix in the cheeses until combined (#1). Add the onion mixture and pepper and, using a fork, stir just until the onions are evenly distributed. The dough will be crumbly.
Step 3
Position a rack in the middle of the oven and preheat to 400 degrees. Line a large, rimmed baking sheet with parchment paper.
Step 4
Lightly flour a work surface, turn the dough out on it and shape it into an 8-inch square. If the dough is too dry to stay together, sprinkle it with more heavy cream, 1 tablespoon at a time, just until it holds its shape. Using a sharp knife or bench scraper, cut it into quarters. Stack one quarter on top of another so that you have two stacks (#2). Push them close together; then, using a rolling pin, gently flatten and roll it out into a 1/2- to 3/4-inch-thick square. For neater biscuits, trim any uneven edges of the dough with a bench scraper or sharp knife, reserving the trimmings, then cut the dough into 1-inch square biscuits.
Step 5
Reroll the trimmings and cut additional biscuits as needed. Working in batches if necessary, arrange the biscuits about 1 inch apart on the prepared baking sheet (#3). Lightly brush each biscuit with heavy cream. Sprinkle them with additional gruyere or parmesan, if desired. (We didn’t do this). If your kitchen is very warm or the dough has gotten soft, chill the cut biscuits in the refrigerator for about 10 minutes.
Step 6
Bake the biscuits for 7 minutes, rotate the pan front to back and continue baking 4 to 5 minutes more, or until the tops are golden (#4). The biscuits are tender, so if the sprinkled cheese on top melts causing them to stick to the parchment, gently free them with a thin spatula before lifting them.
Step 7
Serve warm or room temperature.
These were surprisingly good biscuits.They started out with a very strong onion flavor which as they cooled down mellowed into a smooth slightly sweet carmelized onion flavor that blended well with the saltiness of the anchovy. The texture was a bit surprising. the outside was crunchy like the crust of a pie but the inside was a very soft combination of butter and cheeses. These make great “small-bites” to go with a glass of wine.
Thursday, February 27, 2025
Burdock Root Kelp Roll ごぼうの昆布巻き
We decided that salmon kelp rolls are not just for new year and started making it regularly. We ususally get a half filet of a whole salmon which is much more economical per unit weight but you end up with a lot of salmon. The way I usually handle this is; 1. Scale the salmon skin, 2: Remove the belly portion (we have it as an appetizer, lightly salted and dried overnight in the refrigerator), 3. Remove flesh from the skin from the irregular pieces such as the both ends (From them I make salmon cakes), 4. Thinly slice and make Russian marinated salmon and 5. Cut into half inch buttons and make salmon kelp rolls, 6. When the salmon is particularly large, I also could make two small fillets. This leaves a good amount of salmon skin. I cut the skin in a few inch rectangle and make them flat with a small sheet of parchment paper separating the each pieces and place them in a sealable plastic container stored in the fridge until I cook them
When I make salmon kelp rolls, I try to hydrate just the right amount of “Konbu” kelp and “Kanpyo” goard peel, but, often I have some extras. So, to use up the hydrated kelp and kanpyo, I made burdock root kelp rolls since I had burdock roots at hand. I served this with slamon kelp roll, green beans with sesame dressing and crispy salmon skin as a starter one evening.
I did not follow any particular recipe.
For burdock root, I just scrape the skin, cut into the length matching the width of the kelp. Boil for 10 minutes, roll in the kelp and tie with the kanpyo. Then, I cooked them very similar to the salmon kelp rolls.
This is quite good. I seasoned it less sweet and a bit more salty than the salmon kelp rolls. It has a nice crunch.
Monday, February 24, 2025
Quesadilla with Mini-corn Tortilla and Browned Cheese
My wife really liked the mini corn tortilla we got from Whole Foods (#1 in the composite picture). Using this tortilla, last time we made something resembling “taco carnitas”. This time, we made something resembling quesadilla with a bit of a twist. This was inspired by a Youtube episode in which melted and browned cheese was transferred to tortillas which were made into quesadilla. Since we made a mochi and mushroom dishes using the melted and brown cheese, it was not too difficult to transfer the browed cheese to the tortillas (#2 in the composite picture) to make our quesadilla. I added more cheese and small dices of roasted/Bbqed pork we had. I served this with guacamole I made a quick salsa (the first picture). This was a bit messy to eat. We ended up using folk and knife. This was very good the tortilla has nice corn flavor. The browned cheese layers made it better.
This is not a recipe but just a note for ourselves to remember.
Ingredients (for two mini-quesadillas)
Two mini corn tortillas (#1 in composite)
Two slices of low-moisture mozzarella cheese
Three slices each of sharp cheddar and smoke gouda cheese, cut int small dice
3-4 slices of roasted pork, cut into small dice
Guacamole
Salsa, sour cream (optional)
Directions:
In a dry no-stick frying pan in low flame, add the slice of the mozzarella cheese.
The cheese will melt and bubble and edges start browning after a few minutes
Place the tortilla on the top of the melting cheese and let it cook for one more minute (the cheese needed to be uniformly browned but it is not easy to judge)
Flip it over and the brown crispy layer of the cheese is attached (#2 in the composite picture)
Place on half of pork and cheeses (#3 in the composite picture)
When the cheeses start melting, fold the tortilla with a small spatula and press and hold (#4)
After one more minute, carefully flip over and cook other side for one more minute.
Top it with the guac (and sour cream if using) and the side of salsa. This was perfect lunch for us.
Friday, February 21, 2025
Assorted Japanese Mini-pans 日本のミニ菓子パン各種
When I was browsing the Weee site, I came across an item called “assorted Japanese mini pan”. This category of Japanese “pan” bread is called “Kahi-pan” 菓子パン or sweet bread. “Kahi” 菓子 is a rather inclusive Japanese word which may mean candies, cake, sweets, or snacks. When this word is applied to bread, it is sweet bread and/or bread with sweet filling. The most classic is “anpan” アンパン in which sweet red bean paste or “an” 餡 is inside a round bun. While I was growing up in Japan, for whatever reason, my parents would not allow my brother and I to have “kashi-pan” in general. So my memories of having these sweet breads are non-existent. This changed when my wife discovered these Japanese sweet breads on one of our trips to Japan. Thereafter, whenever we were in Japan, she had to have some for breakfast so we would stop at one of the Japanese bakeries and buy some. She first found “melon-pan” followed by other Japanese sweet and savories. So when I told her an assortment of Japanese sweet bread was available at Weee she asked me to get it. Apparently, this comes from a small bakery in New Jersey called “Parisienne bakery” (#1 in the composite picture). Despite its name, this bakery appears to specialize in Japanese breads and pastries. In any case, the box came with 7 mini-pan. We split one at a time as a part of our breakfast.
We can easily recognize a mini melon-pan (A). It tasted exactly same as a full sized.
“B” is, I think, “kuri-kinton” 栗きんとん filled. “kuri-kinton” is a classic “Osechi” 御節 new year’s dish made of mashed sweet potato and chestnuts (#6 in the composite). “C” is almond flavored custard cream filled (#5 in the composite). “D” is “an-pan” filled with smooth sweet red bean paste or “koshi-an” 漉餡 (completely smooth without any remnant of red beans). “E” is another “an-pan” filled with sweets red bean paste with some remnant of red beans or “tsubu-an” 粒餡 (#3 in the composite). “F” is a “kri-mu pan” クリームパン and filled with custard cream (#5 in the composite). “G” is, I believe, another classic called “Chocolate corona or チョコレートコロナ” which is shaped like a whelk shell and filled with chocolate cream. I did not take a picture of the cut surface but the filling was almost solid milk chocolate (probably because we ket this bread in the refrigerator).
As far as I am concerned these Japanese sweet breads are pretty good and enjoyable, but in small doses. My wife, was absolutely delighted with the treat and has asked me get them again when we order groceries from Weee.
Wednesday, February 19, 2025
Ricotta Lemon Cookie リコッタチーズ レモンクッキー
I just made meat balls with Ricotta and parmesan cheeses using ground chicken instead of pork. I used only 2 tbs. from the container of ricotta. I mentioned to my wife that not only was that container open and mostly full but we were getting a back log of other ricotta cheese containers in the fridge, although luckily they hadn’t been opened. (Apparently, for some reason, every week we bought another container from the grocery store). I suggested to my wife that we should push using ricotta cheese for a while. Then, she saw the recipe of Ricotta cookies at King Arthur site. This was just what we needed and decided to make some. The original recipe used a glaze but we both agreed we did not need one. The original recipe also called for something called “ Fiori di Sicilia” which we didn’t have. But the recipe suggested micro-grated lemon zest and vanilla could be substituted for the “fiori di Sicilia” which is what she did. This turned out to be a great and not-too-sweet cookie. It has a soft consistency almost cake like rather than cookie. We had this as a part of morning breads (#1). We really liked it.
Ingredients X1
1 1/4 cups (150g) Unbleached All-Purpose Flour
1/4 cup (41g) Semolina Flour
1 teaspoon baking powder
1/4 teaspoon baking soda
1/2 teaspoon Kosher salt
6 tablespoons (85g) unsalted butter, room temperature
3/4 cup (149g) granulated sugar
1 large egg, at room temperature
1 cup (227g) ricotta cheese, whole milk
1 teaspoon Vanilla Extract
Lemon zest from one lemon (micro-grated) or 1/8 to 1/4 teaspoon Fiori di Sicilia*
Ingredients (X2)
2 1/2 cups (300g) Unbleached All-Purpose Flour
1/2 cup (82g) Semolina Flour
2 teaspoon baking powder
1/2 teaspoon baking soda
1 teaspoon Kosher salt
12 tablespoons (170g) unsalted butter, room temperature
1 1/2 cup (298g) granulated sugar
2 large eggs, at room temperature
2 cups (454g) ricotta cheese, whole milk
2 teaspoon Vanilla Extract
2 Lemon zest (micro-grated) or 1/4 to 1/2 teaspoon Fiori di Sicilia*
Instructions
To make the dough: Weigh your flours; or measure them by gently spooning them into a cup, then sweeping off any excess.
In a medium bowl, whisk together the flours, baking powder, baking soda, and salt. Set aside.
In a large bowl or the bowl of a stand mixer fitted with the flat beater attachment, combine the butter and sugar. Beat on medium speed until smooth, 1 to 2 minutes. (The mixture will not be lightened in color or fluffy in texture.)
Add the egg and mix until fully combined. Scrape down the sides and bottom of the bowl and beat briefly. Add the ricotta, vanilla, and Fiori di Sicilia. Briefly mix to fully combine.
Add the dry ingredients to the ricotta mixture all at once. Mix slowly until no dry floury streaks remain. Cover the bowl or transfer the dough to an airtight container and chill for at least 2 hours, or up to overnight.
When you’re ready to bake, preheat the oven to 350°F with a rack in the center. Line 2 baking sheets with parchment.
Scoop the chilled dough into generous tablespoon portions.
Place the dough balls onto the prepared baking sheets, spacing them evenly apart (about 12 dough balls per baking sheet)
Bake the ricotta cookies for 15 to 17 minutes, until the edges of the cookies just start to turn light brown.
This was a very nice cookie. It had a soft cake like texture and the lemon flavor really came through nicely giving it a light slightly sweet flavor. It went very well with our morning coffee. That excess of ricotta cheese won’t be around for long now that we have discovered these cookies.
P.S. Out of curiosity we bought some “fiori di sicilia” flavoring and tried it out in another batch of cookies. While the resulting cookies were very different in flavor from the ones make with just the lemon zest and vanilla, they were still very good. The flavor was much less lemon but had an intriguing somewhat floral after taste. The texture of the cookie was still moist and soft like the previous batch. Next time I may add more of the flavoring to see if I can make it a bit stronger.
Thursday, February 13, 2025
Chocolate Milk Bread チョコレートミルクパン
We regularly get a catalog from the King Arthur Baking. One of them had a recipe for “chocolate milk bread”. Being a fan of Japanese milk bread, my wife decided to make it. Compared to regular milk bread, this is much more difficult to make. A direct quote from my wife: “This is the weirdest bread I’ve ever made.” The dough was especially soft and sticky having the texture of dough you would pour rather than knead. Also the instructions to mix on high speed for 20 minutes were unique. The dough did indeed get stiffer after this treatment but it was still impossible to ”fold” and “shape” as instructed. We ended up using a floured board and a baker’s scraper to form it into a loaf and placed it in a pan. It rose very high after baking but collapsed a bit after it was removed from the pan and cooled. The texture was nicely soft but chocolate flavor was muted. We like it very much but knowing the difficulty of making this, we are not sure it is worth the effort to make it again.
Note: We made a second batch of this bread and using “Common Culinary Knowledge” (CCK) we added enough flour to make a stable workable dough. We also did not knead it 20 minutes but the usual kneading time of 7-10 minutes. We also did not bother reweighing the tangzhong but used it as it came out of the pan. The resulting bread was infinitely better than the first batch and is definitely worth making again (even though no distinctly chocolate flavor comes through).
Ingredients (X1 one loaf)
Tangzhong
2 tablespoons (11g) black cocoa
2 tablespoons (11g) Dutch- process cocoa
1 1/2 tablespoons (11g) King Arthur Unbleached Bread Flour
1/4 cup plus 1 tablespoon (70g) milk, whole preferred; cold
1/4 cup plus 1 tablespoon (70g) water, cold
1/2 tsp. King Arthur espresso powder (optional). (this brings out the taste of the chocolate
Dough
1 3/4 cups plus 1 tablespoon (219g) King Arthur Unbleached Bread Flour, plus more for dusting or to make the dough stable and useable.
1/4 cup plus 1 tablespoon (70g) milk, whole preferred; warm (110°F)
3 tablespoons plus 1 teaspoon (41g) granulated sugar
1 1/2 tablespoons (10g) King
Arthur Baker's Special Dry Milk, optional
2 1/2 teaspoons (7g) instant yeast
scant 1 teaspoon (5g) table salt
3 tablespoons (43g) unsalted butter, melted
1 large egg, beaten; divided
Scant 1/2 cup (75g) semisweet chocolate chips
Ingredients (X2) (Why make just one loaf when you can make 2 ?) We made 2 loaves
Tangzhong
4 tablespoons (22g) black cocoa
4 tablespoons (22g) Dutch- process cocoa
3 tablespoons (22g) King Arthur Unbleached Bread Flour
1/2 cup plus 2 tablespoons (140g) milk, whole preferred; cold
1/2 cup plus 2 tablespoon (140g) water, cold
1 tsp. King Arthur espresso powder (optional). (this brings out the taste of the chocolate)
Dough
3 1/2 cups plus 2 tablespoons (438g) King Arthur Unbleached Bread Flour (or however more is needed to make the dough stable and useable.
1/2 cup plus 2 tablespoons (140g) milk, whole preferred; warm (110°F)
6 tablespoons plus 2 teaspoon (82g) granulated sugar
3 tablespoons (20g) Dry Milk, optional
5 teaspoons (14g) instant yeast
2 teaspoons (10g) table salt
6 tablespoons (86g) unsalted butter, melted
2 large eggs, beaten;
Scant 1 cup (140g) semisweet chocolate chips (we didn’t use this)
Directions:
To make the tangzhong: In a small saucepan, whisk the cocoas, flour, milk, and water until no lumps remain. Over low heat, bring the mixture to a boil, whisking constantly, until the mixture looks glossy and thickened to the consistency of hot fudge sauce, 3 to 6 minutes. Transfer the tangzhong to the bowl of a stand mixer; it will weigh about 145g after cooking (or 284 if doubling the recipe). If your tangzhong is more than 155g, (or 310g when doubling the recipe) return it to the pot and cook it a bit longer. (We did not bother to do this with the second batch and the bread turned out just fine.)
To make the dough: Add the flour, milk, sugar, milk powder, yeast, salt, butter, and egg to the bowl of a stand mixer. Add the cooled tangzhong.
Using the dough hook, mix on medium-low speed adding additional flour as needed until a soft, sticky workable dough forms, scraping down the bowl as necessary. Increase the speed to medium-high and continue mixing until the dough almost clears the sides of the bowl (it will stick to the sides for much of the mixing time) and is smooth and elastic, 15 to 20 minutes total (We did not do this with the second batch we made, 7-10 minutes worked just fine). Every few minutes, scrape down the sides and bottom of the bowl, then continue mixing. Eventually the dough will strengthen enough to mostly pull away from the sides of the bowl; the dough will still be slightly sticky but significantly more manageable than it was before. Transfer the dough to a lightly greased bowl, cover, and let it rise until puffy and doubled in bulk, 1 to 1 1/2 hours.
Lightly grease an 8 1/2" x 4 1/2" loaf pan or 9" x 4" Pullman loaf pan with nonstick spray or vegetable oil.
Use a bowl scraper to gently ease the dough out of the bowl onto a lightly floured work surface. Gently form the dough into two loaves. (At this point the original recipe gave complex instructions on how to fold the dough into various squares, which, given the consistency of the dough was quite impossible. It held together but was more a pouring consistency. (#1) Forming it into loaves was the best we could do.) (#2) Cover and let the loaf rise until it just crests over the rim of the pan, 45 to 90 minutes, depending on the temperature of your kitchen. (#3) (If using a 9" x 4" pan, let the dough rise until it's about 1" below the top of the pan.)
Towards the end of the rising time, preheat the oven to 350 degrees F. Bake the chocolate milk bread for 30 to 35 minutes, until the loaf is fragrant, the top crust is firm, and the internal temperature is at least 190°F. Remove the loaf from the oven and cool briefly in the pan before turning it out onto a rack to cool completely.
The loaf was so soft that when we turned it out it started collapsing on itself (# 4) and we had to cool it on its side. Nonetheless once it cooled it stabilized and the soft texture was very nice. (maybe we should leave it in the pan longer before turning it out). There was almost no flavor of chocolate. We ate it for breakfast lightly toasted with butter. It is good we made this bread because it makes our library of Japanese milk breads (to the extent we know of it) complete. But there are various of the other versions we would choose to make before doing this one again.
P.S. Turns out that over time this bread has gotten better. A nice very subtle chocolate flavor has moved to the fore. The texture has also gotten firmer
Subscribe to:
Posts (Atom)