Every year before New Year comes, I have to look through my recipes for the New Year's Osechi dishes that I usually make. For my own convenience, I decided to place my New Year's recipes in one place for easy reference. This is also posted in "Norio's New Year Dishes" tab in the heading.
Herring roe in two ways 数の子 #1 (dashi and soy sauce marinated)
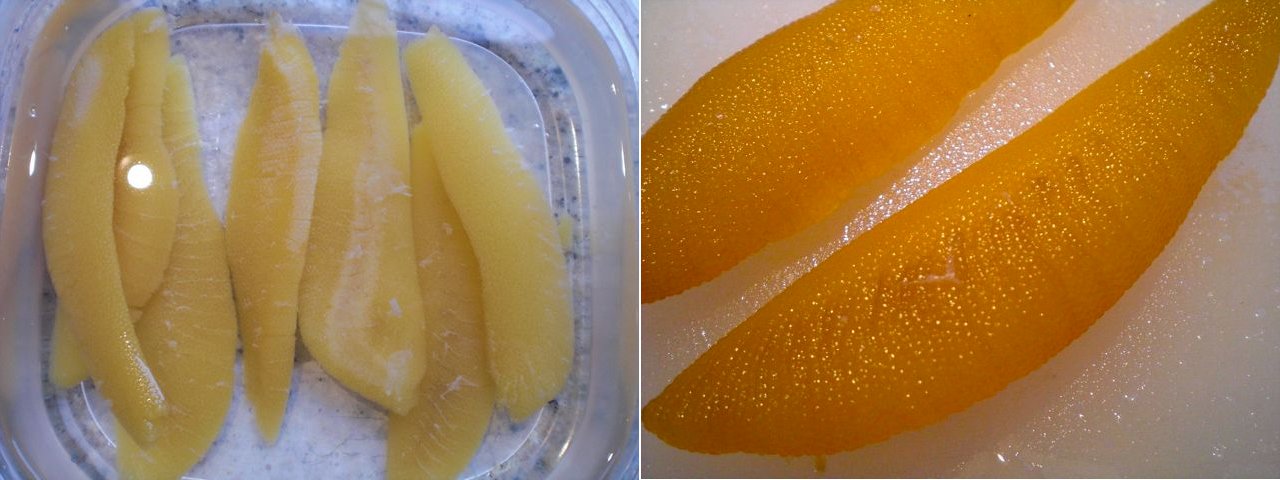
I usually get salted herring roe and prepare it. Store-bought prepared herring tends to be too sweet for me.
Removing excess salt "Shionumi" 塩抜き
First, I have to remove the excess salt from the kazunoko (called “shionuki” 塩抜き) by soaking it in water or weak salted water (I taste the salted water; just a nice salty taste you can drink if you wanted to). Although you could start with water and then finish “shionuki” with salted water. I prefer to use salted water from the beginning and change it several times in 3-4 hour periods. The reason is that if you remove the salt completely, the kazunoko will taste “bitter” (all the sodium chloride gets leached out leaving magnesium chloride behind which is bitter). So, I try to leave some saltiness behind. Using salted water prevents the complete removal of the salt even if I forget and soak it too long. While soaking, I removed the thin white membrane which covers the roe by rubbing the surface with my finger tips under water. After “shionuki” and removing the membrane, the herring roe is ready. I tasted a small piece from the edge to make sure it is not too salty. I sometimes thinly slice this and serve it like sashimi with wasabi and soy sauce but I usually marinate it.
Marinade つけ汁
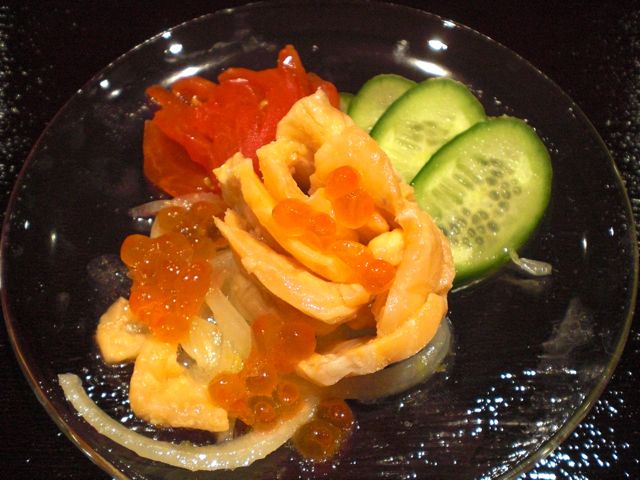
For the marinade, I make dashi broth from a kelp and bonito flakes. I season with light colored soy sauce (to preserve the golden color), sake and mirin. The amount of sake (or mirin if you like it sweet) and soy sauce are up to your taste but I tend to make a strong dashi packed with “umami” and go light on soy sauce. I gently boiled the mixture for few minutes to make sure the alcohol has all evaporated and tastes amalgamated. I let it cool to the room temperature and then refrigerate. I marinated the prepared herring roe for, at least several hours or over night in the refrigerator (The right lower image shows the roe after marinading). This should be eat eaten in a few days.
Serving
I sliced it into small bite sized pieces and then mixed them with dried bonito flakes or kezuribushi 削り節 and served. It has a very interesting crunch and is an excellent drinking companion for cold sake. After eating it, my wife asked, “Why does it suddenly feel like New Year?”
Herring roe in two ways 数の子 #2 (miso and sake lee marinated)
One of the problems with more traditionally prepared herring roe (above) is that it does not last too long (may be 10 days in the refrigerator). Sometimes, we have to push ourselves to finish all the herring roe that I prepared. So, for 2017 New Year, I decided to make miso marinated herring roe as well. I looked up the recipes and decided on
the recipe using a mixture of miso and sake lee. I was particularly interested in this recipe since it said the herring roe would be best consumed between 10 days and 1 month.
Ingredients:
Sake lee, 300 grams, cut into small cubes
Miso, 300 grams
Sake 180 ml
Salt-preserved herring roe, 10 (salt removed, see above, #1 in the picture below).
Direction:
In the food processor, I mixed the first three ingredients (warming the sake may help softten the sake lee, #2 in the picture below)
In a sealable container, I put 1/3 of the marinade and placed a layer of cheese cloth (#3)
I then arrange the herring roe in one layer (#4).
I covered the herring roe with another cheese cloth and spread 1/3 of the marinade on top.
I made another identical layer and finished with the last 1/3 of the marinade.
Salmon kelp roll 鮭の昆布巻き
One New Year several years ago, we received commercial salmon kelp roll from Hokkaido as a gift from one of our Japanese friends. My wife, sort of, challenged me whether I could make it and I accepted the challenge.
Ingredients:
Kelp: A good dried kelp–one that gets soft when cooked and is therefore good for eating. “Hidaka” 日高 kelp is especially desirable, since it gets softer more quickly than other types of kelp such as Rausu 羅臼 or Rishiri 利尻 kelp. I soaked a 5-6 inch long piece of dried “Hidaka” kelp in water until it returned to its “natural state” and became pliable (30 minutes to 1 hour). I used 4 strips to make 8 good sized rolls. I trimmed the ragged ends to make a nice rectangular piece. I reserved the soaking liquid.
This is mostly to tie up the rolls so they don’t unravel but it does have some texture and taste. I washed and then massaged several pieces of kanpyo with salt and washed again. I soaked it in water for 30 minutes to one hour but did not cook it.
Salmon
: I used fresh salmon. I cut the fillet into 1/2 inch wide strips with the skin left on. I trimmed the end to make it fit the width of the kelp.
Directions:
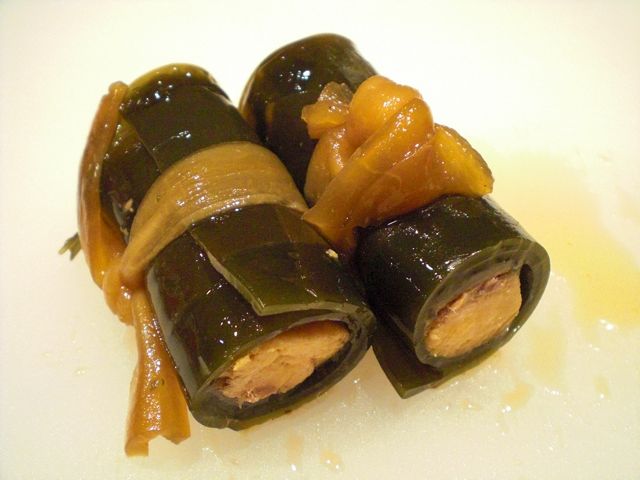
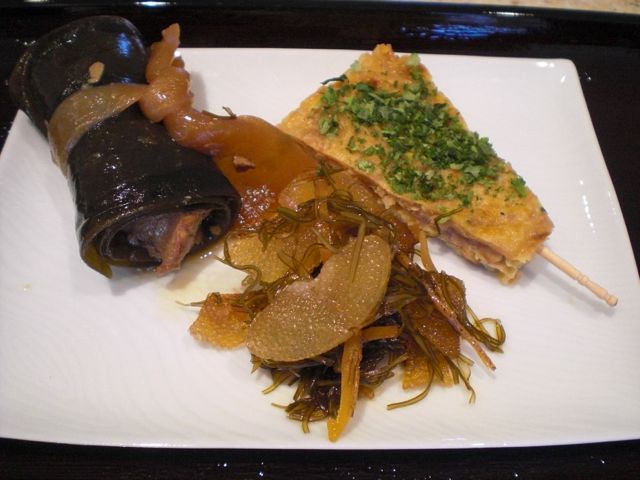
I rolled the kelp around the salmon strip in the center and tied it off in two places using the kanpyou as shown below (this pictures is after cooking).
To prevent it from sticking, I could have put dried bamboo leaves on the bottom of the pan (but darn I was fresh out). I just used additional hydrated kelp to line the bottom (it will stick to the bottom but the rolls do not).
I placed all 4 rolls in a shallow pan in which they fit snugly (I used a square Pyrex baking pan with a glass lid). I then poured in the kelp soaking liquid. Since I also had a soaking liquid left over from rehydrating dried shiitake mushrooms (used in another dish), and the mushrooms had imparted some good flavor to the liquid I also added that. I added sake (2-3 tbs) as well. The kelp rolls should be just covered with water.
I simmered it with the lid on for 1 hour or until the kelp is soft.
The seasoning is essentially sweet and salty (soy sauce) which is a typical Japanese seasoning. As a rule, the “sweet” of the seasoning is added first. So I added sugar (1 tsp) over the rolls and let it simmer for 5 minutes with an otoshibuta 落 とし蓋.
I then added more sugar (1 tsp) and soy sauce (1 tbs) and simmered it for 10-15 minutes.
At the end of cooking, the liquid was reduced in half. At the very end, I added mirin (2 tsp) and soy sauce (2 tsp) for a fresh taste.
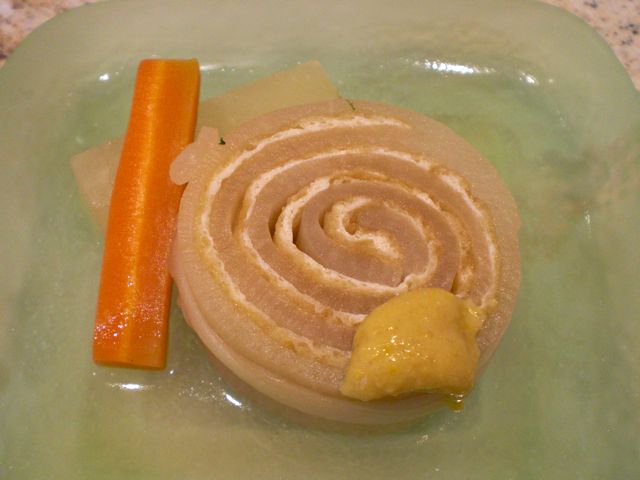
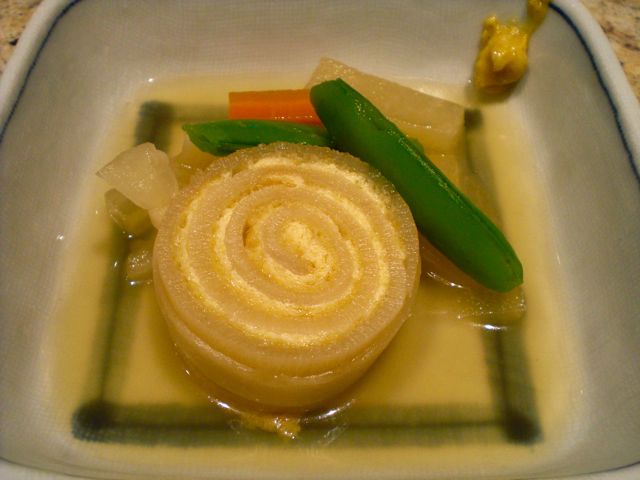
Again, the seasoning is up to your liking; you could add more sugar, mirin and soy sauce. I did not want to season it too strongly. I let it cool in the cooking liquid. The picture above (norio there is no picture above) shows it after it cooled and was ready to be cut.
Datemaki 伊達巻
I originally got this recipe from my mother. Using hanpen はんぺん fish cake instead of ground white fish flesh or "surimi" すり身 makes this recipe very easy.
Ingredients :
Hanpen fish cake, one (about 100grams) (I use previously frozen, see #1 below).
Mirin 1tbs
(Originally I used a food processor but I modified to use my immersion blender which make it easier - no need to beat eggs ahead of time and cleaning is also much easier)
Directions:
1. Cut thawed hanpen into small 1/4 inch cubes add to the mixing container and add the eggs and seasoning (#2 in the picture below).
2. Using an immersion blender process until smooth (#3).
3. In a Japanese Omelet pan (12cm x15cm) on low flame, add a small mount of vegetable oil to cover the bottom and add the egg mixture (#4).
4. Fold a piece of greased aluminum foil over the top of the pan. Then cover over the the aluminum cover pan (I also place a small baking pan, #5).
5. After 10-15 minutes, it is mostly cooked only leaving a center portion to be still somewhat underdone (#5).
6. Flip it over using a spatula and cook the other side for 2-3 minutes (#7).
7. Tip the omelet onto a bamboo sushi mat* as seen below (I am not sure which side should be down but I like the darker side up (which becomes the inside of the roll). I score the surface (#8).
8. Slowly roll and tie the mat with a kitchen twine or rubber bands (#9).
9. Let it cool down for 30-40 minutes and unroll the sushi mat (#10).
10. Cut off both the ragged ends (this is a snack for the chef) (#11).
11. I like the darker inner lines (#12) but sometime I did the light side in (the bottom picture)
*If you have it, for Datemaki one should use a special kind of rolling mat called "Oni-sudare"
鬼すだれ which will make deeper indentation on the surface of the roll.
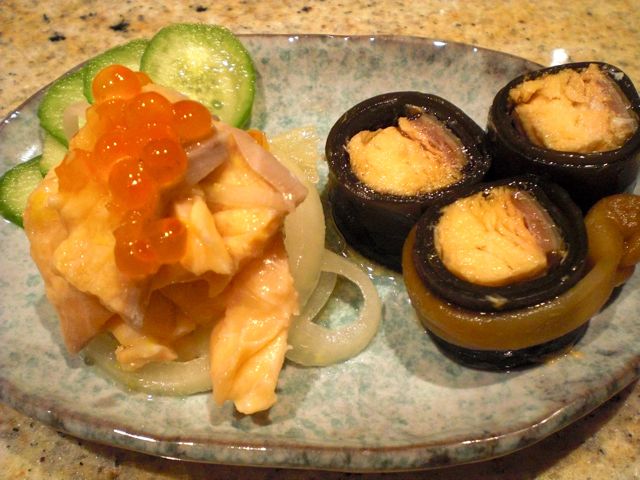
Russian marinated Salmon 鮭のロシアずけ
I also served marinated salmon which is my mother’s recipe. This salmon dish is called “Russian marinated salmon” ロシア漬け and my mother does not know how the dish got the name or where she got the recipe*. Of course, I made my contribution (read modification) to the recipe since I think the pith of the lemon imparts a bitter taste to the dish.
Essentially, I slice fresh salmon (the original recipe uses salt preserved salmon “aramaki shake” 新巻鮭) fillet paper thin, layered with sliced onion, lemon zest (grated by a micrograter), lemon slices (without the rind and pith). As I lay on the new salmon layer I salt it. The marinade it in a mixture of sake, vegetable oil and rice vinegar (1:1:3) but I reduced the amount of oil. I tightly pack the salmon in a seal-able container and let it marinade for a few days. The picture below is this dish served stand alone on the next day.
*I googled (google.co.jp) “鮭のロシア漬け” the marinated salmon recipe and found this blog (in Japanese). The recipe is a very similar to my mother’s. According to this blogger, her mother got the recipe from a Japanese magazine “Kurashi no techo” 暮らしの手帖. The recipe is reportedly published in the section called “Apron memo” quite a number of years ago, although the exact year is unclear. Even though the blogger mentioned the recipe was published some time ago, I was eating this as a kid and it is possible my mother’s recipe predates even that publication.
Daikon Namsu 大根なます
Ingredients:
Daikon, peeled, sliced across or on bias then julienned
Carrot, Peeled, sliced on bias and then julienned
Dressing:
Rice vinegar 1 part
Sugar 1/2 part
Salt a pinch
Japanese red pepper, hydrated then cut into thin rings (optional)
Yuzu juice (optional)
Mirin, Light colored soy sauce (small splash, optional)
Direction:
Place all the ingredients except for Yuzu juice in a pan on medium-low flame and mix and disolve the sugar completely. Let it cool to the room temperature.
Salt and kneed the daikon and carrot, separately, let it sit for 10-15 minutes and squeeze out excess moisture (it was said that if you mix the daikon and carrot before adding the dressing, vitamin C was destroyed, which I did not confirm).
Add the daikon and carrot in the vinegar mixture in a seal-able container and keep it in a refrigerator for at least one day before eating.
Chicken patty with pine nuts and miso or "Matsukaze" chicken patty 松風焼き
I do not know when I adapted this dish for our New Year cuisine, I have been making this this for some years. It is miso flavored chicken patty with pine nuts in it. The name "Matsu-kaze" 松風 means "wind over the pine tree" must be referring to the use of pine nuts. In the picture below, I cut this into the shape of "Hagoita"羽子板 (badminton-like game which was traditionally played by girls during the New Year celebration but the the racket or Hagoita is now totally decorative) and garnished it with dried "aonori" 青のり. Here I served this with salmon kelp roll and "
Matsu-mae zuke" 松前漬け.
Ingredients:
Ground Chicken 250 grams
One egg beaten
Miso 2 tbs
Light colored soy sauce 1 tbs
Sugar 2 tsp
Bread crumbs (panko) 4 tbs
Flour 2 tbs
Mirin 1tbp
Pine nuts, roasted, 3tbs
White sesame seeds, aonori, and poppy seeds (optional).
Direction:
1. Mix all the ingredients except for pine nuts in a food processor (or mixing bowl) and mix well. Add and mix pine nuts.
2. In a small baking sheet, oil the bottom and place the parchment paper cut into size so that it will adherent to the bottom.
3. Using a spatula, spread out the chicken mixture in to 1/2 inch (1.5 cm) thick to fill the bottom of the baking sheet.
4. Cook for 20 minutes in a pre-heated toaster oven at 350F.
5. After its cooled, cut the patty into rectangles or in to a shape of "hagoita".
If so desired, brush the surface with mirin and press either the sesame, aonori or poppy seeds on the surface.
Chicken patty with dried fig and Gorgonzola いちじくとブルーチーズの松風焼き
I found this recipe on line which is a variation of "Matsukaze-yaki".
Ingredients:
Ground chicken: About 400grams.
Dried figs: We used dried mini mission figs. The amount is arbitrary but as far as I can tell, the more the better.
Gorgonzola cheese: we tried American made from goat cheese (mild) and one from whole cow’s milk (stronger). Both worked fine but we liked the stronger one, crumbled the amount arbitrary.
Eggs: two large
Olive oil: 2 tsp.
Directions:
Using a silicon spatula, I mixed the ground chicken, gorgonzola cheese, dried figs, and eggs and olive oil. I oiled the bottom of a small rectangular baking sheet lined with parchment paper. I spread the mixture to make about half an inch thick layer (see below).
I baked it in a toaster oven (in convection oven mode) preheated at 350F for 20 minutes or until done.*
Because of the parchment paper lining, it came out easily in one sheet. I cut it into rectangles. This is a totally new flavor for this dish. Sweet nutty dried figs and salty and a bit sharp Gorgonzola is indeed nice flavor combination and made this dish more Western than Japanese. It goes well with wine or Champagne.
*This was the second try. I made this in a rectangular frying pan covered with aluminum foil as the original recipe suggested. It became sort of steam/baked and produced a large amount of liquid and when I opened the lid, it was floating in the liquid. All the cheese appeared to have leached out and it was dry and did not taste good. My toaster over baking method worked much better. If I am going with a frying pan method, I will not cover it while it is cooking.