Showing posts sorted by date for query lotus. Sort by relevance Show all posts

Thursday, February 8, 2024

Grated Lotus Root and Tofu Ball レンコンと豆腐まんじゅう

This is a variation of “renkon ball” (renkon manju レンコン饅頭) I posted before.  Besides grated renkon lotus root, it also uses tofu. Since I had the last of the lotus root and half of the tofu, this was a perfect dish to make. I got the idea watching one of the YouTube cook shows. This is a basic version but I could add more items to make it more interesting. I could have made some kind of broth or sauce but this was pretty good as is. Picture #1 shows the cut surface with small chunks of tofu. This has nice soft interior and crunchy crust. When I made this dish I also made “nagaimo” fries which turned out really good and will be the subject of separate post (picture #1 right lower).


Ingredients:
200 grams lotus root, peeled and grated, moisture drained out naturally
300 grams tofu, moisture drained
3 tbs Potato starch
1/2 tsp grated ginger
1 tsp miso (original recipe calls for 1/2 tbs soy sauce, I used miso since the dough was bit runny)
Flour for dredging.
Oil for deep frying.

Directions:
Add the grated lotus root, tofu, potato starch, ginger and miso and mix well until smooth. Add more starch if too watery/soft.
Using the ice cream scoop, make equal sized balls, dredge in the flour and deep fry at 160-180F oil for 3-4 minutes turning a few times until the outside is nicely brown (picture #2).


Initially, I served these hot but it can be heated up nicely in the toaster oven. It is seasoned but you could add soy sauce with grated ginger or some type of hot broth. If I make this again I could add chopped scallion, cut up shrimp, ginko nuts, mushrooms etc to make it more interesting.

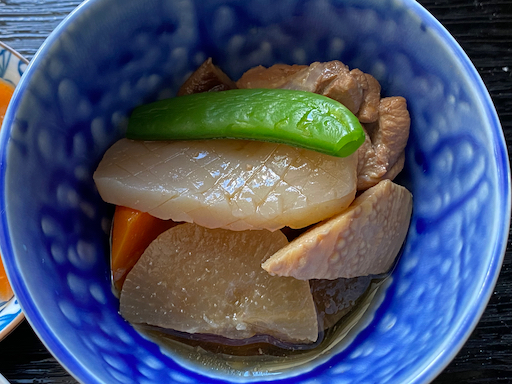
A few days later, I tried to make a dish (soup) with the leftover renkon balls (picture #3). I made this for lunch. I made it a few hours ahead and re-heated just before serving. The idea was good but the execution was not so great. While the renkon balls were sitting in the broth they absorbed the broth and mostly disintegrated as you can see in the picture #3. It still tasted good.


This is mostly leftover control and there is no recipe but this is how I made it.

Ingredients: (for the soup)
4 Renkon balls, cut in half
Half package of brown shimeji mushroom, root end removed and separated
1 inch daikon, peeled and drained
1 spring onion, finely chopped
Cooked udon noodle, amount arbitrary, this was leftover

For broth:
2 cup Japanese broth (from dashi pack)
1 tbs each of  sake and mirin
1/4 cup of x4 concentrated Japanese noodle sauce (or taste)

Directions:
Add the ingredients for the broth in sauce pan and heat to simmer
Add the grated daikon, renkon balls and mushroom and simmer.
Add the noodles and scallion
Serve while hot*

* as I mentioned, I made this ahead of time and reheated before lunch. That was a mistake, the renkon balls absorbed the broth and mostly disintegrated. Nonetheless it tasted good and the addition of grated daikon added flavor and cut the oily taste from the renkon ball.

Saturday, November 18, 2023

11 (or 12) Appetizers 11種類の酒のつまみ

This is another version of multiple small appetizers dishes. I used the divided plate with space for 9 dishes. But I had more than nine to serve so I doubled up in the divided space.  But I still needed to add two more small bowls for a total of 11 small dishes. If you count each part of the doubled up item (lotus root tsukune 蓮根つくね was divided and served with quail eggs and ginko nuts) (bottom row left and center), it would be 12 appetizers. None of them are new recipes. Even though the single portion is small, we were quite full after working our way through 12 of them.


To highlight a few the one shown below is Name-take mushroom なめ茸 (top row right),


simmered taro “satoimo” 里芋 potato and carrot with “Kouya-dofu” 高野豆腐* and sugar snap スナップ豌豆の塩びたし (middle row right)


and two small bowls; tofu and shimeji with oyster sauce 豆腐としめじのオイスターソース(top),


simmered shirataki and deep fried tofu 白滝と油揚の煮物 (bottom).


*Kouya-dofu is freeze dried tofu (for preservation I suppose) which creates unique texture and absorbs whatever liquid it is cooked in.

These appetizers are mostly comprised of vegetables and provide so many different textures and tastes. We really like this type of classic Japanese multiple appetizers.

Wednesday, September 20, 2023

Tsukune with Lotus Root and Perilla 蓮根大葉つくね

This is a hybrid of “Renkon Tuskune”  蓮根つくね and “Tsukune with perilla” つくねの大葉焼き. Since our perilla is growing profusely in our herb garden, we are using perilla leaves whenever we can.  This is also the last segment of fresh lotus root we got from Weee asian grocery delivery service. We found that we could make the lotus root last longer by separating the fresh lotus root into its individual segments, wrapping the segments in paper towel and vacuum packing them. With this preparation they last for a long time under refrigeration (at least 1 mouth or more). Beside using a slice of the lotus root as a base for the Tuskune, I also included chopped up lotus root in the tsukune itself to give it nice crunch without using chicken cartilage. The perilla leaves add an additional unique flavor.


I served this with “kinpira” braised lotus root 金平蓮根 I made to finish up the last of the renkon. I also served simmered “kabocha”  かぼちゃの煮物 Japanese pumpkin.


Ingredients:
8 slices of lotus root, skin peeled and sliced into (4-5mm) thick plus two or three slices chopped up (to mix into the tuskune itself)
8 perilla leaves (if too large cut in half to make 8 pieces)
4 oz (114 gram) of ground chicken (this was low-fat breast meat ground chicken)
1/2 tsp ground ginger root
1/2 tsp ground garlic
1 tsp mayonnaise (optional, to compensate low-fat ground meat)
1 tsp miso
1 tbs “katakuri-ko” potato starch
1 tbs vegetable or olive oil

Directions:
In a bowl, mix the chicken, ginger, garlic, mayonnaise, miso and chopped up lotus root. Mix well by hand until the mixture is elastic and binding together (if too loose, you could add potato starch, if too stiff, you could add a beaten egg)
Coat the slices of lotus root with the potato starch thinly (to improve the adhesion of the meat mixture)
Place 1/8 of the chicken mixture onto the lotus root on the cutting board and press lightly so that the mixture will go into the holes of the lotus root.
Place the perilla leaf on and press lightly so that it adheres to the meat mixture (see below)
Add the oil to a non-stick frying pan on medium heat, and start cooking the lotus root side down first (see below) and cook a few minutes or until the lotus root browns a bit
Gently turn it over and turn down the heat to low and cook a few more minutes with the lid on for the last 2 minutes to make sure the meat mixture is cooked through.
Optionally you could add a mixture of mirin and soy sauce at the end but I did not.


Drain excess oil on a paper towel.


This tsukune is seasoned enough for us but you could add “Yakitori sauce (equal mixture  of mirin and soy sauce) ” as mentioned before. This re-heats nicely in a toaster oven. It is a nice contrast in textures and taste. The chicken portion is almost fluffy in texture which is a nice contrast to the crunch of the renkon on the bottom layer and distributed through out the meat. The perilla adds a nice fresh minty spiciness.

Monday, July 17, 2023

New Divided Plate and 9 Otoshi Appetizers 9つ仕切り皿にのせたお通し9種類

This is on the theme of multiple small “otoshi” appetizers. Previously we used a 5 segmented plate to serve 5 appetizers. A few days ago, I found a 9 segmented square plate available on Amazon which was reasonably priced so I got two. I thought it would be hard coming up with 9 appetizers but I managed it with 8 dishes I made. The ninth dish was an exception since I didn’t make it. It was the fried shrimp head which came from Tako Grill when we had our sashimi/sushi take-out. (Shrimp head is a by-product of “botan-ebi” 牡丹海老 sashimi/sushi). In any case, I was surprised that once I started thinking otoshi I was on a roll and could have served two or three more appetizers if I wanted to. This was a nice start of the evening but even very small dishes are filling for us and we ended up with a  “shime” 〆ending dish after this.


In the 1st row, left, is a sugar snap in salt broth スナップ豌豆の塩びたし. We used to be able to get decent sugar snaps from our regular grocery store but recently, we have had to go to gourmet grocery stores to get decent ones This was crunchy, sweet soaked in salt dashi broth.


In the 1st row, center, are cucumber onion salad and stir fried shirataki, jalapeño pepper and enoki mushroom.


In the 1st row, right, is the cheese curd my wife made  but instead of jalapeño pepper, she added “Yuzukosho” 柚子胡椒, soy sauce and cream. I added a dab of yuzukosho on the side to provide an added “schmear” of yuzukosho flavor if desired.


Tsukune on a slice of lotus root 蓮根つくね.


Uni-shuto” ウニ酒盗 from Maruhide. As I stated before this is the best uni aside from fresh uni. I served it with cucumber and perilla leaves.


I refried the shrimp head kara-age which was part of take-out from Tako Grill a few days ago. Shrimp head has a good amount of meat and is very crunchy but you have to be careful how you eat the prickly legs so as to not injure your mouth.


Recently, we discovered that Whole Foods carries fresh quail eggs. We really like boiled quail eggs. Although we can get canned boiled quail eggs, boiled eggs prepared from fresh quail eggs are much much better. I served it with marinara sauce, basil and sprinkle of salt.


Blanched asparagus with sesame mayonnaise. The dressing is a mixture of mayo, Japanese sesame paste or nerigoma 練りごま and soy sauce.


Salmon salad. My usual. The dressing is mixture of mayo, Greek yogurt and Dijon mustard.


We really like our new plates. If I serve 9 appetizers for two of us in small bowls, we have to wash a total of 18 bowls but here we had to wash only two plates. We really like the many small dishes we had here; true Izakaya-style.

Thursday, May 25, 2023

Root Vegetable Stew 根菜の煮しめ

“Nishime” or “Nitsuke” 煮付け, 煮しめ is a type of traditional Japanese cooking method in which food items are simmered in seasoned broth. I have posted many variations mainly based on what was simmered in the seasoned broth. I understand that there are differences between “Nishime” and “Nituske” but that is too esoteric for me. The broth can be based on either vegetarian (kelp, dried mushroom and vegetables) or more commonly including  bonito flakes, kelp, and other dried fish. The basic seasonings are soy sauce, mirin, sake or sometimes sugar. Food items in nitsuke could be vegetables especially root vegetables, mushrooms, fish cakes, tofu, chicken or fish. I made this because I had a package of boiled renkon lotus root 蓮根 which I needed to use. I also got assorted frozen fish cakes for oden and boiled frozen “satoimo” 里芋 taro root (this is the first time I got this, I usually get fresh ones and prepare them myself) and also a package of “shirataki” noodles tied into a knot called “musubi-shirataki” 結び白滝.  Using these ingredients, I made this without much effort. It was nothing special but a homey, gentle and comforting dish. The picture below shows daikon (left), renkon (center), satoimo (bottom left), fish cake (bottom righ). I also added blanched green beans and carrot.


The layer below shows three different kinds of fish cakes (straight chikuwa ちくわ), chikuwa with squid ika-chikuwa イカちくわ, ganmodoki がんもどき(all cut in half) and a knot of shirataki “musubi-shirataki 結び白滝”. Please notice, the taro “satoimo” is perfectly shaped since this is frozen packaged one.


Using prepared vegetables and assorted fish cakes, makes it much easier to make this dish. Beside using prepackaged items, the recipe is essentially the same as I previously posted.

Thursday, May 4, 2023

Home-made Cookie Butter クッキーバター

Some time ago, we were into chocolate covered cookies; first from GODIVA and then we found a much cheaper alternative made by a German company called Bahlsen (#1, in the composite below). But over time both these kinds of cookies were sort of forgotten and migrated to the very back of the pantry. Recently, my wife found a tin of Godiva with some chocolate cookies remaining and few boxes of Bahlsen’s. We tasted them and, surprisingly, both tasted perfectly OK despite their age. My wife remembered that some time ago while leafing through the La Brea Bakery pastry cookbook there was a reference to using stale brownies, chocolate Madeleines or chocolate cake scraps and grinding them into crumbs to use as the filling in Bobka pastries such as Russian coffee cake or chocolate armadillos. She thought, ‘why not use these cookies the same way for muffins or other baked goods’.  So she started looking on the internet for recipes using cookie crumbs in muffins. She found several. Most of them used Oreo cookies but she thought, ‘substituting chocolate covered cookies should work too.’ Then she saw that the recipe she wanted to use called for “Cookie butter”. Well she didn’t have cookie butter and thought her project was “dead-in-the-water”. Then she found a recipe on line for home-made cookie butter and she was “back-in-business”.  But, before she could make the muffin she had to make the cookie butter. Since this was a work in progress we did not take a picture of the final product but the one below is very close. Cookie butters appear to be made from different kinds of cookies such as sugar cookie, peanut butter cookie, or Oreo cookie . Since this was made from chocolate covered cookies, this must be  “chocolate cookie butter”. 


The recipe is from  the “Beautiful Mess” website with some modifications. (As always)

Ingredients:
2 cups cookie crumbs (we used a chocolate covered cookie from Bhalsen called “Afrika”) (#1)
½ stick butter
½ cup condensed milk sweetened
¼ cup milk evaporated
water as needed

Directions:
Place the cookies in a Ziploc bag, seal, and crush them using a meat pounder. (#2) (We found the food processor couldn’t handle the cookies whole…it’s demonstration of displeasure with the situation was quite impressive!) Place the crumbled cookies into the food processor and pulse until it forms a very fine powder (#3).
In a small saucepan, heat the butter over low heat until melted, and then stir in the sweetened condensed milk and evaporated milk until it’s all melted together (#4).
Starting with 1/2 cup of the liquid, pour it into your cookie crumbs and mix together with a spoon.
Keep adding small amounts of the liquid until the cookie butter is just wet enough to stay together (the first picture).

(The below are direct quote from the original recipe)
Once your cookie butter is blended, allow it to cool in the fridge for an hour or two. If you want to, you can actually stop at this point, and it will taste delicious. But if you want to make the cookie butter smoother and easier to dip things in, then remove the cookie butter from the fridge and stir very small amounts of water (start with 1/8 teaspoon) into the dough. At first it will look like the water is separating from the dough, but just keep stirring and mashing. You should start to notice that the cookie butter loosens up a bit as you stir in more water. Keep adding and stirring until you get to a consistency you like and refrigerate the mixture again.  Store your cookie butter in the fridge and it should be good for at least a week or two.


In any case, we have not used the cookie butter as a spread yet but it tasted rather good. We found out that our regular grocery store carries “Lotus Biscoff” cookie butter. We ordered it and will compare it with the one my wife just made. 


This just in: The“Lotus Biscoff” cookie butter arrived and we tasted it. As you can see in the picture above that it looks like peanut butter but tastes like….wait for it….a butter cookie!!

Thursday, April 13, 2023

Lotus Root Ball Soup 蓮根団子スープ

When I get fresh “renkon” 蓮根 lotus root, I have more choices as to what kind of different dishes I can make than when I just have boiled packaged renkon. Fresh renkon is usually available during the winter months. We can now get fresh renkon from Weee but the amount is rather large. So I have to come up with different ways to use it before it goes bad. Unlike boiled renkon, fresh renkon can be grated producing a starchy puree which  makes a good base for dumpling-type dishes, either boiled or fried. This dish is one of those grated/starchy/puree dishes and can be done only with fresh renkon. Actually, this is the second time I made this dish. The first time, I followed the recipe but the renkon balls did not hold together especially when I put them in the soup. So this time, I made it following my own (culinary) instinct which included using more ground chicken than what the original recipe called for. The renkon balls formed nicely and were very tender.  I made the rest of the soup with ingredients I had on hand. We had this as a lunch and it was rather filling and great.


Ingredients:

For renkon balls (made 8 small balls)
One segment of fresh renkon, peeled and grated, extra-moisture squeezed out (about 200 grams)
200 grams of ground chicken
2 tbs chopped scallion (3-4 stalks)
2 tbs potato starch
1 tsp soy sauce


For soup
300 ml Japanese dashi broth (I used two kinds of dashi packs, one was kelp and shiitake mushroom, the other with bonito for this)
3 tbs or more x4 concentrated Japanese noodle sauce (or soy sauce and mirin) to taste
1/2 package of shimeji mushroom, root end removed and separated (any mushroom will work)
5-6 blanched green beans, cut on the bias
2-3 tbs dried wakame seaweed,
(optional) (freeze dried)mistuba and (frozen) zest of Yuzu citrus.

Directions:
Mix all renkon ball ingredients in a bowl and mix well until it sticks together. Using a small ice cream scope, make small balls. Heat up the broth, put in the renkon balls and simmer for 5 minutes or until done. Take out the cooked renkon balls and set aside.
Meanwhile, add the mushrooms to the remaining broth and simmer for 4-5 minutes, add the renkon balls (I added 4 for 2 servings), the green beans and season with the noodle sauce to taste. I added the wakame, some yuzu zest and mitusba to the bowls. Place two renkon balls in each bowl and distribute the soup and remaining ingredients.

This was a really good soup. I think the amount of ground chicken the original recipe calls for too little. I made the balls with about the same amount of ground chicken as grated renkon which worked much better. Anything can be put into the soup but the mushroom and wakame seaweed worked well.

Friday, March 24, 2023

Lily Bulb 百合根

I keep finding Japanese groceries at Weee  which previously were just not available or difficult to get. This time, it was “edible lily bulb”*. The package states “this is a product of China”. So, initially, I was not sure this item would be the same as Japanese “Yuri-ne” 百合根 but decided to try it anyway. Growing up in Hokkaido 北海道, Japan, which is the major producer of edible lily bulbs in Japan, my family enjoyed “yuri-ne” often. Most commonly, my mother made chawan-mushi 茶碗蒸し or Japanese steamed savory egg custard with yuri-ne lily bulb. I remember the nice texture and sweet flavor of yuri-ne. So it is a very nostalgic flavor for me that I have not tasted in a very long time. It arrived fresh in a vacuum packed container. It looked exactly like Japanese “yuri-ne and (better yet) tasted the same.


Although the package indicated “slices”, the lily bulbs are made of petal-like multiple layers which can come apart especially after blanching (see below). I would have preferred a whole intact bulb since that would have given me more choices in how to prepare it but this will do for sure.


*Digression alert: There is a myth that all lily bulbs are toxic which apparently may be based on the fact that any part of lily is highly toxic to cats (inducing renal failure). Also, the name “lily” is attached to many plants/flowers which are not “true” lily.  Some of these certainly would be toxic to humans. In any case, Japanese and Chinese (reportedly also native American Indians) enjoy eating lily bulbs.

I made three dishes; “chawan-mushi” 百合根入り茶碗蒸し(center bottom), bainiku-ae 百合根の梅肉和え (dressed in pickled plum sauce, upper left) and goma-ae 百合根の胡麻和え (dressed in sesame sauce, upper right). I also served lotus root kimpira “renkon-no-kimpira 蓮根のきんぴら(left bottom) and “ohitashi” edible chrysanthemum or “shungiku-no-ohitashi” 春菊のお浸し (right bottom). The fresh lotus root and edible chrysanthemum both came from Weee.


The picture below shows the chawan-mushi made with yuri-ne, topped with ikura salmon roe and blanched sugar snap. You cannot see the yuri-ne well but two are peaking out on either side of the ikura.


The next picture shows the chawan-mushi before the toppings were put on. I put the yuri-ne on the bottom as well as on the top. Other items included fresh shiitake mushroom, and shrimp as usual. The egg and dashi mixture was my usual 1 to 3 ratio. There is no difference in how to make it from standard other chawan-mushi.


For next two dishes, I quickly blanched the yuri-ne, drained it and let it cool before proceeding.

One pickled “umeboshi” plum, meat removed and then chopped fine with  a knife, then placed in a Japanese “suri-bachi” mortal, 1/2 tsp mirin added, 1/2 soy sauce and ground to make a smooth paste. I added “kezuri bushi” bonito flakes (the amount arbitrary). I added more bonito flakes on the top.


The below picture shows yuri-ne with sesame dressing.

For sesame dressing:
1tsp white roasted sesame, dry roasted in a dry frying pan and then ground in a suri-bachi
2 tsp white sesame paste or “shiro neri-goma” 白ねりごま
1 tsp rice vinegar
1 tsp sugar

I garnished it with blanched sugar snap


These small dishes were nice and Weee made it possible for me to make these. These were quite filling but we also had a small serving of blue-fine tuna sashimi (frozen Australian from Great Alaska Seafood). The chawan-mushi was particularly special since it brought back good memories of the chawan-mushi my mother used to make.

Tuesday, March 21, 2023

Early Hanami 早めの花見

We presently have four cherry trees in our backyard; 3 Japanese style trees and one native choke cherry tree. (The choke cherry tree blooms in late spring with lovely veils of white flowers). There was already one mature cherry tree on the property when we moved in over 30 years ago but we planted two additional cherry trees, so we could have spectacular Hanami celebrations in our own yard. While they provided beautiful flowers and shade for many years neither of them survive today. One never did well and remained stunted for the 20 years of its life. While doing some construction in 2010 we discovered the reason. The poor thing was planted over a giant cement jersey wall such as those used to block traffic on a highway. Unbeknownst to us, and to our utter surprise and horror, the builders had used objects such as that as land fill in our backyard. The poor tree had nowhere to plant its feet so it could thrive. After seeing its circumstances we were amazed it even survived as long as it did. The other cherry tree was more fortunate. We apparently planted it in a more favorable spot and it did very well. It formed a large canopy over our deck and was our main cherry tree for hanami but, it reached its demise in 2018 at the hands of a severe Nor’easter wind. So in the face of this cherry tree devastation, we planted a new cherry tree to replace it. This tree is getting taller but does not yet quite match the grandeur of the destroyed old tree it replaced. Meanwhile, 30 some years ago soon after we moved into the house, I was cleaning out a patch of our backyard heavily overgrown with weeds and thick vines when I came across tiny twig of a tree and recognized it was a very young very small volunteer (i.e. not planted but rooted naturally) cherry tree.  I carefully saved it and nurtured it. Now it is over 2 stories tall. (Shown in the pictures below.)  This cherry tree is perfectly positioned to get full sun in the morning and full sun in the evening this time of year. As a result, it is the first of our cherry trees to bloom in the spring. This year spring came early and this cherry tree is in full bloom in Mid March. To celebrate, we had an early Hanami. Because of the location of the tree, it is most visible from the one of the rooms on the second floor. So despite the cold weather and strong winds of the last few days, we were still able enjoy an early Hanami in the comfort of the warm house. 


We will post more details later but we had five dishes for our early Hanami. Three were made from some newly acquired edible lily bulbs, as well as dishes of edible chrysanthemum and lotus root. Luckily daylight saving time kicked in just last Sunday, so sunset comes later than before increasing the time we have to enjoy the cherry blossoms. Even at sunset, however, the cherry blossoms characteristically glow in the ambient light which is always beautiful to see.


Friday, January 27, 2023

Fresh Wood Ear Mushroom and Chicken Salad キクラゲと鶏肉の酢味噌あえ

I am always on the look out for places where we can get good and specialized (especially Japanese) groceries. I have known about the on line service called “Weee” which does not have a brick-and-mortar location but does deliver Japanese, Chinese, Korean and Latino grocery items. I also recently found out they deliver to our area. So, I finally took the plunge and ordered mostly vegetables, (daikon, and fresh lotus root) but especially indulged in the extensive selection of mushrooms (oyster, shimeji, enjoki and  wood ear). I was surprised that the wood ear mushroom 木耳 or “kikurage” キクラゲ I received was fresh. Until now, I’ve only had dried ones. From the label, this was produced by Guan’s mushroom which seems to be a large nation-wide operation.


In any case, this is what fresh wood ear mushroom looks like.


In the past I usually used dried wood ear mushroom re-hydrated in Chinese-style stir-fry. I looked for new recipes on-line and, because of the other ingredients I had available, I ended up combining two recipes to make this woodear and chicken salad.


I served this as a appetizer one evening. It was good but fresh wood ear is not as crunchy as the dried ones.


Ingredients:
1/3 cup or more, Wood ear mushroom, washed, blanched, and cooled. Remove the hard attachment part if present and cut into strips. If using dried, rehydrate first.
1 American mini cucumber, both ends trimmed and the seeds scooped out. Cut into quarters length-wise and then obliquely
1/2 cooked chicken breast (we used breast meat from a whole chicken which was barbecued in a Weber grill, cut into similar sized pieces as the cucumber.

Karashi sumiso からし酢味噌 dressing (japanese hot mustard, miso, sugar and rice vinegar)

Directions:
Just dress all the ingredients and serve. Because of the acidity of the dressing, sake goes best.

Wood ear does not have much flavor but does have a nice crunch. Actually, the Japanese name “Ki-kurage” キクラゲ means “tree (ki) jelly fish (kurage)” because of the similar crunchy texture. The fresh one is nice but not as crunchy as re-hydrated dried ones. I may prefer the dried also because keep for a long time.

Saturday, October 29, 2022

Tako rice and Matsutake soup for lunch タコ飯と松茸のお吸い物昼食

 This was a lunch we had one day. We had leftover frozen octopus rice or “Tako meshi” たこめし made from a kit we got from the  Rice factory. Although the original was not bad, the amount of octopus was rather small. Since I made tender simmered octopus タコの柔らか煮 a few days ago, I added slices of octopus legs to the previously made rice. Also we had matsutake mushroom 松茸 from Maine and made clear matsutake soup 松茸のお吸い物. I added a dish of salted vegetable or “asazule” 浅漬け and simmered root vegetables and chicken similar to “Chikuzen-ni” 筑前煮.


I  just microwaved the rice to thaw it then added slices of tender simmered octopus with a small amount of the simmering liquid and further heated it. I also garnished it with fresh “myouga” 茗荷 from our garden. The addition of the simmered octopus made the Tako rice much better than the original.


I made this clear soup from broth made from a dashi pack (kelp and shiitake), with mirin みりん and light colored soy sauce 薄口醤油. I also added shrimp (sunk in the bottom), scallion and flower-shaped “fu” 花麩 gluten cake. I also added frozen zest of yuzu 柚子 citrus. This is a lidded soup bowl and when the lid was opened the subtle but distinctive aroma of matustake and yuzu wafted out. (The aroma of matustake is one of the joys of the matusake season).  I think Maine matsutake appears to have a better aroma than the ones we used to get from Oregon.


The below are basic simmered root vegetables including daikon 大根, carrot 人参, bamboo shoot 筍, shiitake mushroom (I used dried) 椎茸, lotus root 蓮根, kon-nyaku 蒟蒻 and sugar snap スナップ豌豆 (for garnish). This time I also included chicken thigh.


This is my usual “asazuke” 浅漬け. I just made myouga in sweet vinegar 茗荷の甘酢漬け. I thinly sliced and served next to the vegetables.


For a lunch, this was quite good. 

Tuesday, May 17, 2022

Pork belly and diakon simmered in miso 大根と豚バラ肉のみそ煮

 We have been getting gourmet meat such as duck and lamb from D’Artagnan. This time, we got an email promotion from them for pork belly from young pig called “porcelet”. Since we have not had pork belly (from adult pig or otherwise) for sometime (we usually get it from Whole Foods), we decided to give it a try. It arrived hard chilled with skin on. It was also much larger than we expected. Although the ad said it was 6 lbs. it was essentially half of the entire belly and we realized that in its present shape it probably would not fit in our freezer so I immediately divided it into three portions. I vacuum packed and froze two and thawed one. I made several dishes from the one piece I thawed. One dish is shown below. I thinly sliced a small portion while it was semi frozen. This preparation is called “buta-bara komagire” 豚バラ細切れ and is usually used to “season” other ingredients, mostly vegetables, rather than served as a “meat dish”. I used it to make a Japanese style miso simmered dish with root vegetables. The original recipe came from erecipe, a Japanese recipe site. One evening I served this dish (left) with dashi-maki omelet, rapini buds (substitute for “nanohana” 菜の花 dressed in mustard-soy sauce or “karashi-jouuyu” 辛子醤油 and skinned Campari tomato.


Ingredients:
150 gram (1/3 lb) Pork belly, thinly sliced
1 carrot, medium, peeled and cut into bite size (“rangiri” 乱切り).\
Lotus root (renkon), I used frozen already cut ino slices, I used 4 which was cut into half circle.
1/3 Gobo burdock root, skin scraped off and cut into bite size (“rangiri”), soak it in vinegared or acidulated water until use (this is my addition since I had some left over gobo)
1 small piece of ginger root, skin scraped off and cit into julienne.
Pre-cooked green beans or other greeneries

oil for sautéing (I used peanut oil with  a dash of dar sesame oil)

Simmering liquid
150 ml Japanese both
3 tbs sake
1 tbs mirin
1 tbs sugar
2 tbs miso
1 tsp soy sauce (this is added at the end of cooking)

Directions:
Add the oil to a pan and sauté the ginger until fragrant. Add the pork and cook until the color changes
Add remaining vegetables and cook for few more minutes.
Add the simmering liquid (sans the soy sauce)
Cover it with either a parchiment paper lid or “otoshi-buta” 落とし蓋 on low flame for 20-30 minutes and the liquid reduces by half.
Remove the paper lid and mix the contents of the pan
Add the soy sauce and green beans

Pork and miso are a good (and classic) combination. The ginger flavor also goes well. This is Japanese home cooking and is very satisfying. It goes well with sake or rice.

Friday, April 8, 2022

Salmon cake with rapini サーモンケーキ

 After we switched to grocery home delivery, we realized some of the items were different from the ones available at a physical store. One of them is a whole half filet of salmon with skin on (around 2.5 lbs.) which appears to be only available for home delivery. The price per pound is more reasonable compared to smaller filets available in the store. We like every part of the salmon even the skin particularly when cooked to crispiness.  Interestingly the salmon is not scaled when it arrives. So one of the first things I have to do is to scale it using a handy-dandy Japanese fish scaler. (I guess the grocery store reasons that most customers don’t like the skin. They just remove it and throw it away so why take the time to scale it.)  Another part of this type of fillet that we particularly like is the belly portion which we eat as a small hors d’oeuvre . We also like the main portion of the fillet dried in the fridge for a few days before panfrying it .  (Drying the salmon in the fridge was a technique my mother introduced to us. On one of our visits to Japan my mother offered to cook some salmon she dried with the enticing phrase “Totemo oishi WA” delivered with an emphatic nod of her head. Even my wife knew this meant, “it’s really good” and it was.) Drying the fish obviously removes some of the moisture and in so doing improves the flavor. 

I usually end up with several portions of salmon in irregular shape from both the belly and tail end of the fillet. I remove the skin and and make salmon cakes with these portions. I usually make 4 cakes which are perfect for lunch or snack. This time, I served this as a small dish to go with red wine. I heated up the cakes in a frying pan, added blanched and chopped rapini and made sauce with brown butter and lemon juice. To make it more interesting, I added yuzu-kosho 柚子胡椒 which went remarkably well with this dish.


I followed this with fried shrimp heads  reheated in the toaster oven (this was a part of take out sashimi/sushi combination from Tako Grill the night before)  and the usual simmered root vegetables I make (lotus root, burdock root, carrot, bamboo shoot, and shiitake mushroom (dried). The greens are blanched sugar snap in salt broth.


Salmon cakes

Ingredients: (make 4 small salmon cakes)
150 gram salmon meat, half finely chopped (to hold the cakes together) and another half coarsely chopped (to add texture), amount is variable, whatever I have when preparing the whole half filet of the salmon.
1 small shallot (or onion) finely chopped (#1)
1 jalapeño pepper, seeded and deveined, chopped finely (#1, optional)
2 fresh shiitake mushrooms, stems removed and caps finely chopped (optional, this time I did not have fresh shiitake)
2-3 tbs of panko Japanese bread crumbs (#4, adjust the amount based on the consistency of the mixture)
1 tbs mayonnaise (#2)
1 1/2 tsp Dijon mustard (#2)
Lemon juice from half a lemon
1 tbs chopped fresh dill (#2), I use the dill I cleaned and froze)
Olive oil for frying the vegetables and the salmon cakes


Directions:
Sauté the onion, pepper and shiitake mushroom in olive oil, season with salt and pepper, let it cool down before mixing with other ingredients.
Mix the remaining ingredients except for the panko (#3), add panko to adjust the consistency of the cakes (#4).
Make round disks (#5) and cook with olive oil in a frying pan, several minutes on each sides until brown and cooked through (#6).

This is a good dish to have. The leftover cakes can be warmed up in a frying pan or in a toaster oven. You could make some kind of sauce as I did here or just a squeeze of lemon juice. They go great with red wine.