Showing posts sorted by relevance for query nitsuke. Sort by date Show all posts

Tuesday, May 16, 2023

Miso-marinated Sable Fish 銀鱈の味噌焼き

This is the second dish I made using the sable fish (black cod) or gindara 銀鱈 we got from Vital choice. The last time, I made “Nitsuke” 煮付け, simmered in soy sauce-based broth.  So this time, I made “miso-yaki 味噌焼き. I marinated the fish in a miso and mirin mixture before cooking. Unlike Japanese households where full-size ovens are rare but almost all kitchen stoves have a special fish grill*, we do not have one. Using the broiling element on the regular oven or toaster oven is feasible but it tends to make smoke and the splatters from the fish as it cooks making the inside of the oven dirty. So I decided to try using non-stick aluminum foil on a dry frying pan. This way I would not need to use any oil to prevent the fish from sticking to the pan and I thought this would best emulate grilling, which sort of worked.

*Japanese “gas stove” is called “Gasu-konro” ガスコンロ. “Konro” appears to have originated from a Chinese word 火炉. Japanese gasu-konro almost always have a grilling unit which is optimized for grilling fish with minimal smoke and grills both sides of the fish at once.

I served the fish with a Japanese “dashi-maki” だし巻き omelet and stir fried asparagus and shiitake mushroom seasoned with the same marinate I used for the fish. We also had freshly cooked rice. This fish is amazing. So soft, moist, flakey with a lot of oil. The skin did not get crispy like salmon but was quite good.


Ingredients:
2 filets of “gin-dara” sable fish, skin on, thawed
White miso and mirin mixture (about 1:1 ratio) for the marinade

Directions:
Smear the marinade on a sheet of plastic wrap, place the fish in the center the skin side up, smear the marinade on the skin side and wrap (#1), refrigerate for several hours

Unwrap and remove the marinade (either scrape off using a silicon spatula or wash and pat dry with paper towel) (#2)

Place a sheet of non-stick aluminum foil on a stainless steel frying pan on medium low flame and place the fish skin side down (#3) without added oil or liquid

Put on the lid and cook for 5 minutes or until the fish is 80% done (the meat side becomes opaque) (#3)

Flip it over and cook the meat side for 1 minute (#4)

I flipped it over again in an attempt make the skin crispy (#5) but, in retrospect, this is not needed.

Meanwhile, in a separate frying pan, I sautéed the finely chopped shallot, asparagus and shiitake mushroom in olive oil and seasoned with the above miso marinade (#6)


We think that sable fish (gin-dara 銀鱈) and Chilean sea bass or Patagonian tooth fish (gin-mutsu 銀むつ) are two of the best fish especially in the category of  “white meat fish”. Sable fish “nitsuke 煮付け” and “miso-yaki” are both excellent but nitsuke may have a slight edge especially when enjoyng with white rice since the simmering liquid is perfect to season the rice.

Saturday, April 22, 2023

Simmered Sable Fish 銀鱈の煮付け

We got frozen “Chilean sea bass” or “Patagonian toothfish” from Vital Choice. We also found they had “sable fish” or black cod. The sable fish is called “Gindara” 銀鱈 in Japanese and is considered one of the best fish. (Actually we had this fish at Yuzu some years ago as a part of “Omakase” and we really liked it). So, we got the sable fish as well. Chilean sea bass and sable fish have some similarity in that they are both white meat fish and are very moist and succulent. At Yuzu, it was served miso-marinated and grilled with meat-miso sauce. After some thought, I decided to make it simmered in a soy sauce based sauce or “nitsuke” 煮付け. I added “Gobou” burdock root and Tokyo scallion.


Ingredients (for 2 servings):
2 (4oz about 115 grams) filets of “gin-dara” sable fish, thawed
half stalk of Tokyo scallion or “Nihon-negi” 日本ネギ, cut into 4 two inch segments (new item purchased from Weee).
3-4 inch of gobou ごぼう, skin scraped off (using the back of the knife), cut into 4 segments lengthwise (I soaked in acidulated water for 2-3 minutes and precooked for 5 minutes)

Simmering liquid*:
15 gram sugar
30 ml soy sauce
30 ml mirin
60ml sake
60ml water

*Many Japanese recipes talk about the “golden ratio” of “nitsuke” seasonings. There appears to be some variations. I used the ratio of 1:2:2:4 sugar:soy sauce:mirin:sake and added water in the same amount as the sake. I thought this ratio was too sweet to our taste, however, and I may reduce the sugar by half (ie 7 grams as in the simmering liquid ingredients listed above).

Directions:
Mix all ingredients of the simmering liquid in a pan and simmer to dissolve the sugar and evaporate the alcohol from the sake and mirin.
In a frying pan, just large enough to fit the fish and vegetables, add the simmering liquid. When it starts simmering add, the fish (skin side up) and the vegetables. Put on the lid and simmer for 6-7 minutes.


Remove the lid, increase the flame and baste the fish with the simmering liquid until the liquid is reduced in half.
Serve the fish with some simmering liquid and a side of white rice.

This fish is really great. The simmering liquid is perfect for plain white rice. Unfortunately, the gobou was a bit too fibrous.

Sunday, June 14, 2015

Cold salmon and simmered vegetables 冷製サーモンと野菜の煮付け


This was a starter dish for one evening made up of leftovers. Cold salmon was leftover from pan fried and oven finished salmon filets. Straight out of the oven,  the skin was nicely crispy and we preferentially ate all the skin leaving good sized chunks of meat behind as leftovers. I simply served these salmon chunks cold with baby arugula dressed with honey mustard dressing.


On the right are simmered vegetables which started life as "oden" おでん. I served the oden several times stretching it out by adding boiled eggs, tofu, and fish cakes. These carrots, daikon, and konnyaku コンニャク were the remaining survivors of this never ending oden, I added a top portion of boiled bamboo shoot (leftover from when I made mu shu pork). I seasoned the oden broth further by adding soy sauce and mirin and made the remaining veggies to "Nitsuke" 煮つけ (compared to oden, nitsuke usually has much stronger seasoning).

Finally all the leftovers have been accounted for and served. I do not remember what we drank with this but either red wine or sake would be just fine.

Thursday, May 25, 2023

Root Vegetable Stew 根菜の煮しめ

“Nishime” or “Nitsuke” 煮付け, 煮しめ is a type of traditional Japanese cooking method in which food items are simmered in seasoned broth. I have posted many variations mainly based on what was simmered in the seasoned broth. I understand that there are differences between “Nishime” and “Nituske” but that is too esoteric for me. The broth can be based on either vegetarian (kelp, dried mushroom and vegetables) or more commonly including  bonito flakes, kelp, and other dried fish. The basic seasonings are soy sauce, mirin, sake or sometimes sugar. Food items in nitsuke could be vegetables especially root vegetables, mushrooms, fish cakes, tofu, chicken or fish. I made this because I had a package of boiled renkon lotus root 蓮根 which I needed to use. I also got assorted frozen fish cakes for oden and boiled frozen “satoimo” 里芋 taro root (this is the first time I got this, I usually get fresh ones and prepare them myself) and also a package of “shirataki” noodles tied into a knot called “musubi-shirataki” 結び白滝.  Using these ingredients, I made this without much effort. It was nothing special but a homey, gentle and comforting dish. The picture below shows daikon (left), renkon (center), satoimo (bottom left), fish cake (bottom righ). I also added blanched green beans and carrot.


The layer below shows three different kinds of fish cakes (straight chikuwa ちくわ), chikuwa with squid ika-chikuwa イカちくわ, ganmodoki がんもどき(all cut in half) and a knot of shirataki “musubi-shirataki 結び白滝”. Please notice, the taro “satoimo” is perfectly shaped since this is frozen packaged one.


Using prepared vegetables and assorted fish cakes, makes it much easier to make this dish. Beside using prepackaged items, the recipe is essentially the same as I previously posted.

Wednesday, December 2, 2020

Renkon balls レンコンまんじゅう

This dish is the result of an unexpected “silver lining” derived from the Covid epidemic. Because of Covid, we decided as a safety precaution, not to go to the grocery store but rather have groceries delivered. This forced us out of our usual routines and by necessity introduced us to new options. One of which was buying groceries from HMart Korean grocery store via the Instacart. As a benefit, we are now getting items which were not available from our usual grocery stores. One such item is fresh “reckon” 蓮根 or lotus root. (It is the floating stalk, not the root of a water lily). Even at our Japanese grocery store, the only reckon we could get was cleaned, boiled and sold in a package. It is easier to use than fresh renkon but it limits the dishes that can be made from it. For example, I could not have made this renkon ball or dumpling  dish レンコンまんじゅう shown below from packaged prepared renkon. But with fresh renkon available I could. I served the dumplings in a very gentle broth, with garnishes of edamame 枝豆, and simply fried reckon slices.


Reckon is an interesting vegetable. Even after cooking, it remains crunchy but grated and made into dumplings, the consistency changes completely into the consistency of “mochi-mochi” もちもち or like-fresh rice cake. I added shrimp and edamame to the dumpling. As a garnish I added simply fried renkon  which gave a nice contrasting  crunchy texture.


The other evening, I served three renkon dishes. From the left, Nitsuke 煮付け, the center is this renkon ball or dumpling dish but I added one fish ball made from blue fish, the right is renkon salad れんこんサラダ. 


In this nitsuke dish, renkon remains crunchy.


Boiled  renkon (again remains crunchy), blanched broccoli and skinned Campari tomato dressed in Yuzu mayonnaise. Since we used up the store bought Yuzu mayonnaise, I made my version by mixing Hellman’s mayo, yuzu juice (from the bottle) and a pinch of sugar . This really emulated the commercial Yuzu mayonnaise we got earlier.


Instructions for the renkon balls

Ingredients:
One segment of fresh renkon (#1) (after grated, #4, it was slightly more than 700grams)
2 tbs potato starch
3 large shrimp, thawed, shell removed and cut into small chunks then salted
10-15 shelled edamame

For broth
1 cup kelp and bonito broth (I used a dashi pack)
1 tbs of white dashi “shirt-dashi” 白だし seasoning or 1tbs each mirin and light colored soy sauce (or to taste).

Directions:
One segment of fresh renkon (#1).
Remove the ends of the segment of renkon and peel the skin (#2 and #3)
Finely grate the renkon and drain to remove excess moisture (#4)
Mix in the corn starch, shrimp and edamame. Make small balls about one inch in diameter.
Deep fry at 300-320 F for 7-10 minutes (#5)
I also fried sliced and quartered renkon
Drain (#6)


Assembly:
I cut one renkon ball in half and placed the halves in a bowl. I added the fried renkon and edamame and poured in the hot broth. You can also reheat everything in the broth and serve.

This is a very good dish. The contrast of elastic texture of the renkon balls and crunchy fried renkon is wonderful. The shrimp has similar texture to the renkon ball and since it was salted, it imparts briny salty burst of flavors. I made the broth very gentle and light which also went well.

Monday, March 7, 2011

Simmered vegetables with chicken 鶏と根菜の煮付け

This is a typical home cooked dish. Similar dishes, but more sophisticated ones, are called "umani" 旨煮 and "chikuzenni" 筑前煮, which are often served as New Year's dishes. The type of dish I made here is generally called "nitsuke" 煮付け and is a homey toned-down version of these two dishes. It has a wider range of vegetables and all the ingredients are cooked together in one pot.

The reason for making this dish was to clean up some ingredients I had in our refrigerator. I deboned chicken thigh several days ago and it had been marinating in sake for several days. I had to use it or lose it. I also had a half daikon and burdock root or "gobo" 牛蒡. You could use any combination of root vegetables for this dish.

The amounts of each ingredients are totally arbitrary. You can make it with lots of chicken or chicken can be just a flavoring or no chicken. I used three chicken thigh (skinned and deboned) cut into large bite sized pieces. The vegetables included daikon (3 inch long, medium, peeled and cut into a half inch thick disk cut into quarters), gobo (half, skin scraped off under running water and cut into small "rangiri*" 乱切り pieces, soaked in acidulated (with rice vinegar) water, and carrots (two medium, peeled and cut into medium "rangiri" pieces).

*rangiri: This is a type of cut used often in Japanese cooking especially for long root vegetables. After peeling, you lay the vegetables flat on the cutting board and cut the first piece on a slant from the end, turn 90 degree and making another cut on a slant until it is completely cut up. Here is a visual aid.

I placed all the root vegetables in cold water in a pan and cooked them for 20-30 minutes or until the daikon and gobo are soft (they take the longest to cook). I drained and placed the vegetables in a pan and poured in dashi broth (about 3 cups, again I made dashi using a dashi pack) to just cover the vegetables. When the broth came to boil, I added the chicken pieces and turned down the heat to simmer with "otoshibuta" 落とし蓋. When the chicken pieces became opaque, I skimmed off the scum and fat that formed on the top of the liquid and added mirin (3 tbs) and soy sauce (2 tbs). I kept simmering occasionally skimming more scum and fat. After 10 minutes, I added more soy sauce (1 tbs) and checked the seasoning. I let it cool down. I reheated it before serving and garnished it with boiled green beans. I think, in a more traditional way, the seasoning of nitsuke is stronger with mirin, sugar and soy sauce. I tend to make the seasonings light, so you have to experiment to find the best seasoning for you. To make it simpler, you could cook everything using broth and seasoning but gobo and daikon will be milder if you precook as I did here.

This is again nothing special but very comforting (at least for me) food.

Tuesday, June 11, 2013

Simmered whole Vermilion snapper 鯛の煮付け

The food you can make really depends on what is available at the store. We went to a local gourmet grocery store one weekend and found a small red snapper called Vermilion snapper. The fish before cleaning was just the right size; weighing about 1 lb. It also looked really fresh. Upon reflection I thought it also looked really lonely in all its freshness so I bought two. My plan was to use them in separate recipes for two dinners. This was a just the right sized fish for me to present as a whole head-on fish (or "okashira-zuki" 御頭付き). It was a much more manageable size than "sea bream" which I posted before. Since the size and appearance were somewhat similar to "Kinme dai" 金目鯛, I decided to try simmering the whole fish or "nitsuke" 煮付け.

Digression alert: I am not sure about the English name for "Kinme dai" but "Splendid Alfonsino" appears to be the corresponding English name. Although the Japanese name bears "dai", (which is the same as "tai" only changing the "T" to "D" sound when making a compound word), they are not related to "tai" 鯛 or "sea bream". Kinme dai are deep water fish with large eyes (Japanese name means “golden eye” red snapper). They are suited for “sashimi” and "nitsuke" with firmer and oiler meat than red snapper but I have never seen this fish in markets in the US.

I had the fish monger scale and gut the fish. Japanese generally keep the fins on for decorative purposes but I forgot to tell the fish monger not to remove them so as you can see in the picture they are gone. After I did a little bit of touch-up cleaning and scaling, I made cross cuts on the skin on both sides to prevent the skin from rupturing during cooking (below #1).

Simmering broth: I soaked a 5 inch square of kelp (not the eating kind but the broth making kind) in about 2 cups of water.  After 30 minutes of soaking, the kelp was soft and pliable. I placed the kelp on the bottom of the square Pyrex pan (which just accommodated the fish diagonally) to prevent from the fish skin from sticking to the bottom of the pan. It also added a "umami" flavor to the broth.  I put the kelp-soaking water (2 cups), soy sauce (4 tbs), sake (2 tbs), mirin (2 tbs) and sugar (2 tbs) in a separate pan and let it come to a gentle boil for few minutes to let the tastes amalgamate and the alcohol to evaporate.  I poured it  in the Pyrex dish with slices of fresh ginger and placed the fish and precooked daikon (see "Daikon" below) (#1 in the picture below).

I placed my favorite "pink" silicon otoshi-buta 落とし蓋 (#2) on top and put the glass lid on (#3). So, this was a cross between simmering and steaming. After 15 minutes of gentle simmering, I turned the lid slightly askew to reduce the simmering liquid. After a total of 30 minutes, the simmering liquid had reduced in half. I turned the flame up a little, and spooned the simmering liquid over the fish repeatedly for 5 minutes to further season the fish and reducing the simmering liquid (#4).

Daikon: I also cooked daikon. I peeled and cut the daikon into 1 inch-thick rounds. I halved it into half moons. As a short-cut method, I placed the daikon in a microwaveable silicon container with a little bit of water on the bottom and microwaved it for a few minutes or until it became soft (do not over zap, it will become dry). I just placed the half moon daikon in the same pot as the fish turning once during the cooking.

As you can see in the first picture, I served the whole fish with the daikon and very finely julienned fresh ginger root or "ito shouga" 糸生姜 (soaked in water with the moisture wrung out) as a garnish.

The dish looked nice (even without the fins) but in terms of the taste and texture, it was a bit of a disappointment.  The meat was soft (too soft) and lacked good flavor despite the simmering liquid and ginger. As usual. my wife was the de-boning expert serving up the meat.  At the end of the meal, my wife readily acceded to my request for the eyes (gelatinous stuff behind the eyes are what I am going for) in exchange she got the "cheek" meat (she made it clear she thought she got the better end of the deal).  But otherwise the head was kind of too small to be worthwhile. Since we got two fish, I will try another cooking method on the other.

Friday, June 14, 2013

Vermilion Snapper baked in miso and butter 鯛のバーター味噌味オーブン焼き

Since the "nitsuke" or simmered vermilion snapper was not a great success, I was pondering what I would do with the second fish. I thought of "papillote" (baked in parchment paper) but the fish was too big for the width of parchment paper I had. So I abandoned that idea. I could just bake or grill it but that was too mundane. So at the last moment, I used aluminum foil to make a pouch and seasoned it with miso and butter as I often cook shimeji or enoki mushrooms on the grill.

I used whatever vegetables were at hand; I used onion, shiitake mushroom, and green asparagus. I first put a long piece of aluminum foil on a large, rimmed cookie sheet (just in case juices spilled out). I made the piece long enough so that after folding it in half it would accommodate the entire length of the fish. I then made a bed of sliced onions (1 small or 1/2 large), asparagus, stem ends removed and skin peeled from the stalk, and sliced fresh shiitake mushrooms (5 large) (#1 below). I then placed the fish on top of the bed of vegetables (#2).
Miso sauce: In a small bowl, I added brown miso (4 tbs), sugar (1 tbs), mirin and sake in 1: 1 ratio until the miso reached a consistency I could smear on the skin of the fish without having it run down the sides. I also added a small amount of soy sauce for no reason. I smeared the miso concoction on the top of the fish and placed thin pats of cold unsalted  butter on top (total of about 2 tbs) (#3 below).
I folded the aluminum foil in half which covered the fish and vegetables loosely leaving enough space for expansion. I crimped the two wider sides and the end to make a tightly sealed pouch and baked it in a preheated 400F convection oven for 30 minutes. After 30 minutes, some of the miso mixture was still clinging to the top of the fish but a nice sauce had developed on the bottom of the pouch with liquid coming from the vegetables and fish (#4). I gently scraped the miso from the skin of the fish and mixed it into the accumulated liquid on the bottom to further expand the sauce.

After placing the fish on a serving plate, I served the vegetables on either side of the fish (the first picture).

This turned out to be a much much better way to cook this fish than the previous method I had used (simmered or "nituske"). After my wife deboned the fish and served the meat and the vegetables on individual plates, I added a small mound of rice on the side and poured the sauce from the bottom of the aluminum foil pouch over the rice and fish.

The fish tasted much richer than it had when cooked the previous way--with sweet (not too sweet) miso flavor. We did not actually taste the butter but it definitely added to the rich flavor and texture to the fish. This was a very satisfying dish.

Monday, October 2, 2023

Mid-autum Full Moon Gazing 月見中秋の名月

Full moon on September 29 (Harvest moon) in Japanese is called “Chuu-shuu-no-meigetsu” 中秋の名月. Traditionally, the Japanese admire (gaze) at the full harvest moon and that “celebration” is called “Tsuki-mi” 月見. Some plants such as pampas grass or “Susuki” ススキ and balloon flower or “Kikyou” 桔梗 (shown below) are associated with tsuki-mi. As for the food associated with Tuskimi it is usually something spherical in shape i.e. resembling the full moon. The most famous is “Tsukimi-dango” 月見団子 which I’ve made several times before, using “mochiko” flour and tofu. I made it again this year. The picture below shows the “tuskimi-dango” in front of  a “Tenugui” Japanese washcloth depicting “Chuu-shuu-no-meigetsu” and balloon flower. This is the prototypical scene depicting tsukimi.  Unfortunately, it was cloudy on the 29th and we could not see the moon. We had to be satisfied with gazing at the full moon on the wash cloth.


It is the tradition for tsukimi to make a pyramid using 15 of the dango (9+4+2) . I made 20 dango. We couldn’t resist and tasted 2 with “Mitarashi sauce”.  These type of dango are called “Mitarashi dango” みたらし団子 which I posted before. Nonetheless despite this early indulgence we still had enough dango to make the appropriate pyramid (shown below).


Just for convenience, I duplicate the recipe we published previously.

Ingredients:
for the Dumpling:
"Mochiko" rice flour 100gram
Sugar 2 tbs (30gram)
Silken tofu about 1/2 (gradually added until right consistency is attained)

for Mitarashi sauce:(all weighed since amounts are rather small).
Soy sauce 40ml (or grams)
Sugar 60 gram
Dashi broth 100ml (or grams)
Mirin 15ml (or grams)
Potato starch 15 gram

Directions:
For Dumpling:
Add the flour and sugar in a bowl (#2).
Add a small amount of the tofu (#3) at times to the dry ingredients and mix by hand.
Add more tofu until the dough forms but is still soft (#4) (The Japanese instructions say "texture of an ear lobe).
Using a small ice cream scoop, make small balls (need to make at least 15, I made 19).
Cooking them in boiling water until they float on the surface and cook additional 3 minutes (#5).
Put cooked dango in ice cold water for few minutes and drain (#6).

The best way to enjoy the dango is “Mitarashi dango” みたらし団子. We microwave the dango and heat up the sauce (I use a small pan, if it gets too watery add more potato starch slurry). Coat the heated dango and just for show, I skewer the three dango together (see below).


This year, I also made “nitsuke” 煮付け or “nikkorogashi” 煮転がし(left in the picture below) using frozen “Sato-imo” 里芋 taro which we got from Weee. I usually do not use frozen taro but I was curious enough to get it some time ago. It is very interesting that the frozen taro are perfectly spherical. When I was looking through the Japanese cooking site “e-recipe”, one of the dishes they listed for “Tuskimi” was this dish since frozen sato-imo is spherical and an appropriate representation of the moon                                     for Tsukimi’ 


Although we could not see the full moon on the 29th, we could see the near-full moon on the 27th. Not really a good picture but it was beautiful.


The dango were a real treat. The ones made with rice flour had a very pleasing texture. They were fluffy and soft. The mitarashi coating was a perfect combination of slightly sweet and slightly salty. The taro dango were a nice addition. They were soft but not mushy and perfectly seasoned. What fun. 

Tuesday, December 9, 2014

Egg in a pouch 卵の袋煮

In general Japanese are fond of hen's eggs (or for that matter any kind of eggs either bird or fish). This ranges from "raw" eggs on rice 卵かけ御飯, omelet (either Western style or Japanese "Dashimaki" 出し巻き卵),  onsen egg 温泉卵, "tamago-toji" 卵とじ (binding topping items with beaten eggs which was lightly cooked like in Donburi どんぶり) and so on.  We like eggs but try not to eat too many. When it comes to eggs the one thing we do not like is hard boiled eggs which have been boiled to the point where a green layer of sulfur appears around a very hard egg yolk. One way to avoid this is to make a soft- or medium boiled egg, peel it and then simmer it in a broth such as in oden おでん. The yolk gets totally cooked and becomes creamy with no sulfa-rings. The same thing happens with this dish "egg-in-a-pouch" or "Tanago no fukuro-ni" 卵の袋煮.

"Fukuro" means "pouch" which in this case is made of deep fried tofu or abra-age. It is made by cracking a raw egg into the deep fried tofu pouch, sealing it with a tooth pick and simmering it in broth. The result is a creamy egg yolk without the sulfur ring but with the added texture and flavor of the deep dried tofu. Besides, busting into it is like opening a surprise package particularly if you do not know what is inside the pouch.


This dish is usually cooked in "nitsuke" 煮付け but I made  it as part of oden this time. The above are daikon, carrots, "chikuwa" 竹輪 fish cake and the "egg in a pouch" served with Japanese hot mustard.


When you cut into it, you can see the totally cooked and creamy yolk without the green sulfa ring. My wife said, that, although this is very good, she prefers a simple boiled egg in oden.

Sunday, May 3, 2015

Hanami 2nd day, simmered red snapper 花見二日目、小鯛の煮付け

DSC_0260
Our every day grocery store has a small fish section but I occasionally find something good and interesting. The fish monger and his assistant there now recognize me (although we are not yet on a first name basis). One Staurday, they had small red snappers or "ko-dai" 小鯛 which were scaled and cleaned but head and fins intact exactly as I like it. The size was much smaller than usual for red snapper and perfect for serving a whole fish per person. I splurged for two. I thought of either making shio-yaki 塩焼き(or salted and grilled) or nitsuke 煮付け(simmered in broth) and decide to go with the latter. As a side, I also cooked some tofu and scallion.

I served this for hanami 花見 on the second day.


Preparation of the red snapper:
To remove the fishiness, if any, I first washed and removed the gills. Our fish monger did a good job of scaling and gutting the fish. I first boiled water in a frying pan large enough for the two red snappers to fit snugly. I placed both fish in the boiling water quickly turning them over (total of 10 seconds) and then plunged them into ice water, further washing any blood etc from the fish (#1).

Cooking broth (for cooking two red snappers below):
Water 200ml
Sake 100ml
Mirin 3 tbs
Soy sauce 3 tbs
Sugar 1 tbs
Ginger root: 6 thin slices.

Tofu and scallion (amount arbitrary).

The above seasoning is best for eating fish for sake but for eating it with rice, you may want to season it a bit more strongly (more soy sauce and sugar depending on your taste).

I scored the skin (in a cross cut) to prevent the skin from breaking during cooking and to allow better penetration of the flavor (#2).

1. I placed all the ingredients of the cooking broth in a frying pan.
2. As soon as the sugar melted, I put in the fish (#2).  Covered it loosely with aluminum foil (or "otoshibuta" 落としぶた) and let it come to a boil and immediately turned down the flame to simmer (#3). I continued  cooking them for 30 minutes, occasionally spooning the broth over the fish (but not turning the fish over to avoid any breakage) (#4). (I stopped at this step several hours before serving. I kept it covered. I reheated and proceed cooking tofu and scallion just before serving).
3. I removed the fish to serving plates and kept them warm.
4. I turned up the flame and reduced the cooking broth a bit further and added cubes of tofu and scallion (white parts first and then green parts) and cooked them for several minutes. I turned the tofu few times).

Red snapper samll composit

I served the fish with tofu and scallion and poured the reduced cooking broth over the fish.  On a second look, I should have taken the pictures without the sauce. In any case, we both enjoyed the fish. Since they were small red snappers, there were lots of bones and required some jedi chop stick action which my wife is better at than I am when it comes to eating fish. She donated the fish eye balls of her fish to me. (Such offerings are the cementing foundation of a good relationship!)  Just for the record, I do not eat the eye balls themselves just the gelatinous stuff behind the eyes.

DSC_0234 (1)
Although the fish were rather small it had lots of meat and we were getting filled up. We turned on the flood lights and went into night time cherry blossom gazing or "yozakura kenbutsu" 夜桜見物.

Wednesday, February 15, 2012

Black vinegar soy sauce simmered chicken 鶏もも肉の黒酢煮

This is just a variation on what I posted before. This time, I added potatoes, carrot and broccoli and served it like "nitsuke" 煮付け or a Japanese traditional stewed dish.

As I have mentioned before, I simmered/steamed chicken breast in a mixture of black vinegar (Japanese not Chinese variety), mirin and soy sauce which was called Kurosuni 黒酢煮. I expanded this to include chicken wings and then chicken thigh in the same sauce. I was initially discarding the leftover broth after the chicken meat was consumed. Then, instead of discarding the broth every time, I added water (to compensate for any evaporation during cooking) and added more soy sauce, black vinegar and mirin (1:1:1 ratio) and reused the broth. I strained the broth between uses and also started adding slices of ginger root (fresh ginger root for every batch discarding the old spent ones). I also changed the way I cook the chicken. instead of cooking it and eating it the same day, I now cook it but eat it later. For example, on the first day, I cook the chicken parts in the broth, then let it cool down and put it in the refrigerator. The next day or few days later, I reheat it. This multi-day process provides a few benefits. One of them is that the chicken becomes much more flavorful and tender as a result of it's extended bath in the liquid. The other is that I can skim off the excess chicken fat.
The above picture on the left is after an over night in the refrigerator. I remove the chicken fat using a large spoon (of course, if you are so inclined, you could save it and use it as "schmalz".) After removing the fat (on the right), the broth is completely jelled because of the collagen and protein leached into the broth from the chicken--many batches of which were cooked in the broth. This gellee could be used as a dressing by cutting it into small cubes.

To make a complete dish, I have added nagaimo (the sliminess disappears leaving a very nice texture), daikon (I precooked and then finished cooking in the broth), potatoes (I also precooked), and carrot; all worked well.

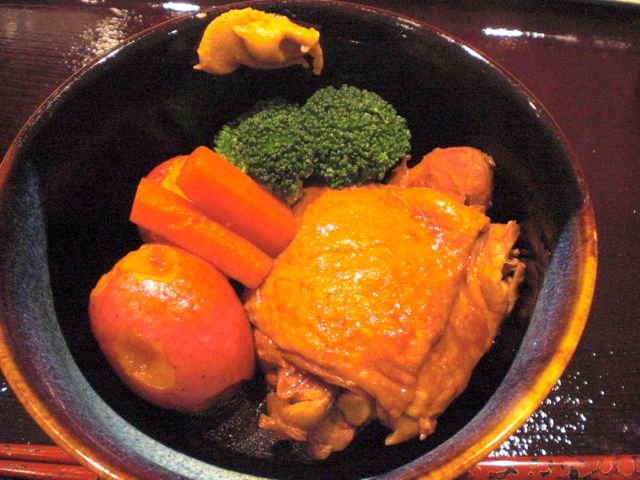
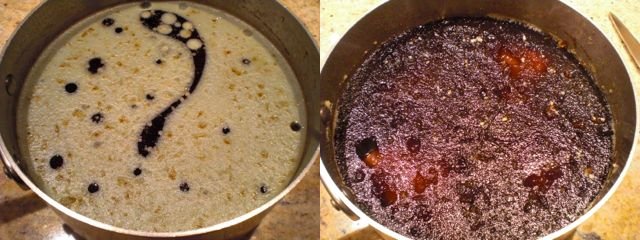
Today, I microwaved small red potatoes and placed them in the black vinegar sauce with carrot and simmered them for 20 minutes with chicken thighs. I also added steamed broccoli. I served all these with Japanese hot mustard. So, I have been using the simmering broth for at least several months. The flavor is getting better and better. This time I did not remove the bone from the thigh but we could eat this chicken using chop sticks. The meat was succulent, flavorful and fell right off the bone. 

Since the black vinegar is very mild, this dish will go with wine, especially sturdy reds. We had a very reasonably priced (read "cheap") Tempranillo Bodegas Ondarre Reserva Rioja 2004. This is a sort of everyday wine but went well with this dish.