Saturday, June 28, 2014

English Izakaya cookbook updates 英語の居酒屋料理の本アップデート


It was sometime ago that I posted an Izakaya cookbooks page for this blog. At that time the only Izakaya cookbook written in English was Mark Robinson’s “The Japanese pub cookbook”. That book was my inspiration to re-start this blog to share our love of Izakaya. During subsequent years, other Izakaya cookbooks and cookbooks which feature some Izakaya-style dishes written in English have emerged. Apparently, Izakaya and Izakaya food have become a bit more popular among English speakers. Also, many Izakaya-style places have appeared especially in New York and San Francisco.


In any case, there are several more Izakaya cookbooks written in English and I finally updated the Izakaya cookbook page of this blog. I divided the pages into “English” and “Japanese” Izakaya cookbooks. Hope this will be of some help to individuals interested in Izakaya cookbooks in English.

jpn cookbooks

Thursday, June 26, 2014

Sea Urchin and watercress in butter ウニクレソン

We had a variation of this dish at Yuzuki in San Francisco and also learned that the original dish was supposedly invented by a small “Teppanyaki” 鉄板焼き place in Hiroshima 広島  called “Naka-chan” 中ちゃん. I decided to try this dish since I got  “Premium” uni from Catalina for the weekend: they did not have “Gold” uni (it is getting nearly impossible to get gold uni).  The “premium” uni could be OK but this batch was very soft and disintegrating when we received it. The first day, I selected the most well-shaped ones for sashimi which tasted OK but the remaining uni did not fare that well. I thought about  making pasta with uni sauce.  I then remembered this dish and decided to make it. Initially, I was going to make the one similar to we had at Yuzuki but, after looking at the original dish, which is served with baguette and I happened to have baked baguette in the morning, I made this dish as it is served at Naka-chan (we have never gone there or had the dish in this variation but I based this dish on the description and pictures).


As you can see, we initially served only two thin slices (toasted) baguette rounds so that we would not fill up on this opening dish of the evening.


But we needed more baguette to mop up the wonderful sauce.


Since there is no "recipe", I just “winged it”. In the picture, the original dish appears to use whole water cress with thick stalks attached but I removed thick stalks (the amount is arbitrary, I could have used more watercress). I added about 1tbs of unsalted butter in a frying pan on medium heat. When butter bubbled and started browning, I added the watercress and sautéed until it wilted. Then I added a whole tray of premium uni (120grams) (Picture above). I added about 1 tsp of soy sauce and a squeeze of lemon juice and cut the fire.

This was sublime! It tasted wonderful on top of toasted baguette. We actually had to go get some more baguette because we were not going to leave a single drop of the wonderful sauce behind. The only alteration I would make is to cut up the watercress—the whole watercress became rather stringy. Next time, I may use the thicker stalks but I will chop up the water cress into much smaller pieces. We had this with cold sake but it may also go well with sparkling wine or a crisp acidic white.

Monday, June 23, 2014

Sous vide salmon poached in olive oil サーモンのオリーブオイル スービィ

This is our continuing exploration of sous vide cooking. We love salmon which I usually brown in a frying pan and finish in the oven. (I usually cook the skin separately to make it very crispy). But when I saw this  olive oil poached sous vide salmon recipe, I had to try it.


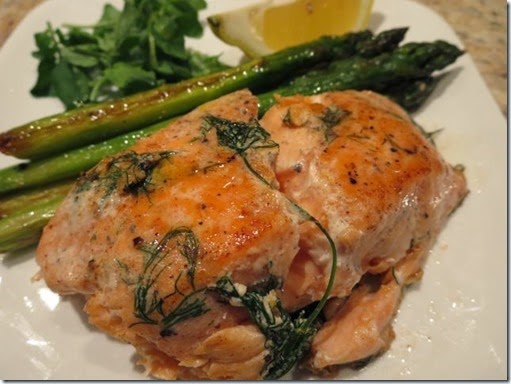
The above is the final product. I prepared and vacuum sealed the salmon over the weekend and cooked this on Monday after coming back from work. For fish, sous vide cooking does not take that long and having vacuum sealed packages ready makes it very easy even when you do not have much time.


The salmon is fully cooked but very moist. This was cooked at 135F for 30 minutes.

I looked at several recipes and decided to take the best of two recipes to come up with this cooking method. Unless you have a chamber type vacuum sealer, it is difficult or nearly impossible to vacuum seal items that include liquid. So, if you want to "oil poach", either you have to use "water-replacing-air- method" or make the olive oil "solid" before vacuum sealing. I used the latter method by freezing the olive oil.

Olive oil: I first added 1/2 cup of light olive oil to the vacuum pouch and placed it (vertically) in the freezer. After a few hours, the olive oil was totally solid.

Salmon: One pound of salmon fillet, skin removed (I also removed the fatty belly portion for another dish.) I made two equal sized fillets and seasoned with salt and pepper, lemon zest (micro-grated) and chopped fresh dill (from our herb garden). I took out the vacuum pouch with solidified olive oil in the bottom and placed sprigs of fresh dill and the seasoned salmon inside with the frozen olive oil. I vacuum sealed (While it was being sealed one of the fillets rotated as you can see in the picture below.)  I placed the package in the refrigerator.

IMG_1951

Sous Vide: The temperature of sous vide was the next decision  I had to make. One recipe called for 109F but, at this temperature no pasteurization would occur (It would be the equivalent of eating raw salmon or sashimi). Another recipe called for 116F for rare, 126F for medium rare and 140F for medium. I decided on 135F which is above the pasteurization temperature. I cooked it in my sous vide for 30 minutes (see below).


Both fillets were nicely contained within the olive oil accomplishing oil poaching. I took them out, blotted the moisture and excess oil from the surface and browned in a frying pan with butter on a medium flame, 30 seconds on each sides. The salmon was very soft and difficult to flip over.

We really liked the end result. The meat was opaque and fully cooked but very tender, moist and flavorful. It encapsulated all the goodness of the salmon and the lemon zest gave a nice lemony flavor. We really like the fact that I can prepared the pouch ahead of time and it is a cinch to just plunge it in the sous vide. I suppose I can prepare these vacuum sealed packages and freeze them. It may take only 5 additional minutes to thaw in the sous vide.

Friday, June 20, 2014

Chicken skin crackling and “jako” cucumber 鶏皮のクラックリングと胡瓜の酢の物雑魚乗せ

This was what I served one weekday evening; chicken skin crackling カリカリ雛皮, cucumber, daikon and carrot asazuke with shio konbu 塩昆布入り胡瓜の浅漬け,  cucumber in vinegar dressing with crispy jako 胡瓜の酢の物カリカリ雑魚乗せ.  I previously posted all items or similar ones. These are perfect appetizers for sake and also take care of the suggested “daily requirement” of eating a serving of  vegetables, (although the chicken skin crackling may nullify the benefit of the fresh vegetables).


We like any crispy skin especially salmon or chicken skin (although we have to admit we are not “into” pork rinds). When I prepared 4 chickens thighs for my wife's chicken curry, I removed the skin and boiled it in salted water spiked with a dash of sake. This boiling serves multiple purposes, it renders some of the fat, reduces the gamey chicken flavor of the skin and kills any potential bacteria on the surface so the skin lasts longer before cooking. After 5-10 minutes of boiling, I washed them in cold running water, put them in a Ziploc bag and kept them in the meat compartment of the refrigerator. This preparation makes it relatively easy to prepare chicken skin crackling even on weekdays. I just place the skin on a non-stick frying pan without oil on medium low heat. I then nest an identical frying pan with the bottom covered in aluminum foil on top of the chicken skins (for flattening the skin as well as preventing splattering). Toward the end of cooking I sprinkled on some salt.


Since I had some previously frozen "jako" already thawed in the refrigerator, I also decided to use it. I cooked a small handful in a small amount of vegetable oil for several minutes until the jako became crispy. I then drained them on a paper towel. I thinly sliced some cucumber (American mini-cucu) salted it, wrung out the excess moisture and dressed it in sushi vinegar. The fried jako provided a nice little addition of crunchiness.


The only addition for this asazuke from the previous versions I posted is the inclusion of salted kelp or Shio konbu.

This was a good starter for sake. (I burned the edge of the crackling a bit but it was still ok—I guess it would take more than a light singeing to lessen the delightful combination of fat and crunch of both the jako and chicken skin in this dish).

Tuesday, June 17, 2014

Onsen egg with “Mozuku” in sweet vinegar 温泉卵とモズクの甘酢

This is a variation on the theme of “Onsen” egg 温泉卵. I put this dish together in a hurry on a weekday evening after work. I thawed a package of frozen “mozuku” もずく in sweet vinegar on the previous weekend but we did not eat it (we had other items and could not get to it). Since I also had a pair of "Onsen" eggs that  I had made using my Sous Vide machine, I decided to combine them into a starter dish.


I divided the mozuku into two bowls, cracked open and dropped an onsen egg into each bowl, garnished it with thinly sliced scallion, "real" wasabi and a drizzle of  "noodle" sauce or mentsuyu 麺つゆ from the bottle. That's it.


The egg yolk was nicely creamy and this combination worked very well. For this dish, we had to have cold sake.