Saturday, March 12, 2022

Pirogi ピロギ

One day, my wife made these pirogi. She was inspired after reading a recipe in the Washington Post at the start of the Russian war with Ukraine for Ukrainian "pierogi". Somehow this triggered a memory of the pirogi she used to eat as a young child. They were part of special family dinners out, in the summer, after an afternoon spent swimming. In rural Pennsylvania, at that time, dinner out often consisted of stopping at the local Tastee Freez and consuming your purchases in the car in the parking lot. (According to my wife, at least the scenery overlooking the beautiful Pennsylvania farmland from the parking lot was quite nice.) For some reason, this Tastee Freez sold food items other than just ice cream; one of which was pierogi. My wife clearly remembers how good they tasted, particularly when she was hungry after an afternoon of swimming. 

(Note from me: Just to bring the record up to date, I researched Tastee Freez and there are presently none located in PA. In addition, pirogi are not on the menu of those not located in PA.). (Note from wife: I was very young when we ate there. On reflection, maybe it was a Dairy Queen). (Note from me: There are lots of Dairy Queens in PA  but like Tastee Freez they don’t serve pirogi.) (Definitive note from wife’s older sister: It was not a Tastee Freez or Dairy Queen, it was a privately run food stand that subsequently went out of business and yes their pirogies were great.) (Note from wifey and me: Oh!)

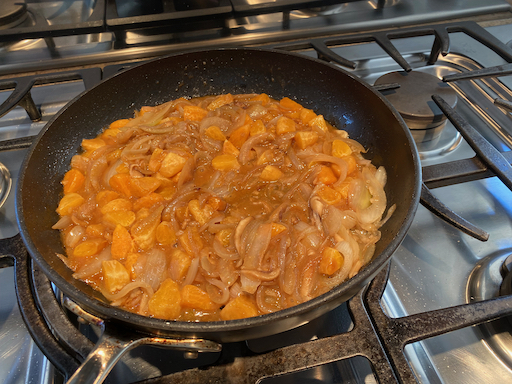
In any case, my wife again raided my stash of gyoza/wonton skins instead of making the dough from scratch. I tasted the pirogi just boiled and it was quite good although the "cheese" flavors didn’t come through strongly. (My wife told me that she added a lot of cheeses). I recently saw a recipe for Japanese gyoza made basically by filling gyoza skins with potato salad. This sounds like a Japanese version of pirogi. Maybe, I should try this recipe. In any case, as a shime/ending dish one evening I cooked the pirogi my wife made in the style of ravioli. I made a quick tomato sauce from skinned Campari tomatoes and shallots.  I garnished with chopped fresh parsley and grated parmesan cheese. For good measure, I drizzled on some of our favorite Spanish olive oil. This was very carbo-intensive but tasted very good and was certainly rather filling.


The recipe is from Washington post. I am sure my wife modified the recipe. So I will ask her to take over.


Ingredients:
2 russet potatoes
4-6 tablespoons unsalted butter (or to taste)
1 small yellow onion, finely chopped and caramelized in a sauce pan.
2 cups of shredded sharp cheese (I used a combination of smoked gouda, Monterey Jack and Irish cheddar)
Salt to taste
1 teaspoon freshly ground black pepper
Chopped fresh chives, dill or scallions, for garnish (optional)
1/2 package (about 20) gyoza skins

Directions:
To make the filling: Cook the potatoes, skin on, in the micro wave (about 10 minutes). Peel and mash in a bowl adding all the other ingredients (#1).

To assemble the pierogi: Wet the edges of the wonton skin with water. Add about 1 tablespoon of the potato filling to the center of the Wonton skin. (I used the smallest ice cream scoop). Fold over the skin to enclose the potato mixture and press firmly to seal making sure there are no air pockets. (I used the handy-dandy presser (see picture below).


Repeat with the remaining dough and filling (#2). The pierogi can be frozen at this point.

To finish, bring a large pot of well-salted water to a boil. Drop the pierogi in a few at a time, so as not to crowd the pot, gently stirring them so they don’t stick together (#3). Cook until they begin to bob to the surface, about 4 minutes. Remove with a slotted spoon. Drain them on a rack (#4) While still hot coat with olive oil so they don’t stick together after they cool.


My wife admitted that while good, these pirogi were only vaguely reminiscent of the pirogi of her childhood. (Maybe an afternoon spent swimming is required seasoning for this dish?) Although the cheese flavor wasn’t pronounced, the overall flavor was very rich. The caramelized onions were very nice. Served this way with the tomato sauce, the pirogies were more like ravioli (can’t go wrong with that). 

Monday, March 7, 2022

Mini Lasagna cups ミニロザニアカップ

One day, all of a sudden, my wife asked if we still have wonton or gyoza skins. I said we had leftover gyoza skins frozen. I was not sure why she was asking this. I found out that she saw a recipe for “mini-lasagna cups” which uses wonton skins as the pasta. This is a good dish to make since I have been reheating my marinara sauce once a week for several weeks now to make it last. It was time to use it up. In any case, the picture below shows the mini-lasagna cups she made. They are perfect for a lunch or appetizer. The combination of flavors is very nice.


You can see the layers in the picture below; layers of ricotta cheese and spinach and alternating layers of marinara sauce (actually one time when I reheated it I put in chopped up cooked chicken) separated by the wonton skins. She ran out of the wonton skins and some of the lasagna cups ended up having a layer of Pennsylvania Dutch noodles instead. (Because she had those and hey, they are a form of pasta).
 

I am not sure where she saw this recipe but I’ll ask my wife to take over. (Note from wifey: I found the recipe in the Washington Post and as usual treated it as just advisory.)

Ingredients:
1 cup cooked spinach
1 cup ricotta cheese
1/2 tsp. salt
2 cups shredded cheese (I used a combination of dry mozzarella, smoked gouda and cheddar.)
1 1/2 cups husbandito’s marinara sauce
36 wonton skins (3 per 12 muffin cup tin)

Directions:
Mix the spinach, ricotta cheese and salt together. Put half of it in a separate bowl and stir in 1/2 of the shredded cheese. Fit a wonton skin into the bottom of a 12 cup muffin tin. (I used muffin papers to make it easier to get the finished product out but it turned out they weren’t necessary.) Evenly divide the ricotta spinach blend into each cup (#1). Fit another wonton skin on top. Spoon the marinara sauce on top (#2). Cover with another wonton skin. (Note that at this point I ran out of wonton skins so I used cooked pasta as shown in the left side of #3) Evenly divide the ricotta shredded cheese on top (#4). Top the mixture with remaining marinara sauce and grated cheese (#5). Cook in a 375 degree oven for 12 to 15 minutes until cheese on the top is melted, browned and bubbling (#6). 

These were a bit tedious to put together but they were worth it. They had all the satisfying complex flavor of a full lasagne with all the elegance of a single portion. They made a perfect lunch with a salad or a small bowl of soup. 

Friday, March 4, 2022

Home-made cream cheese 自家製クリームチーズ

 Recently there has been a shortage of cream cheese . For several weeks we tried to order cream cheese from our regular grocery store and found out all cream cheese and its derivative products were out of stock. Since making cheese has become my wife's thing, she decided to address this shortage the same way she addressed other shortages during covid by making her own. She searched the web for a cream cheese recipe. One thing she noticed was that the recipes for buttermilk on the web were basically ‘take milk and add acid (lemon juice, vinegar, etc). Then the recipes on the web for cream cheese were also basically ‘take milk and add acid.’ Huh? Acidulated milk is the panacea for all things cheesy on the net? She also noticed that other recipes involved such things as rennet or cream cheese cultures that she didn’t have. 

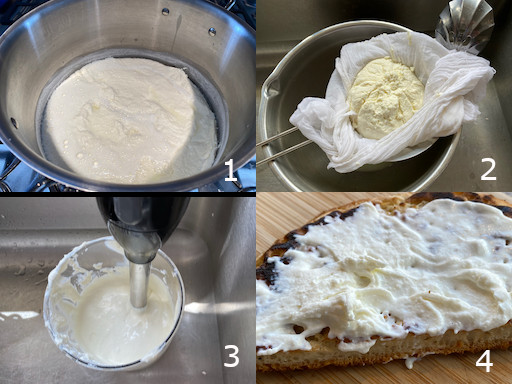
She decide to make her own recipe incorporating various aspects of the recipes she read and her own experience making cheese curd. The basic approach seemed to be combine milk and cream and curdle. She had success making cheese using buttermilk to curdle the milk so she decided to use a variation on that technique. For example, she saw that the rennet based recipes used a ratio of milk to cream of 4:1. She also used an approximation of the ratio of buttermilk to other ingredients that worked for the other cheese she made. She used those ratios to make the cheese (see the ingredients listed below). Then instead of pressing the curd as she did before, as per some of the recipes she read,  she whirred it in a food processor to make it creamy and the consistency of cream cheese. The result was really fantastic. If she can make this, we do not need to buy commercial cream cheese. The picture below is "schmear" of the cream cheese she made on a crumpet she also made. It was very good!


Ingredients:
8 cups whole milk
2 cups cream (I used light cream)
5 cups buttermilk
2 Tbs. salt

Directions.
Combine the ingredients in a large heavy bottomed pan. Slowly heat mixture until it starts to separate into curds and whey (#1). (This will start to happen just before the mixture reaches 212 degrees.) Remove from the heat and let rest for 10 minutes. Ladle the curds into a colander lined with 3 layers of cheese cloth (#2). Squeeze out as much whey as possible. Then add the curds to a food processor (I used a motorboat blender) and whir until the curds reach creamy consistency. Stir in salt to taste. The consistency will become thicker as the mixture cools. Spread a “schmear” on a piece of toast and enjoy. 

This cheese was very good. The taste of the cream really came through followed by a slight tanginess of the buttermilk. The flavor got better over the next few days. This tasted great on a cracker with a glass of wine.

Tuesday, March 1, 2022

Octopus and cucumber in sumiso dressing 蛸のぶつ切りと胡瓜の酢味噌あえ

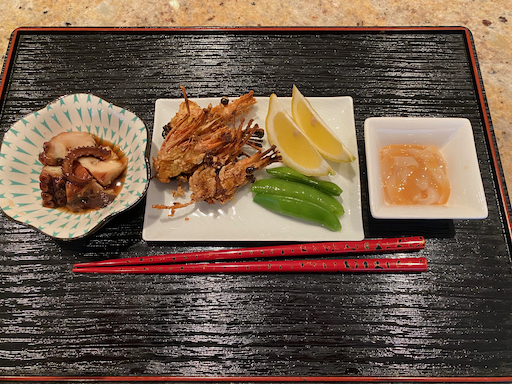
This is nothing new; just a continuation of frozen and boiled Spanish octopus from Great Alaska Seafood. This is a good example of how an octopus leg cut can make a big difference in texture.  Boiled octopus can be sliced thinly with a wave cut or cut into chunks called "Butsu-giri" ぶつ切り. The cut that is used depends on the firmness of the cooked octopus meat. Firm texture octopus it is quite chewy. A thick slice would be too difficult to eat. The thin wave cut provides a manageably chewy piece and the wave pattern catches any sauce that is used. Alternatively if  the octopus meat is soft, the thinly slice wave cut doesn’t have any texture and basically dissolves when eaten so cutting it into chunks is the better choice. Since this octopus was a bit on the soft side, I opted for the chunky cut and made this classic "octopus and cucumber  sumiso-ae" 蛸のぶつ切りと胡瓜の酢味噌あえ. I served this with store bought squid shio-kara (right)


Since this octopus leg was more tender than ones from Japan, this "Butsu-giri" cut really worked. It is not too chewy but has nice texture.

Saturday, February 26, 2022

Tender simmered octopus たこの柔らか煮

I have to admit that I really like octopus (tako) and am on a constant prowl to find places to get decent tako. I have gotten octopus from a few different places with varying success and I’ve cooked it several different ways over the years. Among the seafood vendors, recently, we have been getting fairly good frozen  seafood from  Great Alaska Seafood . This time, they were selling frozen Spanish octopus legs and we tried them. (At another time, they were also selling Alaskan octopus -uncooked and frozen- but we did not try it.) The legs were from Spanish octopus, boiled and frozen (see the picture 2nd from the last below). It came as 4 pounds of octopus in 8 half pound vacuumed sealed packages. After thawing a package in the refrigerator, I thinly sliced it and tasted it. It was fresh tasting but compared to Japanese products, it was much softer. So I decided the first dish I would make would be simmered octopus  or “Tako-no-yawaraka-ni” 蛸の柔らか煮 literally meaning “tender simmered octopus”.  I tried this before with tako from other sources and despite long simmering, the octopus never got really tender. This time I have two elements which would make this dish successful; 1. This particular octopus had been pre-cooked before we received it and it was much more tender than the boiled and frozen octopus I tried before and 2. I now have a Instant pot which allows me to make this dish using pressure cooking. The combination of these factors resulted in a dish that was quite a success. The octopus was very tender and flavorful. 

I served this with fried shrimp heads (they were from Tako Grill takeout). Whenever we have shrimp (“bonanebi“ 牡丹海老) sashimi, we get fried heads which we heat up in the toaster oven and serve with wedges of lemon and salt broth soaked sugar snaps. On the right in the picture below is squid shiokara イカの塩辛 (frozen which comes in a plastic pouch). This is certainly a good line-up for starting the evening.


Here is the close up of the octopus.


The picture below shows how the octopus legs came. Two good sized legs in one package.


Since this was a trial, I used only one leg for this dish.

Ingredients:
Boiled octopus leg, thawed
200ml Japanese dashi (I made this from dashi pack).
1tbs soy sauce
2tbs mirin
2tbs sake
several think ginger slices

Directions:
I used an Instant pot with a small metal container insert with a silicon lid (you could use the inner pot of the instant pot).
I added the octopus and the seasoning liquid into the insert and put on the lid.
I added 1/2 cup water to the pot and using the metal holder that came with the insert, lowered it into the instant pot.
I cooked it on high pressure for 30 minutes with natural depressurization.
The picture below is after cooking.
One of the problems with the Instant Pot cooking is that the simmering liquid does not reduce at all.
So I decided to put the leg and the simmering liquid in a frying pan and cook it on medium flame for 15-20 minutes until the liquid reduced by half.


I cut the leg into bite sized pieces and served it at  room temperature. This is a most tender and flavorful octopus leg. Next time I will make a larger amount since the entire leg was just enough for two small servings.

Tuesday, February 22, 2022

Crumpet Version 4  クランペット 第4弾

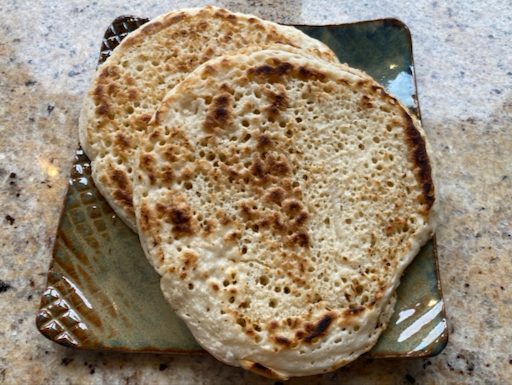
This is the 4th version of crumpet we (my wife) made. She essentially combined V2 ingredients with  V3 cooking method. She got much better at regulating the flame and made really good crumpets. Compared to thin and small crumpets (V2), V4 has nice crunchy crust but much softer inside. We liked V2 flavors and liked cooking method of V3 (using an 8 inch frying pan). So, this is culmination of all the good aspects of crumpets we made.


Ingredients:
(makes 7, 8 inch crumpets)
2 cups AP flour
1 cup plus 2 Tbs. cake flour
600 ml. warm water
1 1/2 tsp. Salt
2 tsp. Sugar
3 tsp. Baking powder (The recipe said baking soda doesn’t work as well)
3 tsp yeast
3 tbs. warm water

Directions
Bloom the yeast in the warm water. Put the flour, water and salt in the bowl of an electric mixer and beat on speed 5 for 1 minute until smooth paste forms. Add the yeast mixture, sugar and baking powder and mix on speed 5 for another 30 seconds. Cover with cling wrap and put in a warm place for 15 to 30 minutes. The surface should get foamy but it will only increase in volume by 10 to 15 % (#1 picture below). 

The whole secret of getting the little holes in the crumpets is in the cooking. (They need a burst of heat at the beginning of the cooking process for the water in the batter to form steam bubbles which create little holes when they burst on the surface of the cooking batter.)  Put 1 tsp. butter in an 8 inch skillet and heat on low for at least 5 minutes.  Increase heat to medium and heat skillet for an additional 1 minute.  Increase the heat to high and immediately pour enough batter into the skillet to cover the bottom. (This will give the batter a burst of heat to start the bubbles forming.) After the batter is in the pan quickly reduce the heat to medium low and contiue cooking until the edges are risen, set and beginning to dry out (about 4 minutes). Keep checking the bottom to make sure it isn’t burning. Take skillet off the heat. Place a dry flat spatula on top of the crumpet and pull up sharply to remove the excess batter and reveal the underlying holes (#2). Turn the crumpet over (#3). Return to the heat on medium until the edges on the second side are lightly browned. Remove to cooling rack (#4). Wipe any crumbs out of the pan. Add a little more butter. Turn heat to high pour in more batter and repeat cooking process.


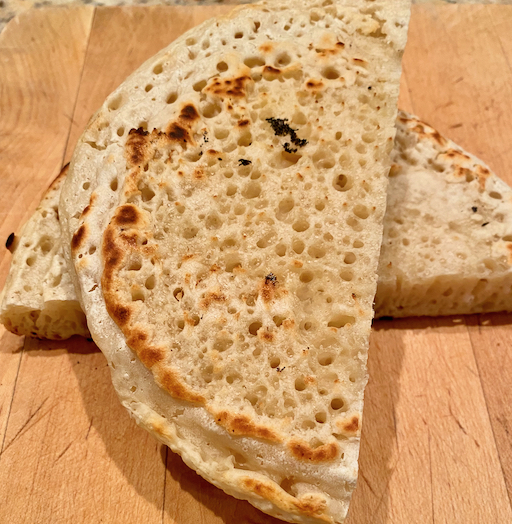
As can be seen in the picture 3 the bottom of these crumpets came out nicely lightly browned. These crumpets were really good. They had better flavor than V3 because the batter was cooked in butter, which gave it a browned butter taste. In addition we avoided the last step in V3 of adding additional water. We used the batter straight from the proofing stage. As a result it still made the required bubbles but the lovely yeast flavor came through. The texture of V4 was better than the texture in V2 because of the addition of the cake flour. When toasted the surface was crunchy with a browned butter taste. The interior was soft with a nice yeasty flavor. Slathered with butter that dripped into the many holes that formed in the cooking process this made a really nice breakfast bread. 


Friday, February 18, 2022

Crumpet version 3 クランペット 第三弾

We have made crumpets a few times. The first attempt was basically a failure. They were certainly edible but did not develop the small multiple holes which makes a crumpet a crumpet. The second attempt was a great success.  Using a “platar” resulted in small crumpets which were the right size but the cooking process was kind of tedious. My wife found a recipe in "Cooks Illustrated 2020" using an 8 inch frying pan to make a large crumpet. It is served cut into wedges. So, she tried it. The serving is shown in the picture below liberally slathered in butter; Yum. 


Ingredients
1 cup (5 oz) AP flour
1 cup (4 oz) cake flour
2 tsp. yeast
3/4 tsp baking powder
1/2 tsp salt
1 1/2 cup warm water (1 1/4 into dough before rising, 1/4 into dough after rising)

Directions:
Combine AP flour through salt in an 8 cup measuring cup (the measuring cup makes it easier to pour the batter into the pan). Add 1 1/4 warm water and mix until smooth. Cover and let rise until double (about 40 minutes). The whole secret of getting the little holes in the crumpets is in the cooking. Put oil in an 8 inch skillet and heat on low for at least 5 minutes. Meanwhile add the remaining 1/4 water to the batter and mix until smooth. Increase heat to medium and heat skillet for an additional 1 minute. Using a paper towel wipe the excess oil out of the skillet. Pour 1/3 of the batter into the skillet. Increase the heat to high and cook on high for 45 seconds. Reduce heat to medium low and contiue cooking until the edges are risen, set and beginning to dry out (about 4 minutes). Take skillet off the heat. Place a dry flat spatula on top of the crumpet and pull up sharply to remove the excess batter and reveal the underlying holes. Turn the crumpet over. Return to the heat on high until the edges on the second side are lightly browned. Remove to cooling rack. Immediately add half of the remaining batter to the pan, turn up the heat and repeat the cooking process.

The picture below shows the crumpet soon after it comes out of the skillet. As you can see there are many nice holes to collect the melted butter or honey. 


The method works well to elicit the necessary nooks and crannies to collect the toppings. The picture below however shows what happened to the underside that was exposed to the high heat to create those lovely holes. No matter how we did it this happened with the batter actually smoking. The good news is that although the surface turned black it apparently was not burned and tasted just fine.

This process of cooking the crumpet is certainly less tedious than our previous method. The crumpet was very nice; crunchy on the outside and soft on the inside. It also held what ever topping we used very well. It tasted pretty good although I think the previous recipe we had tasted better. Also, I'm not sure about adding the additional 1/4 cup of warm water after the batter has risen to double. The recipe says the water in the batter converts rapidly to steam when the high heat is applied creating the bubbles that form the holes before the batter firms up. But this would also have the effect of deflating the rise created by the yeast. The next step would be to use the previous recipe with this cooking method to see what we get. 

Tuesday, February 15, 2022

Edamame hummus 枝豆フムス

 We usually stock frozen edamame since it is a good and healthy snack. Recently, we found the frozen edamame from a frozen case at Tako Grill to be the best. My wife, found a recipe for "edamame hummus" in the cookbook called "Smoke and Pickles" by Edward Lee which we recently acquired. It used shelled edamame. My wife wanted to make this dish but she thought rather than using our stash of edamame which was in the shell and would have to be shelled it would be better to order some frozen edamame that was already out of the shell.  So we ordered some from our regular grocery store. When deciding what to order we could not figure out if the packages available were edamame shelled or in pods. We took a chance and ordered one anyway and it turned out they were in the pods so they had to be shelled anyway. My wife cooked up the package and shelled them making about 1 cup. She turned the prepared edamame over to me to make the hummus. I diverted from the original recipe a bit but the resulting dip/hummus was quite good.


Ingredients:
1 cup edamame, cooked and shelled
1/2 shallot, finely chopped
3 garlic cloves,
1/4 cup lemon juice
1/2 tbs soy sauce
1/4 cup smooth peanut butter (or tahini or Japanese nerigoma sesame paste)
1/2 tsp ground cumin
1tsp salt
1/2 cup water (I did not add the water but I added hot water -may be 1-2 tsp to the peanut butter mixutre to make it looser)
2 tbs olive oil (1/2 tbs to sautee shallot and the remaining mixed into the final product)

Directions:
Mix the peanut butter, soy sauce and hot water to make smooth loose paste.
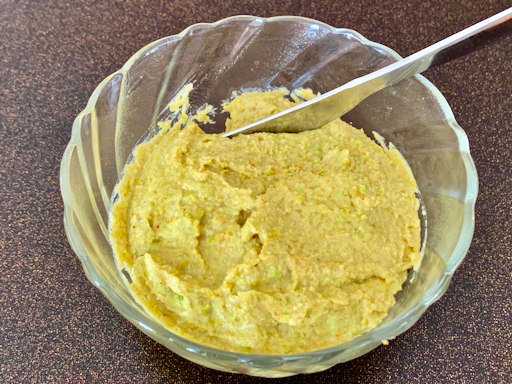
Heat the olive oil and sauté the shallot and then garlic, add the peanut butter mixture, the edamame and heat up (below).
Using a beaker and emersion blender, process the above mixture. I added additional olive oil to make the mixture a bit smoother. Add lemon juice and cumin. Taste and add a small amount of salt to taste.


This is a unique dip/hummus. The edamame flavor really comes through. Substituting, peanut butter for the tahini (we did this before) worked well. We really like this as a hummus variation. 


Saturday, February 12, 2022

Smothered chicken with miso and bourbon

We saw an interesting recipe for chicken that used a sauce made of miso and bourbon.  With such an eclectic combination of ingredients particularly the use of miso, we had to try it. We first saw the recipe in Milk Street which led us to the cookbook by Edward Lee called "Smoke and Pickles". The sauce is made of miso, soy sauce and orange juice and also included bourbon during the cooking. I used the Instant pot for the pressure cooking but not the sauté function. Instead I used a regular frying pan for that function. The smell of bourbon comes through very clearly but unless you were told you would not even know there was miso and soy sauce involved. This is a good dish.

We made this with chicken thighs. Since we did not have any orange juice, we used mandarine orange sections cut up into small pieces. Since we believe in adding potatoes in this kind of dish, we added potatoes and omitted thickening the sauce with corn starch.

Ingredients:
2 medium onion, thinly sliced
3 garlic cloves, peeled and finely chopped
2-3 shiitake mushrooms, caps thinly sliced
3 mandarine oranges, peeled, separated and cut into small chunks (original recipe calls for 1/2 cup orange juice).
2 tbs miso and 3 tbs soy sauce
2 tsp olive oil for sautéing the vegetables.
2/3 cup bourbon (we used Early times).
1 cup water (we used chicken broth)
4 chicken thighs, skin on and bone in, excess skin and fat trimmed.
4 small red potatoes, peeled and cut into bite sized pieces (see the second picture below).

Directions:
Mix the miso, soy sauce (and orange juice if using) in a small bowl and set aside.
Sauté onion in the olive oil for 5-7 minutes until soft and edges slightly browned add the garlic, mushroom, and mandarin oranges and sauté for 4-5 more minutes.
Add the bourbon (turn down the flame and be careful since the alcohol in the bourbon may cause a flare up), cook for several minutes or until the bourbon almost entirely reduces.
Add the soy sauce and miso mixture and cook for a few more minutes (see pictures below).

Add this mixture to the Instant pot, arrange the chicken thighs, skin side down, add the chicken stock.
Put on the lid, make sure venting is sealed, set to manual, high pressure and 15 minutes. I let it de-pressurize naturally (15-20 minutes).

The original recipe calls for thickening the sauce with corn starch and garnishing it with chopped scallion which we skipped.


The potatoes are our addition.

We served this with rice, blanched broccoli and skinned Campari tomato. Before eating, we mashed the potatoes to make the sauce thicker. This was a quite good dish. The chicken was tender and had a distinctive aroma of bourbon. The miso and soy sauce flavors did not come through strongly. We both felt that compared to the different versions of curries my wife makes this was a bit bland.

Monday, February 7, 2022

Mayonnaise muffins マヨマフィン

 I am wondering if I should change the name of the blog since my wife’s baking is more frequent than my Izakaya dishes these days. In any case, here is another of my wife’s baking projects. This is an installment of what she is now calling her new series “cooking with mayonnaise” which evolved after she made the mayo/miso peanut butter cookies logged onto the Hellmans mayonnaise web site and found more baking recipes.** This is a mini muffin. It has a relatively dense texture and sweet taste including the topping. We think it makes a nice sweet mouthful as a desert rather than as a breakfast As usual I ask my wife to provide us with "how-to"s.

**Note: we just found out this mayo is called Hellman’s in the eastern U.S. and Best Foods in the western U.S. 


Ingredients: Makes 24 mini muffins
For the muffin
1 cup AP flour
1 cup sugar
1/2 cup mayonnaise
2 eggs
1/2 tsp. Vanilla

For the topping
(Original recipe) (I recommend reducing the amount of topping. See below)
1/2 cup AP flour
1/3 cup sugar
1/4 cup mayonnaise
1/2 cup toasted walnuts finely chopped
1/4 tsp. Cinnamon

Half quantity of topping
1/4 cup AP flour
1/6 cup sugar
1/8 cup mayonnaise
1/4 cup toasted walnuts
1/8 tsp. Cinnamon

Directions:
To make the topping, combine all the topping ingredients in a bowl. Using your fingers mix into crumbs and then set aside. For the muffin, beat together the sugar through vanilla until completely combined. Whisk in the flour until combined. Pour into greased muffin tins (I recommend using mini muffin papers. It will make it much easier to get the muffins out of the pan.) Top with the prepared crumbs. Cook in a 350 degree oven for 20 minutes or until a toothpick inserted in the centers comes out clean. Cool 5 minutes in the pan. Remove from the pan an cool further on a wire rack.


The next picture shows the muffins right out of the pan. 


I recommend reducing the amount of crumb topping because the next picture shows what happened to the topping when I tried to take the muffins out of the tin. It mostly all came off and went all over everything. But not to despair. I did not throw it away. I gathered it up and I am using it as a topping for yogurt in the morning which is working out well. Maybe because of the flour/mayo combo the crumbs don’t dissolve in the yogurt and they add a nice sweet crunch. 


I see why the recipe calls for making these as mini rather than full sized muffins. They are very rich and sweet.  A full muffin could easily be “too much of a good thing”. The muffin has a moist dense texture and pleasant vanilla flavor. The topping adds a nice crunch element and the nutty flavor of the toasted walnuts. The combination makes the perfect desert bite. 

Friday, February 4, 2022

Uni appetizers two kinds 雲丹の前菜2種

As I mentioned previously, Maruhide 丸秀 is the best place to get consistently high-quality uni and uni products. I wanted to get some fresh uni for the New Year. Although I checked the web site regularly fresh uni was not available for some time. So when I saw it became available recently, I could not resist and ordered fresh uni (both regular and in salt water or "Kaisui-uni" 海水うに). I also ordered some "uni shuto " ウニ酒盗 which is preserved and frozen and lasts longer than fresh uni. This is second best (compared to fresh uni) but among the class of "preserved" uni, this is the best by far. We had an uni tasting the evening the uni arrived. It consisted of regular uni and uni in salt water. We also included some ikura like we did before. We finished the evening with a small uni and ikura "donburi" rice bowl 雲丹いくら丼. 

The next evening, I made a small uni appetizer dish. Although it is hard to see in the picture, I put cubes of avocado dressed in lemon juice in the bottom of the bowl then topped them with uni, "kinshi-ran" 金糸卵 golden thread egg and nori strips or "kizami-nori" 刻み海苔. I added wasabi-jouyu わさび醤油 (mixture of wasabi and soy sauce just before serving). Since the texure of avocado resembles fatty tuna sashimi, this combination went very well together. The avocado really complemented the uni.


The next evening I served the last of the salt water uni “as is” garnished with a small dab of wasabi and the finely chopped green part of scallion.  I included a small "cucumber and wakame seaweed salad" dressed with "sumiso" 酢味噌 dressing. Again, I added wasabi-jouyu just before serving.


As before both the regular and salt water uni were excellent. Just a bit of uni and cold sake, the flavor lingers in the mouth. This is such a luxury.

Sunday, January 30, 2022

Octopus rice 瀬戸内海蛸めし

 We have been getting Japanese rice from the New York Rice factory. It may be hard to believe (we our selves are somewhat incredulous) that there could be such a difference in something as subtly flavored as rice but the rice from the rice factory is really good. It is hard to identify what sets it apart from the rice we used to get but in general we really like the texture, the taste and especially how well it can be reheated and still tastes like it just came out of the rice cooker.

 Whenever I order rice from the rice factory I usually supplement the order with other items. In the past, we got a kit to make “red snapper rice” or “taimeshi” 鯛めし, a type of seasoned rice famous in the Japanese inland sea area or "seto-naikai" 瀬戸内海.  Another time I ordered a similar seasoned rice kit made with octopus called “seto-naikai tako-meshi” 瀬戸内海蛸めし. After I bought it, however, the kit sat in our pantry for some time. When I checked the expiration date, it had expired the previous month, so I decide it was time to make it as a shime 〆 or ending dish one weekend. The kit came in several pouches; one with seasoning sauce, one with small bits of octopus, one with freeze dried items. It also included a rectangle of kelp. I made the octopus rice according to the instructions. I served it with a side of simmered Japanese root vegetables I had made and salted cucumber, daikon and nappa cabbage or "oshinko" お新香.


The octopus was in really small pieces as you can see on the top of the rice in the next picture. I used a one to one mixture of glutinous “mochi” rice 餅米 (called "Hakucho" はくちょう or swan from Hokkaido and regular "uruchi" rice うるち米 called "Yumepirika" ゆめピリカ also from Hokkaido. (These two rice varieties came from the Rice Factory.) 


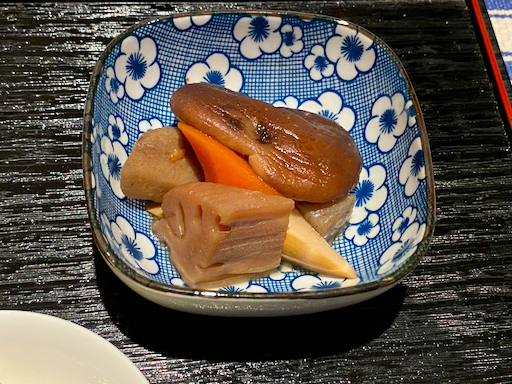
The simmered vegetables included shiitake 椎茸 (from dried and hydrated), "renkon" レンコン lotus root, "gobou" ごぼう burdock root, carrot, small bamboo shoot "or sasatakenoko" 笹筍 and konnyaku or konjack 蒟蒻.


The next picture shows the modified "oshiko" salted cucumbers and other vegetables I made. I modified the original recipe by increasing the salt from 2% to 3% weight of the ingredients and adding a small amount of Vodka. As a result this dish lasts much longer than when I made the 2% salt version.


This octopus rice was ok but we thought the tai rice 鯛めし was better (the octopus pieces were really  very minuscule). My wife said that the seasoned rice I make including chestnut rice 栗ご飯 and matsutake rice 松茸ご飯 are better and there is no reason to buy seasoned rice kits. In any case, this was a nice "shime" dish.

Thursday, January 27, 2022

Breakfast croissant casserole クロワッサンキャセロール

 One day my wife decided to make this croissant casserole dish she saw at an on-line recipe site. It is a cross between quiche and French toast but closer to a crustless quiche. It is the usual milk, egg, and cheese mixture but instead of a pie crust or regular bread this dish uses croissants. Although this was entitled "breakfast croissant casserole", we had this as a lunch with cucumber tomato salad.


She cut the recipe in half and used small store bought croissants. This is a good quiche-like breakfast dish but I was not too crazy about it especially knowing how much bacon, egg and cheese went in. I will let my wife to provide the ingredients and directions.


Ingredients: This is a reduced recipe amount because we weren't feeding a crowd)
4 strips of bacon (crisped and then crumbled)
2 onions chopped
3 eggs
1 cup whole milk
1 tsp. Dijon mustard
1/2 tsp salt
1 cup grated cheese (I used smoked gouda and cheddar)
3 croissants

Directions:
Crisp the bacon. Set aside. Using the bacon drippings saute the onions until slightly brown. Cool slightly. Mix the eggs, milk, Dijon, salt, crumbled bacon and cheese together. Arrange the croissants in the baking dish. Pour the liquid egg mixture over the croissants making sure they are submerged. Cover and put in the refrigerator overnight. The next morning cook in a 375 degree oven for 30 minutes until golden brown. (I used the small blue pyrex baking dish and cooked it in the toaster oven).

This turned out to be an entirely ho-hum form of savory bread pudding. The croissants seemed to dissolve into the pudding like egg mixture which contributed to the quiche like consistency. Don't get me wrong it was quite good and makes an interesting egg alternative to an omelet.

Monday, January 24, 2022

Mayonaisse biscuit マヨネーズビスケット

This is another one of my wife's baking projects. When she made the mayonaisse/miso/peanut butter cookies, using the recipe in the freebee cookie cookbook we got from the grocery store, she saw an advertisement for Hellmann’s mayo beside the recipe. It stated “great cakes take Hellman’s”. She knew this to be true because many years ago a friend gave her a recipe for chocolate mayonnaise cake and it was a great hit. Further down the page she saw the following: “for this recipe and many more, visit Hellman’s.com. Intrigued she logged on and found a goldmine of recipes. This one for mayonnaise biscuits caught her eye particularly after making two versions of butter milk biscuits. So this was a “must bake”.


As usual she took the original recipe as advisory and made her own alterations


Ingredients:
2 cups all-purpose flour
1 Tbs. baking powder
1 Tbs. Sugar
1/2 tsp. salt
1/2 cup mayonnaise
3/4 cup milk (I used butter milk)
1 cup cheddar cheese grated

Other optional additions:
1/2 tsp. Dried basil
1/2 tsp. Dried dill weed
2 Tbs. Finely chopped onion
1/3 cup pepper jack cheese

Directions:
Preheat oven to 450°.
Combine flour, baking powder and salt in medium bowl. In another bowl combine the mayonnaise and buttermilk (#1). Shred the cheese (#2). Stir the mayo/buttermilk mixture and shredded cheese into the dry ingredients. On a baking sheet, lined with parchment paper, drop the batter by 1/4 cupfuls (#3). (I used a medium size ice cream scoop) .
Bake 10 minutes or until slightly golden (#4).


These are amazing biscuits. They have an outside “crust” that almost has the consistency of a very well made very thin pie crust. It gives the biscuit a very pleasing crunch. The inside is very soft and moist. It took a little while for the cheddar cheese flavor to come through but when it did it added another pleasing dimension of flavor. These are so easy to make they could be done at the drop-of-a hat or at the drop-of-an-ice-cream-scoop full. 

Friday, January 21, 2022

Tasting of plum wine made in 1997 and 1998 梅酒飲み比べ.

In the past we used to regularly make plum wine 梅酒 with the plums we harvested from the Japanese plum tree we planted in our back yard. It has been some time however, since we made any plum wine There are several reasons for this: 1: Initially the plum tree was very productive and over the years we accumulated quite a stash of plum wine, 2: Then, about 10 years ago our plum tree, as well as most of the ornamental plum trees in the neighborhood got some kind of fungal disease. Many of the trees died of the disease, but we transplanted ours to a different location in the yard and severely trimmed back the diseased portion. We were not sure if it would survive and certainly during this period it did not produce any fruit. So we did not make any plum wine. Miraculously it not only survived but in the past few years, it started producing fruit again. It is a much smaller tree than it was at its peak and the plum yield is much less. We have been judiciously harvesting the plums to make a type umeboshi or slated plum. 

In any case, I recently stumbled across two bottles of plum wine labeled as started in 1998 (bottled in 1999) and 1997 (bottled in 1998). Both bottles had some cloudiness or precipitate, probably something to do with plum pulp. Both are made of 40% proof Vodka so I was not worried that the “plum wine” may have gone bad. In any case, using a filter paper for filtering cooking oil, I filtered out the sediment and re-bottled the wine in smaller bottles (picture below). The 1997 vintage (one on the right) is much darker probably indicating more oxidation.


So, it was very natural to do vertical tasting.


Both are quite mellowed out and quite good. They almost tasted like aged port. Interestingly, both had their own distinctive flavor and character. The 1997 vintage had a slightly more complex taste. Besides tasting the plum wine straight, we also diluted it with carbonated water which served us as a substitute for Champagne to celebrate New Year’s eve. It did not taste like Champagne but looked exactly like it and provided a refreshing alternative libation.

Wednesday, January 19, 2022

Miso-Mayo-Peanut butter cookie 味噌マヨネーズ, ピーナッツバタークッキー

This unusual recipe came in a freebie cookie recipe book from the local Giant grocery store. This recipe drew my wife’s attention because of the unusual combination of ingredients, i.e. miso, mayonnaise and peanut butter.  She came to me and asked which miso she should use (I have a collection of miso). Since it was for a cookie, I suggested “Saikyo” miso 西京味噌 which is a white sweet miso famous in Kyoto 京都 (“Sai” 西 meaning “West” and  “kyo” 京 meaning “capital” i.e. “West capital” which is “Kyoto” as opposed to “To(u)” meaning “East” 東”  and “kyo” 京 meaning capital which is “Tokyo”  東京).  In any case, she made this cookie which was quite good. I could certainly taste the peanut butter but if I had not been told I would not have guessed “mayo” and “miso” were included. Although I have to say they probably added to the overall peanut butter taste which was very rich; more so than other peanut butter cookies I've tasted. She also added a Hershey’s chocolate chip in the center of the cookie for "good measure".


I will ask my wife to fill in the rest.

Ingredients:
2 cups AP flour
1 tsp. baking soda
1/2 tsp. baking powder
1/2 tsp. salt
1/4 cup (1/2 stick) butter at room temperature
1/4 cup mayonnaise
1 cup brown sugar
1/2 cup granulated sugar
1 large egg
1 tsp. vanilla
1/4 cup miso paste
1/3 cup creamy peanut butter
Hershey's chocolate chip (optional)
Sugar to coat the cookies


Directions
Mix together the dry ingredients flour through salt. In another bowl cream the butter, mayo and sugar until fluffy. Add the egg and vanilla mixing to combine. Then add the miso and peanut butter mixing until completely combined. Slowly add the butter, egg, miso, peanut butter mixture to the dry ingredients to form a dough. Refrigerate the dough for at least and hour until it is thoroughly chilled and can be rolled into the ball. Roll the dough into 1 inch balls. Roll the balls in the coating sugar and place on a parchment covered cookie sheet about 2 inches apart. Cook in a 350 degree oven for 8 to 10 minutes until the edges are golden brown. Remove from the oven and while they are still hot press a chocolate chip into the middle of the cookie. 

These are without a doubt the best peanut butter cookies we've ever had. They are nicely chewy but the main thing is the flavor is very intense and rich. We figure this must come from the umami provided by the mayo and the miso. They are also very good slightly heated in the microwave. 

Sunday, January 16, 2022

Matcha crinkle cookie 抹茶クッキー

My wife was into baking cookies before Christmas. I saw this recipe called "Matcha Crinkle cookie" on the website “No recipe” by Mark Matsumoto.  Although we already had enough cookies, I thought these might be a good addition. So I showed the recipe and images to my wife. It was not a hard sell. These have a very interesting crinkle. They are a cross between cake and cookie with nice sweetness and tea flavor.


Ingredients:
Dry Ingredients
2 cups (280 grams) all purpose flour
6 Tbs. (30 grams) matcha powder
2 teaspoons baking powder
1/4 teaspoon salt

Wet Ingredients
4 large eggs 
1 1/3 cups (268 grams) granulated sugar 
8 Tbs. (114 grams) unsalted butter melted

For Dusting
1/3 cups (140 grams) granulated sugar
1/3 cups (80 grams) powdered sugar

Optional:
kuromame beans 黒豆 (traditional Japanese New Year black bean)
tuck a bean into the interior of the cookie or place on top 

Directions:
Pass the flour, matcha, baking powder and salt through a fine mesh sieve to sift them (#1). Add the eggs and sugar to a mixer bowl fitted with a wire whisk and beat together until light in color. Slowly beat the melted butter into the egg mixture until it's fully incorporated. The mixture will have the consistency of mayonnaise. Add the wet ingredients to the dry ingredients.  Mix together until there are no dry areas and the dough has the texture of soft frosting (#2). Refrigerate the dough for at least an hour or until it is firm enough to scoop. Line a baking sheet with parchment paper. Prepare a bowl with the remaining 1/3 cup of sugar and another bowl with 1/3 cup of powdered sugar (#3). When the dough is ready measure out the dough and roll the pieces into a small ball. (I measured the total weight of the dough then divided it by 24 to get the weight of 24 equal sized cookies.) Drop the ball into the granulated sugar. Roll it around in the sugar to coat evenly (#3). Transfer the ball of matcha cookie dough into the powdered sugar and roll it around until the ball is totally white (#4). Place the sugar-dusted ball onto the prepared cookie sheet and repeat with the remaining dough. Put the oven rack in the center position and preheat to 320°F. Bake the cookies until they've flattened out slightly and the tops have cracked, but the cookie is still soft in the center (about 10 to 15 minutes) . When the cookies are done, remove them from the oven and let them cool for a few minutes before transferring them to a cooling rack to cool completely (#5 and 6).


This is a good cookie. Very unusual and good with unique green tea flavor. It is a cross between a cake and a cookie. We had this with “sencha” 煎茶 green tea.

Thursday, January 13, 2022

Home-made yogurt; the definitive "how-to" make thick and creamy.

This is a note mostly to ourselves to chronicle the steps we use to consistently make thick, creamy and flavorful homemade yogurt. My wife has been making yogurt from the starter she got from "culture for health" for some time. Initially, following the instructions that came with the starter, the first few batches were OK but they resulted in a thin watery yogurt that we could basically drink. The yogurt was made at room temperature which worked in the summer but not in the winter. The batch she made when it turned cold was a "failure". She ended up throwing it out. When a second cold weather batch also failed, somehow dawned on her that the yogurt wasn't forming because it wasn't warm enough. Instead of throwing it out she put it in the oven with the heat off but the light on and VIOLA Le Yogurt! She then went through a "trial-and-error" process for some time and finally nailed a fail-proof process that she has been using to make a wonderful thick, creamy, slightly sweet, slightly tangy yogurt that we really like. 

During this process we realized that we needed some equipment which would allow precise temperature and timing controls. My wife did all the work of trial-and-error while I provided scientific advice and explanation.

Equipment:
1. Slow cooker (one gallon capacity) (#1 picture below)
2. Proofing box with temperature control (We use Brod-and Taylor's, #8 picture below)
3. Temperature probe with high and low temperature  alarm (we use Thermoworks  ChefAlarm® Cooking Alarm Thermometer and Timer). (#2 picture below)
4. Mason jars with an airtight lids 32 oz (need 4 to accommodate 1 gallon of milk, #7 picture below)

Ingredients:
1 gallon whole pasteurized milk
1/4 cup heirloom yogurt

Method:
1. Heat 1 gallon of whole milk in a slow cooker on "high" (with the temperature probe inserted) to 180F (This takes a few hours. Starting at 6:30AM it will reach temp about 10:30 or 10:45AM).
2. Using the cooking alarm thermometer, the high temperature alarm will sound when the milk reaches 180F.
3. Turn the slow cooker to "low" and maintain the temperature for 30 minutes (temperature will keep climbing to near 185F).
4. Turn off the slow cooker.
5. Because a skin forms on the surface of the milk (#3), skim it off and strain the milk through a fine sieve or a sieve lined the with cheese cloth (#4) into a metal dutch oven (This catches any other pieces of milk skin that may have formed). Cover the dutch oven with plastic wrap and insert the temperature probe (#6).
6.  Let the milk cool to 98 -100F (This cooling can take hours and would mean the yogurt could not be finished in one day. It would have to stay overnight. My wife cannot wait that long so she puts the dutch oven in an ice water Bain Marie to hasten the cooling ( #5) If it goes into the Bain Marie at 10 :45 it will have reached the low temp about 12:00 noon. The low temperature cooking alarm thermometer will sound when the temperature cools to 100F, #6).
8. Meanwhile, preheat the proofing box to 99F (#9) while the milk is cooling.
9.When the milk cools to 100F and feels about body temperature when tested with a finger, inoculate the milk with 1/4 cup of the previous batch of home-made yogurt.
10. Divide the mixture into 4 mason jars (#7), close the lids, and place them in the 4 corners of the proofing box (the center position is hottest part and not good for the yogurt. No need for a water tray) (#10).
8. Incubate for about 9 hours. (If the jars go in the proofing box at Noon they can be removed at around 9:00 PM.
9. Take them out and let them cool to room temperature.
10. Refrigerate at least overnight before tasting.


Semi scientific explanation of how these steps work:
1. Reason for heating the milk: The main milk protein casein coagulates or makes a protein meshwork in the presence of lactic acid as the process of making yogurt. The heating process (steps #1 and 2 above) denatures another protein; a major whey protein called "lactoglobulin". Since thick yogurt needs the participation of the most protein available to make a thicker protein meshwork and, hence, a thicker yogurt, denaturing the lactoglobulin increases the protein available for this process. If not heated, the lactoglobulin remains dissolved and does not participate in making the protein meshwork.

2. Initially my wife covered the mason jars with cheese cloth fastened by a rubber band. We later learned that an air-tight lid (step #7 above) works even better. The bacteria in yogurt (lactobacilli and others) ferment anaerobically (i.e. without oxygen) to break down lactose and other milk sugars to lactic acid. So there is no need for oxygen to be present.

3. Incubation time and temperature (steps #7 and #8): Since biochemical or enzymatic reactions accelerate with increased temperature within the range (Michaelis-Menten kinetics), the higher the incubation temperature the faster the fermentation. Some recipes use higher temperature and shorter incubation time. The temperature and time may influence the consistency and flavors (such as tartness) of the resulting yogurt. We thought slower and longer (99F for at least 9 hours) produced the best yogurt.

4. Although low-temperature (step #10) will slow the fermentation, the yogurt appears to continue developing and produces firmer but creamer texture with overnight refrigeration. We also found that over time the yogurt continues to thicken and become creamier. 

We really like this homemade yogurt. It is very creamy and smooth in texture. The flavor while mild is still distinctive. It is slightly sweet with a mild tang. We eat this yogurt almost every morning with a little fresh fruit such as blueberries or strawberries and a little bit of sugar. We will probably won't go back to a commercial brand.

Monday, January 10, 2022

New Year 2022 Jan 3 Salmon three ways 一月三日鮭尽し

We have been enjoying the items from the Sushi Taro osechi box. After indulging in a serving of wonderful dishes from the box which go perfectly with sake,  I served this plate as the “second course”.  The red and white fish cake or "kouhaku kamaboko" 紅白蒲鉾 (upper left in the picture) came from the osechi box (they were the last four slices). I made a deep pocket in each and stuffed the pink one with the leftover Maruhide sea urchin shutou 丸秀雲丹の酒盗 topped with a dab of wasabi. I topped the white one with Ikura marinated in soy sauce イクラの醤油ずけ topped with strips of nori.

The remaining items were all different salmon dishes which I prepared for New Year. Starting from right upper, clock wise, is salmon nanban 鮭の南蛮漬け、Russian marinated salmon 鮭のロシア漬け, and finally salmon kelp roll 鮭の昆布巻き. These three salmon dishes all have different textures and flavors. For the salmon nanban, the salmon was dredged in flour and fried before being marinaded in sweet vinegar which gave it a bit firmer texture. The Russian marinated salmon started out as thin strips of raw salmon marinated in sake, vinegar and oil without any sweetness. This year I something different. I added dijon mustard to the marinade and emulsified it with the “motor boat” emersion blender. As a result the oil didn’t separate or solidify. Also, the salmon did not “over cook”  and had a lovely soft texture. Finally the salmon kelp roll was simmered for sometime in seasoning broth, producing a yet different soft and moist texture. These are wonderful to enjoy with sips of sake.

Friday, January 7, 2022

Sushitaro Osechi 2022 寿司太郎お節 2020

As always, we are so spoiled to have Sushitaro osechi.


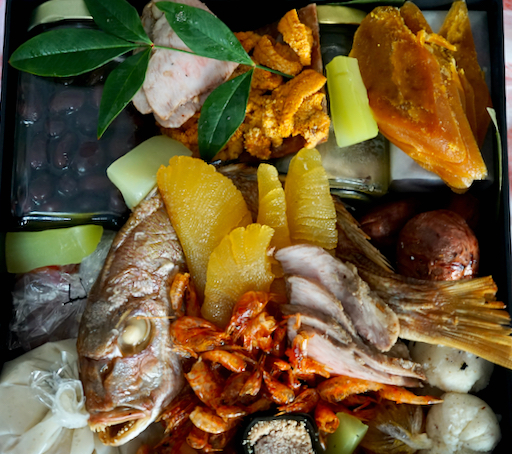
This is a picture of the upper box.  I am not going into the details but its all good stuff. Many items are hidden behind and under the items on the top.


This is the lower box.


This was what we ate from the box the evening of January 2. I just served whatever caught my eye. This round was mainly items that go well  with sake.


The next picture shows is an assortment of goodies. I lightly heated (toasted) “Karasumi” 唐墨 mullet roe or botargo, and wagyu roast beef 和牛ローストビーフ, which makes the beef unctuous melting in you mouth and the karasumi soft with enhanced flavor. Of course, “ankimo tofu” あん肝豆腐 or Monkfish liver terrine is one of our favorites.


In this three compartment plate, I served (from left to right) “Mushi uni” 蒸し雲丹 or steamed sea urchin, “Uni shutou with yuzu-chilli” ウニ酒盗 柚子胡椒 from Maruhide 丸秀 and  “ikura shouyu-zuke”  いくら醤油ずけ soy marinated salmon roe.  I added wasabi-soy sauce to the steamed uni and made a cucumber boat to contain the ikura. All perfect for sake.


After these, we had simmered vegetables (again lightly warmed in the microwave) and finished with a mayo-biscuit my wife made that afternoon (subject of another post).

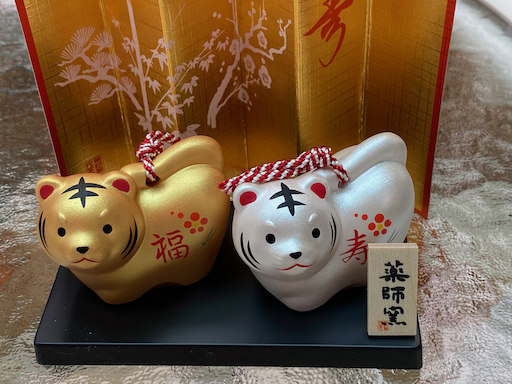
P.S. In the January 1, 2022 post, I mentioned that we thought we had some better zodiac figurines for the year of tiger but the ones we displayed in the blog were the only ones we had. My wife quickly remedied the situation by ordering two figurines from Japan, one (the first picture) perfectly matches the style we have for the other zodiac animals (it is made from earthenware as a bell called "Do-rei" 土鈴).


The fellows below came from the same kiln as the one above. But they have more accoutrements. Aren't they cute?


Hope we can used these figurines again.