Friday, February 7, 2025

Wild Rice Salad ワイルドライスサラダ

This is our on-going saga of dealing with BUB (best-used-by) date. We found a vacuum-packed package of wild rice (from Whole Foods) in which BUB was a few years ago. We opened it and decided to cook up half and see if it is OK to eat. It was OK and I made a wild rice salad (not following any particular recipe) with sweet onion, celery, pecans, and craisin (dried cranberry) and my usual honey mustard dressing.  This turned out to be quite good. We vacuum packed and froze the remaining half of the wild rice.


Cooking wild rice:
To save time, I decided to use our trusty Instant Pot. Since I never cooked wild rice in an Instant Pot, I looked it up. The information I gleaned was that the ratio of rice and liquid is 1.3 to 1 since the liquid does not evaporate in an Instant Pot. So I washed and drained 200 grams of wild rice and added 154 grams of chicken stock and cooked it on high-pressure for 20 minutes and naturally de-pressurized. The rice liquid ratio appears correct and the liquid was almost completely absorbed. But when we tasted it, it was clearly under cooked because it was still very hard (al-dente was an under statement). I ended up recooking it by adding the same amount of the chicken stock as the first time and cooking it another 30-40 minutes in a regular pan until the liquid was all absorbed. I did not add any salt but even low sodium chicken stock (Swanson’s) added enough saltiness. We liked the resulting wild rice. 

So, next time, I may increased the cooking time to 30 minutes to see if that will work better.

Making the salad:
Cooked wild rice (I used half of the cooked wild rice which is 100 gram dry weight of wild rice)
2 stalks of celery, strings removed and finely diced
Half of medium sweet onion, finely diced
1/2 cup pecans, roasted in toaster oven and chopped 
1/4 cup craisin
Zest (micro-grated) and juice of one lemon

Dressing
1 tbs Dijon mustard
1 tbs honey
2 tbs rice vinegar
6 tbs olive oil
salt and pepper to taste

Just add all the ingredients and the dressing in a bowl and mix. 

This made quite a large amount of the salad. The lemon zest and the juice added nice citrucy flavor.

Tuesday, February 4, 2025

Sashimi Daikon Garnish 刺身の大根つま/けん

Sashimi is usually served with garnishes called  “Sashimi-no-Tsuma 刺身のつま”. The kanji ideogram assigned to the word “tsuma” can be “妻” meaning “wife” which has a somewhat sexist tone indicating shashimi is the main character or “husband” and the garnish supporting sashimi is characterized as the “wife” supporting her husband. The alternative meaning is  “褄”  “edge” specifically in reference to the edge of Japanese kimono clothes since these garnishes are often placed at the edge of the serving plate. The “tsuma” can be thinly julienned daikon, cucumber, carrot, daikon sprout (“kaiware daikon” 貝割れ大根) and other vegetable. Other items such as perilla leaves, lemon slices, “kasisou 海藻” sea plants, edible flowers such as dandelion are also common.

Besides being decorative, there are thought to be several purposes for these garnishes: 1) to refresh your mouth, 2) help keep the sushi fresh (preservative effect) (this is attributed especially to daikon), 3) draining excess moisture away from the sashimi so it isn’t sitting in exuded moisture. Daikon garnish is especially noted for this when it is placed underneath the sashimi. But in the end, I think, being decorative and traditional are the main reasons for why the “tsuma” sashimi garnish is used.  Although eating “tsuma” is not against the etiquette (which I often do but only a small portion of it), the vast majority of “tsuma” is untouched and discarded after serving its purpose much like parsley garnish in the west.  I have seen that, in some sushi bars in Japan, after the sashimi was served, the chef will make a small hand roll of these garnishes and serve it to the guests. Some sushi bars or Izakaya may not use garnish at all or  instead of the traditional garnishes, use other green leafy vegetables.

One evening, I served a small assorted  sashimi plate (picture #1) which included tuna chutoro 鮪の中トロ, scallop ホタテ, botan-ebi shrimp ボタン海老. I also serve tuna and avocado cubes 鮪とアボカドの角切り. All came from Riviera Sea Food Club. Later I fried up the shrimp heads as tempura 海老の頭の天ぷら.  All are good but the point of this post is the “tsuma” garnish. I added the “diakon-no-ken 大根のけん” and perilla leaves from our window sill planter.


Among the “tsuma” garnishes, thinly julienned items are called “ken 劍” which means “sword” apparently from its shape. To make this properly, after the skin is peeled, the inner part is peeled into paper thin layers called “Katsura-muki 桂むき” which produce a long, paper thin sheet of daikon. This is cut into manageable size, stacked and then julienned. Katsura-muki is one of the most difficult Japanese knife skills and it is beyond me. Other alternatives are special cutters. The cheaper one is essentially a spiral cutter which does not produce a true “ken”. The more expensive cutters indeed produce “katsura-muki” and quite good “ken” which is being used in many sushi bars and Japanese restaurants in the US (and probably even in Japan since these cutters are designed and produced in Japan including commercial motorized ones).

So, when I serve  sashimi, I do not add “daikon” garnish.  Recently, however, when I was browsing the new Izakaya cook book called “Rintaro”, I found a short passage indicating you could make authentic “Daikon-no-ken” by using a regular slicer. I tried it and it worked (picture #2).


The important idea is how to preserve the direction of the fibers within the daikon. Once I figured how this would work, I tried it. I first cut the daikon into 2 inch lengths, peeled the skin, and using the Benriner slicer (#1 in the composite picture) adjusting to produce fairly thin slices, made the slices cut along the length. By slicing this way, the direction of the fiber is same as in the “katsura-kuki” sheet. I then stacked them (#2 in composite picture) and julienned along the length (#3 in composite picture). This method produces a nice crunchy consistency because it does not cut across the fibers of the daikon. Soak the julienne in cold water (#4 in composite picture) and then drain before serving. Because both slicing and julienne are done with sharp blades, the surface is shiny and the results are really good if not perfect.(Picture #2).

I am sure this is a very minor thing but I feel better knowing I can do this without mastering the katsura-muki technique. By the way, my wife and I enjoyed all of the daikon garnish.  Since we had excess of the “daikon tsuma”, I made Japanese style salad next day. I added cucumber and carrot prepared like the daikon. I made a simple Japanese style dressing mixing sweet vinegar, soy sauce (x4 concentrated noodle sauce) and sesame oil (picture #3) and served with chicken sausage with sage and apple we got from a local gourmet grocery store. The salad was nice accompaniment to the sausage and very refreshing. 


Saturday, February 1, 2025

Braised Eggplant with Ground Chicken 茄子のそぼろ煮

I am always looking for a new recipe especially using eggplants. This one also came from a  chef Kasahara’s 笠原 Youtube episode. Although the original recipe calls for ground pork, I happened to have ground chicken so I made it with eggplants and ground chicken. This turned out to be a good dish and the eggplant absorbed the flavors and almost tastes like meat.  I did not add a poached egg as suggested in the original recipe.


Ingredients:
2 Asian eggplants (long and slender), stem ends removed, peeled the skin in stripes, and cut into half inch rounds
1 1/2 tbs vegetable oil with a splash or dark sesame oil
200 grams ground chicken
2 scallions, finely sliced
1 tsp minced ginger
2 tbs x4 Japanese noodle sauce
2 tbs sake
2 tsp sugar
200 ml water
(hand torn perilla leaves as garnish if available)

Directions:
Add the 1 tbs oil to a frying pan on medium heat, cut side down brown both sides for about 5-7 minutes. remove from the pan and set aside
Add the remaining 1/2 tbs oil to the same pan and add the chicken and cook for few minutes until color changes and meat crumbles into small pieces, add the ginger and cook for 30 seconds or until fragrant
Add. the sugar and cook for 1 minute until the surface of the meat becomes shiny (the original recipe calls for more sugar)
Add the sake, soy sauce or noodle sauce, water. Put back the eggplant and cook for 5-7 minutes until the liquid reduces to the point only a thin layer of the liquid remains, add the scallion and mix and shut the flame off

I thought this might be too sweet but the seasoning worked well. My wife really liked it. I will add this dish to my eggplant go-to recipe.


Wednesday, January 29, 2025

Apple Fritter アップルフリッター

We received a Christmas present which included a good number of apples and pears. We finished all the pears and made a significant dent in the number of apples but we still had several honey crisp apples left. We happened to come across this recipe for “apple fritters”. Since we have never made an apple fritter, and we also happened to have some apples on hand, we decided to try it. It was kind of a production but we fried up fritters for breakfast one weekend. We did not bother with “glazing” them. Hot off the oil (#1) and with cappuccino/cafe late, this was quite a special breakfast. Crispy outside and soft inside with apple cinnamon flavors—can’t be beat, although we should not have this type of breakfast too often.


The original recipe came from “Serious eats”.

Ingredients

For the apples:
226 g granny smith apples (we used two honey crisp apples, peeled, cored and diced in small pieces)
42g unsalted butter (1 1/2 ounces; 3 tablespoons)
2 teaspoons fresh lemon juice
1/2 cup sugar
1 teaspoon plus a pinch kosher salt

For the dough:
355 g all purpose flour
2 teaspoons baking powder
3/4 teaspoons apple pie spice*
2 large eggs, lightly beaten
1/2 cup whole milk
1/3 cup sour cream
1 teaspoon vanilla extract

Canola oil, for frying

*Apple pie spice: 1 tsp. ground cinnamon, 1/4 tsp nutmeg, 1/2 tsp ginger and 1/2 tsp cardamon.

Directions:
In a large skillet, melt butter over medium heat. Cook, whisking constantly with a wooden spoon, until milk solids sink to the bottom of the skillet and turn light golden brown, 3 to 4 minutes. Add apples and stir to evenly coat in butter. Cook, stirring occasionally, until apples are crisp-tender and still hold their shape, about 5 minutes. Add lemon juice, 2 tablespoons of the sugar, and a pinch of salt. Cook, stirring constantly, until sugar dissolves and apples are glazed in sugar mixture, about 2 minutes. Transfer apples to a large plate and refrigerate until cool, about 20 minutes.

Set a wire rack inside a 13- by 18-inch rimmed baking sheet; set aside. Fill a large Dutch oven with 1 1/2 inches of canola oil and heat over medium-high until oil is 375ºF (190ºC).

In a large bowl, whisk flour, baking powder, apple pie spice, remaining 1/2 cup sugar, and 1 teaspoon salt to combine; set aside. In a medium bowl, whisk eggs, milk, sour cream, and vanilla to combine. Add sour cream mixture and cooked apples to dry ingredients, and, using a flexible spatula, fold together until a thick batter forms.

Working in batches carefully drop about 1/2 cup of batter into the hot oil and, using the back of a spoon, immediately press fritter until fritter is about 4-inches in diameter. Fry, adjusting heat as needed to maintain temperature, and use a spider skimmer or slotted spoon to flip fritters halfway through. Cook until fritters are browned, puffed, and cooked through, about 5 minutes (picture #2). Transfer finished fritters to prepared wire rack and repeat with remaining fritters (picture #3).


This recipe made a quite large amount (picture #3). The fritter heated up very well in the toaster oven. They were quite a treat (Can’t go wrong with sweet, spicy, fried bread.) The outside had a wonderful crunch and the inside was soft and sweetly spicy. The apple gave a burst of sweet fruit taste. 

Sunday, January 26, 2025

Mock Tofu 擬制豆腐

I saw this recipe of “Mock tofu” or “Gisei-dofu 擬制豆腐” on Youtube by Chef. Kasahara 笠原. It looked interesting and I happened to have extra tofu and fresh shiitake mushroom which needed to be used up before going bad. Supposedly, this is a common form of “shojin-ryouri 精進料理” or vegetarian cooking done by Buddhist monks. The name “mock” or “gisei” reportedly comes from the fact that tofu was crumbed, other ingredients are added,  formed into an original rectangular shape of tofu and cooked. No eggs should be used in the original shojin-ryori but modern renditions use eggs as binder and some recipes even call for ground meat. 

While I was making this, I realized a U.S. block of tofu is larger than a Japanese block so I was afraid that the final loaf which had more tofu may not firm up but it did. The cut surface looked more like tofu than omelette (picture #1). I did not make it too sweet but this is a very good looking dish and tasted very gentle with nice texture.  Adding more tofu appeared to work. According to Chef Kasahara, this is his regular osechi “new year” dish. I may add this to my osechi next year. Since this could be a new year osechi dish, I served the slices on a small crane design plate we bought in Kyoto some years ago since the “crane” is very suitable motif for new year cerebration.


Ingredients: (made two loaves measuring 2 1/2 and 5 1/2 inch)
1 package (14oz or 400gram*) tofu (I used medium firm), drained, wrapped in paper towel with a weight on the top (I used two cutting boards as weights) for 20 minutes, crumble by hand
3 large eggs, beaten
4-5 caps of shiitake mushroom, thinly sliced
1 small carrot, julienned
3 scallions finely chopped
1 tbs vegetable oil

*Apparently Japanese one block of tofu is smaller. The original recipe used one block which was 300grams. 

Seasoning*:
1 tbs x 4 concentrated noodle sauce or soy sauce either light colored or regular
1 tbs mirin

* Original recipe calls for soy sauce and sugar. The above is not as sweet.

Directions:
Prepare loaf pans (I used two 2 1/2 x 5 1/2 inch silicon loaf pans) by lining with parchment paper and lightly oil for easy lifting (see “A” in the composite picture).  Preheat oven to 350F*.

In a frying pan on medium heat, add 1 tbs vegetable oil and sauté the carrot and mushroom. After few minutes, add the crumbled tofu and keep stirring for another 5 minutes or so until water is not seeping out from the tofu. Add the seasonings and cook until no liquid is visible on the bottom. Add the scallion, mix and shut off the flame.

Add the half of the eggs and mix. The residual heat will semi cook the eggs. Add the remaining eggs and mix.

Pour in the mixture to the loaf pans and press and flatten the surface with a silicon spatula.
Place the loaf pans in the 350F oven for 30 minutes (“A” in the composite picture) .

*Original recipe calls for 250C oven which is over 480F. I thought this was way too hot. Using my own discretion, I baked at 350F (about 180C) using the toaster oven in convection mode.


After cooling down for 10 minutes, I lifted the load out of the pan using both ends of the parchment paper (“B” in the composite picture). I sliced it after it cooled to near room temperature.

As I mentioned before, because of the larger proportion of tofu in my rendition (albeit by accident), the cut surface looks more like tofu than omelette. I do not think this dish should be omelette with tofu mixed in. More like tofu dish hiding the use of eggs like some Buddhist monks may have done. 

Obviously, you could alter the vegetables you can use in this dish. Renkon, wood ear mushroom, green beans, hijiki, ginnan, mitsuba etc were suggested. I also saw the recipes adding ground meat but I do not particularly like that idea.

In any case, we really like this dish as I made it (by accident??).

P.S. I made this dish again with few modifications. 
1. Seasonings: I used 2 tsp sugar and 2tbs x4 concentrated Japanese noodle sauce making it sweeter thatn the first. This appears to have worked. Both of us liked the a bit sweeter taste better.
2. I used three silicon loaf pans without parchment paper lining but coating the inside with a small mount of oil. The giese-tofu came out without problem. I am not sure the oil is needed.


Thursday, January 23, 2025

“Endless” Konnyaku 無限コンニャク

I saw this recipe on Youtube. Many Japanese recipes use the word “Mugen 無限” meaning “endless” in front of the items indicating the dish is so good that you will be eating endlessly or without stopping. This one is “mugen-konnyaku” 無限コンニャク.  I have posted quite a few dishes using Kon-nyaku 蒟蒻 or konjac. I am not sure why Japanese including myself like kon-nyaku. It is made of vegetable roots and has a consistency similar to rubber and does not have any taste or calories. Certainly, this is not one of my wife’s favorites. The only version of konnyaku she sort of likes is “spicy konnyaku stir fry コンニャクのピリカラ炒め” despite the fact she usually does not prefer spicy dishes. I suppose since konnyaku does not have any taste, even a spicy taste is  better than no taste. In any case, this recipe claims that it tastes like “meat” and you can eat it forever or without stopping. Although this may not be true, it is nonetheless  a very interesting dish. Certainly the consistency of the konnyaku is much chewier and the seasoning clings to it better compared to other konnyaku dishes. I added a few sprinkles of seven flavored red pepper flakes or “shichimi tougarashi 七味唐辛子. I think I may have over boiled the konnyaku which made it a bit too chewy. I think this dish has potential and I can make it better next time.


Ingredients:
1 block of konnyaku
1 tbs x4 concentrated Japanese noodle sauce
1 tbs mirin
White sesame
1 small individual package of bonito flakes
1 tsp vegetable oil
1 tsp sesame oil

Directions:
Boil the konnyaku in enough water to cover completely for 10 minutes (I may have boiled it longer than 10 which may have made the consistency too chewy*).
Drain and wrap it in a cloth dish towel and pound using a rolling pin (I used a meat pounder) until the konnyaku is all shredded.
Add the oils to a frying pan on medium heat (add the red pepper flakes if you are using them), stir continuously until bubbles form on the surface. Further evaporate the water from the konnyaku for 5 minutes or so (all the moisture boiling away is from the konnyaku since no additional water has been added to the pan.)
Add the mirin and noodle sauce and stir until only small amount of liquid remains.
Add the bonito flakes and stir which absorbs most of the remaining liquid.
Sprinkle the white sesame and serve.

*I made this dish second time and timed the boiling to 10 minutes. This gave a much better consistency. It is chewy but not too chewy. I also used a small amount of red pepper which made the dish not really hot but added flavor.

I do not think this tastes like meat but it is certainly different from any other konnyaku dish I’ve ever eaten having a much chewier consistency and very well seasoned.

Monday, January 20, 2025

Apple Pie Muffin and Pan Cake アップルパイ マフィン

As part of the season, we received some fresh fruit which included of several Granny Smith Apples. In general, these apples are not good eating apples and are typically used in baked goods such as cake. My wife remembered that she had saved a recipe she found on the internet about apple muffins that taste just like apple pie and thought this would be a perfect use of the Granny Smith Apples.

The original recipe came from “Serious Eats”. This is a somewhat complicated muffin to make. It comes in 3 parts. First is making the apples by coating them with spices and then cooking them in melted butter until they start getting soft. Second is a layer of crumbs to put between two layers of dough. Third is the muffin dough itself.

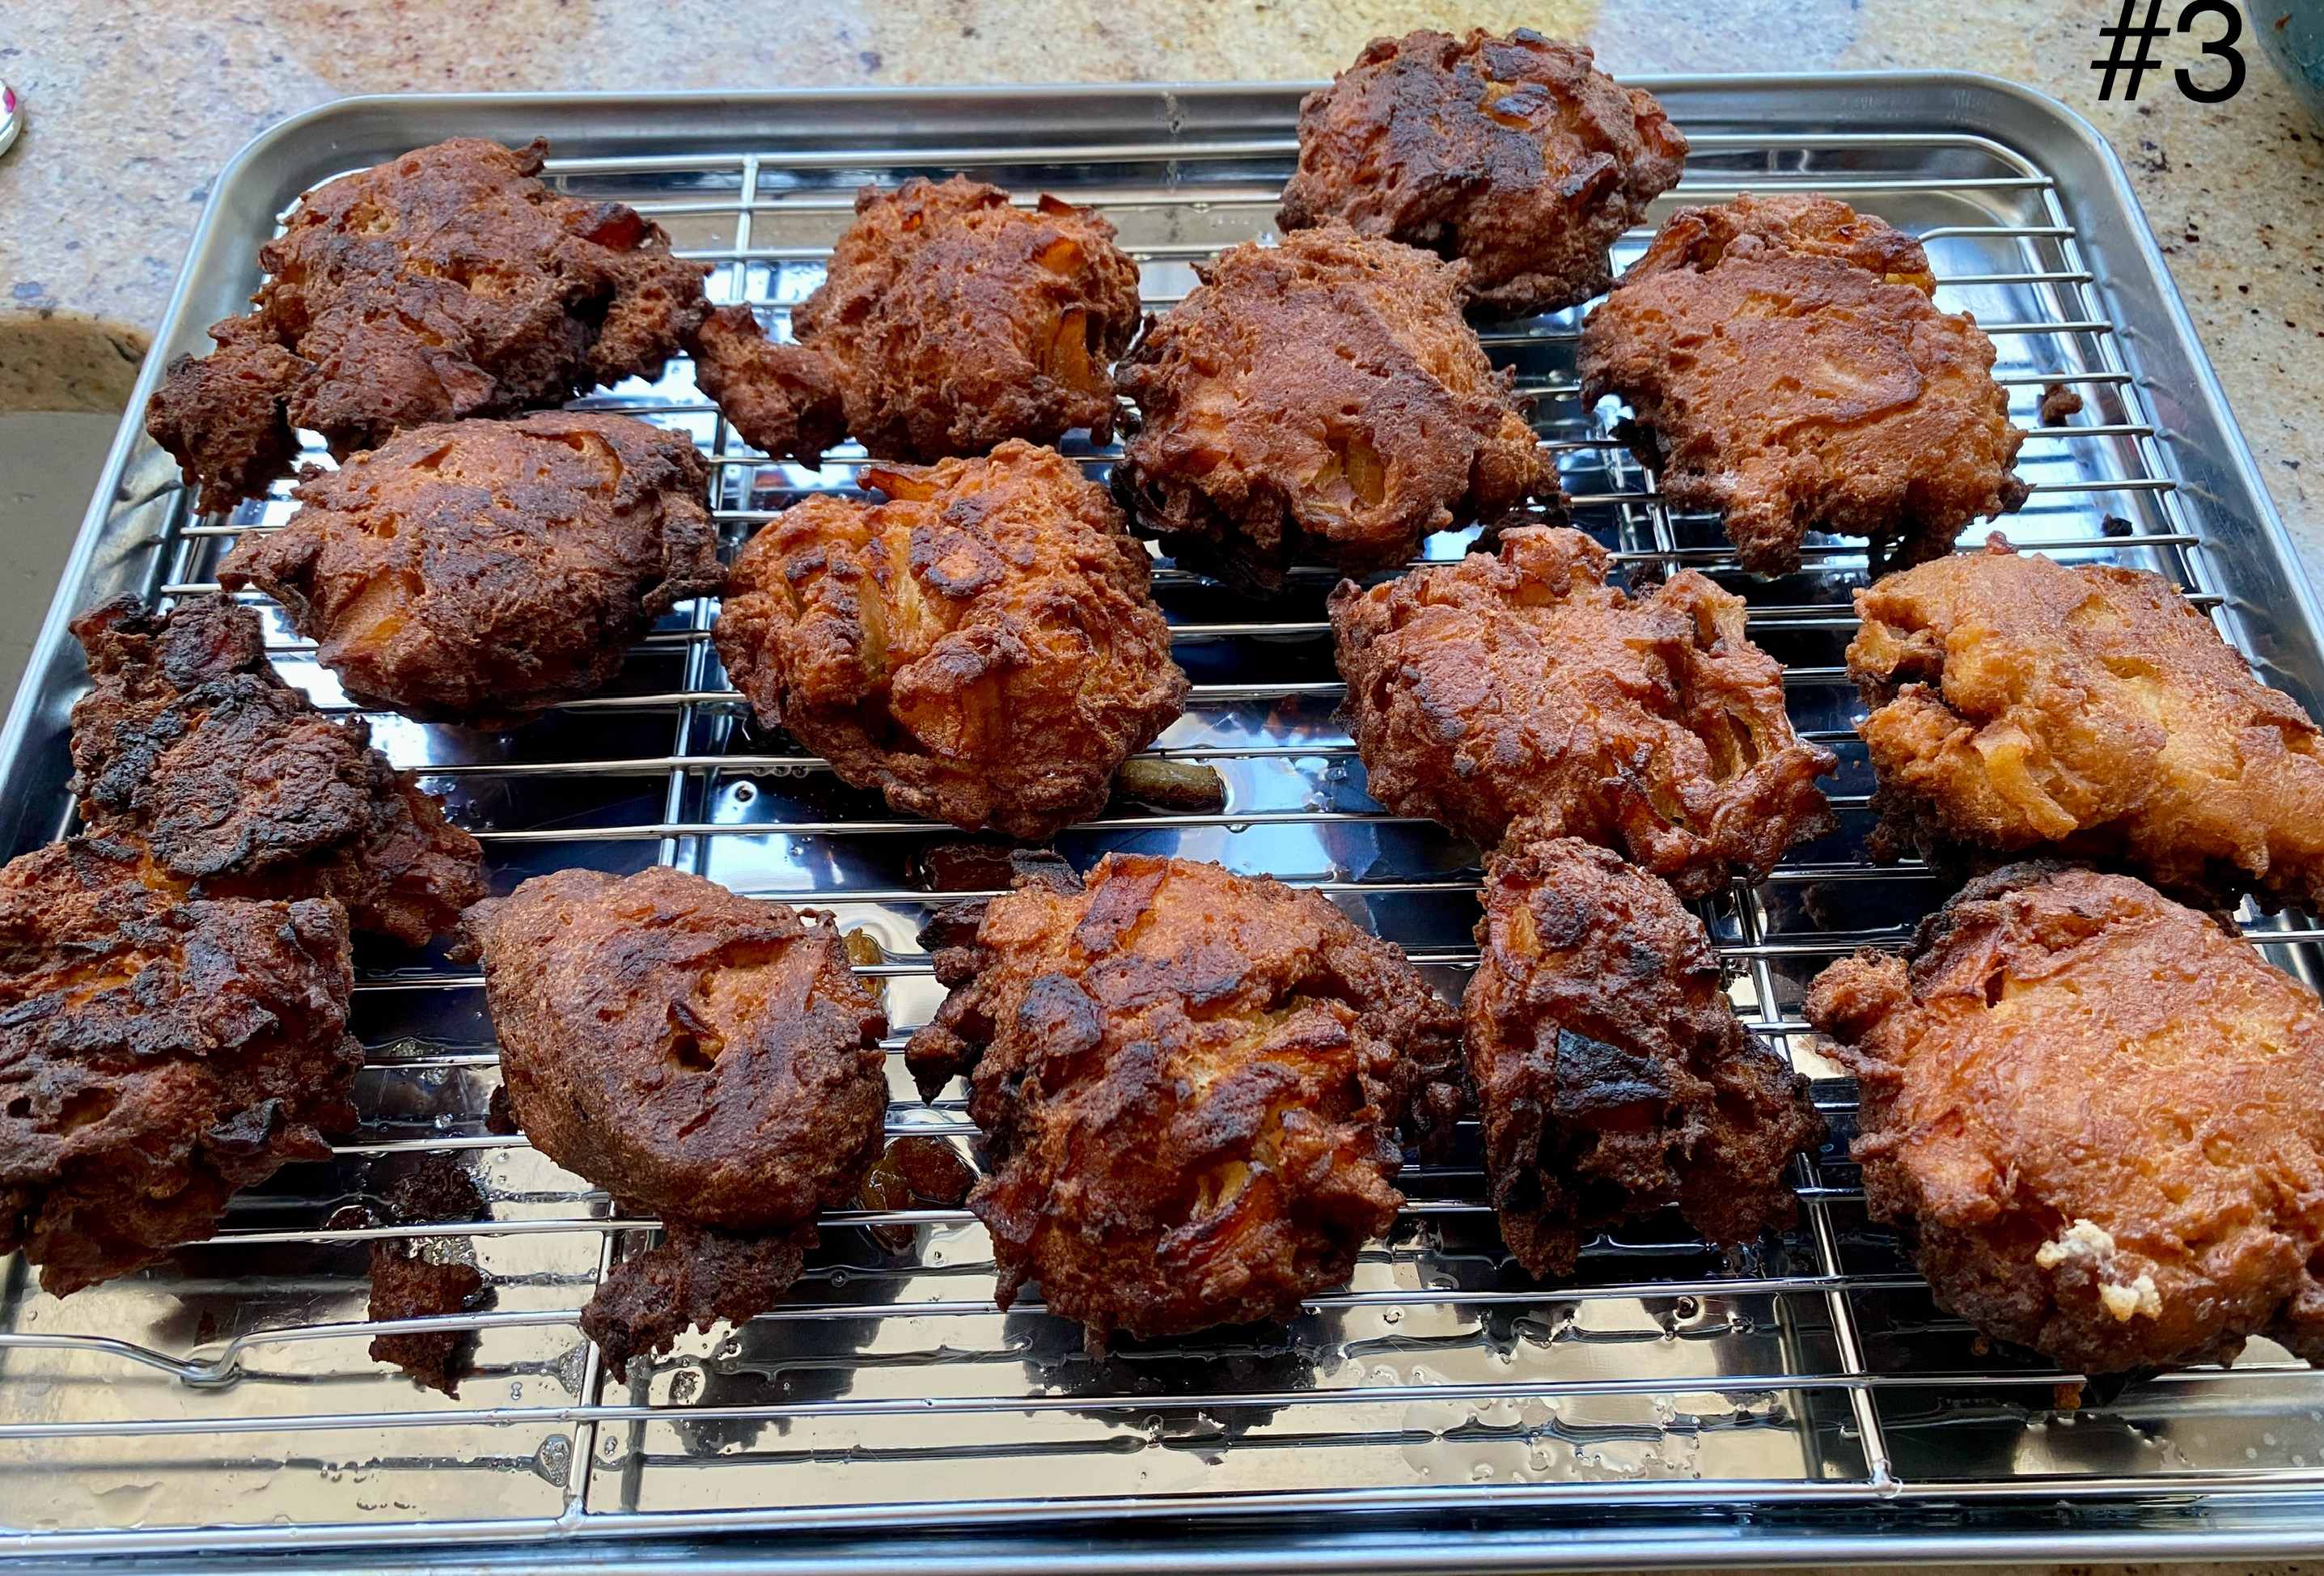
My wife made muffins (pictures #1 and #2) and baked in a baking dish as a flat cake (picture #3).


The problem was that these three different parts were not specified in the original recipe but instead all clumped together with phrases like, “2 1/4 cups AP flour divided” and it wasn’t until you were knee deep in the directions that you discovered 1/2 cup of the flour was supposed to be used to make crumbs and the other 1 3/4 cups was used for the actual muffin batter. As a matter of fact the recipe did not even specify there was a layer of crumbs and it took my wife some time to figure out the recipe consisted of 3 parts at which point the recipe started to make sense. Added to all that we wanted to use up all the Granny Smith apples but once we cooked them all we realized we had too many for just one batch of a dozen muffins. So we decided to double the recipe and make 1/2 as muffins and 1/2 as a pan cake (i.e. a flat cake baked in a baking pan). Hopefully we have sorted out the three components of the recipe below so they are clearer than the original and by showing the recipe as X1 for just muffins and X2 for muffins and pan cake. Good Luck.

Ingredients (X 1)

For the Spiced Apples:
3 tablespoons unsalted butter
2 small tart apple such as Granny Smith cut into 1/4 inch pieces (1 cup chopped)
1/4 cup packed light brown sugar
3/4 teaspoon ground cinnamon
1/4 teaspoon kosher salt; for table salt use half as much by volume
1/4 teaspoon pumpkin pie spice

For the crumbs:
1/2 cup packed light brown sugar
3/4 teaspoon pumpkin pie spice
1/2 cup flour
1 1/2 tsp cinnamon
4 tbs butter

For the muffins: 
1 3/4 cups all-purpose flour,
1 teaspoons ground cinnamon,
2/3 cup unsalted butter, softened,
3/4 cup granulated sugar
2 large eggs, at room temperature
1/2 teaspoon kosher salt; for table salt use half as much by volume
1/2 teaspoon baking powder
1/2 teaspoon baking soda
1/2 cup sour cream, at room temperature
1/3 cup apple cider, at room temperature (We didn’t have any cider so we juiced another apple)

Ingredients (X2) We wanted to use up the Granny Smith Apples but we ended up with too many apples so we chose to double the recipe and make 1/2 as muffins and 1/2 as pan cake

For the Spiced Apples:
6 tablespoons unsalted butter
3 tart apples such as Granny Smith, cut into 1/4 inch pieces
1/2 cup packed light brown sugar
1/2 teaspoon ground cinnamon
1/2 teaspoon kosher salt; for table salt use half as much by volume
1/2 teaspoon pumpkin pie spice

For the crumbs:
1 cup packed light brown sugar
1 1/2 teaspoon pumpkin pie spice
1 cup flour
3 tsp cinnamon
8 tbs butter

For the muffins:
1 1/3 cup unsalted butter, softened,
1 1/2 cup granulated sugar
4 large eggs, at room temperature
3 1/2 cup all-purpose flour
2 tsp. cinnamon
1 teaspoon kosher salt; for table salt use half as much by volume
1 teaspoon baking powder
1 teaspoon baking soda
1 cup sour cream, at room temperature
2/3 cup apple cider, at room temperature (We didn’t have any cider so we juiced another apple)

Directions: whether making 1X or 2X of the recipe just use the quantity of ingredients specified for that amount.

For the Spiced Apples:  In a 10-inch skillet, melt butter over medium heat. Once melted, add apple pieces, brown sugar, cinnamon, salt, and pie spice and cook, stirring frequently, until apples are tender, about 10 minutes. Transfer apple mixture to a fine mesh strainer set over a medium bowl. Thoroughly strain, gently stirring to remove as much excess moisture from apples as possible; set aside to let apples strain until they reach room temperature, about 15 minutes. Spread strained apples in an even layer on a large plate and refrigerate uncovered until cooled, 15 to 20 minutes. Reserve strained sauce for use as a glaze. 

Prepare oven and cooking utensils: Adjust oven rack to middle position and preheat oven to 400°F. Line a 12-cup muffin tin with paper liners. If making pan cake grease the medium sized pyrex cooking pan then line with greased parchment paper.

Make the crumbs for the Muffins: Stir together brown sugar, pie spice,1/2 cup of the flour, and 1 1/2 teaspoons of the cinnamon in a medium bowl until well combined. Work in 4 tablespoons of the butter using fingertips until mixture is well combined and resembles wet sand. Set aside.

Make the batter for the muffin: In a large bowl with an electric mixer, beat granulated sugar and remaining 2/3 cup butter on medium speed until fluffy, 3 to 4 minutes, stopping to scrape down sides as needed. Add eggs, one at a time, beating until combined after each addition, about 30
seconds.

In a medium bowl, whisk together salt, baking powder, baking soda, remaining 1 3/4
cups flour, and remaining 1 teaspoon cinnamon.

In a small measuring cup whisk together sour cream and cider (apple juice) until well combined.

Stir flour mixture into butter mixture in 3 additions, alternating with sour cream mixture, until flour mixture is moistened but large flour streaks remain. Fold cooled apples into batter until evenly dispersed and batter is just combined. (Do not over-mix.)


Assembly: Spoon 2 tablespoons batter into bottom of each paper liner. Sprinkle 1 packed teaspoon brown sugar mixture evenly over batter in each muffin liner; top with remaining batter (about 3 tablespoons per well) spreading into an even layer. (Liners will be very full.) (1 and 2 in the composite)

Bake for 5 minutes. Reduce oven temperature to 375°F and continue baking until a wooden pick inserted in center comes out clean, 12 to 18 minutes, rotating pan halfway. Let cool in pan 10 minutes.

If making pan cake, spoon 1/2 the batter into the baking dish, cover with crumbs, and cover crumbs with remaining batter. Bake at 400 degrees for 5 minutes reduce temperature to 375 and bake for 30 minutes and start testing for doneness by seeing if wooden pick comes out clean (3 and 4 in the composite).

Carefully remove from pan and serve warm or at room temperature, drizzling with reserved strained apple juices from step 2 just before serving.


Although this is a fairly convoluted recipe for apple based muffins it is probably worth it because the end result is very good. They do taste distinctly of apple pie. The texture is very light, soft and tender. The cooked apples introduce a burst of cinnamon flavored moistness that is very pleasant. The crumbs kind of melted into the texture making an internal layer of buttery cinnamon flavored dough. The pan cake had all the similar characteristics but was simpler to make. These muffins are a bit unique in the combination of flavors and textures they deliver. Despite the initial difficulties now that we have the recipe sorted out we will be making them again.